1. spring6 的jdbctemplate的jdbc模板类的详细使用说明
jdbctemplate 是spring 提供的一个jdbc模板类,是对jdbc的封装,简化jdbc代码,当然,你也可以不用,可以让spring集成其它的orm框架,例如:mybatis,hibernate 等。
下面我们正式开始对 jdbctemplate 上的学习,完成增删改查。
2. 环境准备
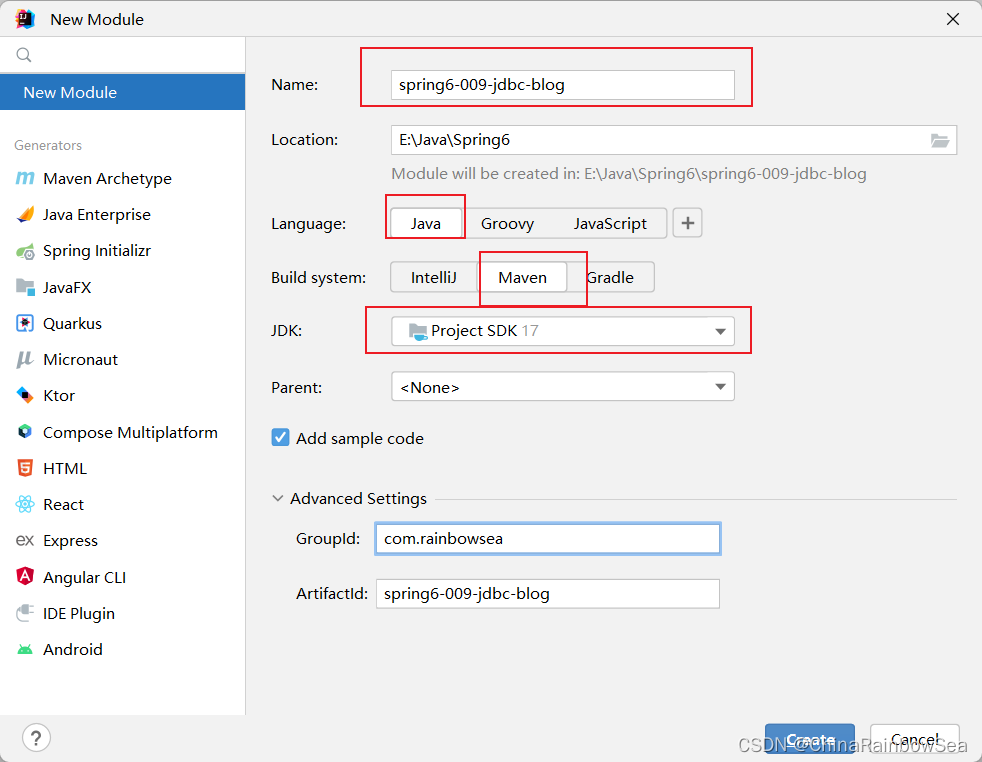
这里,我们新建一个模块,方便学习,如下:因为我们这里是spring6,而spring6最低支持的jdk是17,所以我这里是 jdk17的。
新建好模块以后,我们需要导入相关的依赖,这里我们通过 maven 导入依赖。
具体的依赖有:
- spring context 依赖 (spring6 的依赖)
- mysql-connector-java(关于mysql驱动的依赖,因为我们要连接数据库,这里我们连接的是mysql数据库)
- spring-jdbc (spring jdbc,这个依赖中有jdbctemplate)
- junit (junit4 单元测试依赖)
特殊的还有这个,也得添加上
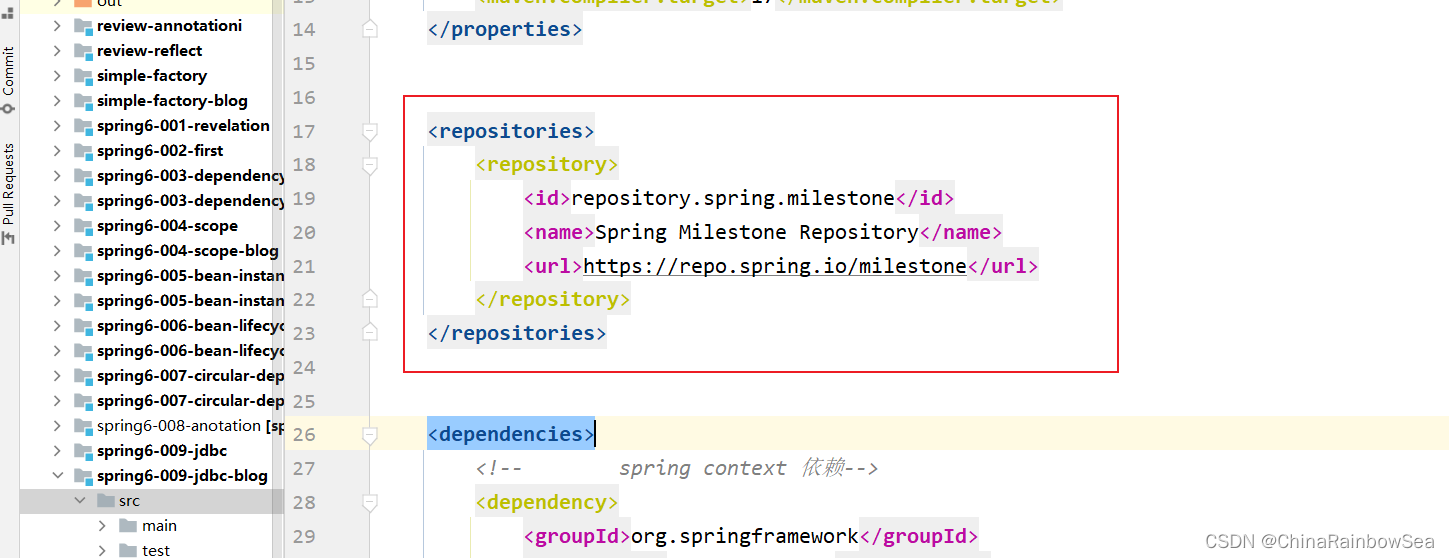
<repositories>
        <repository>
            <id>repository.spring.milestone</id>
            <name>spring milestone repository</name>
            <url>https://repo.spring.io/milestone</url>
        </repository>
    </repositories>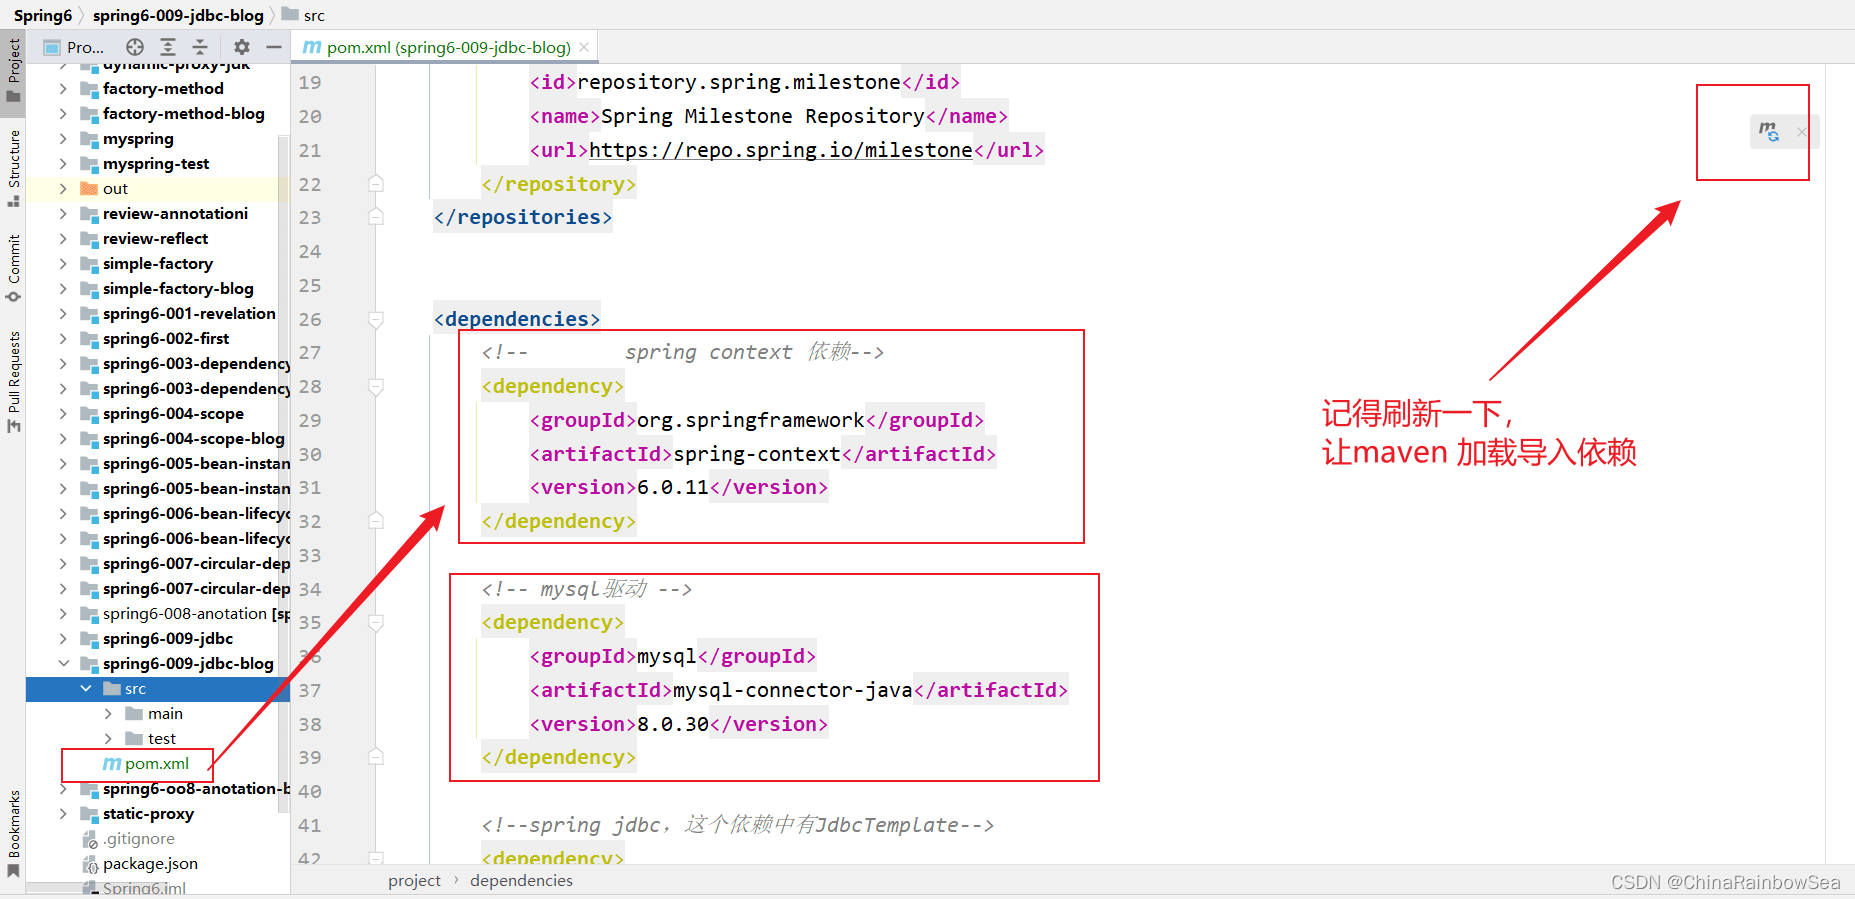
<?xml version="1.0" encoding="utf-8"?>
<project xmlns="http://maven.apache.org/pom/4.0.0"
         xmlns:xsi="http://www.w3.org/2001/xmlschema-instance"
         xsi:schemalocation="http://maven.apache.org/pom/4.0.0 http://maven.apache.org/xsd/maven-4.0.0.xsd">
    <modelversion>4.0.0</modelversion>
    <groupid>com.rainbowsea</groupid>
    <artifactid>spring6-009-jdbc-blog</artifactid>
    <version>1.0-snapshot</version>
    <properties>
        <maven.compiler.source>17</maven.compiler.source>
        <maven.compiler.target>17</maven.compiler.target>
    </properties>
    <repositories>
        <repository>
            <id>repository.spring.milestone</id>
            <name>spring milestone repository</name>
            <url>https://repo.spring.io/milestone</url>
        </repository>
    </repositories>
    <dependencies>
        <!--        spring context 依赖-->
        <dependency>
            <groupid>org.springframework</groupid>
            <artifactid>spring-context</artifactid>
            <version>6.0.11</version>
        </dependency>
        <!-- mysql驱动 -->
        <dependency>
            <groupid>mysql</groupid>
            <artifactid>mysql-connector-java</artifactid>
            <version>8.0.30</version>
        </dependency>
        <!--spring jdbc,这个依赖中有jdbctemplate-->
        <dependency>
            <groupid>org.springframework</groupid>
            <artifactid>spring-jdbc</artifactid>
            <version>6.0.0-m2</version>
        </dependency>
        <!-- junit4 -->
        <dependency>
            <groupid>junit</groupid>
            <artifactid>junit</artifactid>
            <version>4.13.2</version>
            <scope>test</scope>
        </dependency>
    </dependencies>
</project>
3. 数据准备
首先,我们创建一个名为 spring6的数据库
/* 判断该数据库是否存在,不存在,创建*/
create database if not exists spring6;
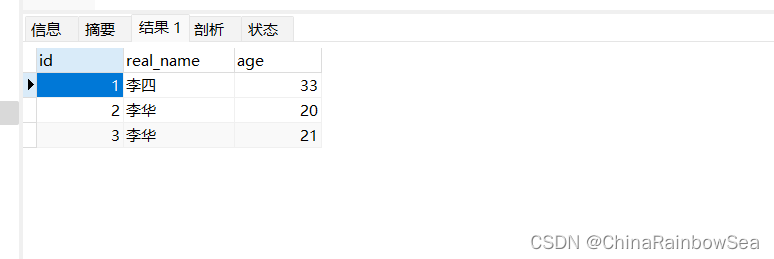
然后在 spring6 数据库中创建一个名为 user 的数据表
create table `user`  (
  `id` int not null auto_increment,
  `real_name` varchar(255) ,
  `age` int ,
  primary key (`id`) using btree
) ;
-- ----------------------------
-- records of user
-- ----------------------------
insert into `user` values (1, '李四', 33);
insert into `user` values (2, '李华', 20);
insert into `user` values (3, '李华', 21);

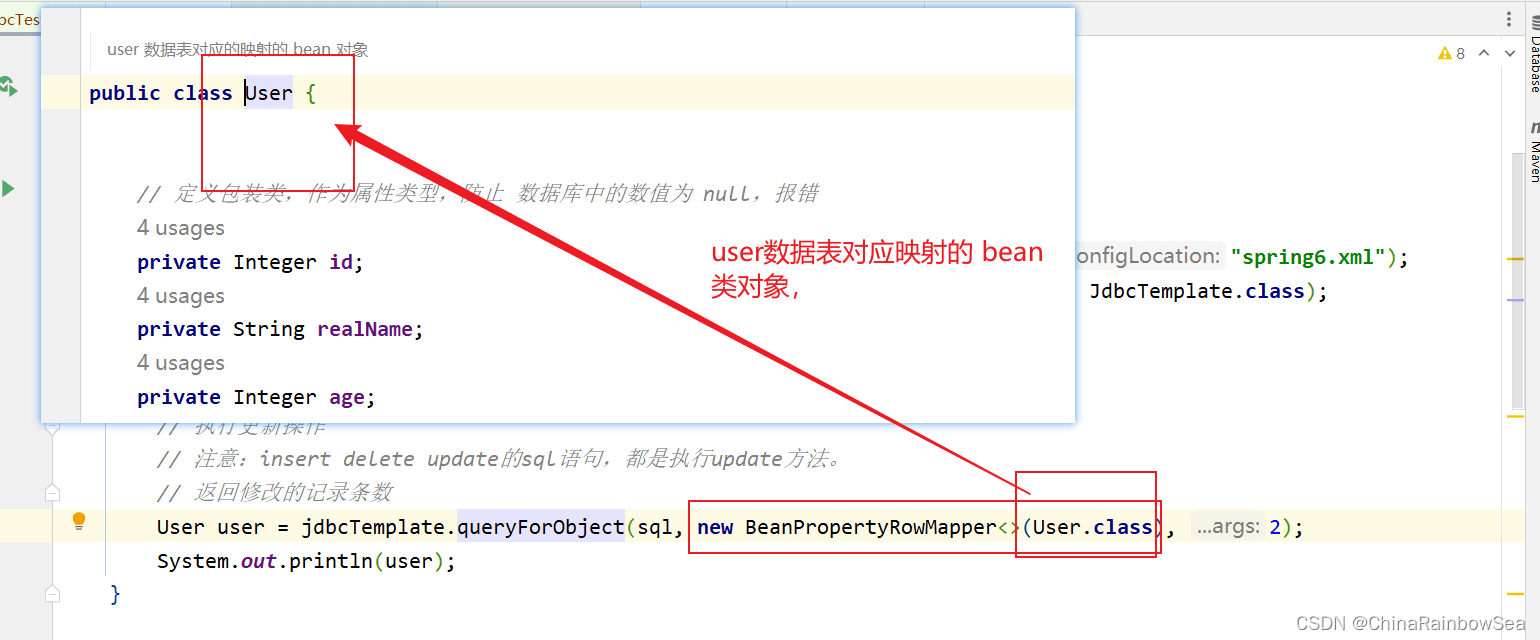
准备实体类:表user对应的实体类user。根据user 数据表结构创建对于的bean 实体类。
注意: 这里我们定义用对应简单类型的包装类,来定义成员变量,防止数据库的数值为null时,报错,中断。

package com.rainbowsea.spring6.bean;
/**
 * user 数据表对应的映射的 bean 对象
 */
public class user {
    // 定义包装类,作为属性类型,防止 数据库中的数值为 null,报错
    private integer id;
    private string realname;
    private integer age;
    public user(integer id, string realname, integer age) {
        this.id = id;
        this.realname = realname;
        this.age = age;
    }
    public user() {
    }
    public integer getid() {
        return id;
    }
    public void setid(integer id) {
        this.id = id;
    }
    public string getrealname() {
        return realname;
    }
    public void setrealname(string realname) {
        this.realname = realname;
    }
    public integer getage() {
        return age;
    }
    public void setage(integer age) {
        this.age = age;
    }
    @override
    public string tostring() {
        return "user{" +
                "id=" + id +
                ", realname='" + realname + '\'' +
                ", age=" + age +
                '}';
    }
}配置编写相关的spring.xml的信息
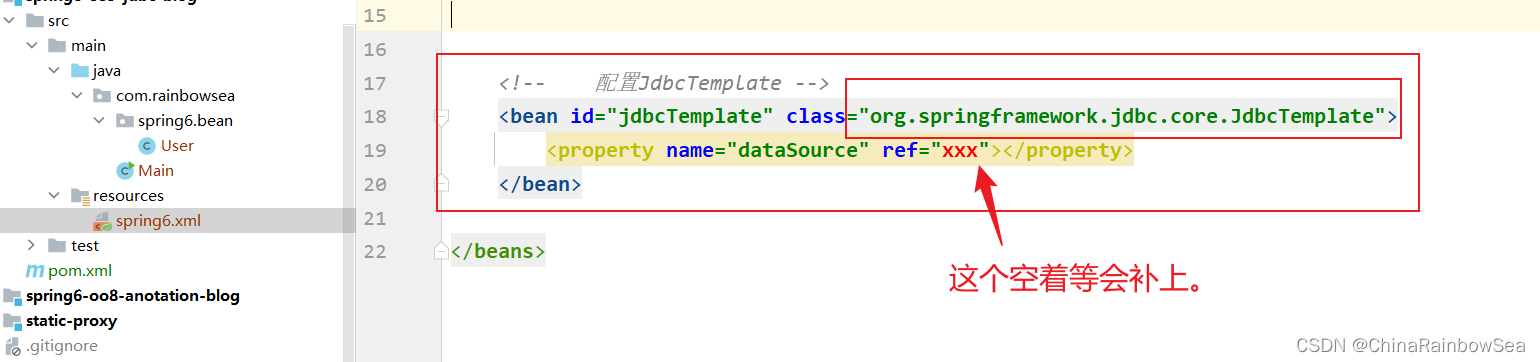
jdbctemplate 是spring 提供好的类,这类的完整类名是:org.springframework.jdbc.core.jdbctemplate 。这个类上的使用,我们 new 对象就好了,而spring 可以帮我们 new 对象,所以,我们就将这个new jdbctemplate 对象这件事交给 spring 来做。直接将这个类配置到 spring.xml 的配置文件当中,纳入 bean管理即可。
我们来看一下这个jdbctemplate源码:
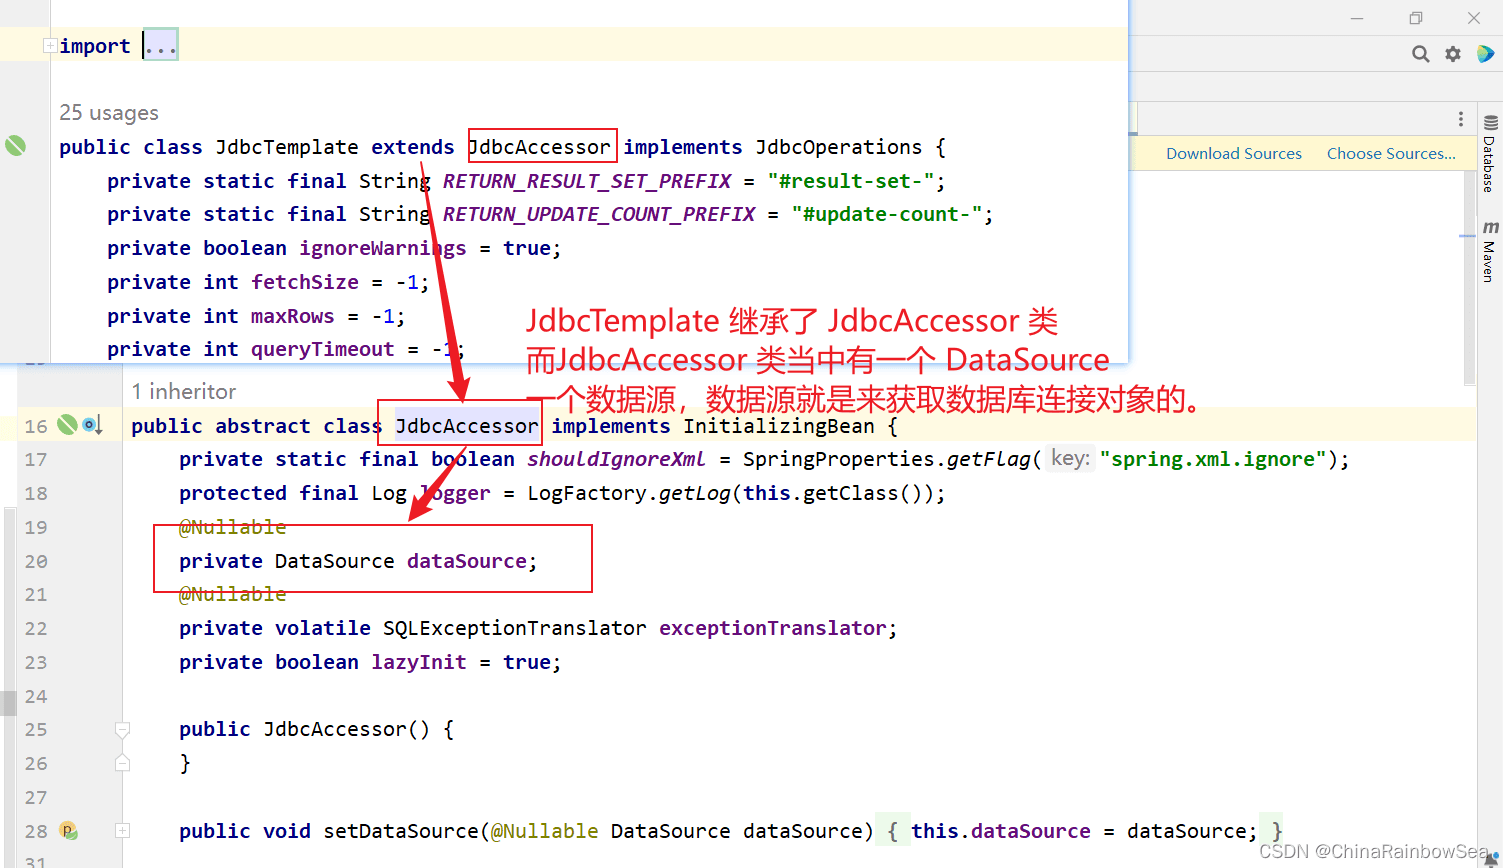
所以这里,我们只需要配置好 datasource 数据源,用来连接数据库即可,将datasource 属性进行 set 注入赋值上。可以看到jdbctemplate中有一个datasource属性,这个属性是数据源,我们都知道连接数据库需要connection对象,而生成connection对象是数据源负责的。所以我们需要给jdbctemplate设置数据源属性。
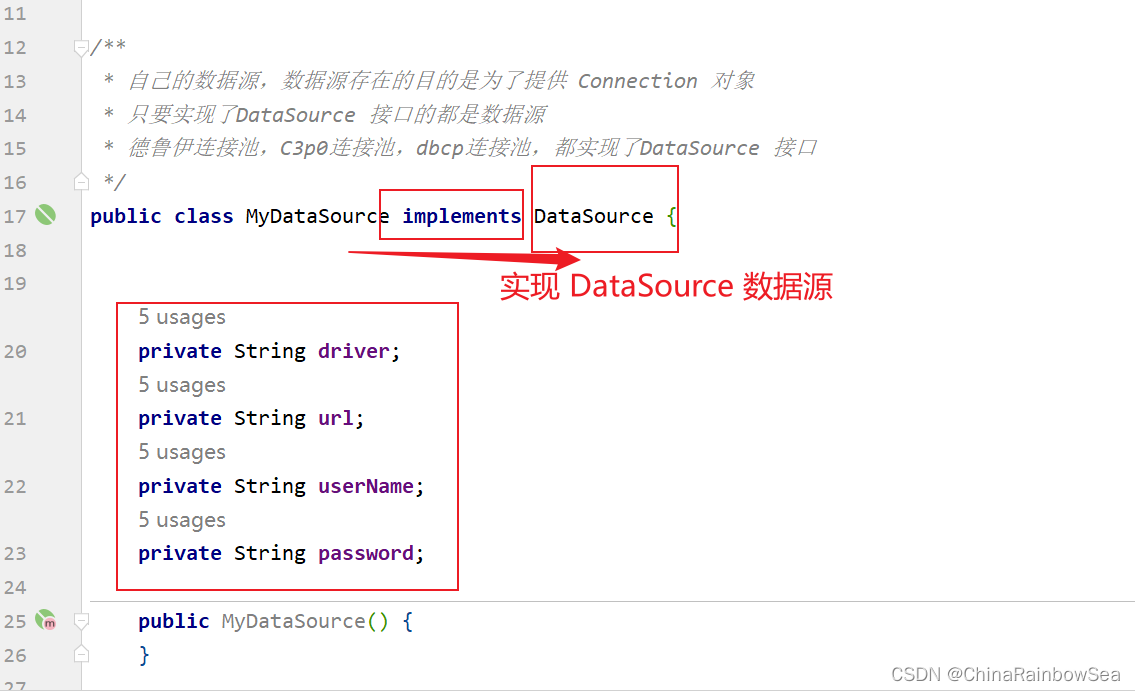
所有的数据源都是要实现javax.sql.datasource接口的。这个数据源可以自己写一个,也可以用写好的,比如:阿里巴巴的德鲁伊连接池,c3p0,dbcp等。我们这里自己先手写一个数据源。
自己的数据源,数据源存在的目的是为了提供 connection 对象;只要实现了datasource 接口的都是数据源:德鲁伊连接池,c3p0连接池,dbcp连接池,都实现了datasource 接口
如下:
重写其中的**public connection getconnection() throws sqlexception ** 方法,注意是没有参数的。
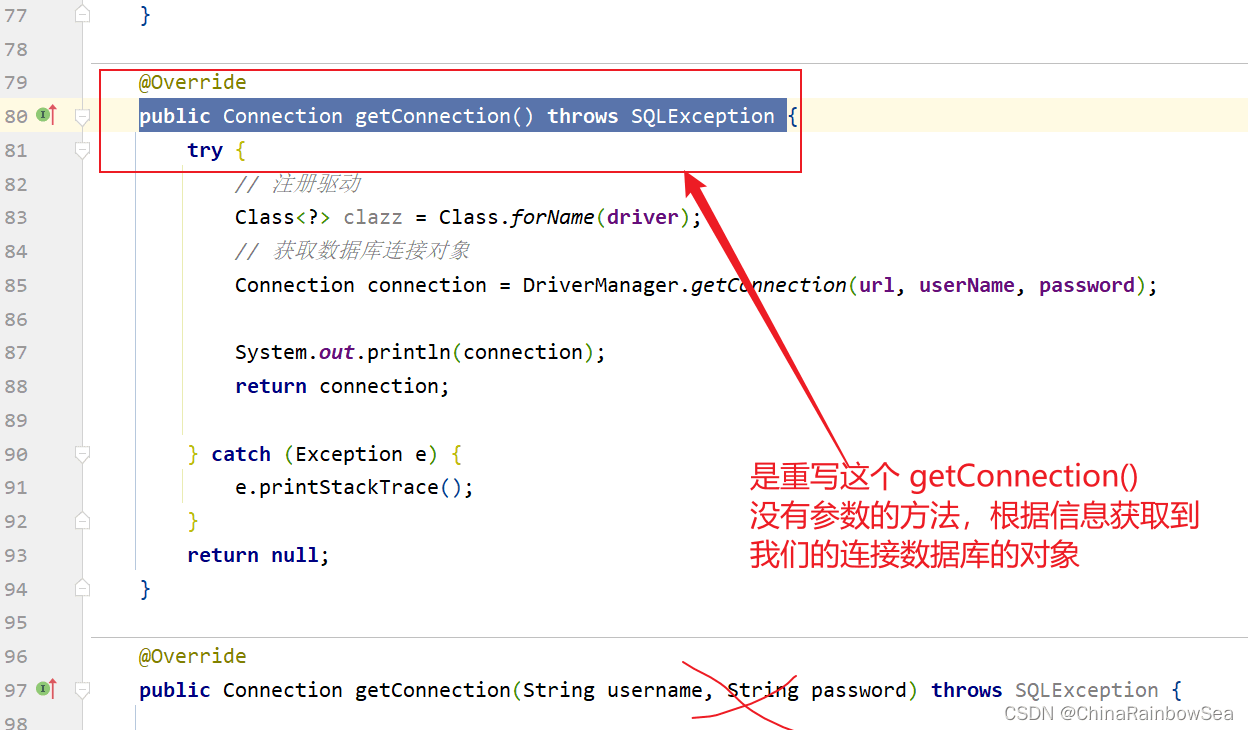
@override
    public connection getconnection() throws sqlexception {
        try {
            // 注册驱动
            class<?> clazz = class.forname(driver);
            // 获取数据库连接对象
            connection connection = drivermanager.getconnection(url, username, password);
            system.out.println(connection);
            return connection;
        } catch (exception e) {
            e.printstacktrace();
        }
        return null;
    }
package com.rainbowsea.spring6.bean;
import javax.sql.datasource;
import java.io.printwriter;
import java.sql.connection;
import java.sql.drivermanager;
import java.sql.sqlexception;
import java.sql.sqlfeaturenotsupportedexception;
import java.util.logging.logger;
/**
* 自己的数据源,数据源存在的目的是为了提供 connection 对象
* 只要实现了datasource 接口的都是数据源
* 德鲁伊连接池,c3p0连接池,dbcp连接池,都实现了datasource 接口
*/
public class mydatasource implements datasource {
private string driver;
private string url;
private string username;
private string password;
public mydatasource() {
}
public mydatasource(string driver, string url, string username, string password) {
this.driver = driver;
this.url = url;
this.username = username;
this.password = password;
}
public string getdriver() {
return driver;
}
public void setdriver(string driver) {
this.driver = driver;
}
public string geturl() {
return url;
}
public void seturl(string url) {
this.url = url;
}
public string getusername() {
return username;
}
public void setusername(string username) {
this.username = username;
}
public string getpassword() {
return password;
}
public void setpassword(string password) {
this.password = password;
}
@override
public string tostring() {
return "mydatasource{" +
"driver='" + driver + '\'' +
", url='" + url + '\'' +
", username='" + username + '\'' +
", password='" + password + '\'' +
'}';
}
@override
public connection getconnection() throws sqlexception {
try {
// 注册驱动
class<?> clazz = class.forname(driver);
// 获取数据库连接对象
connection connection = drivermanager.getconnection(url, username, password);
system.out.println(connection);
return connection;
} catch (exception e) {
e.printstacktrace();
}
return null;
}
@override
public connection getconnection(string username, string password) throws sqlexception {
return null;
}
@override
public printwriter getlogwriter() throws sqlexception {
return null;
}
@override
public void setlogwriter(printwriter out) throws sqlexception {
}
@override
public void setlogintimeout(int seconds) throws sqlexception {
}
@override
public int getlogintimeout() throws sqlexception {
return 0;
}
@override
public logger getparentlogger() throws sqlfeaturenotsupportedexception {
return null;
}
@override
public <t> t unwrap(class<t> iface) throws sqlexception {
return null;
}
@override
public boolean iswrapperfor(class<?> iface) throws sqlexception {
return false;
}
}写完数据源,我们需要把这个数据源传递给jdbctemplate。因为jdbctemplate中有一个datasource属性;同时获取为该 datasource 数据源,通过spring的set 注入,为其中的成员变量赋值。就是连接我们mysql数据库的一些信息。如下:
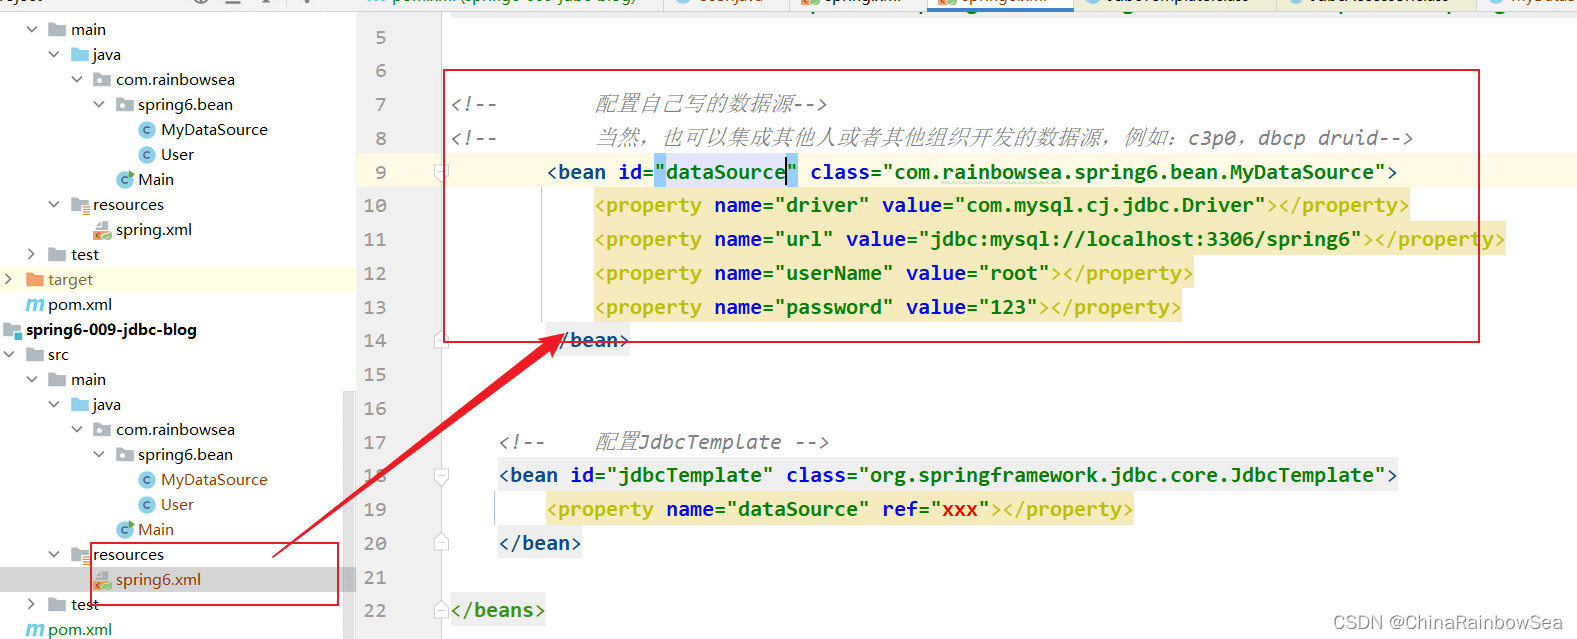
<!-- 配置自己写的数据源-->
<!-- 当然,也可以集成其他人或者其他组织开发的数据源,例如:c3p0,dbcp druid-->
<bean id="datasource" class="com.rainbowsea.spring6.bean.mydatasource">
<property name="driver" value="com.mysql.cj.jdbc.driver"></property>
<property name="url" value="jdbc:mysql://localhost:3306/spring6"></property>
<property name="username" value="root"></property>
<property name="password" value="123"></property>
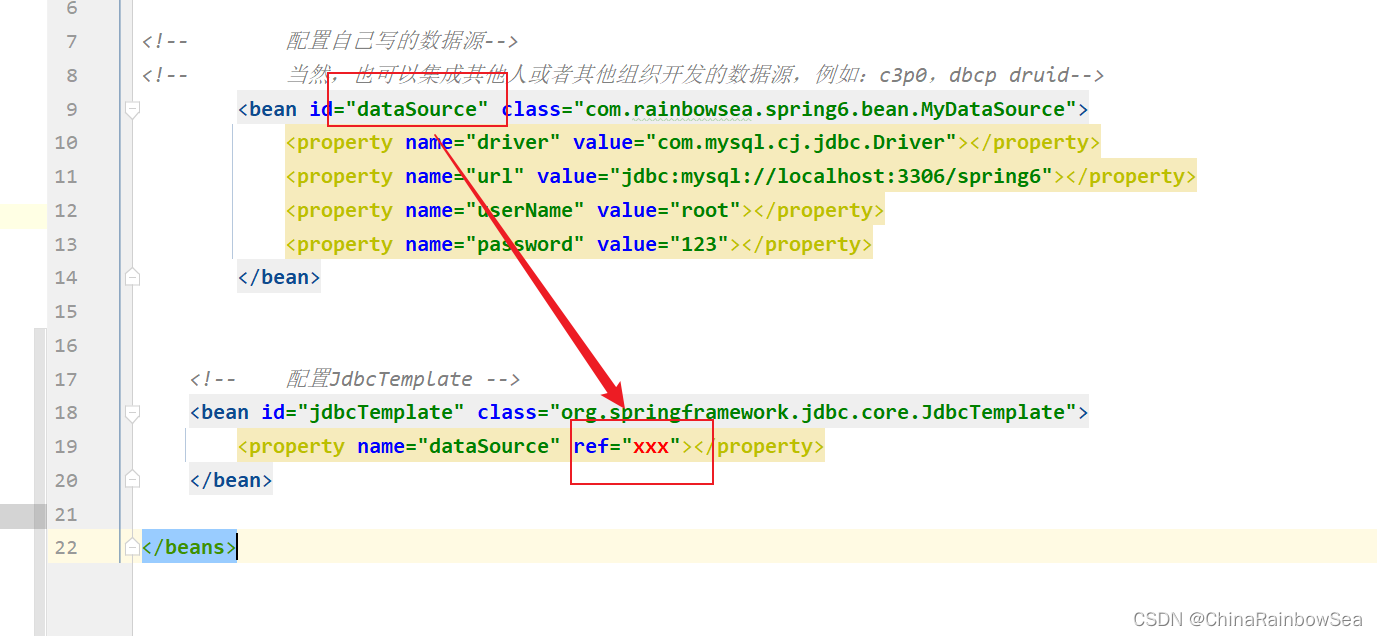
</bean>这时候,我们就可以将这个数据源传递给jdbctemplate。因为jdbctemplate中有一个datasource属性。
<?xml version="1.0" encoding="utf-8"?>
<beans xmlns="http://www.springframework.org/schema/beans"
xmlns:xsi="http://www.w3.org/2001/xmlschema-instance"
xsi:schemalocation="http://www.springframework.org/schema/beans http://www.springframework.org/schema/beans/spring-beans.xsd">
<!-- 配置自己写的数据源-->
<!-- 当然,也可以集成其他人或者其他组织开发的数据源,例如:c3p0,dbcp druid-->
<bean id="datasource" class="com.rainbowsea.spring6.bean.mydatasource">
<property name="driver" value="com.mysql.cj.jdbc.driver"></property>
<property name="url" value="jdbc:mysql://localhost:3306/spring6"></property>
<property name="username" value="root"></property>
<property name="password" value="123"></property>
</bean>
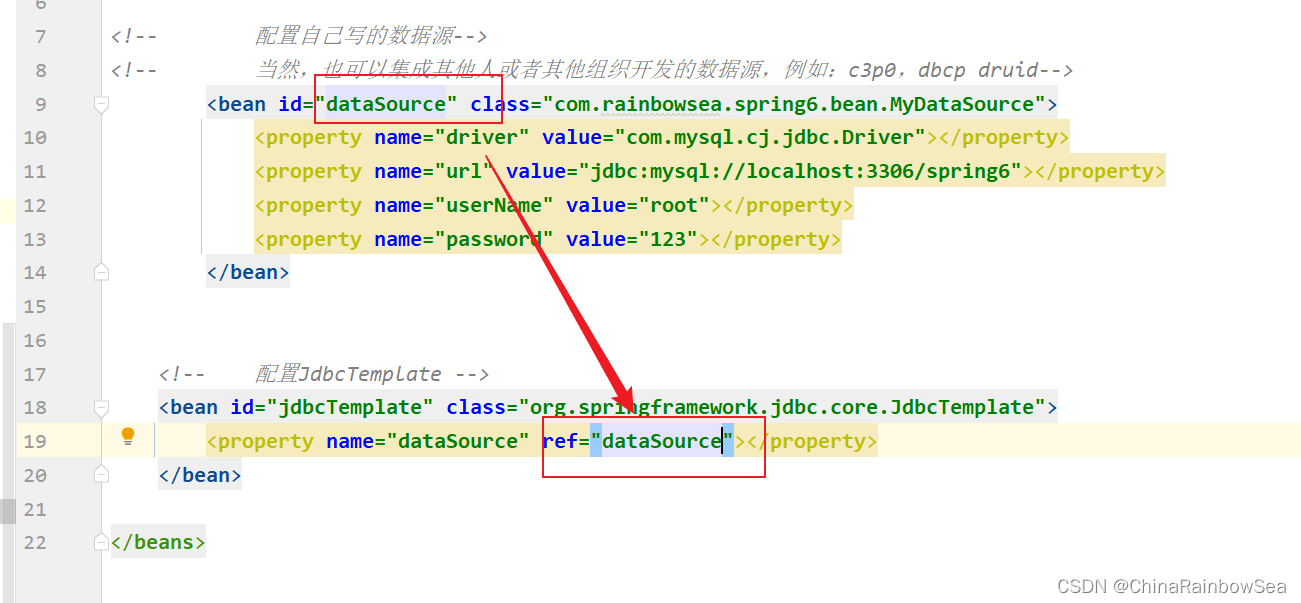
<!-- 配置jdbctemplate -->
<bean id="jdbctemplate" class="org.springframework.jdbc.core.jdbctemplate">
<property name="datasource" ref="datasource"></property>
</bean>
</beans>这里,我们的环境准备好了,数据表也准备好了,下面就可以开始通过spring 的jdbctemplate 操作数据库了(对数据库进行增删改查)的操作了。具体内容如下。
4. 开始
4.1 从数据表中插入(添加)数据
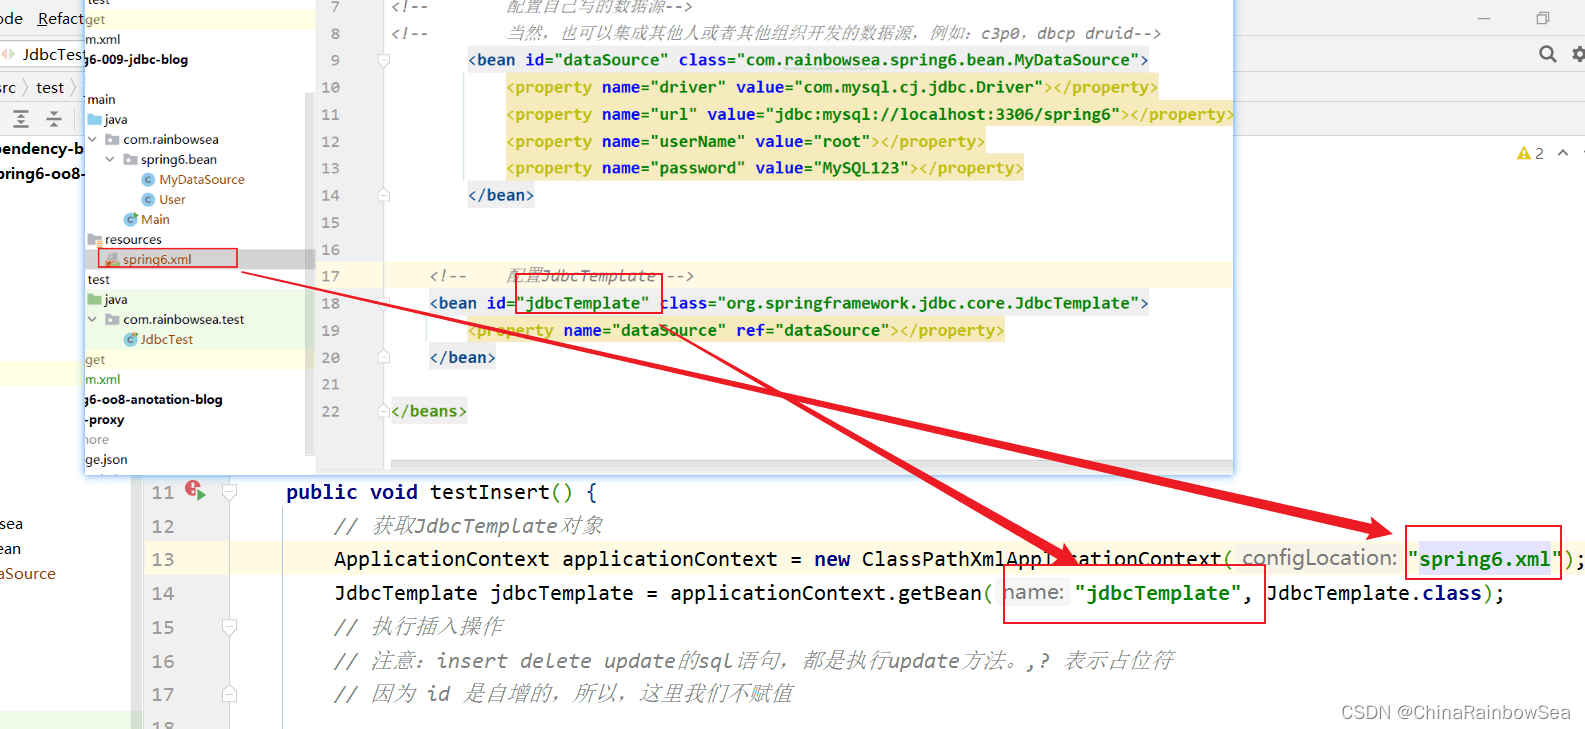
首先,我们通过 spring 读取上面我们配置好的spinrg.xml 文件当中的,从而实例化 jdbctemplate 类对象。
然后使用:jdbctemplate.update() 的方法,执行sql语句。
需要注意的是:在spring当中的jdbctemplate,对于数据库上的增删改,执行sql语句都是使用update() 的方法处理的。
第一个参数:string sql
第二个参数: @nullable object... args 是一个可变参数(是一个数组),表示
表示:sql语句当中的? 占位符的要填入的值。

返回值:int 表示修改/更新的记录条数。


package com.rainbowsea.test;
import org.junit.test;
import org.springframework.context.applicationcontext;
import org.springframework.context.support.classpathxmlapplicationcontext;
import org.springframework.jdbc.core.jdbctemplate;
public class jdbctest {
@test
public void testinsert() {
// 获取jdbctemplate对象
applicationcontext applicationcontext = new classpathxmlapplicationcontext("spring6.xml");
jdbctemplate jdbctemplate = applicationcontext.getbean("jdbctemplate", jdbctemplate.class);
// 执行插入操作
// 注意:insert delete update的sql语句,都是执行update方法。,? 表示占位符
// 因为 id 是自增的,所以,这里我们不赋值
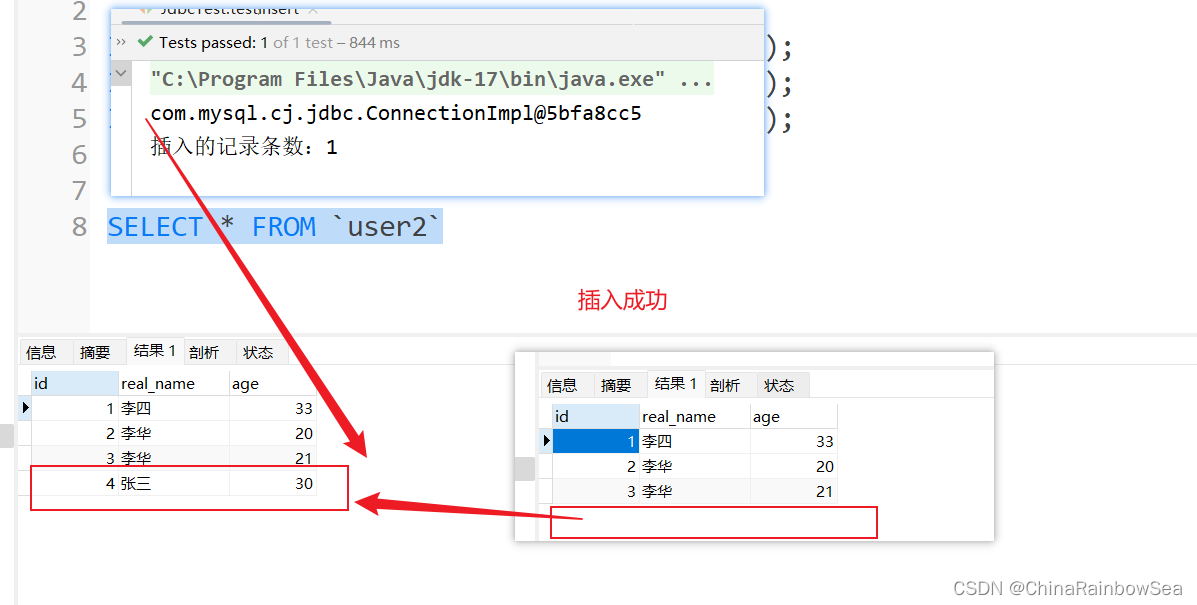
string sql = "insert into user(real_name,age) values(?,?)";
// 返回修改的记录条数
int count = jdbctemplate.update(sql, "张三", 30);
system.out.println("插入的记录条数:" + count);
}
}
4.2 从数据表中修改数据
在spring当中的jdbctemplate,对于数据库上的增删改,执行sql语句都是使用update() 的方法处理的。
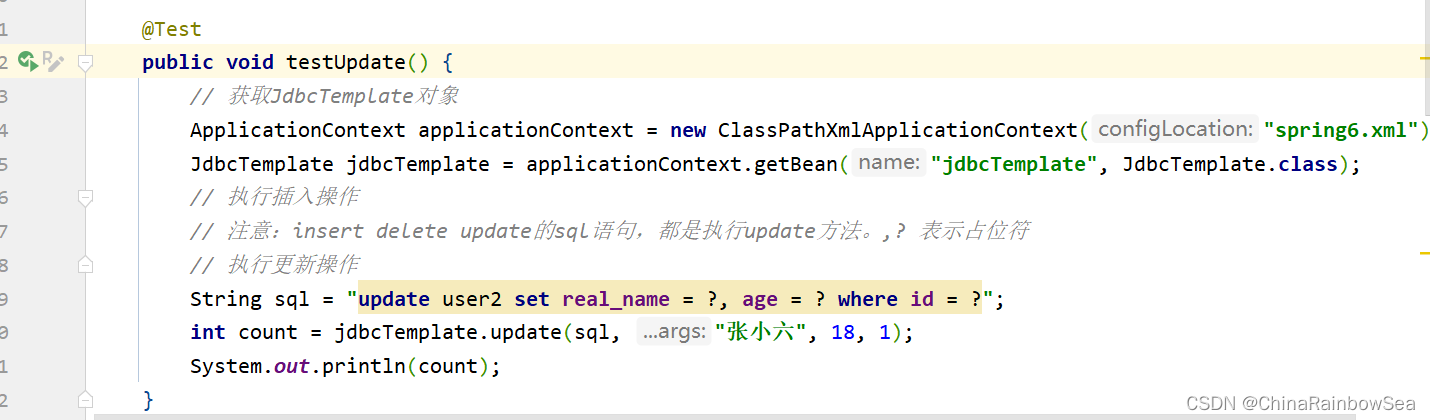
我们这里:将id 为1的,real_name修改为:张小六,age 为 18
package com.rainbowsea.test;
import org.junit.test;
import org.springframework.context.applicationcontext;
import org.springframework.context.support.classpathxmlapplicationcontext;
import org.springframework.jdbc.core.jdbctemplate;
public class jdbctest {
@test
public void testupdate() {
// 获取jdbctemplate对象
applicationcontext applicationcontext = new classpathxmlapplicationcontext("spring6.xml");
jdbctemplate jdbctemplate = applicationcontext.getbean("jdbctemplate", jdbctemplate.class);
// 执行插入操作
// 注意:insert delete update的sql语句,都是执行update方法。,? 表示占位符
// 执行更新操作
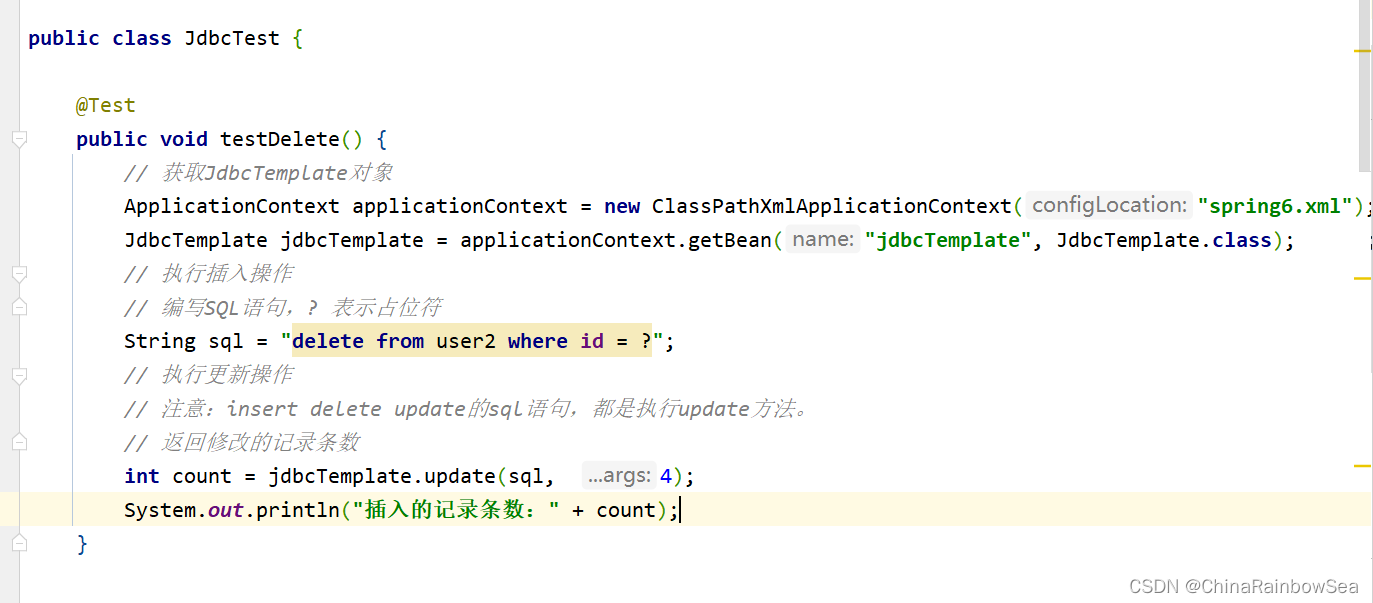
string sql = "update user2 set real_name = ?, age = ? where id = ?";
int count = jdbctemplate.update(sql, "张小六", 18, 1);
system.out.println(count);
}
}
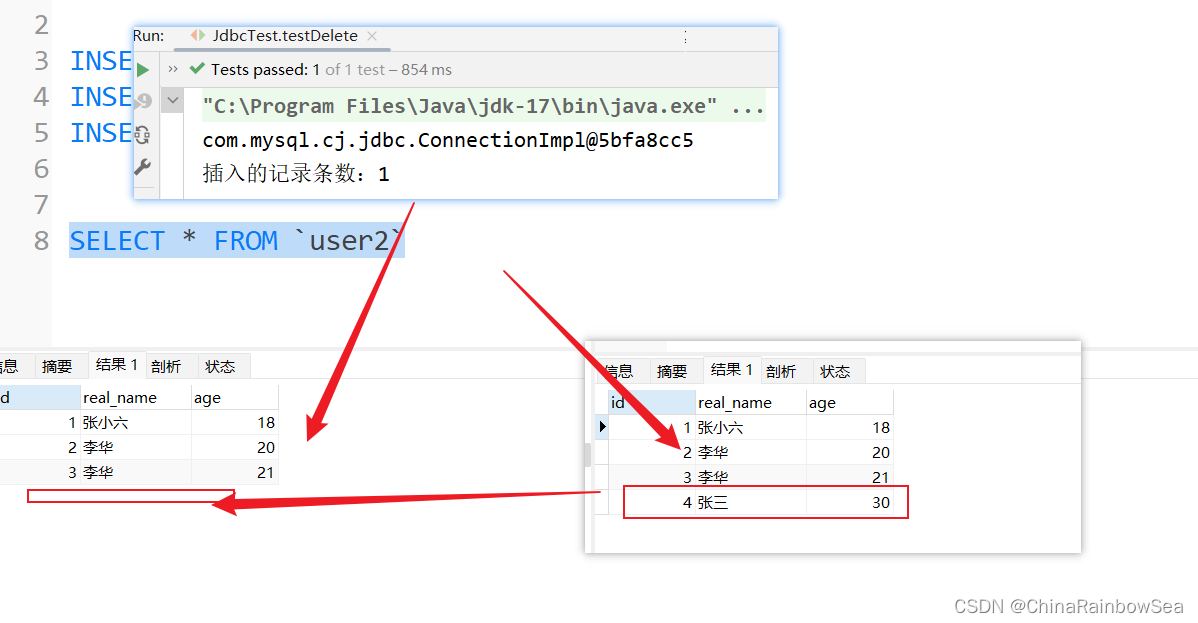
4.3 从数据表中删除数据
在spring当中的jdbctemplate,对于数据库上的增删改,执行sql语句都是使用update() 的方法处理的。
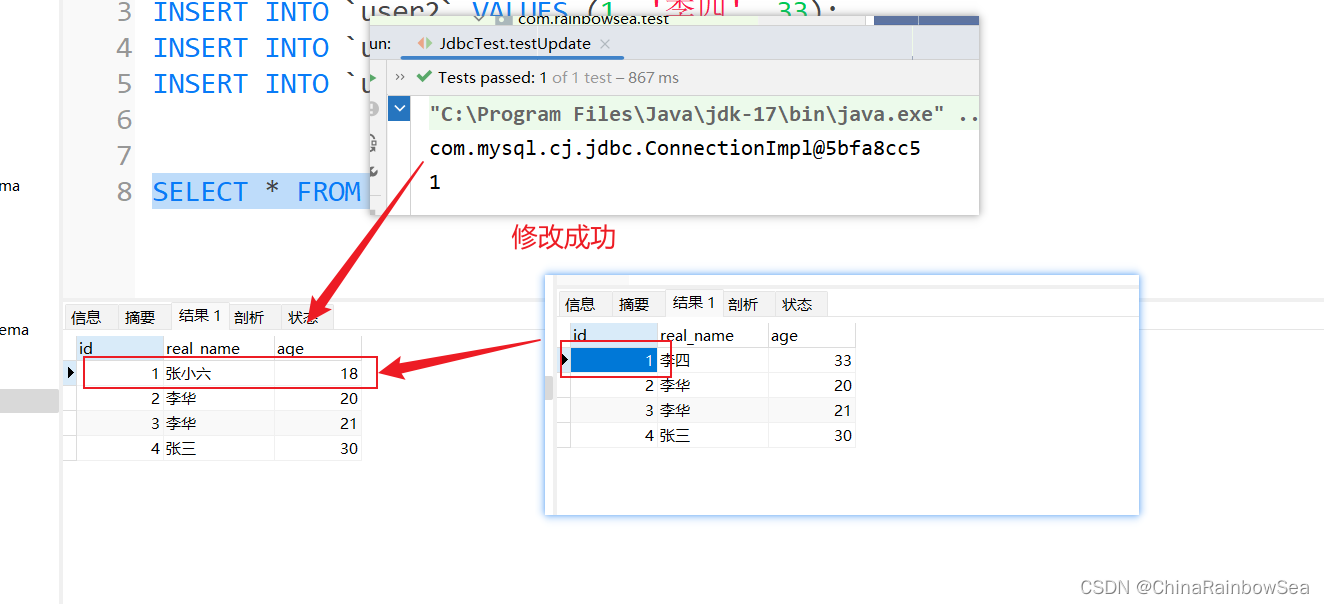
我们这里:将id 为4的一条记录删除了。
package com.rainbowsea.test;
import org.junit.test;
import org.springframework.context.applicationcontext;
import org.springframework.context.support.classpathxmlapplicationcontext;
import org.springframework.jdbc.core.jdbctemplate;
public class jdbctest {
    @test
    public void testdelete() {
        // 获取jdbctemplate对象
        applicationcontext applicationcontext = new classpathxmlapplicationcontext("spring6.xml");
        jdbctemplate jdbctemplate = applicationcontext.getbean("jdbctemplate", jdbctemplate.class);
        // 执行插入操作
        // 编写sql语句,? 表示占位符
        string sql = "delete from user2 where id = ?";
        // 执行更新操作
        // 注意:insert delete update的sql语句,都是执行update方法。
        // 返回修改的记录条数
        int count = jdbctemplate.update(sql,  4);
        system.out.println("插入的记录条数:" + count);
    }
}
4.4 从数据表中查询一个对象
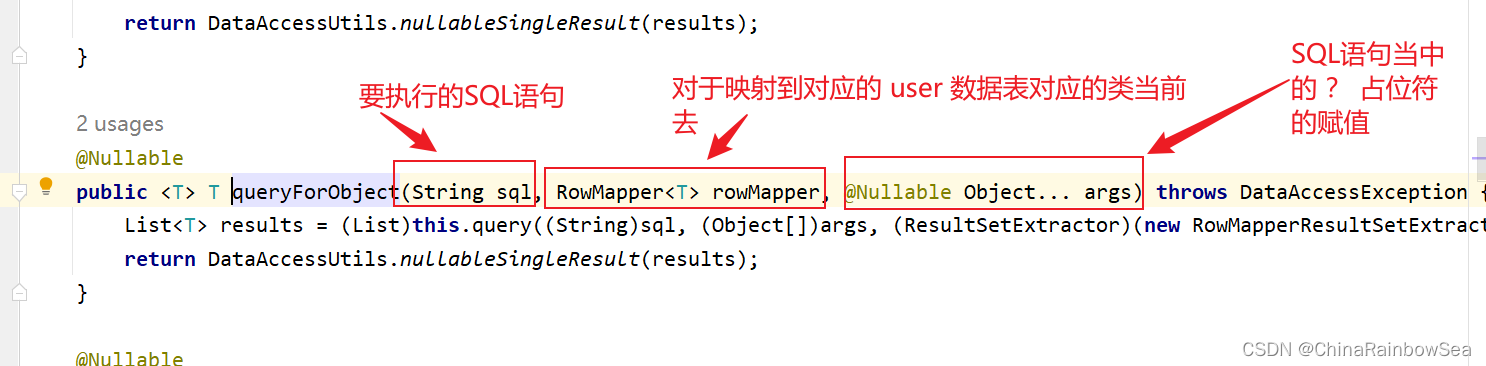
关于查询一条记录,使用 jdbctemplate.queryforobject() 方法:

第一个参数:string sql 要执行的sql语句
第二个参数:beanpropertyrowmapper 与对应数据库表中 bean 类的相映射的类。一般用: new beanpropertyrowmapper<>(t.class) 这样的对象装配上。bean属性值和数据库记录行的映射对象。在构造方法中指定映射的对象类型。

第三个参数:sql语句当中的 ? 占位符。可变长参数,给sql语句的占位符问号传值。
返回值:运用了泛型,也就是对应数据库表中在java当中相对应,映射的 bean 类。
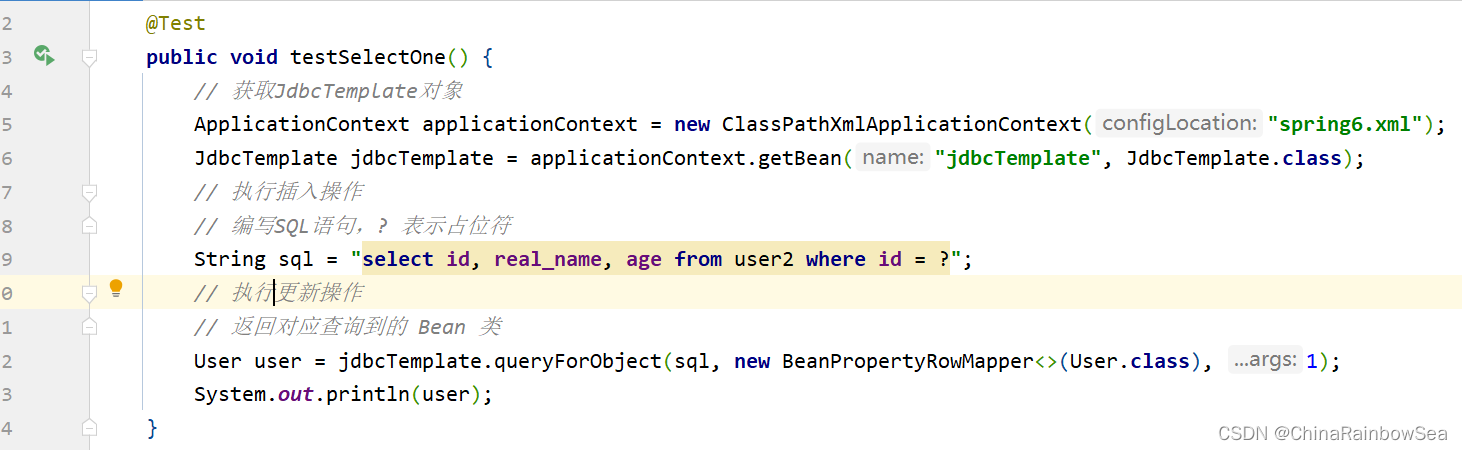
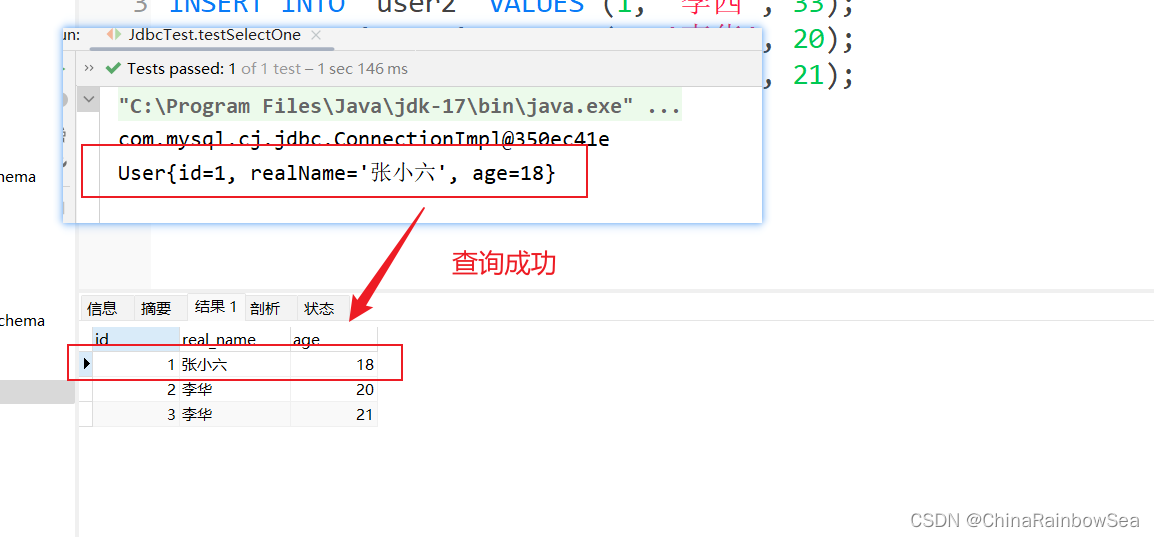
这里我们查询一个id为1的,其中的id,real_name,age 的一条记录
import com.rainbowsea.spring6.bean.user;
import org.junit.test;
import org.springframework.context.applicationcontext;
import org.springframework.context.support.classpathxmlapplicationcontext;
import org.springframework.jdbc.core.beanpropertyrowmapper;
import org.springframework.jdbc.core.jdbctemplate;
public class jdbctest {
    @test
    public void testselectone() {
        // 获取jdbctemplate对象
        applicationcontext applicationcontext = new classpathxmlapplicationcontext("spring6.xml");
        jdbctemplate jdbctemplate = applicationcontext.getbean("jdbctemplate", jdbctemplate.class);
        // 执行插入操作
        // 编写sql语句,? 表示占位符
        string sql = "select id, real_name, age from user2 where id = ?";
        // 执行更新操作
        // 返回对应查询到的 bean 类
        user user = jdbctemplate.queryforobject(sql, new beanpropertyrowmapper<>(user.class), 1);
        system.out.println(user);
    }
}
4.5 从数据表中查询一个值
查询数据表当中有几条记录,对应查询数据表中的一个值的内容,我们同样还是使用:jdbctemplate.queryforobject() 方法来进行。不同的是,这个参数是两个的,是对应的类对象,
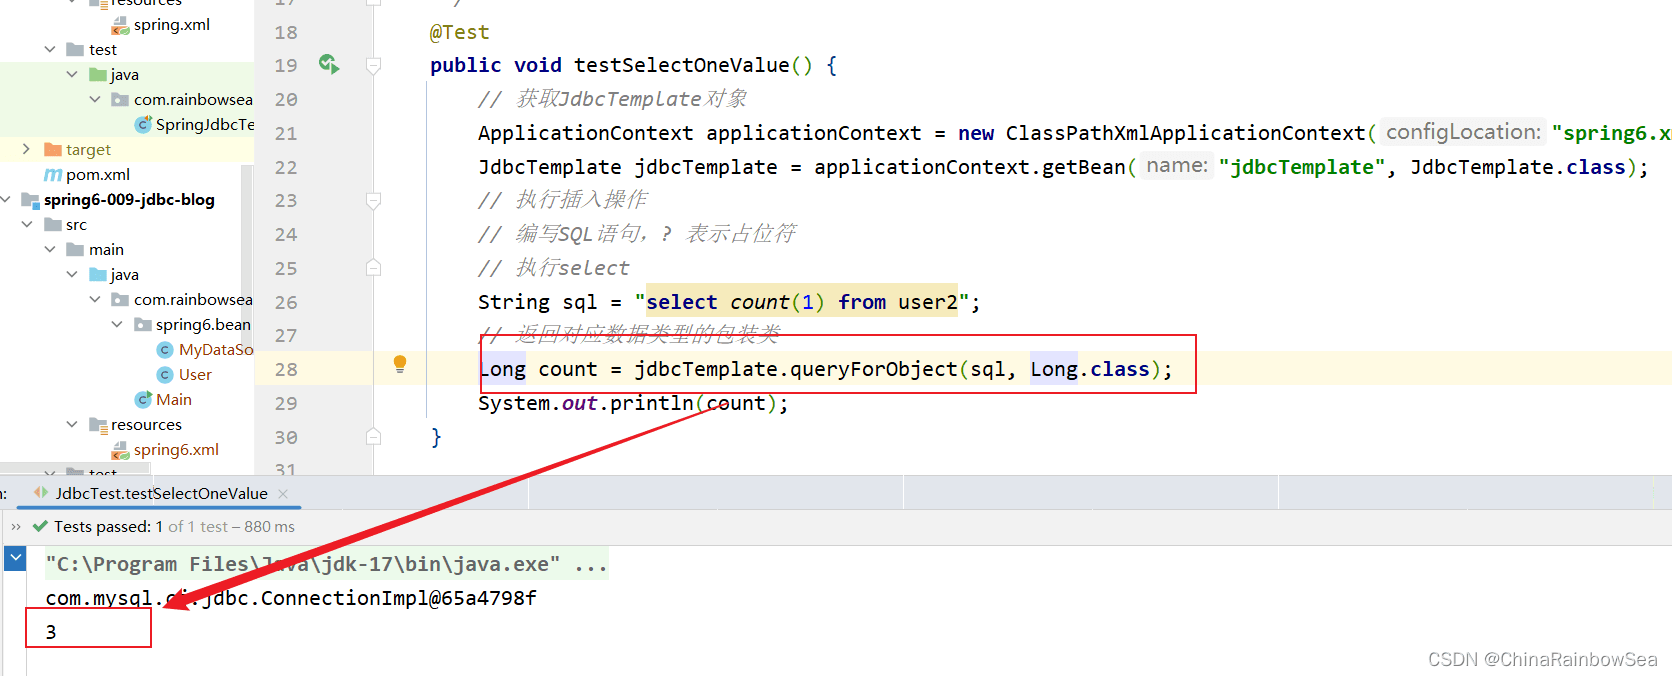
- 比如这里我们查询的是一个数据表中有几条记录,几条记录,就是一个值了,一个数值类型的类对象了,可以是 int.class,也可以是 long.class,还可以是 short.class 因为只要是数值类型就可以了。
- 返回值是对应类的包装类,


import com.rainbowsea.spring6.bean.user;
import org.junit.test;
import org.springframework.context.applicationcontext;
import org.springframework.context.support.classpathxmlapplicationcontext;
import org.springframework.jdbc.core.beanpropertyrowmapper;
import org.springframework.jdbc.core.jdbctemplate;
import java.util.list;
public class jdbctest {
/**
* 查询数据表中的一个值
*/
@test
public void testselectonevalue() {
// 获取jdbctemplate对象
applicationcontext applicationcontext = new classpathxmlapplicationcontext("spring6.xml");
jdbctemplate jdbctemplate = applicationcontext.getbean("jdbctemplate", jdbctemplate.class);
// 执行插入操作
// 编写sql语句,? 表示占位符
// 执行select
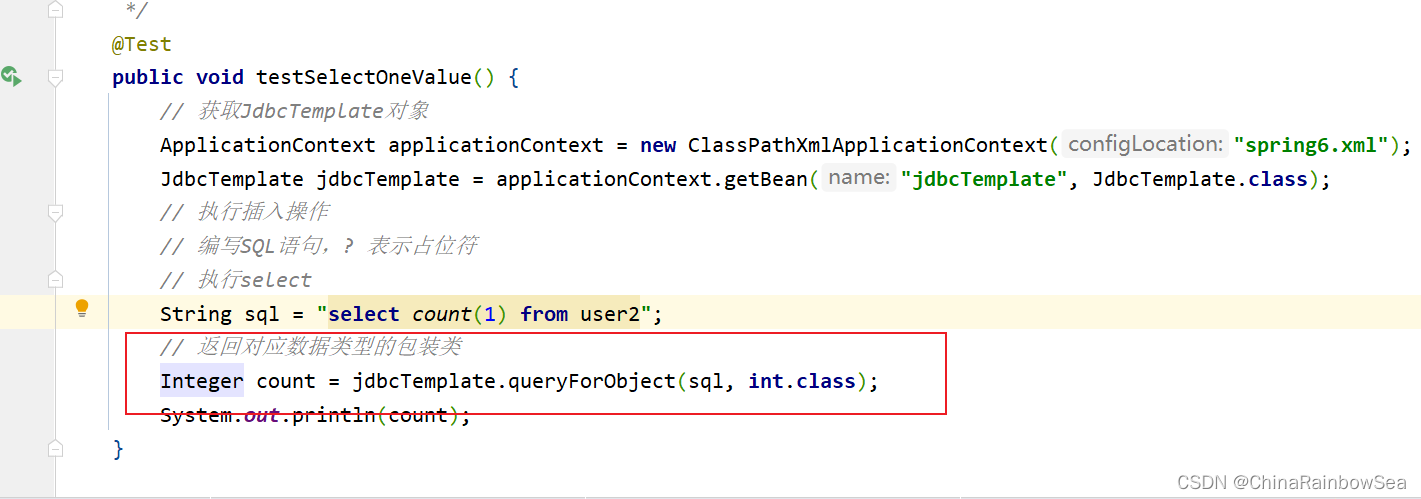
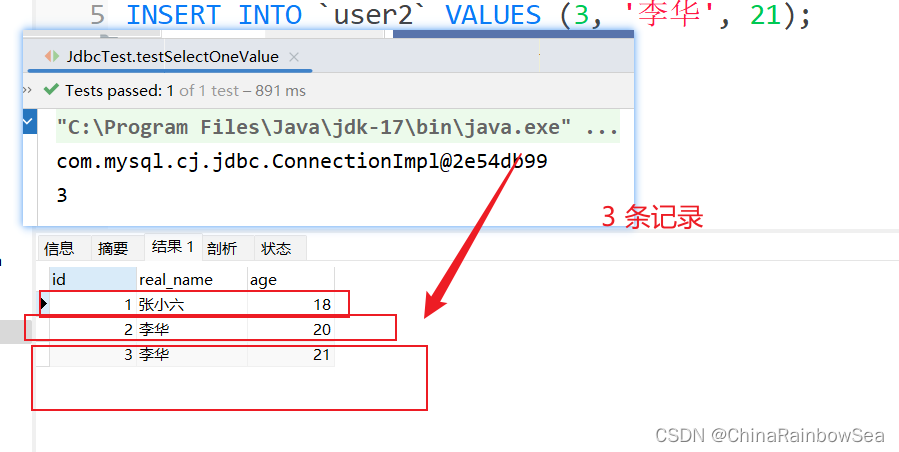
string sql = "select count(1) from user2";
// 返回对应数据类型的包装类
integer count = jdbctemplate.queryforobject(sql, int.class);
system.out.println(count);
}
}
用 long.class 也是可以的。
4.6 从数据表中查询多条记录
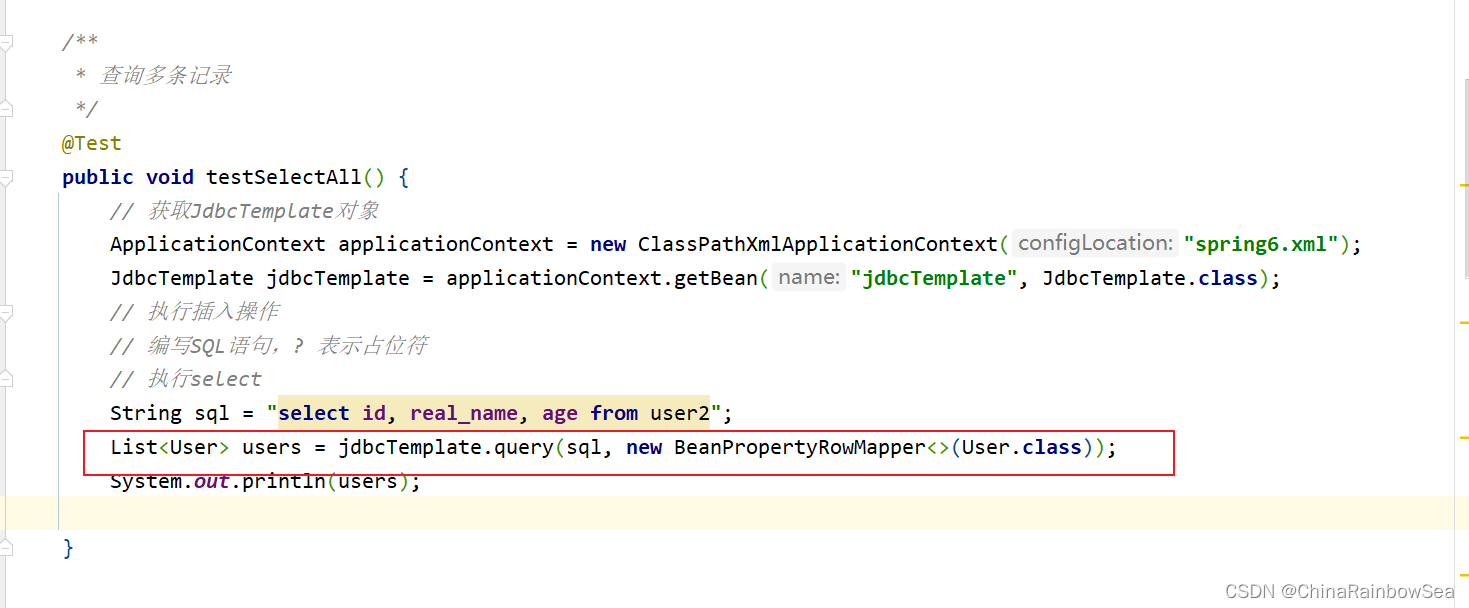
查询数据表中的多个对象,我们就要使用:jdbctemplate.query() 方法了
- 第一个参数:同样还是:要执行的sql语句
- 第二个参数:。bean属性值和数据库记录行的映射对象。在构造方法中指定映射的对象类型。;beanpropertyrowmapper 与对应数据库表中 bean 类的相映射的类。一般用: new beanpropertyrowmapper<>(t.class) 这样的对象装配上。
- 返回值:是一个list 集合了,因为我们查询到的多条记录,自然就是存储到集合当中去了。

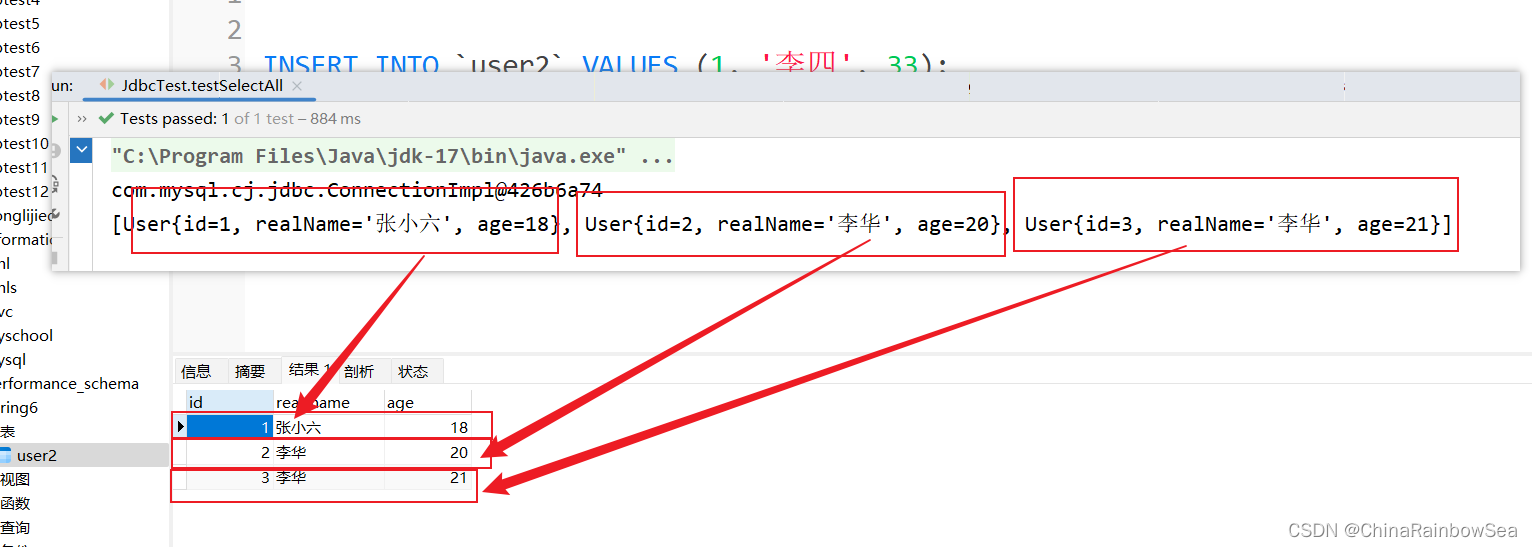
这里我们查询,user2 表中的所有用户的所有信息。
import com.rainbowsea.spring6.bean.user;
import org.junit.test;
import org.springframework.context.applicationcontext;
import org.springframework.context.support.classpathxmlapplicationcontext;
import org.springframework.jdbc.core.beanpropertyrowmapper;
import org.springframework.jdbc.core.jdbctemplate;
import java.util.list;
public class jdbctest {
/**
* 查询多条记录
*/
@test
public void testselectall() {
// 获取jdbctemplate对象
applicationcontext applicationcontext = new classpathxmlapplicationcontext("spring6.xml");
jdbctemplate jdbctemplate = applicationcontext.getbean("jdbctemplate", jdbctemplate.class);
// 执行插入操作
// 编写sql语句,? 表示占位符
// 执行select
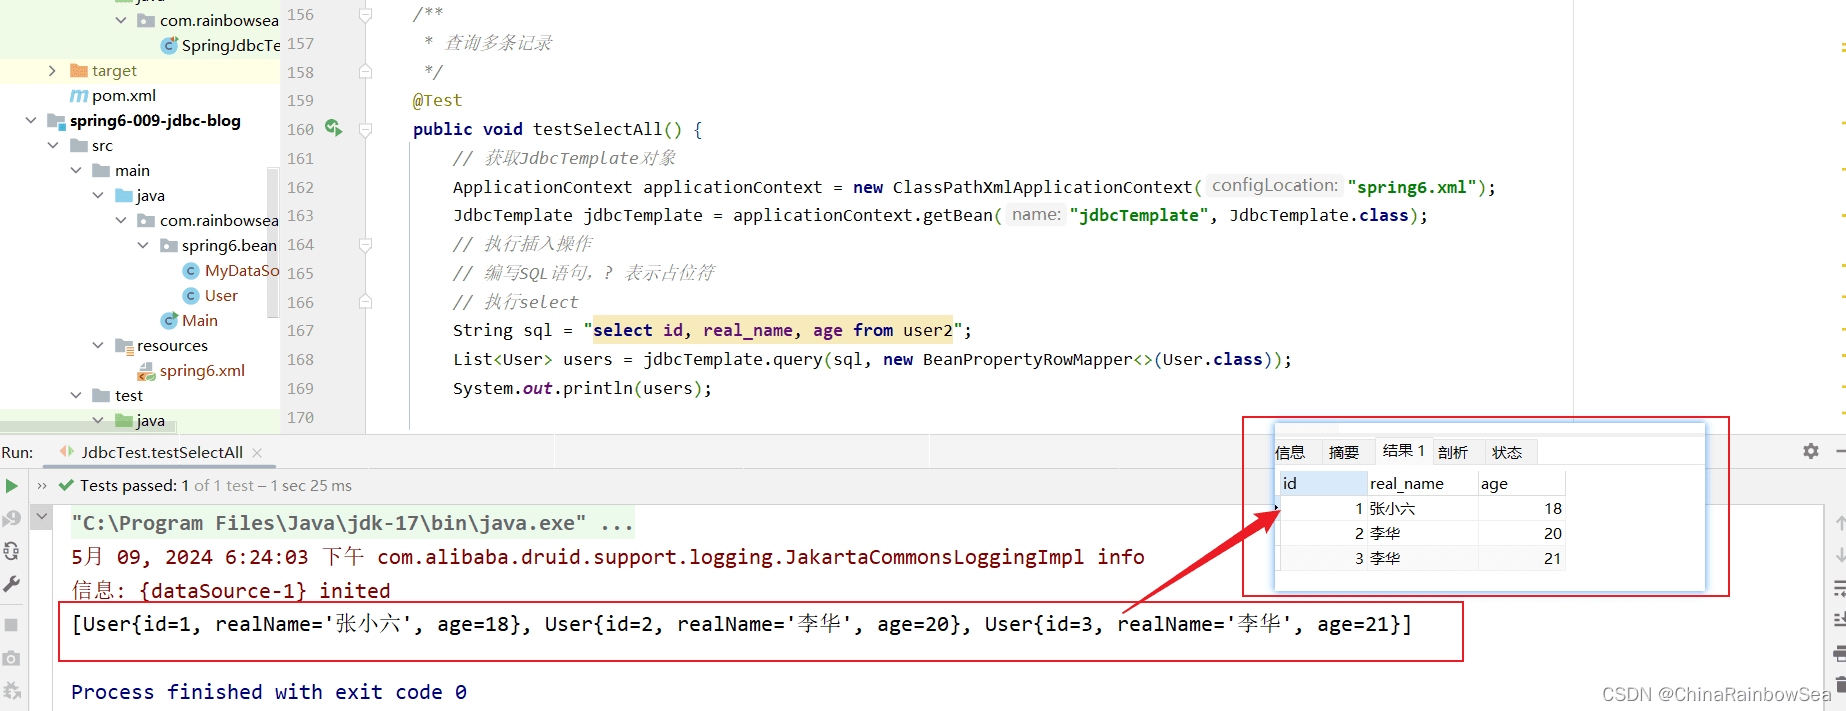
string sql = "select id, real_name, age from user2";
list<user> users = jdbctemplate.query(sql, new beanpropertyrowmapper<>(user.class));
system.out.println(users);
}
}
4.7 从数据表中批量添加数据
对于数据表中的批量添加数据,我们这里需要用上:jdbctemplate.batchupdate() 方法
- 第一个参数:string sql 要执行的sql语句
- 第二个参数: list<object[]> batchargs 是一个list集合当中存储 object[ ] 数组,注意是数组,这个list 就是,我们批量插入数据时,对于sql语句当中的
?占位符的传值,因为这个参数是: list<object[]> batchargs,所以我们需要将我们 ?占位符的值,放入到list 集合当中,再作为参数,传给jdbctemplate.batchupdate() 方法。
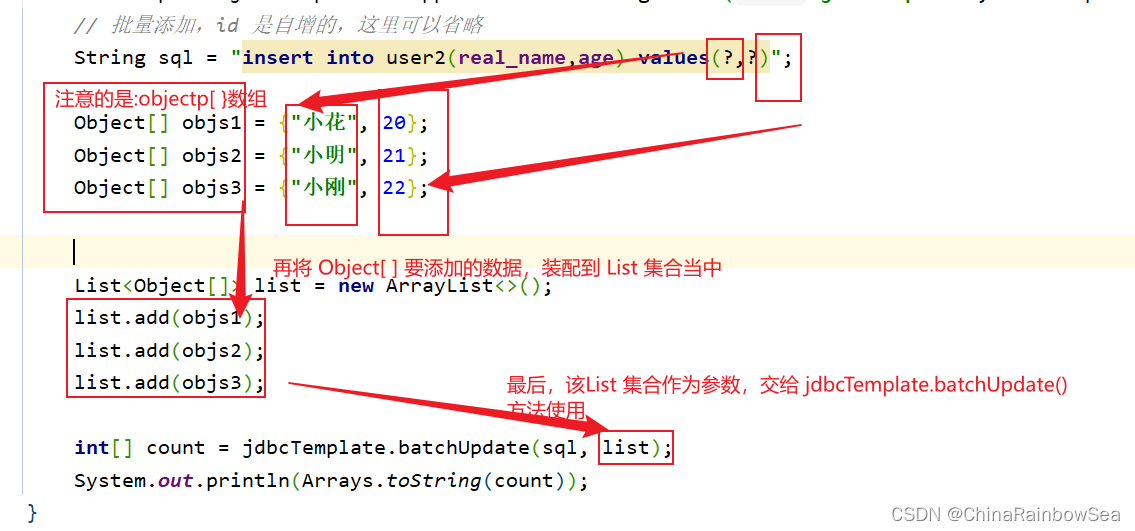
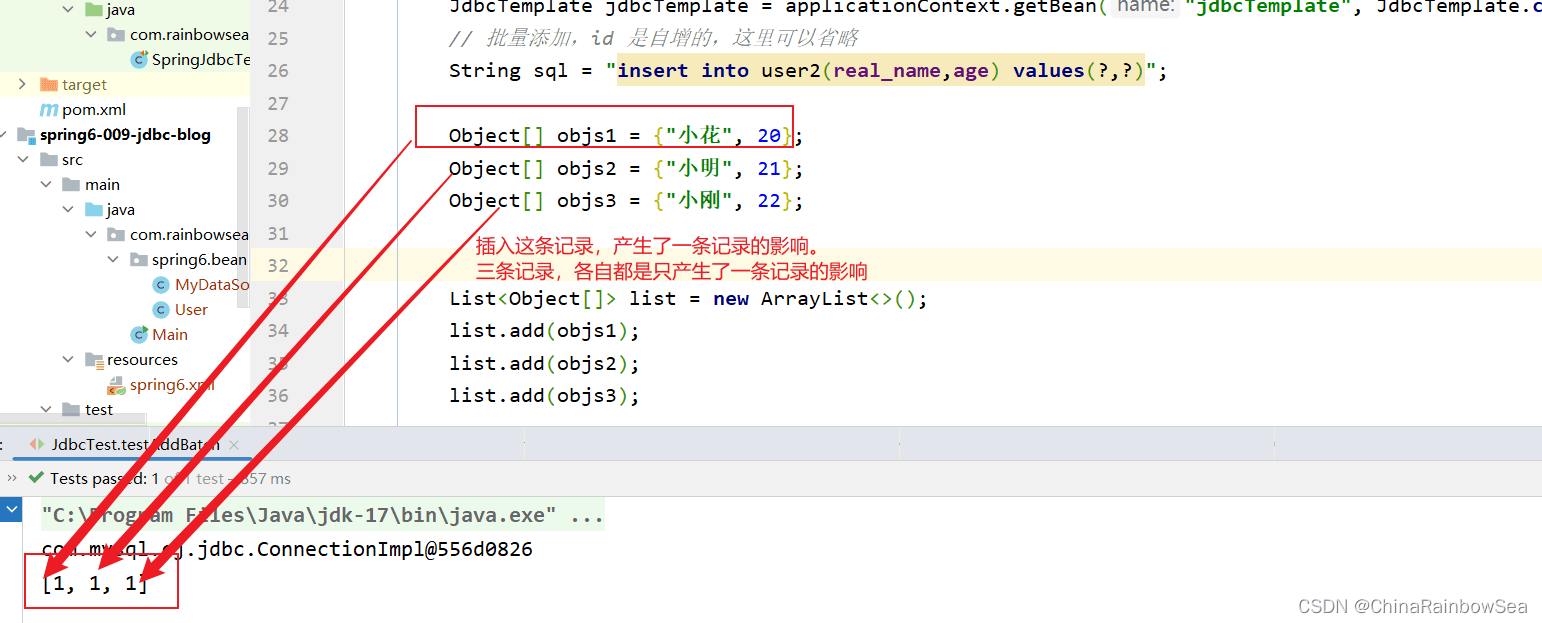
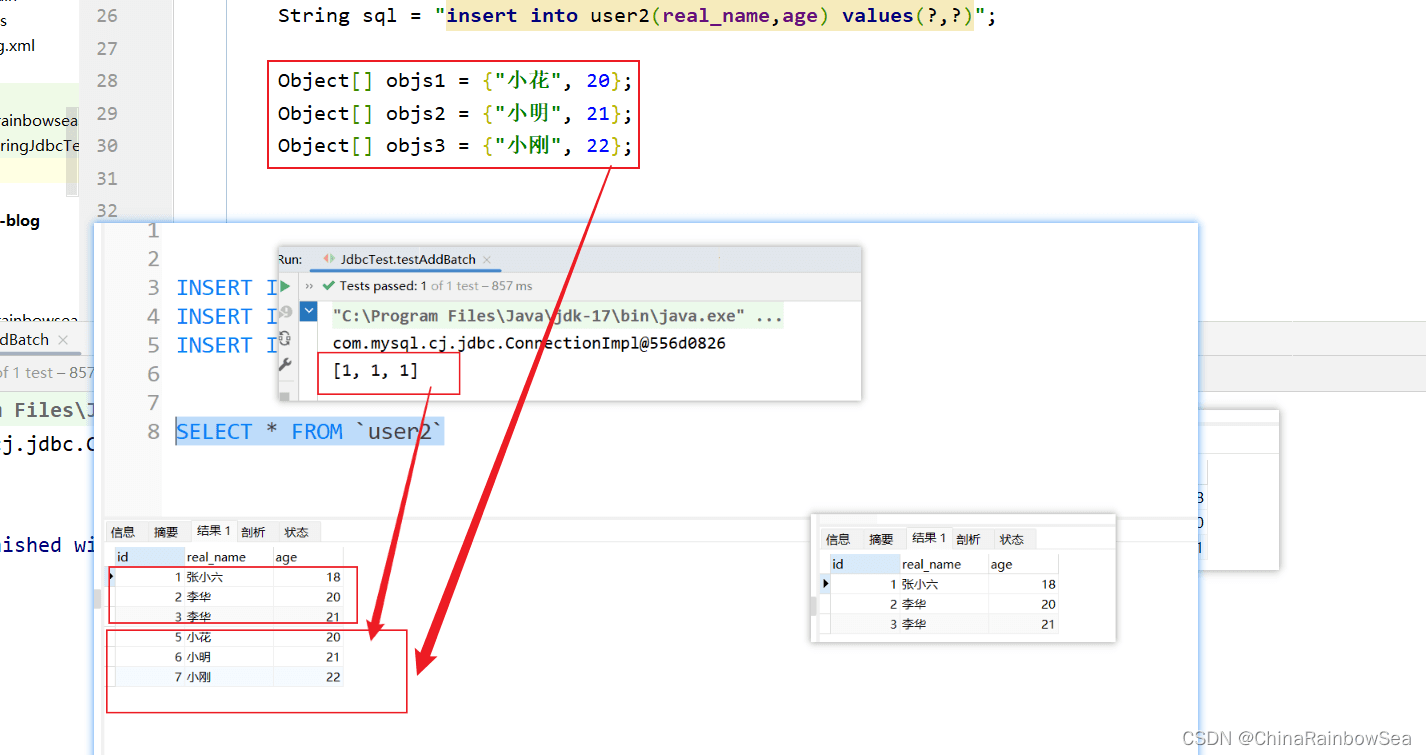
- 返回值:就是你各个批量插入的记录的,各个成功的记录条数,比如这里我们批量添加了3条记录,那么如果三条记录都插入成功了的话,就是[1,1,1]。表示每执行一次这个:"insert into user2(real_name,age) values(?,?)"; sql语句就会影响到一条记录。
插入这条记录,产生了一条记录的影响。
三条记录,各自都是只产生了一条记录的影响

import com.rainbowsea.spring6.bean.user;
import org.junit.test;
import org.springframework.context.applicationcontext;
import org.springframework.context.support.classpathxmlapplicationcontext;
import org.springframework.jdbc.core.beanpropertyrowmapper;
import org.springframework.jdbc.core.jdbctemplate;
import java.util.arraylist;
import java.util.arrays;
import java.util.list;
public class jdbctest {
/**
* 批量添加数据
*/
@test
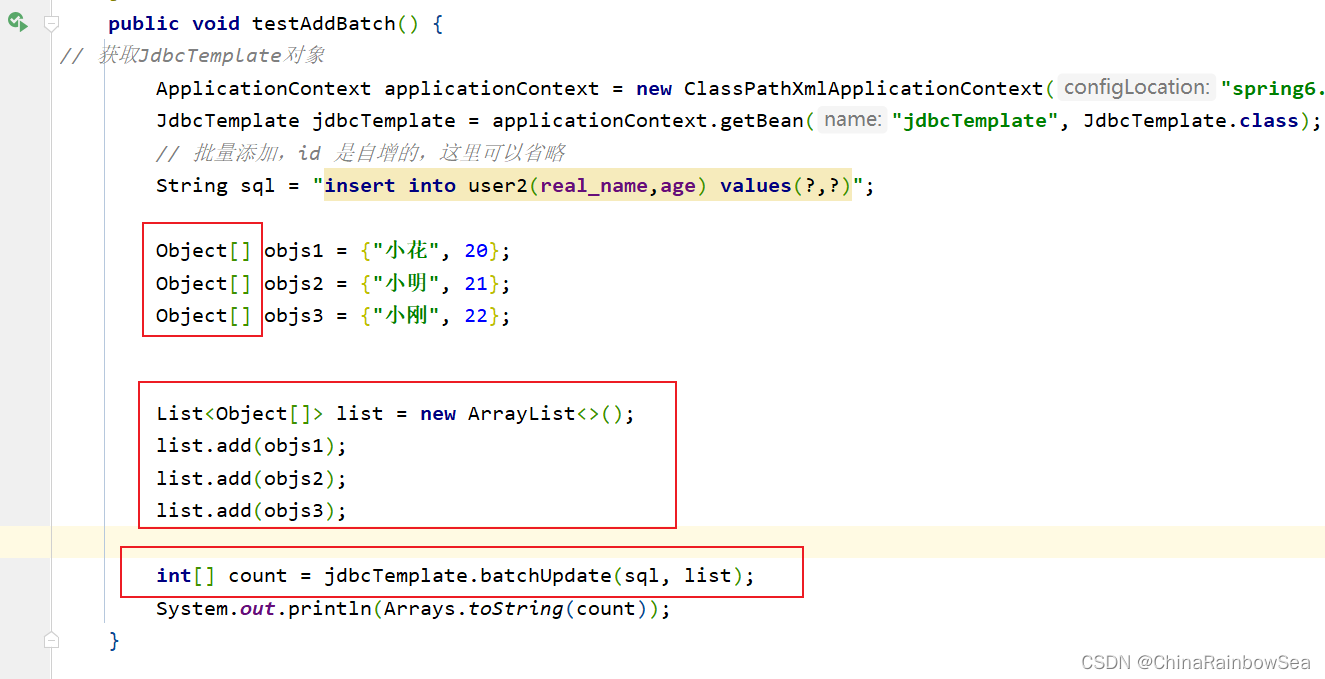
public void testaddbatch() {
// 获取jdbctemplate对象
applicationcontext applicationcontext = new classpathxmlapplicationcontext("spring6.xml");
jdbctemplate jdbctemplate = applicationcontext.getbean("jdbctemplate", jdbctemplate.class);
// 批量添加,id 是自增的,这里可以省略
string sql = "insert into user2(real_name,age) values(?,?)";
object[] objs1 = {"小花", 20};
object[] objs2 = {"小明", 21};
object[] objs3 = {"小刚", 22};
// 将要修改的数据封装到 list 集合当中,再作为参数传入
list<object[]> list = new arraylist<>();
list.add(objs1);
list.add(objs2);
list.add(objs3);
int[] count = jdbctemplate.batchupdate(sql, list);
system.out.println(arrays.tostring(count));
}
}
4.8 从数据表中批量修改数据
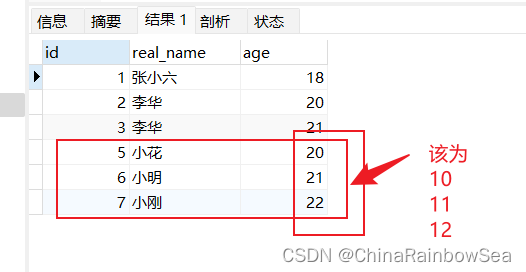
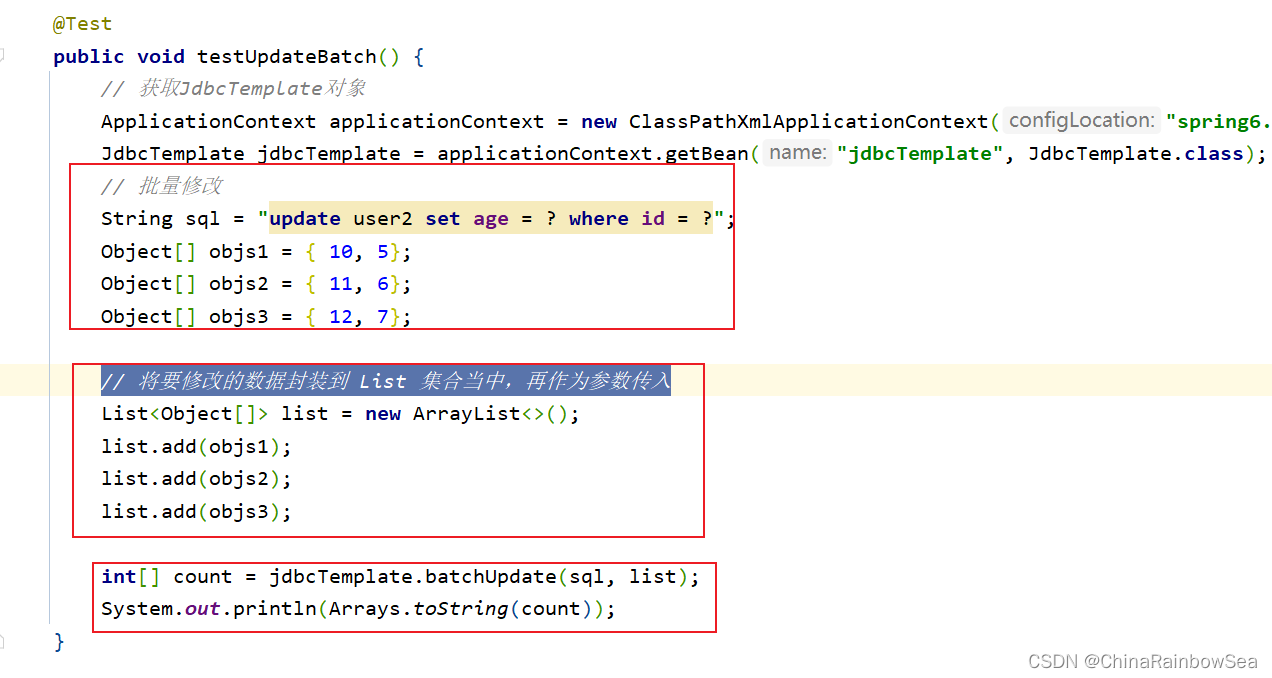
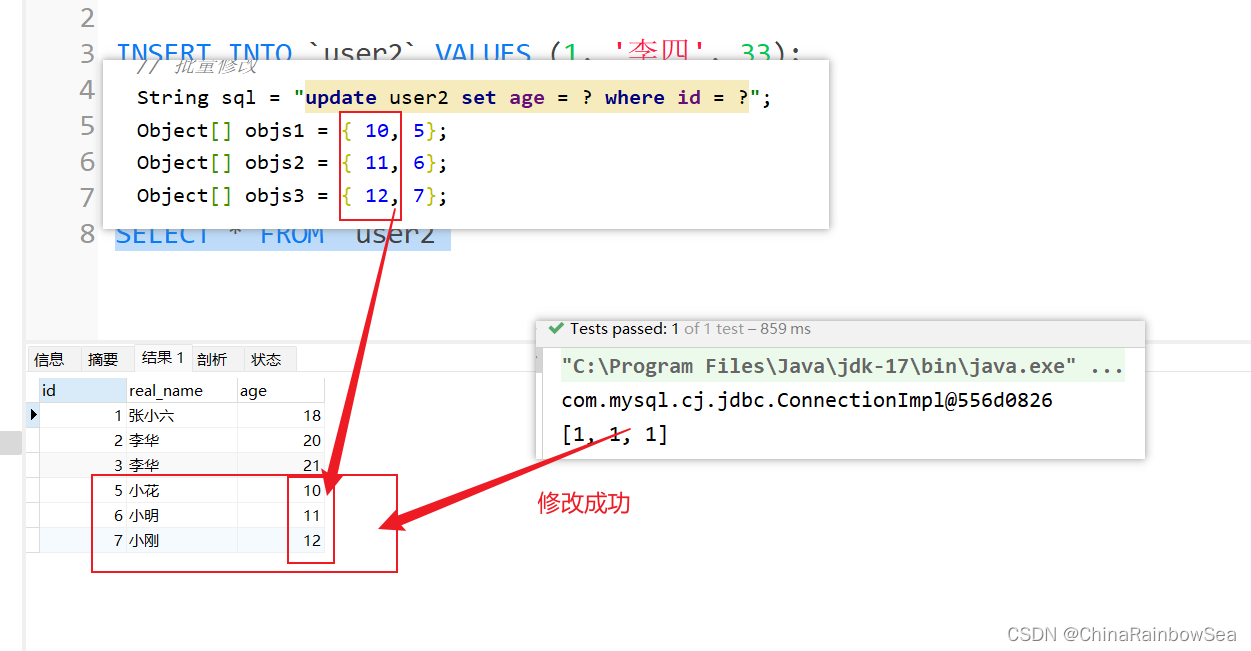
从数据表中批量修改数据还是使用:jdbctemplate.batchupdate() 方法。唯一不同的就是执行的sql语句不同而已。下面我们将id 为 5,6,7 的 age 改为 10,11,12
import com.rainbowsea.spring6.bean.user;
import org.junit.test;
import org.springframework.context.applicationcontext;
import org.springframework.context.support.classpathxmlapplicationcontext;
import org.springframework.jdbc.core.beanpropertyrowmapper;
import org.springframework.jdbc.core.jdbctemplate;
import java.util.arraylist;
import java.util.arrays;
import java.util.list;
public class jdbctest {
    /**
     * 批量修改
     */
    @test
    public void testupdatebatch() {
        // 获取jdbctemplate对象
        applicationcontext applicationcontext = new classpathxmlapplicationcontext("spring6.xml");
        jdbctemplate jdbctemplate = applicationcontext.getbean("jdbctemplate", jdbctemplate.class);
        // 批量修改
        string sql = "update user2 set age = ? where id = ?";
        object[] objs1 = { 10, 5};
        object[] objs2 = { 11, 6};
        object[] objs3 = { 12, 7};
        // 将要修改的数据封装到 list 集合当中,再作为参数传入
        list<object[]> list = new arraylist<>();
        list.add(objs1);
        list.add(objs2);
        list.add(objs3);
        int[] count = jdbctemplate.batchupdate(sql, list);
        system.out.println(arrays.tostring(count));
    }
}
4.9 从数据表中批量删除数据
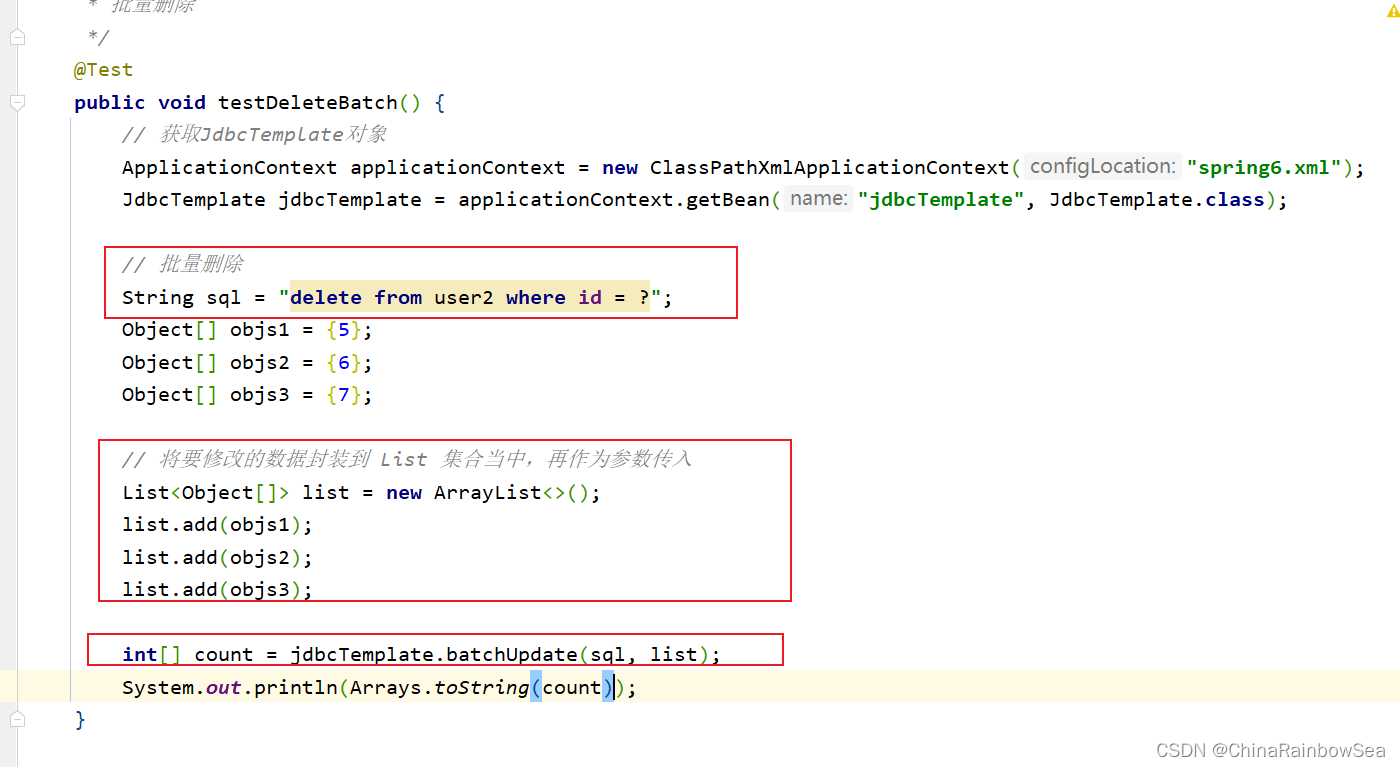
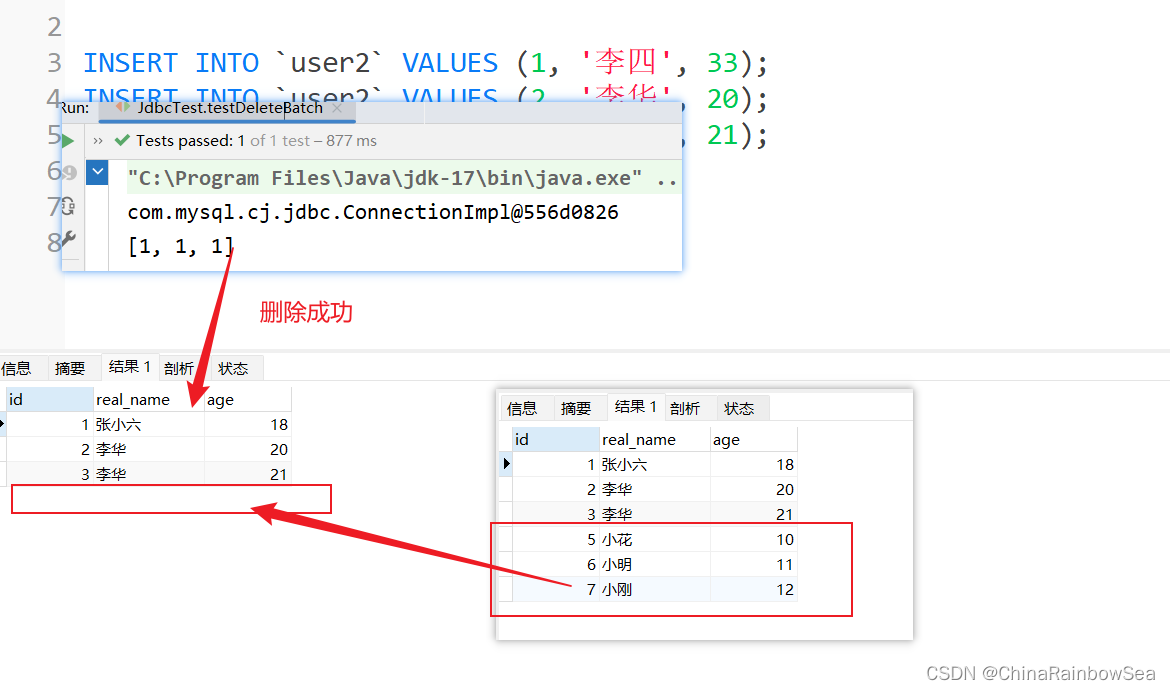
从数据表中批量删除数据还是使用:jdbctemplate.batchupdate() 方法。唯一不同的就是执行的sql语句不同而已。下面我们将user 数据表中的 id 为 5,6,7 的记录删除了。
import com.rainbowsea.spring6.bean.user;
import org.junit.test;
import org.springframework.context.applicationcontext;
import org.springframework.context.support.classpathxmlapplicationcontext;
import org.springframework.jdbc.core.beanpropertyrowmapper;
import org.springframework.jdbc.core.jdbctemplate;
import java.util.arraylist;
import java.util.arrays;
import java.util.list;
public class jdbctest {
    /**
     * 批量删除
     */
    @test
    public void testdeletebatch() {
        // 获取jdbctemplate对象
        applicationcontext applicationcontext = new classpathxmlapplicationcontext("spring6.xml");
        jdbctemplate jdbctemplate = applicationcontext.getbean("jdbctemplate", jdbctemplate.class);
        // 批量删除
        string sql = "delete from user2 where id = ?";
        object[] objs1 = {5};
        object[] objs2 = {6};
        object[] objs3 = {7};
        // 将要修改的数据封装到 list 集合当中,再作为参数传入
        list<object[]> list = new arraylist<>();
        list.add(objs1);
        list.add(objs2);
        list.add(objs3);
        int[] count = jdbctemplate.batchupdate(sql, list);
        system.out.println(arrays.tostring(count));
    }
}
4.10 jdbctemplate 使用回调函数
使用回调函数,可以参与的更加细节:例如:如果你想写jdbc代码,可以使用callback回调函数
想要执行回调函数,用使用上 jdbctemplate.execute() 方法,

第一个参数是:string sql 要执行的sql语句第二个参数是:preparedstatementcallback action ,是个接口,我们要传其实例化对象,

preparedstatementcallback,一般我们通常是使用 lambda 表达式 ,简化代码。

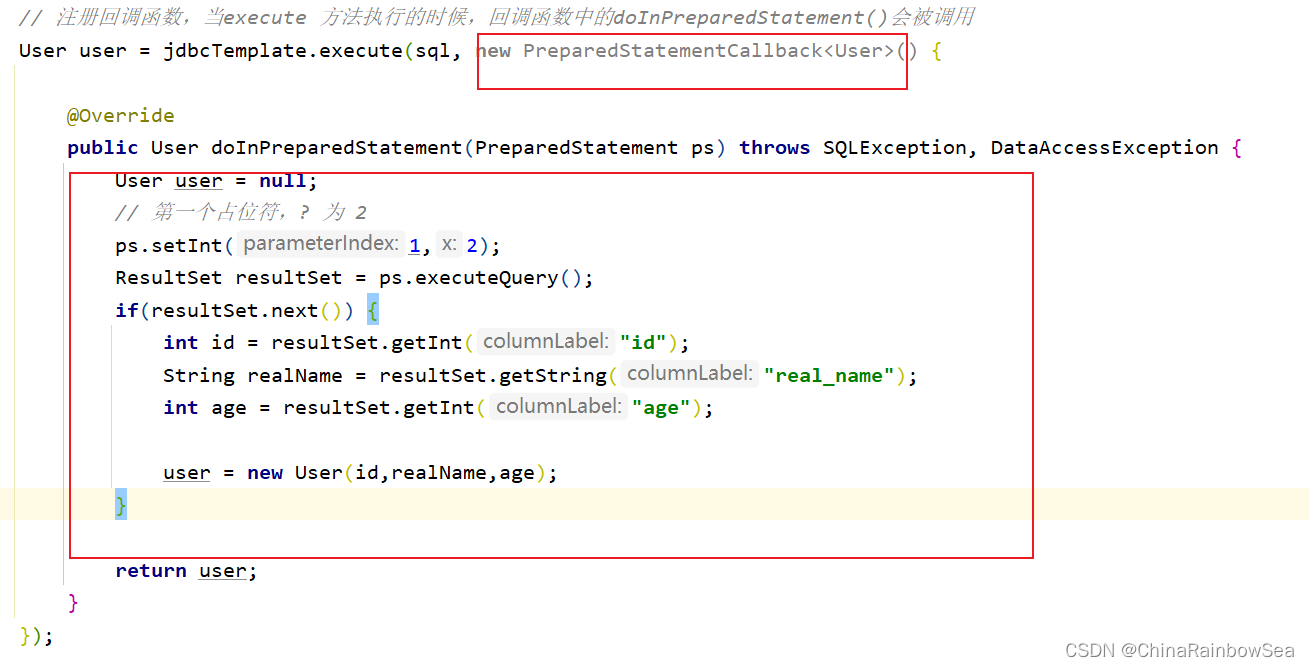
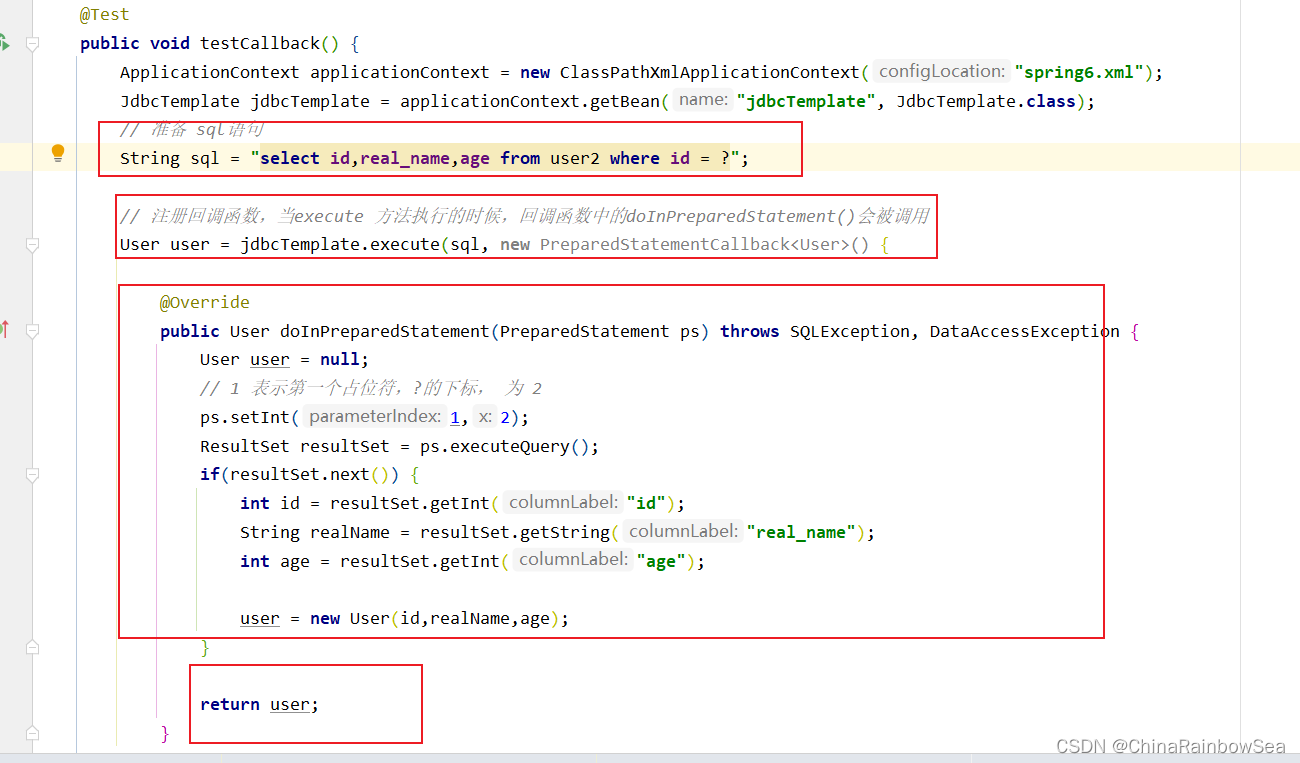
需要注意的是:注册回调函数,当execute 方法执行的时候,回调函数中的doinpreparedstatement()会被调用
返回值:就是这里运用的泛型,返回值,就是你传的 t.class 的 bean 对象。
这里我们使用回调函数,查询 user 数据表中 id 为 2的 用户的,id, real_name,age 的记录信息
import com.rainbowsea.spring6.bean.user;
import org.junit.test;
import org.springframework.context.applicationcontext;
import org.springframework.context.support.classpathxmlapplicationcontext;
import org.springframework.dao.dataaccessexception;
import org.springframework.jdbc.core.beanpropertyrowmapper;
import org.springframework.jdbc.core.jdbctemplate;
import org.springframework.jdbc.core.preparedstatementcallback;
import java.sql.preparedstatement;
import java.sql.resultset;
import java.sql.sqlexception;
import java.util.arraylist;
import java.util.arrays;
import java.util.list;
public class jdbctest {
/**
* 回调函数
* 如果你想写jdbc代码,可以使用callback回调函数
*/
@test
public void testcallback() {
applicationcontext applicationcontext = new classpathxmlapplicationcontext("spring6.xml");
jdbctemplate jdbctemplate = applicationcontext.getbean("jdbctemplate", jdbctemplate.class);
// 准备 sql语句
string sql = "select id,real_name,age from user2 where id = ?";
// 注册回调函数,当execute 方法执行的时候,回调函数中的doinpreparedstatement()会被调用
user user = jdbctemplate.execute(sql, new preparedstatementcallback<user>() {
@override
public user doinpreparedstatement(preparedstatement ps) throws sqlexception, dataaccessexception {
user user = null;
// 1 表示第一个占位符,?的下标, 为 2
ps.setint(1,2);
resultset resultset = ps.executequery();
if(resultset.next()) {
int id = resultset.getint("id");
string realname = resultset.getstring("real_name");
int age = resultset.getint("age");
user = new user(id,realname,age);
}
return user;
}
});
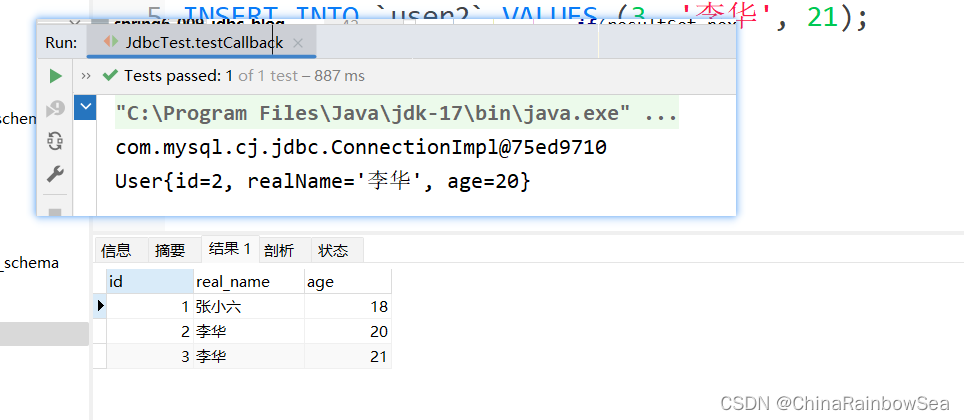
system.out.println(user);
}
}
4.11 jdbctemplate 配合使用上德鲁伊连接池
上面演示的是用我们自己写的数据源。这里我们其实也是可以使用别人写好的。例如比较牛的德鲁伊连接池。
第一步:引入德鲁伊连接池的依赖。(毕竟是别人写的,我需要导入,才能使用),使用 maven 导入。
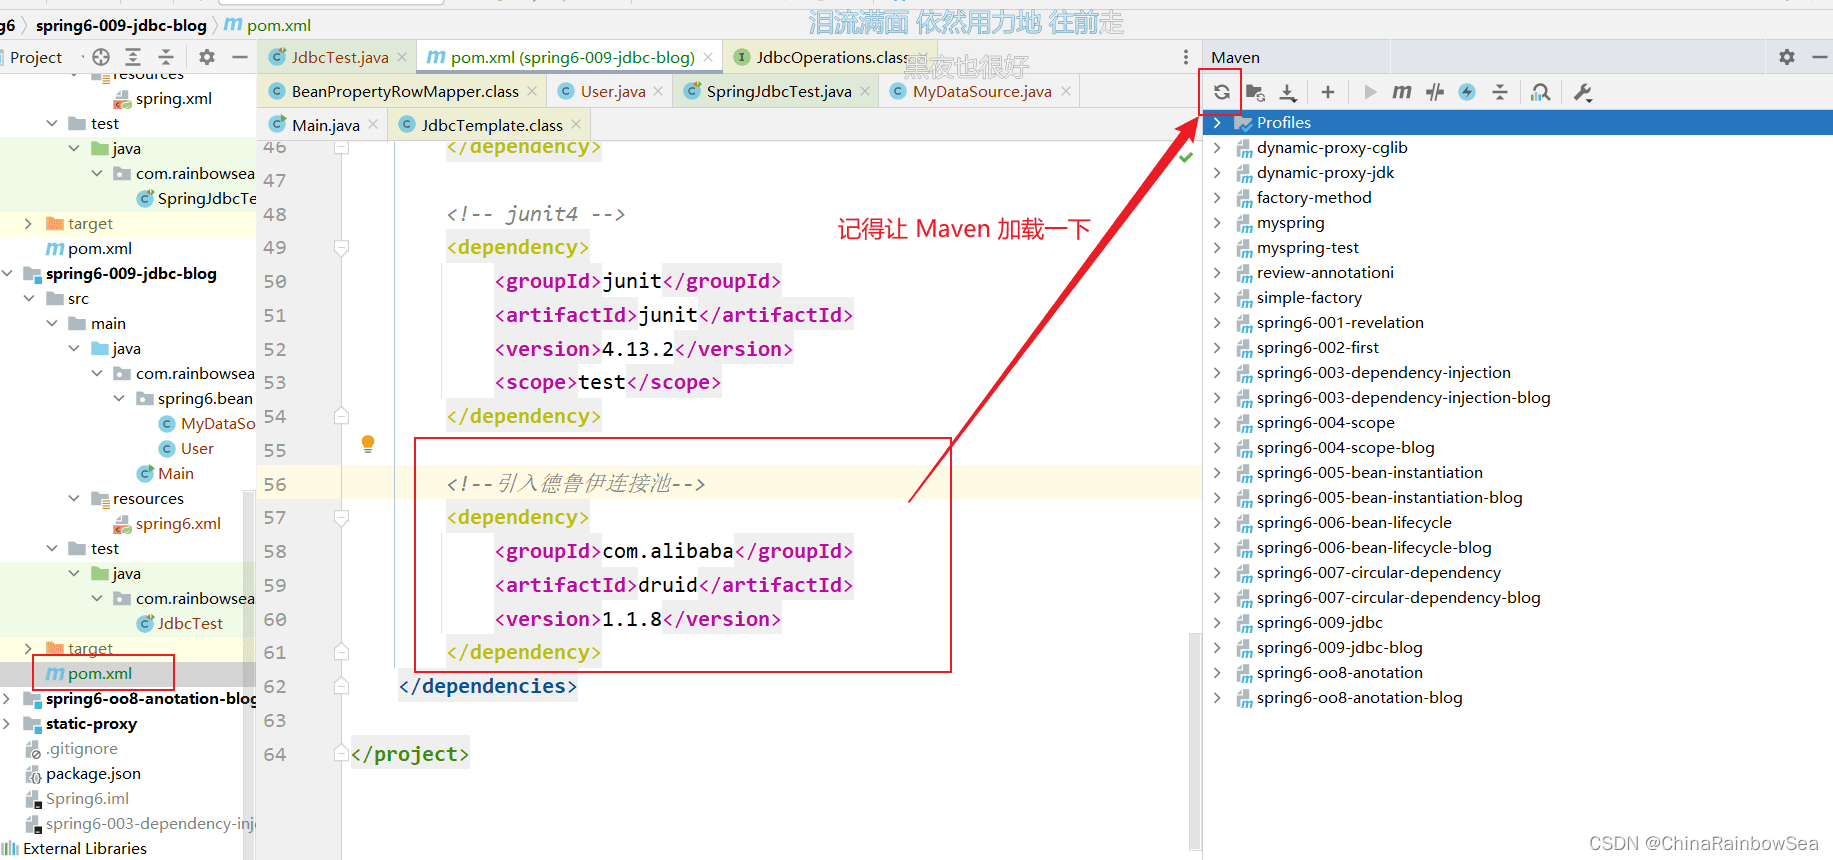
<!--引入德鲁伊连接池-->
        <dependency>
            <groupid>com.alibaba</groupid>
            <artifactid>druid</artifactid>
            <version>1.1.8</version>
        </dependency>
第二步:将德鲁伊中的数据源配置到 spring.xml 配置文件中。和配置我们自己写的一样。就是一些:对应数据库的注册驱动,指明数据库的所在位置,以及连接数据库的账号和密码。
需要特别注意的是:注意这里是:driverclassname,是简单类型进行set注入对属性赋值,简单类型可以用 value
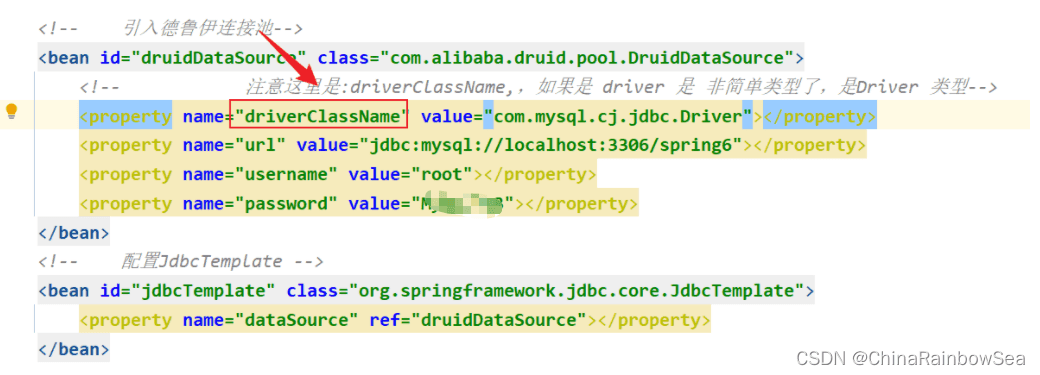
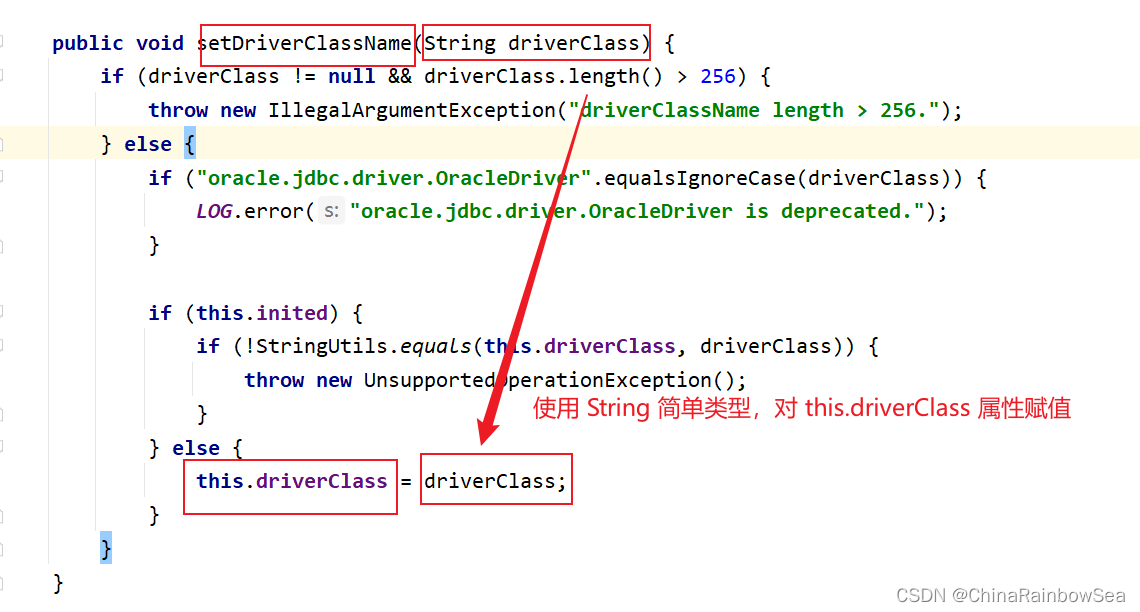
而如果是使用:driver,用 ref了

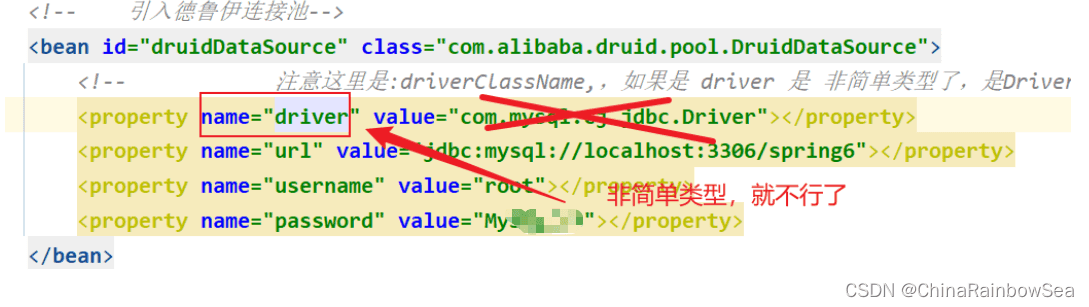
这里我们用:driverclassname,进行简单类型的set 注入,对 this.driver 成员变量的属性赋值。

<?xml version="1.0" encoding="utf-8"?>
<beans xmlns="http://www.springframework.org/schema/beans"
       xmlns:xsi="http://www.w3.org/2001/xmlschema-instance"
       xsi:schemalocation="http://www.springframework.org/schema/beans http://www.springframework.org/schema/beans/spring-beans.xsd">
    <!--    引入德鲁伊连接池-->
    <bean id="druiddatasource" class="com.alibaba.druid.pool.druiddatasource">
        <!--            注意这里是:driverclassname,,如果是 driver 是 非简单类型了,是driver 类型-->
        <property name="driverclassname" value="com.mysql.cj.jdbc.driver"></property>
        <property name="url" value="jdbc:mysql://localhost:3306/spring6"></property>
        <property name="username" value="root"></property>
        <property name="password" value="123"></property>
    </bean>
    <!--    配置jdbctemplate -->
    <bean id="jdbctemplate" class="org.springframework.jdbc.core.jdbctemplate">
        <property name="datasource" ref="druiddatasource"></property>
    </bean>
</beans>
下面,我们测试,使用德鲁伊数据库连接池,进行对数据库的查询:
查询id 为1的一条记录。

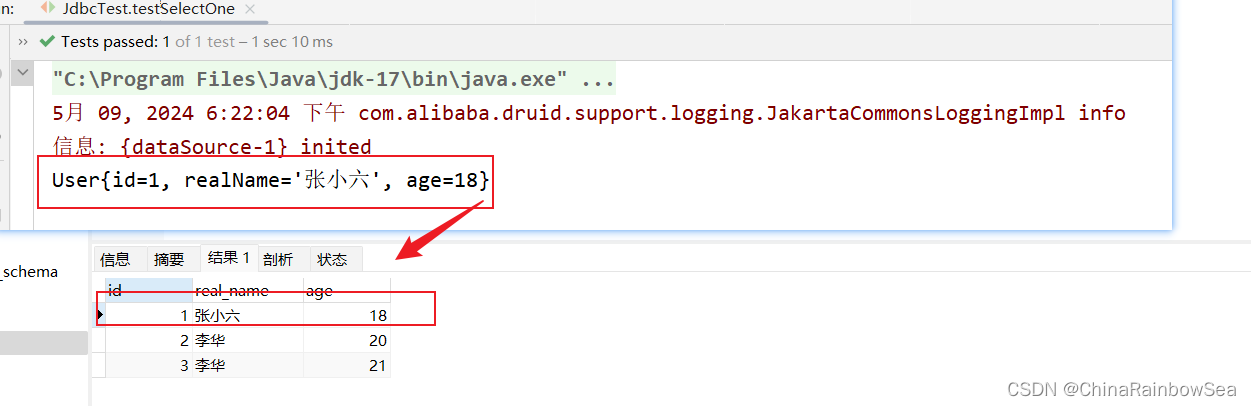
查询成功。
我们再使用德鲁伊进行多个数据的查询。同样也是没有问题的。
5. 总结:
- jdbctemplate 是spring 提供的一个jdbc模板类,是对jdbc的封装,简化jdbc代码,当然,你也可以不用,可以让spring集成其它的orm框架,例如:mybatis,hibernate 等。
- 使用jdbctemplate 需要导入的如下 jar依赖
 spring context 依赖 (spring6 的依赖)
 mysql-connector-java(关于mysql驱动的依赖,因为我们要连接数据库,这里我们连接的是mysql数据库)
 spring-jdbc (spring jdbc,这个依赖中有jdbctemplate)
 junit (junit4 单元测试依赖)
- 在spring当中的jdbctemplate,对于数据库上的增删改,执行sql语句都是使用
update()的方法处理的。 - 关于查询一条记录,使用 jdbctemplate.queryforobject() 方法:
- 查询数据表中的多个对象,我们就要使用:jdbctemplate.query() 方法了
- 查询数据表当中有几条记录,对应查询数据表中的一个值的内容,我们同样还是使用:jdbctemplate.queryforobject() 方法来进行。不同的是,这个参数是两个的,是对应的类对象。需要注意的第二个参数,使用的是:对应返回类型的 t.class 类
- 使用回调函数,可以参与的更加细节:例如:如果你想写jdbc代码,可以使用callback回调函数
- 想要执行回调函数,用使用上 jdbctemplate.execute() 方法, 需要注意的是:注册回调函数,当execute 方法执行的时候,回调函数中的doinpreparedstatement()会被调用
- 对于数据表中的批量添加删除修改数据,我们这里需要用上:jdbctemplate.batchupdate() 方法
6. 最后:
到此这篇关于spring6 的jdbctemplate的jdbc模板类的详细使用说明的文章就介绍到这了,更多相关spring6 jdbctemplate的jdbc模板类内容请搜索代码网以前的文章或继续浏览下面的相关文章希望大家以后多多支持代码网!


发表评论