
 我要评论
我要评论一、模式注解
stereotype annotation俗称为模式注解,spring中常见的模式注解有@service,@repository,@controller等,它们都“派生”自@component注解。我们都知道,凡是被@component标注的类都会被spring扫描并纳入到ioc容器中,那么由@component派生的注解所标注的类也会被扫描到ioc容器中。
下面我们主要通过自定义模式注解来了解@component的“派生性”和“层次性”。
1.1 @component “派生性”
新建一个spring boot工程,spring boot版本为2.3.3.release,artifactid为autoconfig,并引入spring-boot-starter-web依赖。
项目结构如下所示:
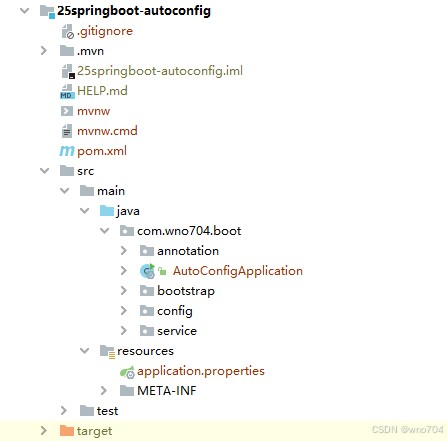
在com.wno704.boot下新建annotation包,然后创建一个firstlevelservice注解:
@target({elementtype.type})
@retention(retentionpolicy.runtime)
@documented
@service
public @interface firstlevelservice {
    string value() default "";
}
这个注解定义由@service标注,查看@service的源码会发现其被@component注解标注,所以它们的层次关系为:
└─@component
   └─@service
      └─@firstlevelservice
即@firstlevelservice为@component派生出来的模式注解,我们来测试一下被它标注的类是否能够被扫描到ioc容器中:
在com.wno704.boot下新建service包,然后创建一个testservice类:
@firstlevelservice
public class testservice {
}
在com.wno704.boot下新建bootstrap包,然后创建一个servicebootstrap类,用于测试注册testservice并从ioc容器中获取它:
@componentscan("com.wno704.boot.service")
public class servicebootstrap {
    public static void main(string[] args) {
        configurableapplicationcontext context = new springapplicationbuilder(servicebootstrap.class)
                .web(webapplicationtype.none)
                .run(args);
        testservice testservice = context.getbean("testservice", testservice.class);
        system.out.println("testservice bean: " + testservice);
        context.close();
    }
}
运行该类的main方法,控制台输出如下:
testservice bean: com.wno704.boot.service.testservice@38ea9fcf
1.2 @component “层次性”
我们在com.example.demo.annotation路径下再创建一个secondlevelservice注解定义,该注解由上面的@firstlevelservice标注:
@target({elementtype.type})
@retention(retentionpolicy.runtime)
@documented
@firstlevelservice
public @interface secondlevelservice {
    string value() default "";
}
我们将testservice上的注解换成@secondlevelservice,然后再次运行servicebootstrap的main方法,输出如下:
testservice bean: com.wno704.boot.service.testservice@42d1d771
可见结果也是成功的。
注意:这里有一点需要注意的是:@component注解只包含一个value属性定义,所以其“派生”的注解也只能包含一个value属性定义。
二、@enable模块驱动
@enable模块驱动在spring framework 3.1后开始支持。这里的模块通俗的来说就是一些为了实现某个功能的组件的集合。通过@enable模块驱动,我们可以开启相应的模块功能。
@enable模块驱动可以分为“注解驱动”和“接口编程”两种实现方式,下面逐一进行演示:
2.1 注解驱动
spring中,基于注解驱动的示例可以查看@enablewebmvc源码:
@retention(retentionpolicy.runtime)
@target(elementtype.type)
@documented
@import(delegatingwebmvcconfiguration.class)
public @interface enablewebmvc {
}
该注解通过@import导入一个配置类delegatingwebmvcconfiguration:
@configuration(proxybeanmethods = false)
public class delegatingwebmvcconfiguration extends webmvcconfigurationsupport {
	private final webmvcconfigurercomposite configurers = new webmvcconfigurercomposite();
···
}
该配置类又继承自webmvcconfigurationsupport,里面定义了一些bean的声明。
注意:所以,基于注解驱动的@enable模块驱动其实就是通过@import来导入一个配置类,以此实现相应模块的组件注册,当这些组件注册到ioc容器中,这个模块对应的功能也就可以使用了。
我们来定义一个基于注解驱动的@enable模块驱动。
在com.example.demo下新建configuration包,然后创建一个helloworldconfiguration配置类:
@configuration
public class helloworldconfiguration {
    @bean
    public string hello() {
        return "hello world";
    }
}
这个配置类里定义了一个名为hello的bean,内容为hello world。
在com.wno704.boot.annotation下创建一个enablehelloworld注解定义:
@target({elementtype.type})
@retention(retentionpolicy.runtime)
@documented
@import(helloworldconfiguration.class)
public @interface enablehelloworld {
}
我们在该注解类上通过@import导入了刚刚创建的配置类。
接着在com.example.demo.bootstrap下创建一个testenablebootstap启动类来测试@enablehelloworld注解是否生效:
@enablehelloworld
public class testenablebootstap {
    public static void main(string[] args) {
        configurableapplicationcontext context = new springapplicationbuilder(testenablebootstap.class)
                .web(webapplicationtype.none)
                .run(args);
        string hello = context.getbean("hello", string.class);
        system.out.println("hello bean: " + hello);
        context.close();
    }
}
运行该类的main方法,控制台输出如下:
hello bean: hello world
说明我们自定义的基于注解驱动的@enablehelloworld是可行的。
2.2 接口编程
除了使用上面这个方式外,我们还可以通过接口编程的方式来实现@enable模块驱动。spring中,基于接口编程方式的有@enablecaching注解,查看其源码:
@target({elementtype.type})
@retention(retentionpolicy.runtime)
@documented
@import({cachingconfigurationselector.class})
public @interface enablecaching {
    boolean proxytargetclass() default false;

    advicemode mode() default advicemode.proxy;

    int order() default 2147483647;
}
enablecaching注解通过@import导入了cachingconfigurationselector类,该类间接实现了importselector接口,在 深入学习spring组件注册 中,我们曾介绍了可以通过importselector来实现组件注册。
注意:所以通过接口编程实现@enable模块驱动的本质是:通过@import来导入接口importselector实现类,该实现类里可以定义需要注册到ioc容器中的组件,以此实现相应模块对应组件的注册。
接下来我们根据这个思路来自个实现一遍:
在com.wno704.boot下新建selector包,然后在该路径下新建一个helloworldimportselector实现importselector接口:
public class helloworldimportselector implements importselector {
    @override
    public string[] selectimports(annotationmetadata importingclassmetadata) {
        return new string[]{helloworldconfiguration.class.getname()};
    }

    @override
    public predicate<string> getexclusionfilter() {
        return null;
    }
}
接着我们修改enablehelloworld:
@target({elementtype.type})
@retention(retentionpolicy.runtime)
@documented
@import(helloworldimportselector.class)
public @interface enablehelloworld {
}
上面导入的是helloworldimportselector,而非helloworldconfiguration。
再次运行testenablebootstap的main方法,你会发现输出是一样的。
2.3 自动装配
spring boot中的自动装配技术底层主要用到了下面这些技术:
- spring 模式注解装配
- spring @enable 模块装配
- spring 条件装配装
- spring 工厂加载机制
spring 工厂加载机制的实现类为springfactoriesloader,查看其源码:

该类的方法会读取meta-inf目录下的spring.factories配置文件
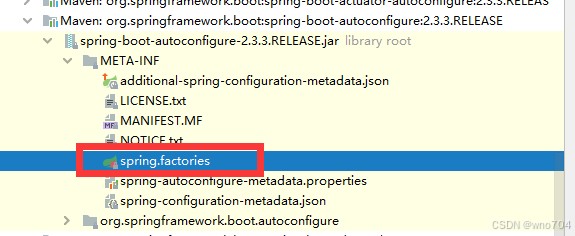
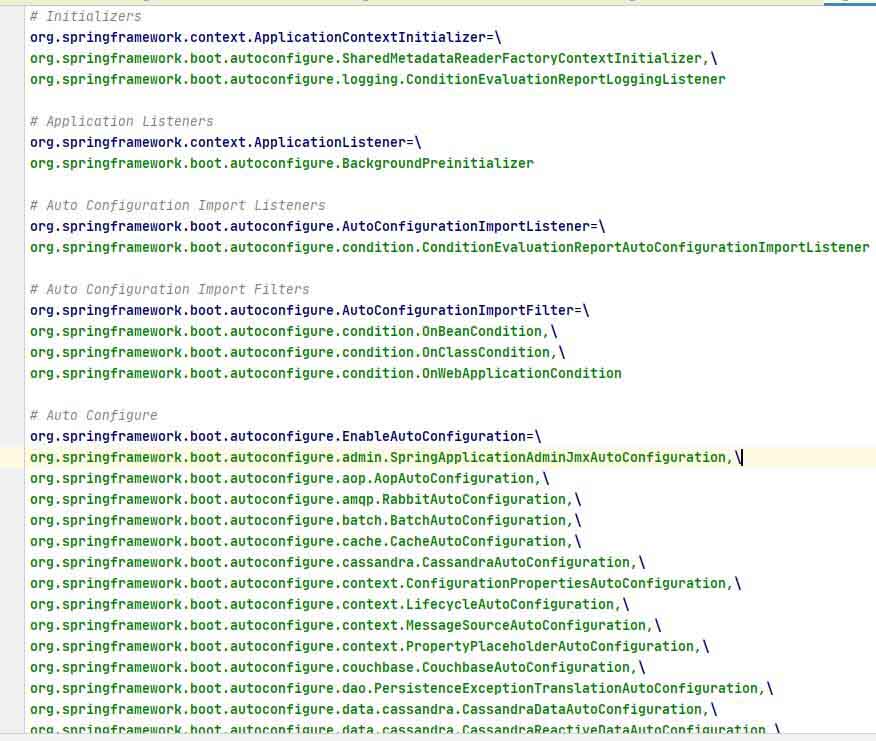
当启动类被@enableautoconfiguration标注后,上面截图中的所有类spring都会去扫描,看是否可以纳入到ioc容器中进行管理。
比如我们查看org.springframework.boot.autoconfigure.data.redis.redisautoconfiguration的源码:
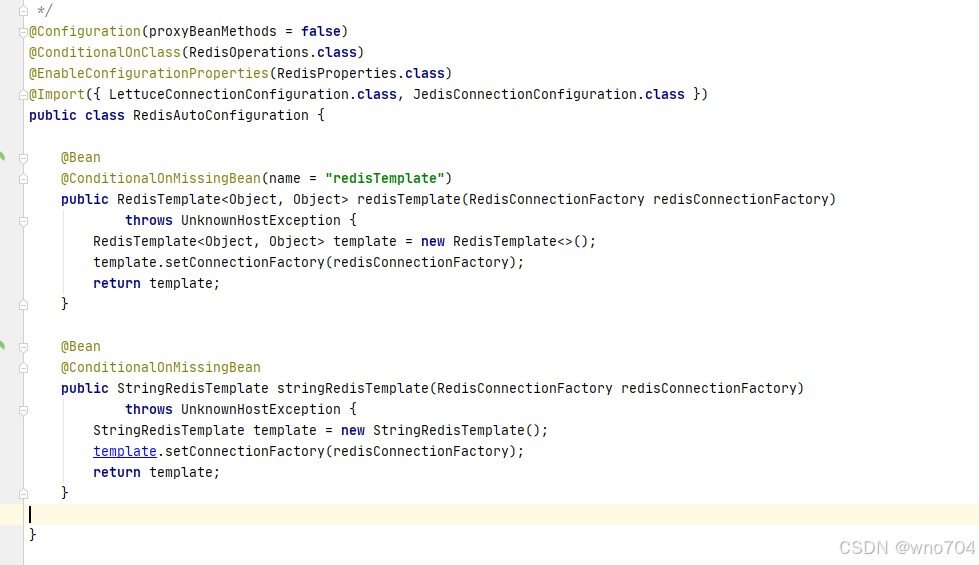
可看到该类上标注了一些注解,其中@configuration为模式注解,@enableconfigurationproperties为模块装配技术,conditionalonclass为条件装配技术。这和我们上面列出的spring boot自动装配底层主要技术一致,所以我们可以根据这个思路来自定义一个自动装配实现。
新建一个配置类helloworldautoconfiguration:
@configuration
@enablehelloworld
@conditionalonproperty(name = "helloworld", havingvalue = "true")
public class helloworldautoconfiguration {
}
然后在resources目录下新建meta-inf目录,并创建spring.factories文件:
# auto configure
org.springframework.boot.autoconfigure.enableautoconfiguration=com.wno704.boot.config.helloworldautoconfiguration
接着在配置文件application.yml中添加helloworld: true配置
helloworld: true
最后创建enableautoconfigurationbootstrap,测试下helloworldautoconfiguration是否生效:
@enableautoconfiguration
public class enableautoconfigurationbootstrap {
    public static void main(string[] args) {
        configurableapplicationcontext context = new springapplicationbuilder(enableautoconfigurationbootstrap.class)
                .web(webapplicationtype.none)
                .run(args);
        string hello = context.getbean("hello", string.class);
        system.out.println("hello bean: " + hello);
        context.close();
    }
}
运行该main方法,控制台输出如下:
hello bean: hello world
说明我们自定义的自动装配已经成功了。
下面简要分析下代码的运行逻辑:
1.spring 的工厂加载机制会自动读取meta-inf目录下spring.factories文件内容;
2.我们在spring.factories定义了:
org.springframework.boot.autoconfigure.enableautoconfiguration=com.example.demo.configuration.helloworldautoconfiguration
3.我们在测试类上使用了@enableautoconfiguration注解标注,那么helloworldautoconfiguration就会被spring扫描,看是否符合要求,如果符合则纳入到ioc容器中;
helloworldautoconfiguration上的@conditionalonproperty的注解作用为:当配置文件中配置了helloworld=true(我们确实添加了这个配置,所以符合要求)则这个类符合扫描规则;
@enablehelloworld注解是我们前面例子中自定义的模块驱动注解,其引入了hello这个bean,所以ioc容器中便会存在hello这个bean了;
4.通过上面的步骤,我们就可以通过上下文获取到hello这个bean了。
总结
以上为个人经验,希望能给大家一个参考,也希望大家多多支持代码网。

发表评论