
 我要评论
我要评论本文将详细介绍spring bean配置的六种不同方式的特点与使用条件。
一、spring 的配置文件概述
其实,spring的配置文件是spring容器对bean进行生产以及关系注入的图纸,他是spring的基础。如果我们没有配置文件的话,则spring的容器将无从谈起。
spring 的配置文件是用于指导 spring 工厂进行 bean 的生产、依赖关系注入及 bean 实例分发的“图纸”, j2ee 程序员必须学会并灵活应用这份“图纸”,准确地表达自己的“生产意图”。它是一个或多个标准的xml文档,其applicationcontext.xml是spring的默认配置文件,当容器启动时找不到其他的配置文件时,则会尝试加载这个默认的配置文件。
spring容器成功启动需要以下三方面的条件同时具备:
- spring的类包必须已经放在spring的类容器下面
- 应用程序应当为spring提供完备的bean的配置信息
- bean的类都已经放在spring的类容器下面
spring启动时读取应用程序提供的bean的配置信息,并在spring容器中生成一份相应的bean的配置注册表,然后根据这张注册表来实例化bean,装配好bean之间的依赖关系,为上层应用提供准备就绪的运行环境。而bean的配置信息就是bean的元数据信息,他由以下五个方面来组成:spring
- bean的实现类
- bean的属性信息 比如:数据源的连接数,用户名和密码等等。
- bean的依赖关系 spring根据依赖关系配置完成bean之间的装配
- bean的行为配置 比如:生命周期范围以及生命周期各个过程的回调函数等
- bean的创建方式定义 主要说明是通过构造器还是工厂方法来构造bean
接下来是他们之间的相互关系:
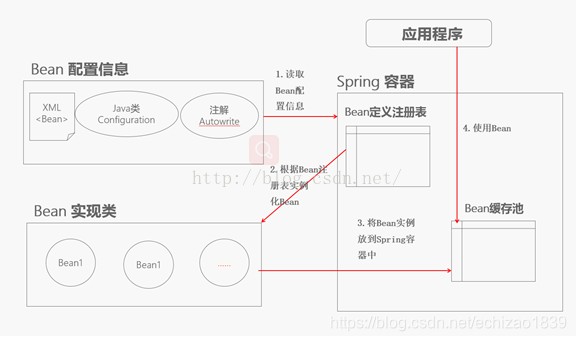
有时,一个项目中可能存在多个配置文件,那么spring项目加载多个配置文件的方法:
- 在配置文件中使用import来导入所需的配置文件。
- 将多个配置文件构造为一个数组,然后传递给applicationcontext实现加载多个配置文件。
这两种方式都是通过调用beandefinitionreader来读取定义文件的,在内部实现上没有任何的区别。
在大型的spring项目当中,所有的bean配置在一个配置文件当中很不容易管理且也不利于团队的开发。通常在开发过程当中,我们会按照功能模块和开发人员来将配置文件分成多个。这样会有利与模块的划分。接下来我们需要使用import属性来引入多个配置文件到项目当中。
假如我们的项目需要用到多个配置文件,且配置文件位于不同的文件夹下,比如:
- spring-common.xml位于common文件夹下
- spring-connection.xml位于connection文件夹下
- spring-module.xml位于module文件夹下
传统加载方式:
applicationcontext context = new classpathxmlapplicationcontext(new string[]
    {"spring-common.xml","spring-connection.xml","spring-modulea.xml"});
但是这种方法不宜组织,且不宜维护。
则我们使用整合配置文件:spring-all-module.xml
<beans .....>
    <import resource="common/spring-common.xml"/>
    <import resource="connection/spring-connection.xml"/>
    <import resource="module/spring-module.xml"/>
</beans>
在文件当中使用import直接将其他的配置文件导入到这个文件当中就好了。
整合后加载方式:
applicationcontext context = new classpathxmlapplicationcontext(“spring-all-module.xml”);
可以看到配置文件是整个spring项目的灵魂,我们先来看一下spring配置文件的一般结构:
<beans>//bean定义的开始和结束
    <import  resource=“resource1.xml” />//导入其他配置文件bean的定义
    <import  resource=“resource2.xml” />
    <bean id=“bean1” class=“***”></bean>
    <bean name=“bean2” class=“***”></bean>
    <alias alias=“bean3” name=“bean2” />//alias用于定义bean的别名
</beans>
可以看到一个简单的spring配置文件就是这样。
其中:
import标签可以放在beans标签下的任何位置,没有顺序关系。
bean3和bean2是同一个bean,bean3是bean2的别名。
spring 的配置文件是基于xml格式的,spring1.0的配置文件采用dtd格式,spring2.0以后使用schema的格式,后者让不同类型的配置拥有了自己的命名空间,使配置文件更具有扩展性。
采取基于schema的配置格式,文件头的声明会复杂一些,请看一个简单示例:
<?xml version="1.0" encoding="utf-8" ?>
<beans
<!--标准命名空间-->
xmlns="http://www.springframework.org/schema/beans"
<!--xsi标准命名空间,用于指定自定义命名空间的schema文件-->
xmlns:xsi="http://www.w3.org/2001/xmlschema-instance"
<!—aop表示自定义命名空间,aop是该命名空间的简称,而后面是命名空间的全称。必须在xsi命名空间为其指定的命名空间对应的schema文件-->
    xmlns:aop="http://www.springframework.org/schema/aop"
<!—下面这四行代码,是为每个命名空间指定具体的schema文件-->
    xsi:schemalocation="
           http://www.springframework.org/schema/beans
    http://www.springframework.org/schema/beans/spring-beans-3.0.xsd
           http://www.springframework.org/schema/aop
           http://www.springframework.org/schema/context/spring-aop-3.0.xsd">
<!—默认命名空间的配置 -->
    <bean id = "app" class="cn.lovepi.app" />
<!—aop命名空间的配置 -->
    <aop:config>
        <aop:pointcut id="mycut" expression="execution(* cn.love*(..))"/>
    </aop:config>
</beans>
注:
xml schema:schema在文档根节点中通过xmlns对文档当中的命名空间进行命名。
我们在上面的代码中定义了三个命名空间,
- 首先我们定义了一个默认命名空间,他没有空间名,用于spring bean的定义。
- 接下来我们命名了一个xsi命名空间,这个命名空间用于为每个文档中命名空间指定相对应的schema的样式文件。是标准组织定义的标准命名空间。
- 我们还命名了一个aop的命名空间,这个命名空间是spring配置aop的命名空间,是用户自定义的命名空间。
命名空间的定义分为了两个步骤:
- 指定命名空间的名称,需要指定命名空间的缩类名和全名
- 指定命名空间的schema文档样式文件的位置,用空格或回车行来进行分割。
指定命名空间schema地址有两个用途:
- xml解析器可以获取schema文件,并对文档进行格式合法性验证
- 在开发环境下,ide可以用schema文件来对文档编辑器进行诱导功能。
spring3.0 的配置schema文件分布在各模块类包中,如果模块拥有对应的schema文件,则可以在模块类包中找到一个config目录,schema文件就位于该目录中,如下是对这些schema文件的用途进行了简单说明:
- 示例说明:spring-beans-3.0.xsd
- 命名空间:http://www.springframework.org/schema/beans
- schema 文件:http://www.springframework.org/schema/beans/spring-beans-3.0.xsd
可以看出在spring3.0当中,所有的schema文件的命名空间以及对应的位置都和beans这个schema文件是类似的。
那么接下来来了解以下spring当中其他schema文件的用途:
spring-beans-3.0.xsd:spring3.0最主要的配置文件,主要是用于配置bean
spring-aop-3.0.xsd:aop配置定义的schema
spring-tx-3.0.xsd:声明式事物配置定义的schema
spring-mvc-3.0.xsd:spring3.0当中新增的
spring-util-3.0.xsd:是为简化某些复杂的标准配置而提供的schema
spring-jee-3.0.xsd:是为简化j2ee中ejb等功能的配置而提供的schema
spring-jdbc-3.0.xsd:为spring内接数据库而提供的schema,3.0新增
spring-jms-3.0.xsd:jms配置的schema
spring-lang-3.0.xsd:增加了对动态语言的支持,为集成动态语言而定义
spring-oxm-3.0.xsd:配置对象xml映射到schema,3.0新增
spring-task-3.0.xsd:任务调度的schema
spring-tool-3.0.xsd:为集成schema一些有用工具而提供的schema
二、spring配置bean的集中方式
- 基于xml的配置方式
- 基于注解的配置方式
- 基于java类的配置方式
1、基于xml的配置方式,以及各参数的含义
<?xml version="1.0" encoding="utf-8"?>
<!--suppress all -->
<beans xmlns="http://www.springframework.org/schema/beans"
       xmlns:xsi="http://www.w3.org/2001/xmlschema-instance"
       xsi:schemalocation="
		http://www.springframework.org/schema/beans http://www.springframework.org/schema/beans/spring-beans-3.2.xsd
	">
    <!--
        使用无参构造器来创建对象。
        id属性:要求唯一 。
        class属性:要写类的完整的名称。
     -->
    <bean id="a1" class="first.apple"/>
    <bean id="date1" class="java.util.date"/>
    <!--
        使用静态工厂方法来创建对象。
        factory-method属性:用来指定静态方法名。
        注:
            spring容器会调用该类的静态方法来创建
            一个对象。
     -->
    <bean id="cal1" class="java.util.calendar" factory-method="getinstance"/>
    <!--
        使用实例工厂方法来创建对象:
        factory-bean属性:指定要调用的bean的id,
        factory-method属性:指定要调用的实例方法。
        注:
            spring容器会调用该bean的实例方法来
            创建对象。
            在spring框架里面,所谓的bean指的是由
            spring容器管理的对象。
     -->
    <bean id="date2" factory-bean="cal1" factory-method="gettime"/>
</beans>
<?xml version="1.0" encoding="utf-8"?>
<!--suppress all -->
<beans xmlns="http://www.springframework.org/schema/beans"
xmlns:xsi="http://www.w3.org/2001/xmlschema-instance"
xmlns:context="http://www.springframework.org/schema/context"
xmlns:jee="http://www.springframework.org/schema/jee"
xmlns:aop="http://www.springframework.org/schema/aop"
xmlns:mvc="http://www.springframework.org/schema/mvc"
xmlns:util="http://www.springframework.org/schema/util"
xsi:schemalocation="
http://www.springframework.org/schema/beans http://www.springframework.org/schema/beans/spring-beans-3.2.xsd
http://www.springframework.org/schema/context http://www.springframework.org/schema/context/spring-context-3.2.xsd
http://www.springframework.org/schema/jee http://www.springframework.org/schema/jee/spring-jee-3.2.xsd
http://www.springframework.org/schema/aop http://www.springframework.org/schema/aop/spring-aop-3.2.xsd
http://www.springframework.org/schema/mvc http://www.springframework.org/schema/mvc/spring-mvc-3.2.xsd
http://www.springframework.org/schema/util http://www.springframework.org/schema/util/spring-util-3.2.xsd">
<!--
scope属性:用来指定bean的作用域。
缺省值是"singleton"(单例),如果值为
"prototype"(原型),则创建多个实例。
-->
<bean id="sb1" class="basic.scopebean" scope="prototype"/>
<!--
init-method属性:用来指定初始化方法。
destroy-method属性:用来指定销毁方法。
注:
spring容器关闭之前,会删除它所管理的
bean,在删除bean之前,会调用destroy
方法。
销毁方法只针对作用域为singleton的bean。
-->
<bean id="mb1" class="basic.messagebean"
init-method="init"
destroy-method="destroy"
scope="singleton"/>
<!--
lazy-init属性:如果值为true,表示延迟加载。
即容器启动之后,不会立即创建该实例,只有等
到调用时(getbean)才创建。
-->
<bean id="lb1" class="basic.lazybean"
lazy-init="true"/>
</beans>2、基于xml的参数注入的方式
<?xml version="1.0" encoding="utf-8"?>
<beans xmlns="http://www.springframework.org/schema/beans"
       xmlns:xsi="http://www.w3.org/2001/xmlschema-instance"
       xmlns:util="http://www.springframework.org/schema/util"
       xsi:schemalocation="
		http://www.springframework.org/schema/beans http://www.springframework.org/schema/beans/spring-beans-3.2.xsd
		http://www.springframework.org/schema/util http://www.springframework.org/schema/util/spring-util-3.2.xsd">
    <bean id="now" class="java.util.date"/>
    <!-- 通过set方式注入属性的值 -->
    <!-- 通过set方式注入属性的值 -->
    <!-- property节点用于配置属性的值 -->
    <bean id="user" class="cn.tedu.spring.user">
        <property name="name" value="mike"/>
        <property name="from" value="beijing"/>
        <property name="age" value="26"/>
        <property name="regtime" ref="now"/>
    </bean>
    <!-- 通过构造方法注入属性的值 -->
    <!-- constructor-arg节点用于配置构造方法的参数 -->
    <bean id="person" class="cn.tedu.spring.person">
        <constructor-arg index="0" value="shenzhen"/>
    </bean>
    <!-- 注入集合类型的值 -->
    <bean id="samplebean" class="cn.tedu.spring.samplebean">
        <!-- 注入list类型的值 -->
        <property name="names">
            <list>
                <value>tom</value>
                <value>kate</value>
                <value>mary</value>
                <value>david</value>
            </list>
        </property>
        <!-- 注入set类型的值 -->
        <property name="cities">
            <set>
                <value>hangzhou</value>
                <value>beijing</value>
                <value>shanghai</value>
                <value>guangzhou</value>
                <value>shenzhen</value>
            </set>
        </property>
        <!-- 注入map类型的值 -->
        <property name="session">
            <map>
                <entry key="uid" value="9527"/>
                <entry key="username" value="jack"/>
                <entry key="password" value="1234"/>
            </map>
        </property>
        <!-- 注入数组类型的值 -->
        <property name="numbers">
            <array>
                <value>7</value>
                <value>3</value>
                <value>9</value>
            </array>
        </property>
        <!-- 注入来自.properties中的配置 -->
        <property name="properties" ref="dbconfig"/>
    </bean>
    <!-- 读取.properties文件 -->
    <!-- classpath表示src/main/resources文件夹 -->
    <util:properties id="dbconfig" location="classpath:db.properties"/>
    <!-- 使用spring表达式 -->
    <bean id="valuebean" class="cn.tedu.spring.valuebean">
        <property name="username" value="#{user.name}"/>
        <property name="realname" value="#{samplebean.names[1]}"/>
        <property name="password" value="#{samplebean.session['password']}"/>
    </bean>
</beans>
3、基于注解的配置方式,以及各参数的含义
1) 首先在spring配置文件中开启注解扫描
<?xml version="1.0" encoding="utf-8"?>
<!--suppress all -->
<beans xmlns="http://www.springframework.org/schema/beans"
       xmlns:xsi="http://www.w3.org/2001/xmlschema-instance"
       xmlns:context="http://www.springframework.org/schema/context"
       xsi:schemalocation="
		http://www.springframework.org/schema/beans http://www.springframework.org/schema/beans/spring-beans-3.2.xsd
		http://www.springframework.org/schema/context http://www.springframework.org/schema/context/spring-context-3.2.xsd">
    <!-- 组件扫描 -->
    <!-- base-package:根包 -->
    <!-- resource-pattern:正则匹配 -->
    <context:component-scan base-package="cn.tedu.spring" resource-pattern="anno/*.class"/>
</beans>
spring2.0开始引入基于注解的配置方式,即bean的定义信息可以通过在bean的实现类上标注注解实现。
@component是spring容器中的基本注解,表示容器中的一个组件(bean),可以作用在任何层次,下面的示例介绍该注解的使用方法。
注解配置示例
@component("userdao")
public class userdao{......}
他等效于xml配置
<bean id="userdao" class="cn.lovepi.***.userdao"/>
此外,还有一些其他的可以被用来注解bean的注解,这些可以让注解类本身的用途更加清晰,此外,特定的注解也具备特定的功能。
spring在2.5后提供了一个context的命名空间,它提供了通过扫描类包来加载利用注解定义的bean的方式。
在context中可以使用resource-pattern来过滤出特定的类。
<context:component-scan base-package="cn.lovepi.spring" resource-pattern="anno/*.class"/>
默认情况下加载的是package下的*.class即扫描全部类,在使用了resource-pattern之后,则只扫描package下的anno子包下的所有类。
不过使用resource-pattern并不能提供给我们完善的功能,所有我们得使用过滤子元素的方法。
<context:component-scan base-package="cn.lovepi.spring">
   <context:include-filter type="regex" expression="cn.lovepi.spring.*"/>
   <context:exclude-filter type="aspectj" expression="cn.lovepi..*controller+"/>
</context:component-scan>
其中:
- include-filter表示要包含的目标类,
- exclude-filter表示要排除在外的目标类
- 一个component-scan标签下可以有多个include-filter和exclude-filter,
过滤表达式所支持的类型如下表所示:
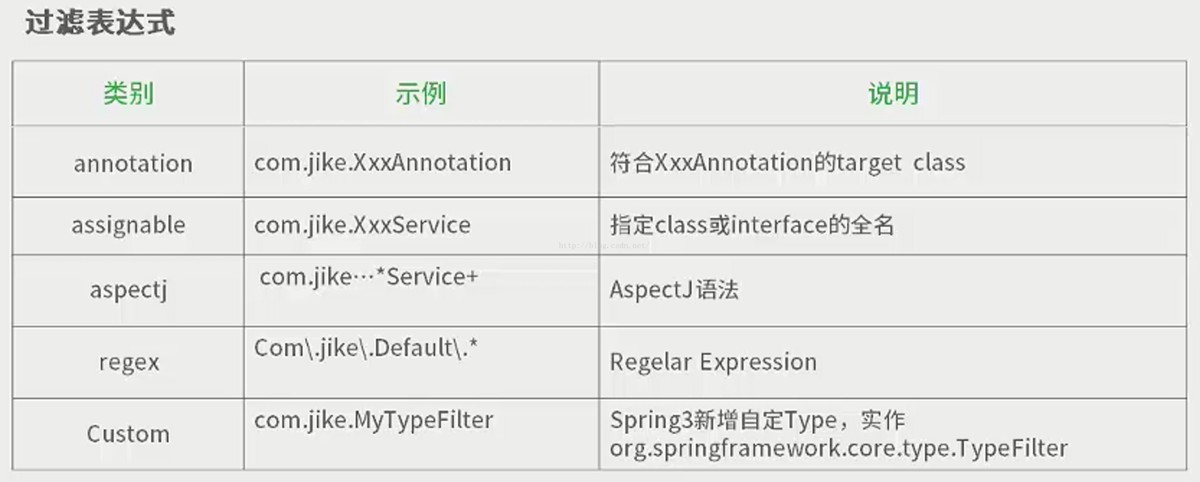
在这些类型当中,除了custom外,aspectj的过滤功能最强大,他能轻易的实现其他类别的过滤规则。
spring3.0提供了一系列的针对依赖注入的注解,这使得spring ioc在xml文件之外多了一种可行的选择,主要包含如下 注解类型:
- bean的定义注解
- bean的生命周期注解
- bean的依赖检查注解
- bean的自动装配注解
1.bean的定义注解
spring自2.0开始,陆续引入了一些注解用于简化spring的开发。
@repository注解便属于最先引入的一批,用于将数据访问层(dao层)的类标识为spring bean。具体使用如下:
①首先使用@repository将dao类声明为bean
@repository
public class userdaoimpl implements userdao{......}
②在xml配置文件中启动spring的自动扫描功能
<beans ...>
    <context:component-scan base-package="cn.lovepi.dao"/>
    ......
<beans/>
如此的话,我们便不在需要在xml当中显式使用bean来进行bean的配置。spring容器在初始化的时候便会自动扫描base-package所指定的包以及子包下面的所有class文件。所有标注为repository的类将被自动注册为bean。
为什么repository只能标注在dao类上面呢?
因为该注解的作用不只是将类识别为bean,同时他还能将所标注的类中所抛出的数据访问异常封装为spring的数据访问异常类型。spring本身提供了一个丰富的,并且是与具体的访问技术无关的数据访问异常结构,用于封装不同的持久层框架所抛出的异常,使得异常独立与底层的框架。
spring2.5在@repository的基础上增加了功能类似的额外三个注解,总共有如下四种注解:
- @component:一个泛化的概念,表示一个组件(bean),可作用在任何层次
- @controller:用于对controller实现类进行标注,目前该功能与component相同
- @repository:用于对dao实现类进行标注
- @service:用于对service实现类进行标注,目前该功能与component相同
这三个注解除了作用于不同软件层次的类,其使用方式与repository是完全相同的。
2.bean的生命周期注解
在某些情况下,可能需要我们手工做一些额外的初始化或者销毁操作,例如资源的获取和是否操作,spring1.x为此提供了两种方式供用户指定执行生命周期回调的方法:
- 实现spring提供的两个接口:initializingbean 和 disposablebean,这种方法是要求bean类实现spring的接口,但增加了bean和spring容器的耦合度,因此不推荐使用。
- 在xml文件中使用<bean>的init-method 和 destory-method 属性,指定初始化之后和回调之前的回调方法。这两个属性的取值是bean中相应的初始化和销毁方法的名称。方法名称任意,但是方法不能有参数。
示例如下:
<bean id="userservice" class="cn.lovepi.***.userservice"
   init-method="init" destory-method="destory">
</bean>
在这里,我们指定了userservice 这个bean的初始化方法为:init 销毁方法为:destory
spring2.5在保留以上两种方式的基础上,提供了对jsr-250的支持。
jsr-250规范定义了两个用于指定声明周期方法的注解:
- @postconstruct:初始化之后的执行的回调方法
- @predestroy:销毁之前的回调方法
注解示例说明:
public class personservice{
   @postconstruct
   public void init(){......}
   @predestory
   public void destory(){......}
}
在这里init方法是初始化之后执行的方法,而destory方法为销毁之前执行的方法
由于使用了注解,所以得激活bean的后处理器,所以得在xml配置文件当中增加
<context:annotation-config/>
3.bean的依赖检查注解
spring2.0之前使用dependency-check在配置文件中设置属性用于依赖检查(只会检查setter方法是否被调用),缺点是粒度较粗,该属性的取值包括以下几种:
- none: 默认不执行依赖检查
- simple :对原始基本类型和集合类型进行检查
- objects :对复杂类型进行检查
- all :对所有类型进行检查
使用spring2.0提供的@required注解,提供了更细粒度的控制,@required注解只能标注在setter方法之上,(标注在其他方法之上会被忽略 )用于检查其是否被调用,当setter方法未被调用的话会抛出异常。
由于使用了注解,所以得激活bean的后处理器,所以得在xml配置文件当中增加
<context:annotation-config/>
4.bean的自动装配注解
@autowired可以对成员变量、方法和构造函数进行标注,来完成自动装配的工作,他根据类型进行自动装配,如果需要按名称进行装配,则需要配合@qualifier使用。(比如接口多实现的时候)
当标注了@autowired的方法所需的类型在spring容器中不存在的话会抛出异常
@service
public class loginservice{
   @autowired
   private logdao logdao;
}
如上面的例子所示,假如spring容器中没有logdao这个bean的话便会抛出异常。
解决的办法便是使用required=false属性来标注
public class loginservice{
   @autowired(required=false)
   private logdao logdao;
}
但是假如spring当中存在多个所需类型的bean,那么便要使用@qualifier注解来指定名称。
public class loginservice{
   @autowired
   @qualifier("userdao")
   private userdao userdao;
}
@autowired 可以对类中集合类的变量或方法入参进行标注,此时会将容器中类型匹配的所有bean都注入进来,如下所示:
public class loginservice{
   @autowired(required=false)
   public list<plugin> pligins;
   public list<plugin> getplugins(){
      return plugins;
   }
}
spring会将容器中所有类型为plugin的bean都注入到集合中去。
三、基于java类的配置
基于java类定义bean配置元数据,其实就是通过java类定义spring配置元数据,且直接消除xml配置文件。首先让我们看一下基于java类如何定义bean配置元数据,具体步骤如下:
- 使用@configuration注解需要作为配置的类,表示该类将定义bean的元数据
- 使用@bean注解相应的方法,该方法名默认就是bean的名称,该方法返回值就是bean的对象。
- annotationconfigapplicationcontext或子类进行加载基于java类的配置
接下来通过示例来演示下如何基于java类来配置spring
首先创建一个配置类
@configuration
public class applicationcontextconfig {
    @bean
    public string message() {
        return "hello";
    }
}
然后还需要一个测试类,来查看配置是否成功
public class configurationtest {
    public static void main(string[] args) {
        annotationconfigapplicationcontext ctx =
        new annotationconfigapplicationcontext(applicationcontextconfig.class);
        system.out.println(ctx.getbean("message"));
    }
}
通过@configuration注解的类将被作为配置类使用,表示在该类中将定义bean配置元数据,且使用@configuration注解的类本身也是一个bean,使用方式如下所示:
@configuration("ctxconfig")
public class applicationcontextconfig {
    ……
}
其中configuration中的参数值即为该bean的名称。
通过@bean注解配置类中的相应方法,则该方法名默认就是bean名,该方法返回值就是bean对象,并定义了spring ioc容器如何实例化、自动装配、初始化bean逻辑,具体使用方法如下:
@bean(name={},
      autowire=autowire.no,
      initmethod="",
      destroymethod="")
其中name为bean的名称,可以有多个,autowire为是否自动装配,默认值为no,initmethod为bean的初始化方法,destorymethod为bean的销毁方法。
bean的注解具体使用如下:
@bean
public string message() {
    return new string("hello");
}
如上的代码等价与xml配置:
<bean id="message" class="java.lang.string">
    <constructor-arg index="0" value="hello"/>
</bean>
注意:使用bean注解的方法不能是private、final、static的。
基于java方式的配置方式不是为了完全替代基于xml方式的配置,两者可以结合使用,因此可以有两种结合使用方式:
- 在基于java方式的配置类中引入基于xml方式的配置文件
- 在基于xml方式的配置文件中中引入基于java方式的配置
引入基于xml配置文件:
<bean id="message" class="java.lang.string">
    <constructor-arg index="0" value="test"></constructor-arg>
</bean>
@configuration("ctxconfig")
@importresource("classpath:com/jike/***/appctx.xml")
public class applicationcontextconfig {
  ……
}
可以看到在java程序中使用@importresource导入了xml的配置文件
引入基于java的配置文件:
<context:annotation-config/>
<bean id="ctxconfig" class=“com.jike.***..applicationcontextconfig"/>
//测试类
public void testxmlconfig() {
        string configlocations[] = {" classpath:com/jike/***/appctx.xml"};
        applicationcontext ctx = new classpathxmlapplicationcontext(configlocations);
         ……
}
可以看到在xml的配置文件当中将java的配置类当中bean来声明,第一行的是开启注解驱动支持。
值得注意的是必须得配置<context:annotation-config/>在xml配置文件中。
spring提供了一个annotationconfigapplicancontext类,能够直接通过标注@configuration的java类启动spring容器:
通过构造函数加载配置类:
applicationcontext ctx = new annotationconfigapplicationcontext(appconf.class);
通过编码方式注册配置类:
annotationconfigapplicationcontext ctx = new annotationconfigapplicationcontext();
ctx.register(daoconfig.class);
ctx.register(serviceconfig.class);
ctx.refresh();
可以看到ctx注册了多个configuration类,然后通过refresh类来刷新容器以应用这些配置文件。
可以通过代码一个个的引入配置类,当然也可以使用@import注解来引入配置类
引入多个配置类:
@configuration
@import(daoconfig.class)
public class serviceconfig  {……}
四、实现 factorybean
/**
 * @author liwenchao
 */
@component("house")
public class housefactorybeantest implements factorybean<house> {

    private static final string house_name = "coderlwc";

    @override
    @postconstruct
    public house getobject() throws exception {
        house house = new house();
        house.setname(house_name);
        return house;
    }

    @override
    public class<?> getobjecttype() {
        return house.class;
    }
}
五、实现importbeandefinitionregistrar
@component
public class housefactorybeantest implements importbeandefinitionregistrar {

    @override
    public void registerbeandefinitions(annotationmetadata importingclassmetadata, beandefinitionregistry registry) {
        rootbeandefinition definition = new rootbeandefinition();
        definition.setbeanclass(house.class);
        mutablepropertyvalues propertyvalues = new mutablepropertyvalues();
        propertyvalues.add("name", "lwc");
        definition.setpropertyvalues(propertyvalues);
        registry.registerbeandefinition("house", definition);
        importbeandefinitionregistrar.super.registerbeandefinitions(importingclassmetadata, registry);
    }
}
六、实现 beandefinitionregistry
/**
 * @author liwenchao
 */
@component
public class housefactorybeantest implements beandefinitionregistrypostprocessor {


    /**
     * modify the application context's internal bean definition registry after its
     * standard initialization. all regular bean definitions will have been loaded,
     * but no beans will have been instantiated yet. this allows for adding further
     * bean definitions before the next post-processing phase kicks in.
     *
     * @param registry the bean definition registry used by the application context
     * @throws beansexception in case of errors
     */
    @override
    public void postprocessbeandefinitionregistry(beandefinitionregistry registry) throws beansexception {
        rootbeandefinition definition = new rootbeandefinition();
        definition.setbeanclass(house.class);
        mutablepropertyvalues propertyvalues = new mutablepropertyvalues();
        propertyvalues.add("name", "lwc");
        definition.setpropertyvalues(propertyvalues);
        registry.registerbeandefinition("house", definition);
    }

    /**
     * modify the application context's internal bean factory after its standard
     * initialization. all bean definitions will have been loaded, but no beans
     * will have been instantiated yet. this allows for overriding or adding
     * properties even to eager-initializing beans.
     *
     * @param beanfactory the bean factory used by the application context
     * @throws beansexception in case of errors
     */
    @override
    public void postprocessbeanfactory(configurablelistablebeanfactory beanfactory) throws beansexception {

    }
}
总结:不同配置方式比较
我们来看一下不同配置方式在不同方面的使用
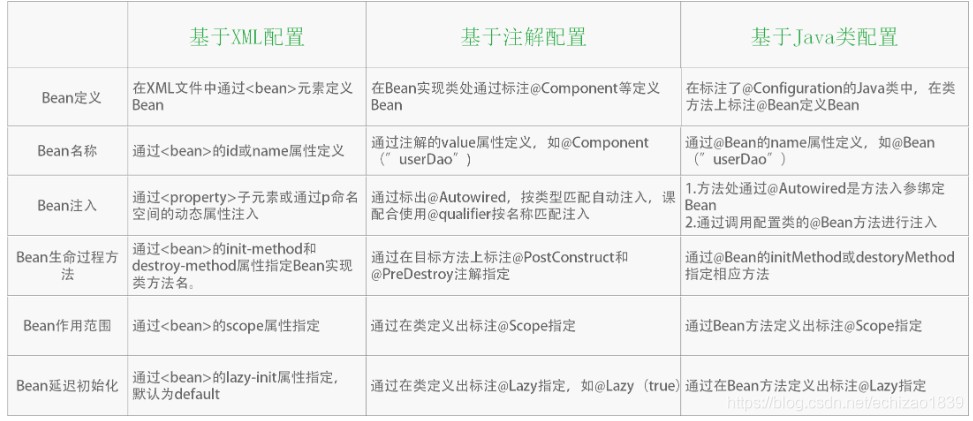
其实spring支持这么多的配置方式,那么这些配置方式必然有其自己独特的舞台
基于xml的配置主要使用场景:
- 第三方类库,如datasource、jdbctemplate等;
- 命名空间,如aop、context等;
基于注解的配置主要使用场景:
- bean的实现类是当前项目开发的,可直接在java类中使用注解配置
基于java类的配置主要使用场景:
- 对于实例化bean的逻辑比较复杂,则比较适合用基于java类配置的方式
- 在日常的开发中我们主要是使用xml配置和注解配置方式向结合的开发方式,一般不推荐使用基于java类的配置方式。
总结
以上为个人经验,希望能给大家一个参考,也希望大家多多支持代码网。



发表评论