
 我要评论
我要评论引言
numpy 是 python 科学计算生态系统中最重要的基础库之一,它提供了强大的多维数组对象和各种派生对象(如掩码数组和矩阵),以及用于数组快速操作的各种例程。在开始使用 numpy 进行数据分析、机器学习或科学计算之前,我们需要正确地安装这个库。本文将详细介绍使用 pip 和 conda 两种方式来安装 numpy,并提供完整的实践指导。
什么是 numpy?
numpy(numerical python 的缩写)是一个开源的 python 库,专门用于处理大型多维数组和矩阵。它提供了大量的数学函数来操作这些数组,是 pandas、scikit-learn、matplotlib 等众多数据科学库的基础。
numpy 的主要特性包括:
- 高效的 n 维数组对象
ndarray - 广播功能函数
- 集成 c/c++ 和 fortran 代码的工具
- 线性代数、傅里叶变换和随机数生成等功能
import numpy as np

# 创建一个简单的 numpy 数组
arr = np.array([1, 2, 3, 4, 5])
print("创建的数组:", arr)
print("数组类型:", type(arr))
print("数组形状:", arr.shape)
包管理器概述
在安装 numpy 之前,我们需要了解两个主要的 python 包管理器:pip 和 conda。
pip 包管理器
pip 是 python 的官方包管理器,全称为 “pip installs packages” 或 “pip installs python”。它是 python 标准库的一部分,用于从 python package index (pypi) 安装和管理 python 包。
# 检查 pip 版本
pip --version
# 升级 pip 到最新版本
python -m pip install --upgrade pip
conda 包管理器
conda 是一个开源的包管理和环境管理系统,最初由 anaconda 公司开发。它可以管理 python 包以及其他语言的包,并且能够创建独立的虚拟环境。
# 检查 conda 版本
conda --version
# 更新 conda
conda update conda
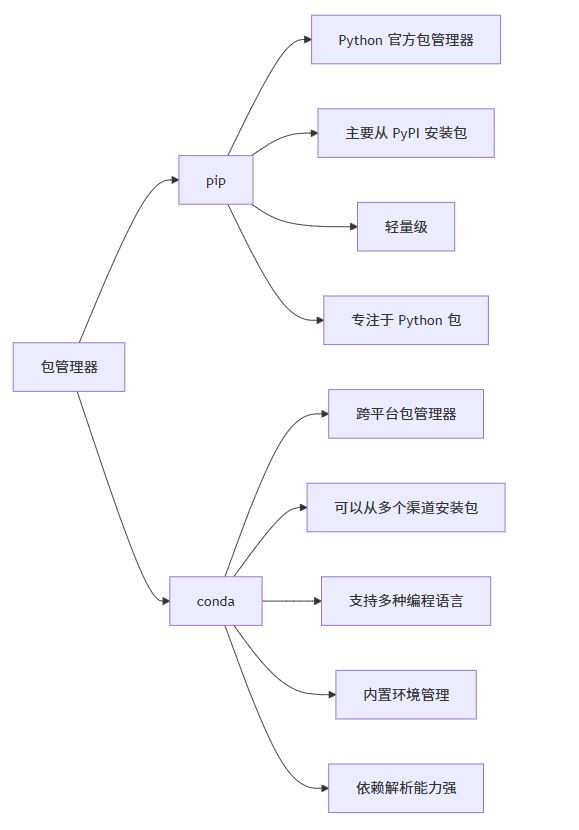
让我们通过一个 mermaid 图表来直观地比较这两种包管理器的特点:
使用 pip 安装 numpy
基础安装命令
使用 pip 安装 numpy 是最直接的方法。以下是基本的安装命令:
# 安装最新版本的 numpy
pip install numpy
# 或者使用 python -m pip 方式(推荐)
python -m pip install numpy
指定版本安装
如果你需要安装特定版本的 numpy,可以使用以下语法:
# 安装指定版本
pip install numpy==1.21.0
# 安装大于等于某个版本
pip install numpy>=1.20.0
# 安装小于某个版本
pip install numpy<1.22.0
升级现有安装
如果已经安装了 numpy,但想要升级到最新版本:
# 升级 numpy 到最新版本
pip install --upgrade numpy
# 强制重新安装
pip install --force-reinstall numpy
查看已安装信息
安装完成后,可以查看 numpy 的详细信息:
# 查看已安装的包列表
pip list
# 查看 numpy 的具体信息
pip show numpy
实际测试安装效果
让我们编写一个简单的 python 脚本来验证 numpy 是否正确安装:
# test_numpy_installation.py
try:
    import numpy as np
    print("✅ numpy 成功导入!")

    # 测试基本功能
    arr = np.array([[1, 2, 3], [4, 5, 6]])
    print(f"创建的数组:\n{arr}")
    print(f"数组形状: {arr.shape}")
    print(f"数组维度: {arr.ndim}")
    print(f"数组大小: {arr.size}")
    print(f"数组数据类型: {arr.dtype}")

    # 测试一些基本运算
    result = np.sum(arr)
    print(f"数组元素总和: {result}")

    mean_val = np.mean(arr)
    print(f"数组平均值: {mean_val}")

except importerror:
    print("❌ numpy 导入失败,请检查是否正确安装")
except exception as e:
    print(f"❌ 发生错误: {e}")
运行这个脚本可以确认 numpy 是否正常工作:
python test_numpy_installation.py
使用 conda 安装 numpy
基础安装命令
conda 提供了更加灵活的包管理方式,特别是对于科学计算相关的包:
# 使用 conda 安装 numpy
conda install numpy
# 从 conda-forge 渠道安装(推荐)
conda install -c conda-forge numpy
指定版本安装
conda 同样支持指定版本安装:
# 安装指定版本
conda install numpy=1.21.0
# 安装特定范围的版本
conda install "numpy>=1.20.0"
使用不同渠道
conda 支持多个渠道,不同的渠道可能包含不同版本的包:
# 从默认渠道安装
conda install numpy
# 从 conda-forge 安装
conda install -c conda-forge numpy
# 从 anaconda 官方渠道安装
conda install -c anaconda numpy
查看可用包信息
在安装前,可以先查看可用的包信息:
# 搜索 numpy 相关包
conda search numpy
# 查看特定渠道的包信息
conda search -c conda-forge numpy
管理环境中的安装
conda 最强大的功能之一是环境管理:
# 创建新的环境并安装 numpy
conda create -n myenv python=3.9 numpy
# 激活环境
conda activate myenv
# 在当前环境中安装 numpy
conda install numpy
# 退出环境
conda deactivate
查看已安装信息
查看 conda 环境中安装的包:
# 查看当前环境的所有包
conda list
# 查看特定包的信息
conda list numpy
# 查看环境信息
conda info
pip vs conda 对比分析
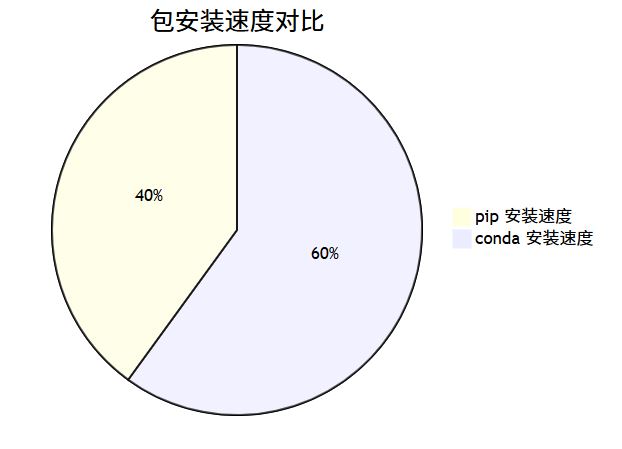
现在让我们深入比较这两种安装方式的优缺点:
性能对比
功能特性对比
| 特性 | pip | conda |
|---|---|---|
| 包来源 | 主要来自 pypi | 来自多个渠道 |
| 依赖解析 | 基础依赖解析 | 强大的依赖解析 |
| 环境管理 | 需要额外工具 | 内置环境管理 |
| 支持语言 | 主要是 python | 多种语言 |
| 包数量 | 庞大 | 相对较少但质量高 |
实际性能测试
我们可以编写一个简单的基准测试来比较两种方式的安装性能:
# performance_test.py
import time
import subprocess
import sys

def test_pip_install():
    """测试 pip 安装性能"""
    start_time = time.time()
    try:
        result = subprocess.run([
            sys.executable, '-m', 'pip', 'install', '--dry-run', 'numpy'
        ], capture_output=true, text=true, timeout=30)
        end_time = time.time()
        return end_time - start_time, result.returncode == 0
    except subprocess.timeoutexpired:
        return 30, false
    except exception as e:
        return none, false

def test_conda_install():
    """测试 conda 安装性能"""
    start_time = time.time()
    try:
        result = subprocess.run([
            'conda', 'install', '--dry-run', 'numpy'
        ], capture_output=true, text=true, timeout=30)
        end_time = time.time()
        return end_time - start_time, result.returncode == 0
    except subprocess.timeoutexpired:
        return 30, false
    except exception as e:
        return none, false

if __name__ == "__main__":
    print("🚀 开始性能测试...")

    pip_time, pip_success = test_pip_install()
    print(f"⏱️  pip 测试完成: {'成功' if pip_success else '失败'} "
          f"{'用时: {:.2f}秒'.format(pip_time) if pip_time else ''}")

    conda_time, conda_success = test_conda_install()
    print(f"⏱️  conda 测试完成: {'成功' if conda_success else '失败'} "
          f"{'用时: {:.2f}秒'.format(conda_time) if conda_time else ''}")
高级安装配置
pip 配置优化
为了提高 pip 的安装效率,可以进行一些配置优化:
# 设置国内镜像源(以清华源为例)
pip config set global.index-url https://pypi.tuna.tsinghua.edu.cn/simple/
# 设置超时时间
pip config set global.timeout 60
# 设置缓存目录
pip config set global.cache-dir ~/.pip/cache
也可以创建配置文件 ~/.pip/pip.conf(linux/mac)或 %appdata%\pip\pip.ini(windows):
[global]
index-url = https://pypi.tuna.tsinghua.edu.cn/simple/
trusted-host = pypi.tuna.tsinghua.edu.cn
timeout = 60
cache-dir = ~/.pip/cache

[install]
upgrade-strategy = only-if-needed
conda 配置优化
conda 同样可以通过配置来优化使用体验:
# 添加常用渠道
conda config --add channels conda-forge
conda config --add channels bioconda
# 设置渠道优先级
conda config --set channel_priority strict
# 设置求解器
conda config --set solver libmamba
配置文件通常位于 ~/.condarc:
channels:
  - conda-forge
  - defaults
channel_priority: strict
solver: libmamba
show_channel_urls: true
故障排除与常见问题
pip 安装问题
编译错误
有时在安装 numpy 时会遇到编译错误:
# 解决方案:安装系统依赖
# ubuntu/debian
sudo apt-get update
sudo apt-get install build-essential python3-dev
# centos/rhel
sudo yum groupinstall "development tools"
sudo yum install python3-devel
网络问题
如果遇到网络连接问题,可以尝试:
# 使用代理
pip install numpy --proxy http://user:password@proxy.server:port
# 增加超时时间
pip install numpy --timeout 1000
# 使用国内镜像
pip install numpy -i https://pypi.tuna.tsinghua.edu.cn/simple/
conda 安装问题
依赖冲突
当遇到依赖冲突时:
# 强制安装
conda install --force-reinstall numpy
# 忽略依赖
conda install --no-deps numpy
# 使用 mamba(更快的求解器)
conda install mamba -c conda-forge
mamba install numpy
渠道问题
如果默认渠道无法找到包:
# 搜索所有渠道
conda search -c conda-forge numpy
# 从特定渠道安装
conda install -c conda-forge numpy
安装验证与测试
安装完成后,进行全面的验证测试是很重要的:
# comprehensive_test.py
import sys
import numpy as np

def test_basic_functionality():
    """测试基本功能"""
    print("🔬 测试基本功能...")

    # 创建数组
    arr1d = np.array([1, 2, 3, 4, 5])
    arr2d = np.array([[1, 2], [3, 4]])

    print(f"1d 数组: {arr1d}")
    print(f"2d 数组: \n{arr2d}")

    # 基本属性
    print(f"1d 形状: {arr1d.shape}")
    print(f"2d 形状: {arr2d.shape}")
    print(f"2d 维度: {arr2d.ndim}")

    return true

def test_mathematical_operations():
    """测试数学运算"""
    print("\n🧮 测试数学运算...")

    arr = np.array([1, 2, 3, 4, 5])

    # 基本运算
    print(f"数组和: {np.sum(arr)}")
    print(f"数组平均值: {np.mean(arr)}")
    print(f"数组标准差: {np.std(arr)}")
    print(f"数组最大值: {np.max(arr)}")
    print(f"数组最小值: {np.min(arr)}")

    return true

def test_advanced_features():
    """测试高级功能"""
    print("\n🚀 测试高级功能...")

    # 矩阵运算
    matrix_a = np.array([[1, 2], [3, 4]])
    matrix_b = np.array([[5, 6], [7, 8]])

    matrix_product = np.dot(matrix_a, matrix_b)
    print(f"矩阵乘法结果:\n{matrix_product}")

    # 线性代数
    determinant = np.linalg.det(matrix_a)
    print(f"矩阵行列式: {determinant}")

    # 随机数生成
    random_array = np.random.rand(3, 3)
    print(f"随机数组:\n{random_array}")

    return true

def test_performance():
    """测试性能"""
    print("\n⚡ 测试性能...")

    import time

    # 创建大数组
    large_array = np.random.rand(1000, 1000)

    # 计算时间
    start_time = time.time()
    result = np.sum(large_array)
    end_time = time.time()

    print(f"大数组求和: {result}")
    print(f"计算耗时: {end_time - start_time:.4f} 秒")

    return true

def main():
    """主测试函数"""
    print("🧪 numpy 安装验证测试")
    print("=" * 50)

    try:
        # 显示版本信息
        print(f"🐍 python 版本: {sys.version}")
        print(f"🔢 numpy 版本: {np.__version__}")
        print(f"📍 numpy 位置: {np.__file__}")
        print("=" * 50)

        # 执行各项测试
        tests = [
            test_basic_functionality,
            test_mathematical_operations,
            test_advanced_features,
            test_performance
        ]

        for test_func in tests:
            try:
                if test_func():
                    print("✅ 测试通过\n")
                else:
                    print("❌ 测试失败\n")
            except exception as e:
                print(f"❌ 测试异常: {e}\n")

        print("🎉 所有测试完成!numpy 安装成功!")

    except importerror as e:
        print(f"❌ numpy 导入失败: {e}")
        print("请检查是否正确安装 numpy")
    except exception as e:
        print(f"❌ 测试过程中发生错误: {e}")

if __name__ == "__main__":
    main()
国内镜像加速
在中国大陆地区,由于网络限制,直接从官方源下载可能会很慢。使用国内镜像是很好的解决方案。
pip 国内镜像
常用的 pip 国内镜像源:
# 清华大学镜像
pip install numpy -i https://pypi.tuna.tsinghua.edu.cn/simple/
# 阿里云镜像
pip install numpy -i https://mirrors.aliyun.com/pypi/simple/
# 中科大镜像
pip install numpy -i https://pypi.mirrors.ustc.edu.cn/simple/
# 豆瓣镜像
pip install numpy -i https://pypi.douban.com/simple/
conda 国内镜像
配置 conda 国内镜像:
# 添加清华镜像渠道
conda config --add channels https://mirrors.tuna.tsinghua.edu.cn/anaconda/pkgs/main/
conda config --add channels https://mirrors.tuna.tsinghua.edu.cn/anaconda/pkgs/free/
conda config --set show_channel_urls yes
# 或者编辑 ~/.condarc 文件
channels:
  - https://mirrors.tuna.tsinghua.edu.cn/anaconda/pkgs/main
  - https://mirrors.tuna.tsinghua.edu.cn/anaconda/pkgs/free
  - defaults
show_channel_urls: true
环境隔离最佳实践
在实际开发中,使用虚拟环境是非常重要的实践:
使用 venv(pip 方式)
# 创建虚拟环境
python -m venv numpy_env
# 激活虚拟环境(linux/mac)
source numpy_env/bin/activate
# 激活虚拟环境(windows)
numpy_env\scripts\activate
# 在虚拟环境中安装 numpy
pip install numpy
# 退出虚拟环境
deactivate
使用 conda 环境
# 创建 conda 环境
conda create -n numpy_env python=3.9 numpy
# 激活环境
conda activate numpy_env
# 在环境中安装其他包
conda install pandas matplotlib
# 退出环境
conda deactivate
# 删除环境
conda env remove -n numpy_env
实际应用示例
让我们通过一些实际的应用示例来展示 numpy 的强大功能:
# practical_examples.py
import numpy as np
import time

def example_data_analysis():
    """数据分析示例"""
    print("📊 数据分析示例")

    # 模拟销售数据
    np.random.seed(42)  # 设置随机种子确保结果可重现
    sales_data = np.random.normal(1000, 200, 1000)  # 1000天的销售数据

    print(f"数据点数量: {len(sales_data)}")
    print(f"平均销售额: ${np.mean(sales_data):.2f}")
    print(f"销售额标准差: ${np.std(sales_data):.2f}")
    print(f"最高销售额: ${np.max(sales_data):.2f}")
    print(f"最低销售额: ${np.min(sales_data):.2f}")

    # 计算百分位数
    percentiles = [25, 50, 75, 90, 95]
    for p in percentiles:
        value = np.percentile(sales_data, p)
        print(f"{p}th 百分位数: ${value:.2f}")

def example_image_processing():
    """图像处理示例"""
    print("\n🖼️ 图像处理示例")

    # 创建一个模拟的灰度图像(8x8像素)
    image = np.random.randint(0, 256, (8, 8), dtype=np.uint8)
    print("原始图像:")
    print(image)

    # 图像旋转90度
    rotated_image = np.rot90(image)
    print("\n旋转90度后的图像:")
    print(rotated_image)

    # 图像翻转
    flipped_image = np.fliplr(image)
    print("\n水平翻转后的图像:")
    print(flipped_image)

    # 图像亮度调整
    brightened_image = np.clip(image.astype(np.int16) + 50, 0, 255).astype(np.uint8)
    print("\n亮度增加后的图像:")
    print(brightened_image)

def example_linear_algebra():
    """线性代数示例"""
    print("\n📐 线性代数示例")

    # 创建矩阵
    a = np.array([[2, 1], [1, 2]], dtype=float)
    b = np.array([[1, 0], [0, 1]], dtype=float)  # 单位矩阵

    print("矩阵 a:")
    print(a)
    print("\n矩阵 b (单位矩阵):")
    print(b)

    # 矩阵运算
    print(f"\na 的行列式: {np.linalg.det(a)}")
    print(f"a 的迹: {np.trace(a)}")

    # 矩阵乘法
    c = np.dot(a, b)
    print("\na × b =")
    print(c)

    # 求逆矩阵
    try:
        a_inv = np.linalg.inv(a)
        print("\na 的逆矩阵:")
        print(a_inv)

        # 验证逆矩阵
        identity_check = np.dot(a, a_inv)
        print("\na × a^(-1) (应该接近单位矩阵):")
        print(identity_check)
    except np.linalg.linalgerror:
        print("矩阵不可逆")

def example_performance_comparison():
    """性能比较示例"""
    print("\n⚡ 性能比较示例")

    size = 1000000

    # 使用 numpy 数组
    np_array = np.random.rand(size)
    start_time = time.time()
    np_result = np.sum(np_array ** 2)
    np_time = time.time() - start_time

    # 使用 python 列表(仅作对比,不推荐大数据使用)
    py_list = np_array.tolist()
    start_time = time.time()
    py_result = sum(x ** 2 for x in py_list)
    py_time = time.time() - start_time

    print(f"numpy 计算结果: {np_result:.6f}")
    print(f"python 列表计算结果: {py_result:.6f}")
    print(f"numpy 耗时: {np_time:.6f} 秒")
    print(f"python 列表耗时: {py_time:.6f} 秒")
    print(f"numpy 比 python 列表快 {py_time/np_time:.1f} 倍")

def main():
    """主函数"""
    print("🚀 numpy 实际应用示例")
    print("=" * 60)

    examples = [
        example_data_analysis,
        example_image_processing,
        example_linear_algebra,
        example_performance_comparison
    ]

    for example in examples:
        try:
            example()
            print("-" * 40)
        except exception as e:
            print(f"❌ 示例执行出错: {e}")

    print("\n🎉 所有示例执行完毕!")

if __name__ == "__main__":
    main()
版本管理策略
在项目开发中,正确的版本管理非常重要:
固定版本号
# 在 requirements.txt 中固定版本
echo "numpy==1.21.0" >> requirements.txt
# 安装指定版本
pip install -r requirements.txt
使用版本范围
# 兼容性版本
echo "numpy~=1.21.0" >> requirements.txt
# 最小版本要求
echo "numpy>=1.20.0" >> requirements.txt
conda 环境文件
创建 environment.yml 文件:
name: myproject
channels:
  - conda-forge
  - defaults
dependencies:
  - python=3.9
  - numpy=1.21.0
  - pandas
  - matplotlib
  - pip
  - pip:
    - requests
使用环境文件:
# 创建环境
conda env create -f environment.yml
# 更新环境
conda env update -f environment.yml
# 导出当前环境
conda env export > environment.yml
安全考虑
验证包的完整性
# pip 可以验证已安装的包
pip check
# 查看包的安全性警告
pip install safety
safety check
使用可信源
# 配置可信主机
pip config set global.trusted-host pypi.org
pip config set global.trusted-host pypi.python.org
pip config set global.trusted-host files.pythonhosted.org
最佳实践总结
基于前面的讨论,我们总结出以下最佳实践:
- 选择合适的安装方式:对于纯 python 项目,pip 是不错的选择;对于科学计算项目,conda 更适合。
- 使用虚拟环境:始终在虚拟环境中安装包,避免全局环境污染。
- 固定版本号:在生产环境中固定依赖包的版本号,确保可重现性。
- 定期更新:保持包的及时更新,但要注意兼容性问题。
- 使用镜像加速:在国内使用镜像源可以显著提高下载速度。
- 验证安装:安装后进行基本的功能验证,确保安装成功。
结语
numpy 作为 python 科学计算的核心库,其安装虽然看似简单,但涉及到包管理器的选择、版本控制、性能优化等多个方面。通过本文的详细介绍,相信你已经掌握了使用 pip 和 conda 安装 numpy 的各种方法和技巧。
无论你是数据科学家、机器学习工程师还是普通的 python 开发者,正确地安装和配置 numpy 都是你工作中不可或缺的一环。希望本文的内容能够帮助你在未来的项目中更好地使用 numpy,发挥其在数值计算方面的强大能力。
记住,好的开始是成功的一半。正确安装 numpy 并建立良好的开发环境,将为你后续的数据科学之旅奠定坚实的基础。继续探索 numpy 的更多功能,你会发现它在处理数组和矩阵运算方面的优雅和高效。
以上就是python numpy两种安装方法详解(pip与conda)的详细内容,更多关于python numpy安装方法的资料请关注代码网其它相关文章!


发表评论