1、easypoi简介
上几篇文章都介绍poi在导出导出excel、导出csv、word的功能,用起来感觉代码有点过于繁琐,目前开发市场上流行一种简化poi开发的类库:easypoi。从名称上就能发现就是为了简化开发。
excel的快速导入导出,excel模板导出,word模板导出,可以仅仅5行代码就可以完成excel的导入导出,修改导出格式简单粗暴,快速有效。
easypoi需要熟悉poi的操作,它是为简化poi的开发,使用模板更便捷。
为谁而开发?
easypoi的目标不是替代poi,而是让一个不懂导入导出的快速使用poi完成excel和word的各种操作,而不是看很多api才可以完成这样工作。
再次强调一下easypoi完全替代不了poi!
需要的依赖
把项目中的poi的依赖去除
    <dependency>
        <groupid>cn.afterturn</groupid>
        <artifactid>easypoi-base</artifactid>
        <version>4.1.0</version>
    </dependency>
    <dependency>
        <groupid>cn.afterturn</groupid>
        <artifactid>easypoi-web</artifactid>
        <version>4.1.0</version>
    </dependency>
    <dependency>
        <groupid>cn.afterturn</groupid>
        <artifactid>easypoi-annotation</artifactid>
        <version>4.1.0</version>
    </dependency>
或springboot
<dependency>
			<groupid>cn.afterturn</groupid>
			<artifactid>easypoi-spring-boot-starter</artifactid>
			<version>4.4.0</version>
		</dependency>
2、注解方式导出
2.1. 修改实体类,添加注解
其中主要用到的注解是@excel注解,更详细的说明请看这里 (按住ctrl点击)
此处注意必须要有空构造函数,否则会报错“对象创建错误”
package com.tigerhhzz.pojo;
import cn.afterturn.easypoi.excel.annotation.excel;
import cn.afterturn.easypoi.excel.annotation.excelcollection;
import com.baomidou.mybatisplus.annotation.idtype;
import com.baomidou.mybatisplus.annotation.tablefield;
import com.baomidou.mybatisplus.annotation.tableid;
import com.baomidou.mybatisplus.annotation.tablename;
import com.fasterxml.jackson.annotation.jsonformat;
import lombok.data;
import java.util.date;
import java.util.list;
/**
 * 员工
 * @author administrator
 */
@data
@tablename(value="tb_user")
public class user {
    @tableid(value = "id",type = idtype.auto)
    @excel(name = "编号", ordernum = "0", width = 5)
    private long id;         //主键
    @excel(name = "员工名", ordernum = "1", width = 15,isimportfield="true")
    private string username; //员工名
    @excel(name = "手机号", ordernum = "2", width = 15,isimportfield="true")
    private string phone;    //手机号
    @excel(name = "省份名", ordernum = "3", width = 15,isimportfield="true")
    private string province; //省份名
    @excel(name = "城市名", ordernum = "4", width = 15,isimportfield="true")
    private string city;     //城市名
    @excel(name = "工资", ordernum = "5", width = 10,type = 10,isimportfield="true") //type=10表示会导出数字
    private integer salary;   // 工资
    @jsonformat(pattern="yyyy-mm-dd")
    @excel(name = "入职日期",  format = "yyyy-mm-dd",ordernum = "6", width = 15,isimportfield="true")
    private date hiredate; // 入职日期
    private string deptid;   //部门id
    @excel(name = "出生日期",  format = "yyyy-mm-dd",ordernum = "7", width = 15,isimportfield="true")
    private date birthday; //出生日期
    @excel(name = "照片", ordernum = "10",width = 15,type = 2,isimportfield="true",savepath = "f:\\idea-project\\easypoi-demo\\src\\main\\resources\\static\\user_photos")
    private string photo;    //一寸照片
    @excel(name = "现在居住地址", ordernum = "9", width = 30,isimportfield="true")
    private string address;  //现在居住地址
    //映射一对多关系
    @tablefield(exist = false) //非数据库字段
    @excelcollection(name = "资源列表", ordernum = "5")
    private list<resource> resourcelist; //办公用品
    public list<resource> getresources() {
        return resourcelist;
    }
    public void setresources(list<resource> resources) {
        this.resourcelist = resources;
    }
}
2.2. usercontroller添加方法
    @getmapping(value = "/downloaduserinfowitheastpoi",name = "导出用户详细信息-使用easypoi")
    public void downloaduserinfowitheastpoi(long id,httpservletrequest request,httpservletresponse response) throws exception{
        userservice.downloaduserinfowitheastpoi(id,request,response);
    }
2.3. userservice实现方法
void downloadxlsxwitheaypoi(httpservletresponse response) throws exception;
2.4. 实现类
 @override
    public void downloaduserinfowitheastpoi(long id, httpservletrequest request, httpservletresponse response) throws exception {
        //        获取模板的路径
        file rootpath = new file(resourceutils.geturl("classpath:").getpath()); //springboot项目获取根目录的方式
        file templatepath = new file(rootpath.getabsolutepath(),"/excel_template/userinfoeasypoi.xlsx");
        // 读取模板文件
        templateexportparams params = new templateexportparams(templatepath.getpath(),true);
        //        查询用户,转成map
        user user = usermapper.selectbyid(id);
        map<string, object> map = entityutils.entitytomap(user);
        imageentity userimage = new imageentity();
        userimage.settype(imageentity.url); // 设置类型为url
//        userimage.setheight(64); //测试发现 这里设置了长度和宽度在合并后的单元格中没有作用
//        userimage.setwidth(380);
        userimage.setrowspan(5);//向下合并三行
        userimage.setcolspan(3);//向右合并两列
//        userimage.setdata(imageconverter.jpgtobytes(rootpath+user.getphoto()));
        userimage.seturl(user.getphoto());
        map.put("photo", userimage);
        workbook workbook = excelexportutil.exportexcel(params, map);
        //            导出的文件名称
        string filename="用户详细信息数据.xlsx";
        //            设置文件的打开方式和mime类型
        servletoutputstream outputstream = response.getoutputstream();
        response.setheader( "content-disposition", "attachment;filename="  + new string(filename.getbytes(),"iso8859-1"));
        response.setcontenttype("application/vnd.openxmlformats-officedocument.spreadsheetml.sheet");
        workbook.write(outputstream);
    }
3、注解方式导入
有导出就应该有导入,excel导入时需要的参数类importparams常用设置说明
- 读取指定的sheet 比如要读取上传得第二个sheet 那么需要把startsheetindex = 1 就可以了
- 读取几个sheet 比如读取前2个sheet,那么 sheetnum=2 就可以了
- 读取第二个到第五个sheet 设置 startsheetindex = 1 然后sheetnum = 4
- 读取全部的sheet sheetnum 设置大点就可以了
- 保存excel 设置 needverfiy = true,默认保存的路径为upload/excelupload/test/yyyymmddhhmss 保存名称上传时间五位随机数 如果自定义路径 修改下saveurl 就可以了,同时saveurl也是图片上传时候的保存的路径
- 判断一个excel是不是合法的excel importfields 设置下值,就是表示表头必须至少包含的字段,如果缺一个就是不合法的excel,不导入
- 图片的导入
有图片的导出就有图片的导入,导入的配置和导出是一样的,但是需要设置保存路径 1.设置保存路径saveurl 默认为"upload/excelupload" 可以手动修改 importparams 修改下就可以了
3.1.修改实体类,表明哪些需要导入
package com.tigerhhzz.pojo;
import cn.afterturn.easypoi.excel.annotation.excel;
import cn.afterturn.easypoi.excel.annotation.excelcollection;
import com.baomidou.mybatisplus.annotation.idtype;
import com.baomidou.mybatisplus.annotation.tablefield;
import com.baomidou.mybatisplus.annotation.tableid;
import com.baomidou.mybatisplus.annotation.tablename;
import com.fasterxml.jackson.annotation.jsonformat;
import lombok.data;
import java.util.date;
import java.util.list;
/**
 * 员工
 * @author administrator
 */
@data
@tablename(value="tb_user")
public class user {
    @tableid(value = "id",type = idtype.auto)
    @excel(name = "编号", ordernum = "0", width = 5)
    private long id;         //主键
    @excel(name = "员工名", ordernum = "1", width = 15,isimportfield="true")
    private string username; //员工名
    @excel(name = "手机号", ordernum = "2", width = 15,isimportfield="true")
    private string phone;    //手机号
    @excel(name = "省份名", ordernum = "3", width = 15,isimportfield="true")
    private string province; //省份名
    @excel(name = "城市名", ordernum = "4", width = 15,isimportfield="true")
    private string city;     //城市名
    @excel(name = "工资", ordernum = "5", width = 10,type = 10,isimportfield="true") //type=10表示会导出数字
    private integer salary;   // 工资
    @jsonformat(pattern="yyyy-mm-dd")
    @excel(name = "入职日期",  format = "yyyy-mm-dd",ordernum = "6", width = 15,isimportfield="true")
    private date hiredate; // 入职日期
    private string deptid;   //部门id
    @excel(name = "出生日期",  format = "yyyy-mm-dd",ordernum = "7", width = 15,isimportfield="true")
    private date birthday; //出生日期
    @excel(name = "照片", ordernum = "10",width = 15,type = 2,isimportfield="true",savepath = "f:\\idea-project\\easypoi-demo\\src\\main\\resources\\static\\user_photos")
    private string photo;    //一寸照片
    @excel(name = "现在居住地址", ordernum = "9", width = 30,isimportfield="true")
    private string address;  //现在居住地址
    //映射一对多关系
    @tablefield(exist = false) //非数据库字段
    @excelcollection(name = "资源列表", ordernum = "5")
    private list<resource> resourcelist; //办公用品
    public list<resource> getresources() {
        return resourcelist;
    }
    public void setresources(list<resource> resources) {
        this.resourcelist = resources;
    }
}
3.2. usercontroller添加方法
    @postmapping(value = "/uploadexcelbyeasypoi", name = "上传用户数据byeasypoi")
    public void uploadexcelbyeasypoi(multipartfile file)  throws exception{
        userservice.uploadexcelbyeasypoi(file);
    }
3.3. userservice实现方法
void uploadexcelbyeasypoi(multipartfile file) throws exception;
3.4. 实现类
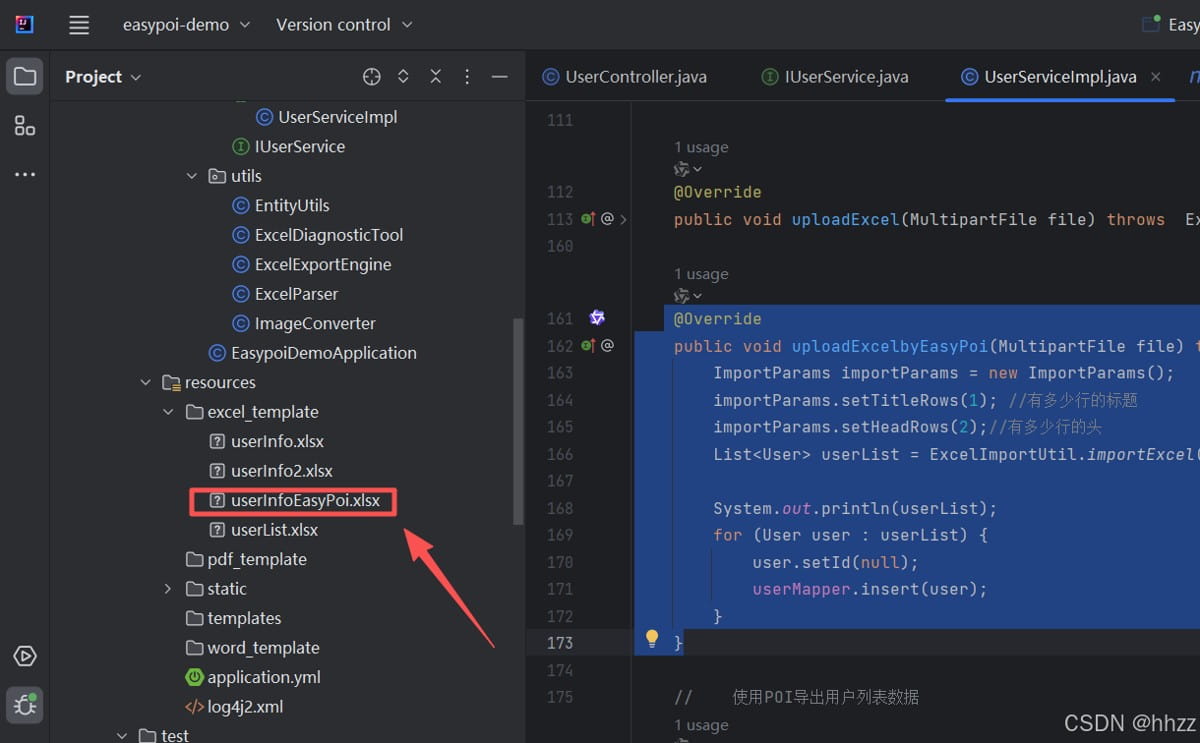
 @override
    public void uploadexcelbyeasypoi(multipartfile file) throws exception {
        importparams importparams = new importparams();
        importparams.settitlerows(1); //有多少行的标题
        importparams.setheadrows(2);//有多少行的头
        list<user> userlist = excelimportutil.importexcel(file.getinputstream(),user.class,importparams);
        system.out.println(userlist);
        for (user user : userlist) {
            user.setid(null);
            usermapper.insert(user);
        }
    }
4、模板方式导出数据
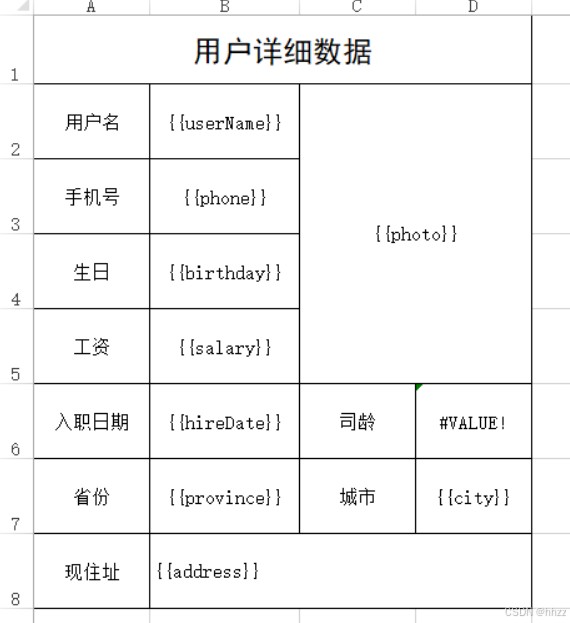
模板是处理复杂excel的简单方法,复杂的excel样式,可以用excel直接编辑,完美的避开了代码编写样式的雷区,同时指令的支持,也提了模板的有效性。
采用的写法是{{}}代表表达式,然后根据表达式里面的数据取值
- 关于样式问题
easypoi不会改变excel原有的样式
- 需求:导出用户的详细信息,这个功能我们做过,今天我们使用easypoi的方式再做一次
- 制作模板
这个模板和我们做的userinfo2.xlsx模板一样,只是这个变量使用了{{}}包起来了
- 第二步:放到项目中
- 第三步:改写usercontroller中导出用户信息的方法
    @getmapping(value = "/downloaduserinfowitheastpoi",name = "导出用户详细信息-使用easypoi")
    public void downloaduserinfowitheastpoi(long id,httpservletrequest request,httpservletresponse response) throws exception{
        userservice.downloaduserinfowitheastpoi(id,request,response);
}- 第四步:完成userservice中的方法
void downloaduserinfowitheastpoi(long id, httpservletrequest request, httpservletresponse response) throws exception;
- 第五步:实现类方法
 @override
    public void downloaduserinfowitheastpoi(long id, httpservletrequest request, httpservletresponse response) throws exception {
        //        获取模板的路径
        file rootpath = new file(resourceutils.geturl("classpath:").getpath()); //springboot项目获取根目录的方式
        file templatepath = new file(rootpath.getabsolutepath(),"/excel_template/userinfoeasypoi.xlsx");
        // 读取模板文件
        templateexportparams params = new templateexportparams(templatepath.getpath(),true);
        //        查询用户,转成map
        user user = usermapper.selectbyid(id);
        map<string, object> map = entityutils.entitytomap(user);
        imageentity userimage = new imageentity();
        userimage.settype(imageentity.url); // 设置类型为url
//        userimage.setheight(64); //测试发现 这里设置了长度和宽度在合并后的单元格中没有作用
//        userimage.setwidth(380);
        userimage.setrowspan(5);//向下合并三行
        userimage.setcolspan(3);//向右合并两列
//        userimage.setdata(imageconverter.jpgtobytes(rootpath+user.getphoto()));
        userimage.seturl(user.getphoto());
        map.put("photo", userimage);
        workbook workbook = excelexportutil.exportexcel(params, map);
        //            导出的文件名称
        string filename="用户详细信息数据.xlsx";
        //            设置文件的打开方式和mime类型
        servletoutputstream outputstream = response.getoutputstream();
        response.setheader( "content-disposition", "attachment;filename="  + new string(filename.getbytes(),"iso8859-1"));
        response.setcontenttype("application/vnd.openxmlformats-officedocument.spreadsheetml.sheet");
        workbook.write(outputstream);
    }
5、导出csv
csv的导出基本上和excel的导出一致,大体参数也是一致的
csvexportparams 的参数描述如下:
| 属性 | 类型 | 默认值 | 功能 |
|---|---|---|---|
| encoding | string | utf8 | 文件编码 |
| spiltmark | string | , | 分隔符 |
| textmark | string | “ | 字符串识别,可以去掉,需要前后一致 |
| titlerows | int | 0 | 表格头,忽略 |
| headrows | int | 1 | 标题 |
| exclusions | string[] | 0 | 忽略的字段 |
需求:改写之前使用opencsv导出csv文件
第一步:修改usercontroller方法
@getmapping(value = "/downloadcsv",name = "导出用户数据到csv文件中")
public void downloadcsv(httpservletresponse response) throws exception{
    //        userservice.downloadcsv(response);
    userservice.downloadcsvwitheasypoi(response);
}
第二步:完成userservice方法
public void downloadcsvwitheasypoi(httpservletresponse response) throws exception {
        servletoutputstream outputstream = response.getoutputstream();
//            文件名
        string filename="百万数据.csv";
//            设置两个头 一个是文件的打开方式 一个是mime类型
        response.setheader( "content-disposition", "attachment;filename="  + new string(filename.getbytes(),"iso8859-1"));
        response.setcontenttype("application/csv");
//            创建一个用来写入到csv文件中的writer
        csvexportparams params = new csvexportparams();
//        设置忽略的列
        params.setexclusions(new string[]{"照片"}); //这里写表头 中文
        list<user> list = usermapper.selectall();
        csvexportutil.exportcsv(params, user.class, list, outputstream);
    }
说明:从上述的代码中你会发现,如果需要导出几百万数据时不可能全部加载到一个list中的,所以easypoi的方式导出csv是支持不了太大的数据量的,如果导出几百万条数据还是得选择opencsv方式导出。
到此这篇关于springboot项目中使用easypoi操作excel(详细教程系列4/4)的文章就介绍到这了,更多相关springboot使用easypoi操作excel内容请搜索代码网以前的文章或继续浏览下面的相关文章希望大家以后多多支持代码网!


发表评论