一、问题的由来
最近,有网友说,他一天要处理很多100多份订单截图,提取其中的发货单号、车号、净重、品种、出厂日期等,并存入到excel文件当中。普通的人工录入太慢,电脑ocr识图又不太准确,还要来回复制粘贴,非常的麻烦,而且耗时耗力。因此,他想编写一个批量处理工具,实现批量化操作订单截图,自动提取指定信息,然后可以转到excel里。
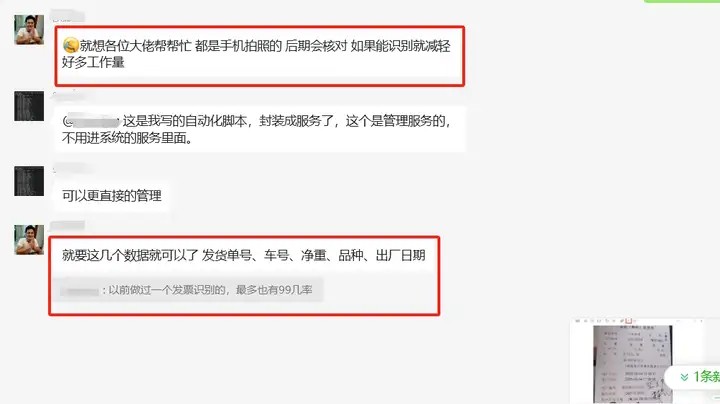
问题的由来
二、问题的分析
这个问题与提取发票信息有点儿像,不过发票一般都是pdf格式,而且很清晰,这是图片,一般都是手机拍摄的,不仅不规则,有时还不太清晰,所以要准确提取难度有点儿大。我想了一下,提供了两套解决的思路。
1. 用智能体的方法
我们进入豆包,在左侧菜单栏中,点击【更多】,找到【ai智能体】,再点击右上角的【创建智能体】,
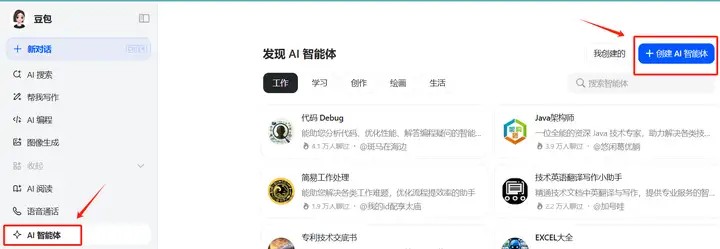
创建智能体
然后,在设定描述中输入相关指令,并为这个智能体设计一个名称,可以通过ai一键生成。
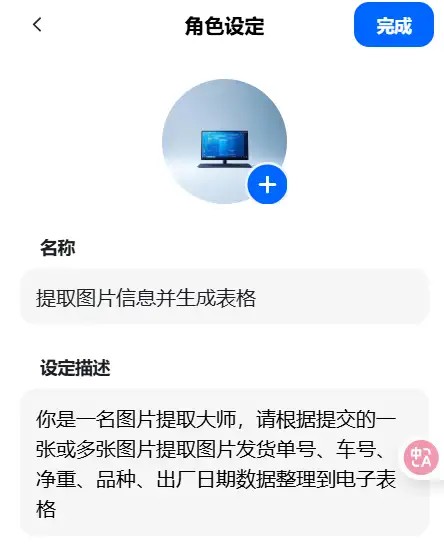
录入指令
完成智能体编写后,提交豆包审核,审核通过后,我们就可以通过提交图片来实现相关信息的提交了。不过这种方法,一次只能提交一张图片,效果如下所示:

智能体识别相关信息
但这种方法的好处是可以在手机上提交识别,速度还挺快的,准确率也很好,而且操作免费。
2. python编程法
另一种方法有点儿复杂,但可以实现批量操作,无人职守就可以完成提取图片信息的任务,但是就得消耗豆包api的额度,不过貌似价格不是很高。在编程前,可以去申请一个豆包api。
申请完之后,在控制台找到多模态处理的ai样例代码如下:
import os
from openai import openai
# 初始化客户端
client = openai(
base_url="https://ark.cn-beijing.volces.com/api/v3",
api_key="<api_key>" # 这里修改了一下,直接为变量赋值,输入你的api_key即可
)
response = client.chat.completions.create(
model="doubao-seed-1-6-250615", #豆包的多模态处理模型。
messages=[
{
"role": "user",
"content": [
{
"type": "image_url",
"image_url": {
"url": "https://wx3.sinaimg.cn/orj480/7ffa58d5ly1i44lggggjxj20k00zkjse.jpg"
},
},
{"type": "text", "text": "提取图片中的文字信息,其它不要显示。"},
],
}
],
)
# 提取content内容
content = response.choices[0].message.content
print("提取的内容:")
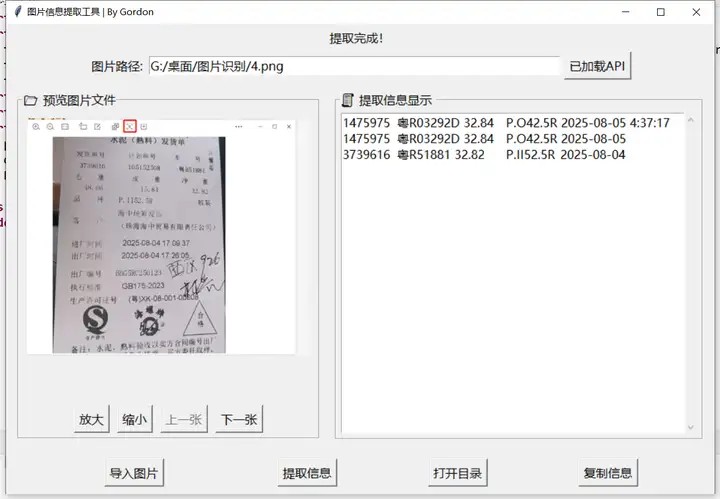
print(content)根据上面的样例代码,我们借助python中的tkinter框架,编写了一款图片信息提取工具,实现包括图片的导入、预览、信息提取、复制等功能,基本的样式如下:
图片识别工具
软件编写过程中处理了底部按钮放大后变形,图片预览框忽大忽小等问题,为信息提取和图片预览区还设置了labelframe,便于操作。
软件可以自动检测本地是否加载api key,如果没有加载,就会弹窗提醒输入。如果已经加载api,就会提供已经加载api。
软件提取信息,一方面会显示在界面中部右侧,中间用制表位隔开,生成完,点击复制信息就可以粘贴到excel当中。通过打开目录,还可以查看已经写入本地的信息。
3. 代码展示
import os
import json
from tkinter import tk, label, entry, filedialog, messagebox, stringvar, end, button, left,labelframe,frame, toplevel
from tkinter.scrolledtext import scrolledtext
from tkinter import photoimage, font
import threading
import base64
import pyperclip
from pathlib import path
from openai import openai
from pil import image, imagetk

class imageessayevaluator:
    def __init__(self, root):
        self.root = root
        self.root.title("图片信息提取工具 | by gordon")
        self.setup_ui()
        self.api = none
        self.output_dir = os.path.join(os.getcwd(), "识别结果")
        os.makedirs(self.output_dir, exist_ok=true)
        self.current_scale = 1.0  # track current zoom scale
        self.image_files = []  # list to store multiple image paths
        self.current_image_index = 0  # track current image index

        json_filename = "config.json"
        if not os.path.exists(json_filename):
            with open(json_filename, "w") as json_file:
                json.dump({"api_key": self.api}, json_file)
            print("json 文件已创建。")
        else:
            with open(json_filename, "r") as json_file:
                data = json.load(json_file)
            self.api = data.get("api")
        if self.api is none:
            self.show_settings()
        self.update_api_button_text()

    def update_api_button_text(self):
        """根据api状态更新按钮文本"""
        if self.api:
            self.api_button.config(text="已加载api")
        else:
            self.api_button.config(text="设置api")

    def setup_ui(self):
        self.info_var = stringvar()
        self.info_var.set("tip: 请导入图片,识别结果将显示在下方文本框")
        label(self.root, textvariable=self.info_var, font=("微软雅黑", 12)).pack(pady=5)

        frame = frame(self.root)
        frame.pack(padx=6)

        label(frame, text="图片路径:", font=("微软雅黑", 12)).pack(side='left')
        self.image_path_entry = entry(frame, width=60, font=("微软雅黑", 12))
        self.image_path_entry.pack(side=left, padx=5, pady=5)

        self.api_button = button(frame, text="设置api", font=("微软雅黑", 12), command=self.show_settings)
        self.api_button.pack()

        # create a frame for the image and text display
        main_frame = frame(self.root)
        main_frame.pack(padx=5, pady=5)

        # left frame for image preview (no fixed height)
        #self.preview_frame = frame(main_frame, width=500)
        self.preview_frame = labelframe(main_frame, text="  预览图片文件",font=("微软雅黑", 12), width=400, height=460, padx=1, pady=1)
        self.preview_frame.grid(row=0, column=0, padx=10, pady=10)
        self.preview_frame.pack_propagate(false)

        # image preview label
        self.image_label = label(self.preview_frame)
        self.image_label.pack(padx=10, pady=10)

        # frame for zoom and navigation buttons
        button_frame = frame(self.preview_frame)
        button_frame.pack(side='bottom',pady=5)

        # zoom buttons (up and down) and navigation buttons (previous and next)
        self.zoom_in_button = button(button_frame, text="放大", font=("微软雅黑", 12), command=self.zoom_in)
        self.zoom_in_button.pack(side=left, padx=5)
        self.zoom_out_button = button(button_frame, text="缩小", font=("微软雅黑", 12), command=self.zoom_out)
        self.zoom_out_button.pack(side=left, padx=5)
        self.prev_button = button(button_frame, text="上一张", font=("微软雅黑", 12), command=self.previous_image)
        self.prev_button.pack(side=left, padx=5)
        self.next_button = button(button_frame, text="下一张", font=("微软雅黑", 12), command=self.next_image)
        self.next_button.pack(side=left, padx=5)

        # right frame for text display
        #self.text_frame = frame(main_frame, width=400, height=300)
        self.text_frame = labelframe(main_frame, text="  提取信息显示 ", font=("微软雅黑", 12), width=400, height=300, padx=1, pady=1)
        self.text_frame.grid(row=0, column=1, padx=10, pady=10)
        # text display area
        self.text_display = scrolledtext(self.text_frame, width=50, height=20, font=("微软雅黑", 12))
        self.text_display.pack(padx=5, pady=5)
        button_frame = frame(self.root)
        button_frame.pack(expand=true)
        # other buttons
        button(button_frame, text="导入图片", font=("微软雅黑", 12), command=self.load_image).pack(side="left", padx=90, pady=10)
        button(button_frame, text="提取信息", font=("微软雅黑", 12), command=self.start_evaluation).pack(side="left", padx=60, pady=10)
        button(button_frame, text="打开目录", font=("微软雅黑", 12), command=self.open_output_dir).pack(side="left", padx=60, pady=10)
        button(button_frame, text="复制信息", font=("微软雅黑", 12), command=self.copy_info).pack(side="left", padx=60, pady=10)

    def show_settings(self):
        self.settings_window = toplevel(self.root)
        self.settings_window.attributes('-topmost', true)
        self.settings_window.title("豆包 api设置")

        label(self.settings_window, text="请把kimi的api放在这里,使用ctrl+v:").pack(pady=5)
        self.api_var = stringvar()
        self.entry = entry(self.settings_window, textvariable=self.api_var, width=30, font=("微软雅黑", 12))
        self.entry.pack()
        confirm_button = button(self.settings_window, text="确认", command=lambda: self.apply_settings())
        confirm_button.pack(pady=10)

        screen_width = self.settings_window.winfo_screenwidth()
        screen_height = self.settings_window.winfo_screenheight()
        self.settings_window.update_idletasks()
        window_width = self.settings_window.winfo_width()
        window_height = self.settings_window.winfo_height()

        x_position = (screen_width - window_width) // 2
        y_position = (screen_height - window_height) // 2
        self.settings_window.geometry(f"{window_width}x{window_height}+{x_position}+{y_position}")

    def apply_settings(self):
        new_time = self.api_var.get()
        self.api = new_time.strip()
        data = {'api': self.api}
        with open('config.json', 'w+') as f:
            json.dump(data, f, indent=4)
        self.settings_window.destroy()

    def copy_info(self):
        pyperclip.copy(self.text_display.get(1.0, end))
    def load_image(self):
        if len(str(self.api)) < 10:
            messagebox.showwarning("警告!", "api设置不正确或者没有")
            self.show_settings()
            return

        # 选择导入方式
        choice = messagebox.askquestion("选择导入方式", "是:加载多个图片文件\n否:加载整个文件夹中的图片")

        image_paths = []

        if choice == 'yes':
            # 导入多个图片文件
            file_paths = filedialog.askopenfilenames(
                title="选择图片",
                filetypes=[("图片文件", "*.jpg;*.png;*.jpeg;*.bmp")]
            )
            if file_paths:
                image_paths = [fp.replace("\\", "/") for fp in file_paths]
                # 显示第一张图片路径到 entry
                self.image_path_entry.delete(0, end)
                self.image_path_entry.insert(0, image_paths[0])

        elif choice == 'no':
            # 导入整个文件夹中的图片
            folder_path = filedialog.askdirectory(title="选择文件夹")
            if folder_path:
                folder_path = folder_path.replace("\\", "/")  # 替换为统一的路径分隔符
                for fname in os.listdir(folder_path):
                    if fname.lower().endswith(('.jpg', '.jpeg', '.png', '.bmp')):
                        image_path = os.path.join(folder_path, fname).replace("\\", "/")
                        image_paths.append(image_path)
                image_paths.sort()

                # 设置 entry 显示文件夹路径
                self.image_path_entry.delete(0, end)
                self.image_path_entry.insert(0, folder_path)

        # 若成功导入图片路径
        if image_paths:
            self.image_files = image_paths
            self.current_image_index = 0
            self.current_scale = 1.0  # reset zoom

            # 显示状态信息
            self.info_var.set(
                f"已加载图片: {os.path.basename(self.image_files[self.current_image_index])} "
                f"({self.current_image_index + 1}/{len(self.image_files)})"
            )
            self.display_image(self.image_files[self.current_image_index])
            self.update_navigation_buttons()
        else:
            self.info_var.set("未选择任何图片")

    def update_navigation_buttons(self):
        """enable or disable navigation buttons based on image list and current index"""
        if len(self.image_files) > 1:
            self.prev_button.config(state="normal" if self.current_image_index > 0 else "disabled")
            self.next_button.config(state="normal" if self.current_image_index < len(self.image_files) - 1 else "disabled")
        else:
            self.prev_button.config(state="disabled")
            self.next_button.config(state="disabled")

    def previous_image(self):
        if self.current_image_index > 0:
            self.current_image_index -= 1
            self.image_path_entry.delete(0, end)
            self.image_path_entry.insert(0, self.image_files[self.current_image_index])
            self.info_var.set(f"已加载图片: {os.path.basename(self.image_files[self.current_image_index])} ({self.current_image_index + 1}/{len(self.image_files)})")
            self.current_scale = 1.0  # reset zoom scale
            self.display_image(self.image_files[self.current_image_index])
            self.update_navigation_buttons()

    def next_image(self):
        if self.current_image_index < len(self.image_files) - 1:
            self.current_image_index += 1
            self.image_path_entry.delete(0, end)
            self.image_path_entry.insert(0, self.image_files[self.current_image_index])
            self.info_var.set(f"已加载图片: {os.path.basename(self.image_files[self.current_image_index])} ({self.current_image_index + 1}/{len(self.image_files)})")
            self.current_scale = 1.0  # reset zoom scale
            self.display_image(self.image_files[self.current_image_index])
            self.update_navigation_buttons()

    def display_image(self, image_path):
        # open the image and display it as preview
        img = image.open(image_path)
        # estimate text area height (15 lines of font "微软雅黑" size 12)
        text_font = font.font(family="微软雅黑", size=12)
        line_height = text_font.metrics("linespace")
        target_height = int(line_height * 15 * self.current_scale)
        # calculate width based on aspect ratio
        original_width, original_height = img.size
        target_width = int(target_height * original_width / original_height)
        img = img.resize((target_width, target_height), image.resampling.lanczos)
        self.image_preview = imagetk.photoimage(img)
        self.image_label.config(image=self.image_preview)

    def zoom_in(self):
        # increase image size by 10%
        self.current_scale *= 1.1
        self.update_image()

    def zoom_out(self):
        # decrease image size by 10%
        self.current_scale *= 0.9
        self.update_image()

    def update_image(self):
        if not self.image_files or self.current_image_index >= len(self.image_files):
            messagebox.showwarning("警告", "请先加载图片")
            return

        image_path = self.image_files[self.current_image_index]

        try:
            img = image.open(image_path)

            # estimate text area height (15 lines of font "微软雅黑" size 12)
            text_font = font.font(family="微软雅黑", size=12)
            line_height = text_font.metrics("linespace")
            target_height = int(line_height * 15 * self.current_scale)

            # calculate width based on aspect ratio
            original_width, original_height = img.size
            target_width = int(target_height * original_width / original_height)

            img = img.resize((target_width, target_height), image.resampling.lanczos)
            self.image_preview = imagetk.photoimage(img)
            self.image_label.config(image=self.image_preview)

            # 更新路径栏显示当前图片(可选)
            self.image_path_entry.delete(0, end)
            self.image_path_entry.insert(0, image_path)

        except exception as e:
            messagebox.showerror("错误", f"无法加载图片:{e}")


    def start_evaluation(self):
        threading.thread(target=self.evaluate_essay).start()
    def evaluate_essay(self):
        if not self.image_files:
            messagebox.showerror("错误", "请先导入图片文件或文件夹!")
            return

        self.info_var.set("正在提取内容,请稍候...")

        try:
            for file in self.image_files:
                result = self.chat_doubao(file)
                base_name = os.path.splitext(os.path.basename(file))[0]
                output_path = os.path.join(self.output_dir, f"{base_name}.txt")
                with open(output_path, "a+", encoding="utf-8") as f:
                    f.write(result)

            self.info_var.set("提取完成!")
        except exception as e:
            messagebox.showerror("错误", f"提取失败: {e}")
            self.info_var.set("提取失败,请重试")

    def get_order(self):
        with open("order.txt","r",encoding="utf-8") as f:
            order = f.read().strip()
        return order
    def image_to_base64(self,image_path):
        # 获取图片文件的mime类型
        ext = os.path.splitext(image_path)[1].lower()
        mime_type = f"image/{ext[1:]}" if ext in ['.jpg', '.jpeg', '.png', '.gif'] else "image/jpeg"

        with open(image_path, "rb") as image_file:
            # 读取文件内容并进行base64编码
            base64_data = base64.b64encode(image_file.read()).decode('utf-8')
            # 返回完整的data uri格式
            return f"data:{mime_type};base64,{base64_data}"
    def chat_doubao(self,local_image_path):
        # 初始化客户端
        client = openai(
            base_url="https://ark.cn-beijing.volces.com/api/v3",
            api_key="<your api key>"  # 这里要输入自己的api
        )

        try:
            # 转换本地图片为base64编码
            image_data = self.image_to_base64(local_image_path)

            # 调用api处理图片
            response = client.chat.completions.create(
                model="doubao-seed-1-6-250615",
                messages=[
                    {
                        "role": "user",
                        "content": [
                            {
                                "type": "image_url",
                                "image_url": {
                                    "url": image_data  # 使用base64编码的本地图片数据
                                },
                            },
                            {"type": "text", "text": self.get_order()},
                        ],
                    }
                ]
            )

            # 提取并打印内容
            content = response.choices[0].message.content
            self.text_display.insert(end, f"{content}\n")
            self.text_display.see(end)
            # 更新预览图片显示
            self.display_image(local_image_path)

            # 更新顶部路径栏显示
            self.image_path_entry.delete(0, end)
            self.image_path_entry.insert(0, local_image_path)

        except filenotfounderror:
            self.text_display.insert('1.0',f"错误:找不到图片文件 '{local_image_path}'")
        except exception as e:
            print(f"处理过程中发生错误:{str(e)}")
        return content

    def open_output_dir(self):
        os.startfile(self.output_dir)


if __name__ == "__main__":
    root = tk()
    app = imageessayevaluator(root)
    root.mainloop()
上面程序中,为了实现本地图片的读取,我们通过image_to_base64这个函数进行图像信息的转化,如果不转化,我们就得从网址里获取,有可能需要网络存储桶,不仅不方便,也会延迟速度。
三、学后总结
1. 人工智能性能不断提升,未来对于多模态数据如:图片、音频和视频的处理就变得非常方便。借用python批量处理的特点,我们可以很好地实现指定文本的提取和保存。
2. 此工具还可以拓展。把指令文件order.txt修改一下,通过修改指令可以实现发票信息提取、作文批改等功能。如果未来支持音频和视频,也可以这么操作。
到此这篇关于python调用豆包api实现批量提取图片信息的文章就介绍到这了,更多相关python提取图片信息内容请搜索代码网以前的文章或继续浏览下面的相关文章希望大家以后多多支持代码网!


发表评论