背景
一般来说springcloud gateway到后面服务的路由属于内网交互,因此路由方式是否是https就显得不是那么重要了。事实上也确实如此,大多数的应用开发时基本都是直接http就过去了,不会一开始就是直接上https。然而随着时间的推移,项目规模的不断扩大,当被要求一定要走https时,就会面临一种困惑:将所有服务用一刀切的方式改为https方式监听,同时还要将网关服务所有的路由方式也全部切为https方式,一旦生产环境上线出问题将要面临全量服务的归滚,这时运维很可能跳出来说:生产环境几十个服务,每个服务最少2个节点,全量部署和回滚不可能在短时间完成。另外测试同学也可能会说,现在没有全量接口自动化回归测试工具,做一个次人工的全量接口回归测试也不现实。因此在这种情况下最稳妥的方式是实现:springcloud gateway & springboot restcontroller http/https双支持,这样可以做到分批分次进行切换,那么上面的困惑自然也就不存在了。
1. springboot http/https监听双支持
1.1 代码实现
为了不对原来的http监听产生任何影响,因此需要保障以下两点:
1、原主端口(server.port)监听什么都不变,监听方式仍为http,附加端口监听方式为https。(需要绕开的问题是:如果一个服务有多个监听端口,主端口会优先选择https方式)
2、附加端口不进行nacos服务注册(主要的考虑点还是不对原来的http监听和路由产生任何影响,这里我的方案是https监听端口号为http端口+10000)。
这样就能实现springboot服务主端口http监听,附加端口https监听。
实现代码如下:
import org.apache.catalina.connector.connector;
import org.apache.coyote.http11.http11nioprotocol;
import org.springframework.beans.factory.annotation.value;
import org.springframework.boot.web.embedded.tomcat.tomcatservletwebserverfactory;
import org.springframework.boot.web.server.webserverfactorycustomizer;
import org.springframework.context.annotation.bean;
import org.springframework.context.annotation.configuration;

/**
 * httpsconnectoraddinconfiguration
 *
 * @author chenx
 */
@configuration
public class httpsconnectoraddinconfiguration {

    private static final int https_port_offset = 10000;

    @value("${server.port}")
    private int port;

    @value("${additional-https-connector.ssl.key-store:xxx.p12}")
    private string keystore;

    @value("${additional-https-connector.ssl.key-store-password:xxx}")
    private string keystorepassword;

    @value("${additional-https-connector.ssl.key-store-type:pkcs12}")
    private string keystoretype;

    @value("${additional-https-connector.ssl.enabled:false}")
    private boolean enabled;

    @bean
    public webserverfactorycustomizer<tomcatservletwebserverfactory> servletcontainer() {
        return server -> {
            if (!this.enabled) {
                return;
            }

            connector httpsconnector = this.createhttpsconnector();
            server.addadditionaltomcatconnectors(httpsconnector);
        };
    }

    /**
     * createhttpsconnector
     *
     * @return
     */
    private connector createhttpsconnector() {
        connector connector = new connector(tomcatservletwebserverfactory.default_protocol);
        connector.setscheme("https");
        connector.setport(this.port + https_port_offset);
        connector.setsecure(true);

        http11nioprotocol protocol = (http11nioprotocol) connector.getprotocolhandler();
        protocol.setsslenabled(true);
        protocol.setkeystorefile(this.keystore);
        protocol.setkeystorepass(this.keystorepassword);
        protocol.setkeystoretype(this.keystoretype);
        protocol.setsslprotocol("tls");

        return connector;
    }
}
备注:
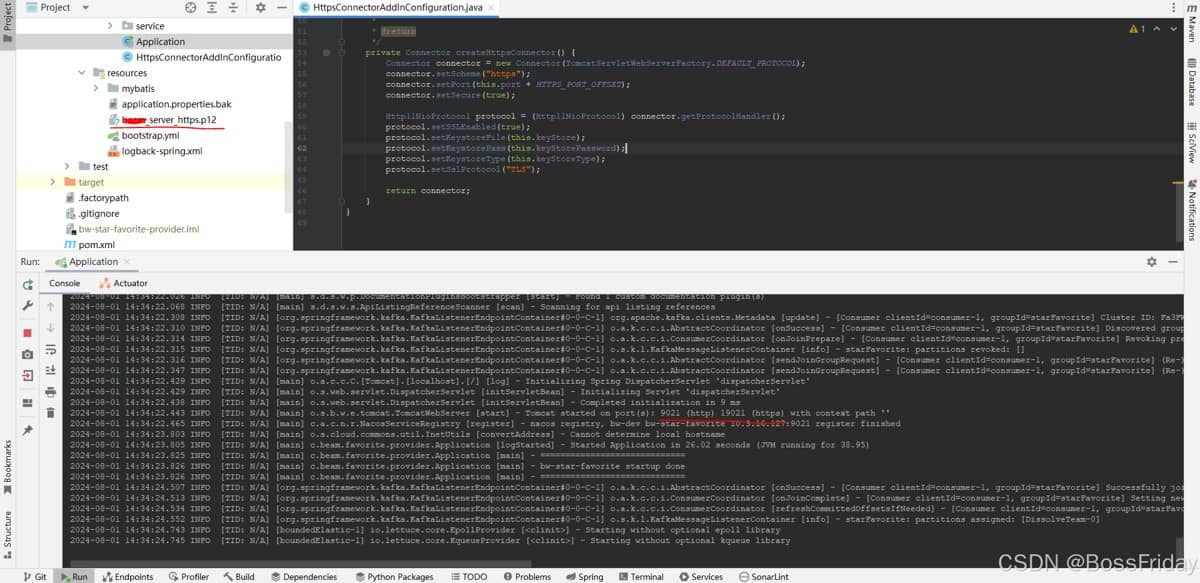
1、上述代码中的配置默认值大家自行修改(key-store:xxx.p12,key-store-password:xxx),如果觉得配置additional-https-connector相关配置命名不合适也可自行修改。当配置好additional-https-connector相关配置(additional-https-connector.ssl.enabled是一个https附加端口监听的开关),启动服务就可以看到类似如下的日志,同时查看nacos中的服务实例也会发现并没有进行https端口的服务注册;
2、这里我用的是p12自签证书,证书需要放到项目的resouces目录下(可以用keytool -genkey命令去生成一个)。

1.2 配置
配置示例如下,keystore、keystorepassword、keystoretype使用代码中的默认值,需要更换证书的时候再进行配置。
server:
  port: 9021
  tomcat:
    min-spare-threads: 400
    max-threads: 800

additional-https-connector:
  ssl:
    enabled: true
2. springcloud gateway http/https路由双支持
思路:在网关服务增加自定义配置(httpsserviceconfig)来定义需要切换为https路由的服务列表,然后使用过滤器(httpsloadbalancerfilter)进行转发uri的https重写;
这样就能实现在配置列表中的服务进行https路由,否则保持原有https路由。
2.1 代码实现
- httpsserviceconfig
import lombok.extern.slf4j.slf4j;
import org.apache.commons.collections.collectionutils;
import org.springframework.boot.context.properties.configurationproperties;
import org.springframework.cloud.context.config.annotation.refreshscope;
import org.springframework.cloud.endpoint.event.refreshevent;
import org.springframework.context.event.eventlistener;
import org.springframework.stereotype.component;

import java.util.hashset;
import java.util.list;
import java.util.set;

/**
 * httpsserviceconfig
 *
 * @author chenx
 */
@slf4j
@component
@refreshscope
@configurationproperties(prefix = "bw.gateway")
public class httpsserviceconfig {

    private list<string> httpsservices;
    private set<string> httpsserviceset = new hashset<>();

    public list<string> gethttpsservices() {
        return this.httpsservices;
    }

    public void sethttpsservices(list<string> httpsservices) {
        this.httpsservices = httpsservices;
        this.updatehttpsservices();
    }

    public set<string> gethttpsserviceset() {
        return this.httpsserviceset;
    }

    /**
     * handlerefreshevent
     */
    @eventlistener(refreshevent.class)
    public void handlerefreshevent() {
        this.updatehttpsservices();
    }

    /**
     * updatehttpsservices
     */
    private void updatehttpsservices() {
        this.httpsserviceset = collectionutils.isnotempty(this.httpsservices) ? new hashset<>(this.httpsservices) : new hashset<>();
        log.info("httpsserviceset updated, httpsserviceset.size() = {}", this.httpsserviceset.size());
    }
}
- httpsloadbalancerfilter
import com.beam.work.gateway.common.filterenum;
import com.beam.work.gateway.config.httpsserviceconfig;
import lombok.extern.slf4j.slf4j;
import org.springframework.beans.factory.annotation.autowired;
import org.springframework.cloud.client.serviceinstance;
import org.springframework.cloud.client.loadbalancer.loadbalancerclient;
import org.springframework.cloud.context.config.annotation.refreshscope;
import org.springframework.cloud.gateway.filter.gatewayfilterchain;
import org.springframework.cloud.gateway.filter.globalfilter;
import org.springframework.cloud.gateway.route.route;
import org.springframework.cloud.gateway.support.serverwebexchangeutils;
import org.springframework.core.ordered;
import org.springframework.stereotype.component;
import org.springframework.web.server.serverwebexchange;
import org.springframework.web.util.uricomponentsbuilder;
import reactor.core.publisher.mono;

import java.net.uri;
import java.util.objects;

/**
 * httpsloadbalancerfilter
 *
 * @author chenx
 */
@slf4j
@refreshscope
@component
public class httpsloadbalancerfilter implements globalfilter, ordered {

    private static final int https_port_offset = 10000;
    private final loadbalancerclient loadbalancer;

    @autowired
    private httpsserviceconfig httpsserviceconfig;

    public httpsloadbalancerfilter(loadbalancerclient loadbalancer) {
        this.loadbalancer = loadbalancer;
    }

    @override
    public int getorder() {
        return filterenum.https_load_balancer_filter.getcode();
    }

    @override
    public mono<void> filter(serverwebexchange exchange, gatewayfilterchain chain) {
        route route = exchange.getattribute(serverwebexchangeutils.gateway_route_attr);
        boolean isrewritetohttps = objects.nonnull(route) && this.httpsserviceconfig.gethttpsserviceset().contains(route.getid());
        if (isrewritetohttps) {
            serviceinstance instance = this.loadbalancer.choose(route.geturi().gethost());
            if (objects.nonnull(instance)) {
                uri originaluri = exchange.getrequest().geturi();
                uri httpsuri = uricomponentsbuilder.fromuri(originaluri)
                        .scheme("https")
                        .host(instance.gethost())
                        .port(instance.getport() + https_port_offset)
                        .build(true)
                        .touri();

                log.info("httpsloadbalancerfilter rewritetohttps: {}", httpsuri.tostring());
                exchange.getattributes().put(serverwebexchangeutils.gateway_request_url_attr, httpsuri);
            }
        }

        return chain.filter(exchange);
    }
}
备注:
1、这里实现了配置的刷新,因此需要进行服务的https路由切换时只需修改配置即可,而网关服务不需要重启;
2、过滤器使用set进行判断,效率上肯定优于对list的遍历查找;
3、过滤器的order建议放到最后,因此可以直接使用integer.max_value(我们的项目中有多个过滤器,并且通过filterenum枚举去统一管理);
2.2 配置
配置示例:
spring:
  cloud:
    gateway:
      enabled: true
      httpclient:
        ssl:
          use-insecure-trust-manager: true
        connect-timeout: 10000
        response-timeout: 120000
        pool:
          max-idle-time: 15000
          max-life-time: 45000
          evictioninterval: 5000
      routes:
        - id: bw-star-favorite
          uri: lb://bw-star-favorite
          order: -1
          predicates:
            - path=/star-favoritear/v1/**

bw:
  gateway:
    xssrequestfilterenable: false
    xssresponsefilterenable: false
    httpsservices:
      - bw-star-favorite
备注:
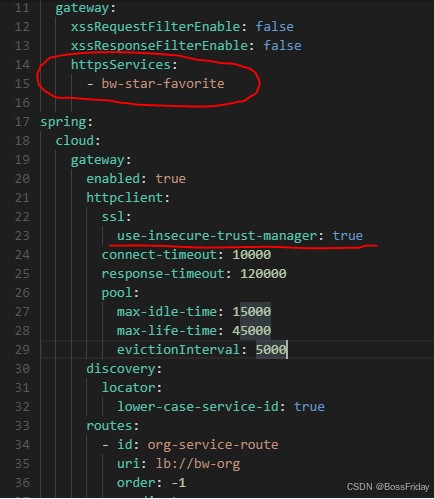
1、需要变更的配置为:
- 开启ssl信任(spring.cloud.gateway.httpclient.ssl):
- 设置https路由服务列表(bw.gateway.httpsservices)

结束语
通过上述两步就能实现springcloud gateway & springboot restcontroller http/https双支持,严谨的做法是还需要将feignclient的调用进行https化,上面的实现方式中之所以不对https端口进行注册的原因就是避免http方式的feignclient去调用https目标端口从而引发问题。关于feignclient的https切换实际上也可以借鉴网关的思路将请求uri重写为端口号+10000的https请求即可。
那么通过这个思路就可以实现:服务的分批、feignclient分步https路由切换,从而保障整个割接风险可控和平滑。
到此这篇关于springboot服务http/https双监听及路由的实现示例的文章就介绍到这了,更多相关springboot http/https双监听及路由内容请搜索代码网以前的文章或继续浏览下面的相关文章希望大家以后多多支持代码网!


发表评论