概述
http 摘要认证使用对通信双方都可知的口令进行校验,最终的传输数据并非明文形式。
http 摘要基本认证意在解决 http 基本认证存在的大部分严重漏洞,但不应将其认为是web安全的最终解决方案。
参数
http摘要认证的回应与http基本认证相比要复杂得多,下面看看http摘要认证中涉及的一些参数:
username:用户名。password:用户密码。realm:认证域,由服务器返回。opaque:透传字符串,客户端应原样返回。method:请求的方法。nonce:由服务器生成的随机字符串。nc:即nonce-count,指请求的次数,用于计数,防止重放攻击。qop被指定时,nc也必须被指定。cnonce:客户端发给服务器的随机字符串,qop被指定时,cnonce也必须被指定。qop:保护级别,客户端根据此参数指定摘要算法。若取值为auth,则只进行身份验证;若取值为auth-int,则还需要校验内容完整性。uri:请求的uri。response:客户端根据算法算出的摘要值。algorithm:摘要算法,目前仅支持md5。entity-body:页面实体,非消息实体,仅在auth-int中支持。
通常服务器携带的数据包括realm、opaque、nonce、qop等字段,如果客户端需要做出验证回应,就必须按照一定的算法计算得到一些新的数据并一起返回。
总结:
- http摘要认证与http基本认证一样,都是基于http层面的认证方式,不使用session,因而不支持remember-me。
- 虽然解决了http基本认证密码明文传输的问题,但并未解决密码明文存储的问题,依然存在安全隐患。
- http 摘要认证与 http 基本认证相比,仅仅在非加密的传输层中有安全优势,但是其相对复杂的实现流程,使得它并不能成为一种被广泛使用的认证方式。
demo
pom.xml依赖
		<dependency>
			<groupid>org.springframework.boot</groupid>
			<artifactid>spring-boot-starter-web</artifactid>
		</dependency>
		<!-- 测试包,当我们使用 mvn package 的时候该包并不会被打入,因为它的生命周期只在 test 之内-->
		<dependency>
			<groupid>org.springframework.boot</groupid>
			<artifactid>spring-boot-starter-test</artifactid>
			<scope>test</scope>
		</dependency>

		<dependency>
			<groupid>org.springframework.boot</groupid>
			<artifactid>spring-boot-starter-security</artifactid>
		</dependency>
digest1application.java
import org.springframework.boot.springapplication;
import org.springframework.boot.autoconfigure.springbootapplication;
import org.springframework.web.bind.annotation.getmapping;
import org.springframework.web.bind.annotation.restcontroller;

/**
 * @author gzb
 */
@restcontroller
@springbootapplication
public class digest1application {

    public static void main(string[] args) {
        springapplication.run(digest1application.class, args);
    }

    @getmapping("/demo1")
    public string demo1() {
        return "hello battcn";
    }

}
mypasswordencoder.java
import org.springframework.security.crypto.password.passwordencoder;
import org.springframework.stereotype.component;

/**
 * @author gzb
 * @date 2021/10/1315:06
 */
@component
public class mypasswordencoder implements passwordencoder {
    @override
    public string encode(charsequence charsequence) {
        return charsequence.tostring();
    }

    @override
    public boolean matches(charsequence charsequence, string s) {
        return s.equals(charsequence.tostring());
    }
}
websecurityconfig.java
import org.springframework.beans.factory.annotation.autowired;
import org.springframework.context.annotation.bean;
import org.springframework.security.config.annotation.web.builders.httpsecurity;
import org.springframework.security.config.annotation.web.configuration.enablewebsecurity;
import org.springframework.security.config.annotation.web.configuration.websecurityconfigureradapter;
import org.springframework.security.core.userdetails.userdetailsservice;
import org.springframework.security.web.authentication.www.digestauthenticationentrypoint;
import org.springframework.security.web.authentication.www.digestauthenticationfilter;

/**
 * @author gzb
 * @date 2021/10/1313:41
 */
@enablewebsecurity
public class websecurityconfig extends websecurityconfigureradapter {
    @autowired
    private digestauthenticationentrypoint mydigestentrypoint;
    @autowired
    private userdetailsservice userdetailsservice;

    @bean
    public digestauthenticationentrypoint digestentrypoint() {
        digestauthenticationentrypoint digestauthenticationentrypoint = new digestauthenticationentrypoint();
        digestauthenticationentrypoint.setkey("https://blog.csdn.net/zhanwuguo8346");
        digestauthenticationentrypoint.setrealmname("spring security");
        digestauthenticationentrypoint.setnoncevalidityseconds(500);
        return digestauthenticationentrypoint;
    }

    public digestauthenticationfilter digestauthenticationfilter() {
        digestauthenticationfilter filter = new digestauthenticationfilter();
        filter.setauthenticationentrypoint(mydigestentrypoint);
        filter.setuserdetailsservice(userdetailsservice);
        return filter;
    }

    protected void configure(httpsecurity http) throws exception {
        http.authorizerequests()
                .anyrequest().authenticated()
                .and()
                .csrf().disable()
                .exceptionhandling().authenticationentrypoint(mydigestentrypoint)
                .and()
                .addfilter(digestauthenticationfilter());
    }
}
application.properties
server.port=9090
server.servlet.context-path=/ditest

spring.security.user.name=name
spring.security.user.password=password
测试
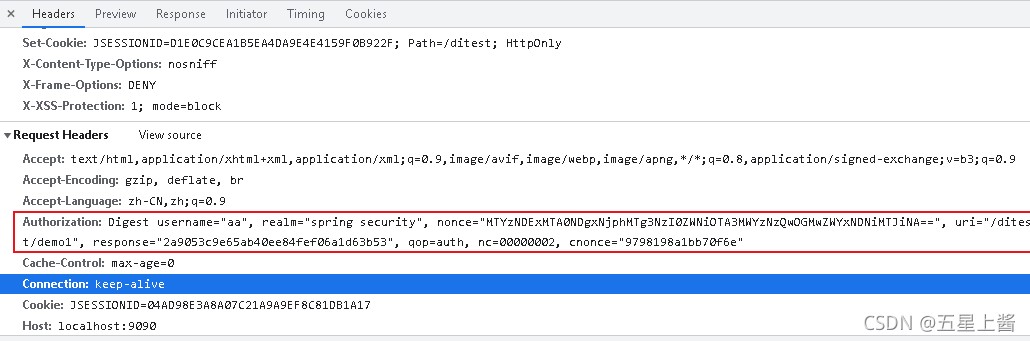
- 浏览器f12打开开发者界面
- 启动项目,浏览器访问:http://localhost:9090/ditest/demo1
- 输入用户名、密码:name、password
- 界面返回:hello battcn
查看请求数据:
总结
以上为个人经验,希望能给大家一个参考,也希望大家多多支持代码网。


发表评论