一.登录security
1.自定义用户账号和密码
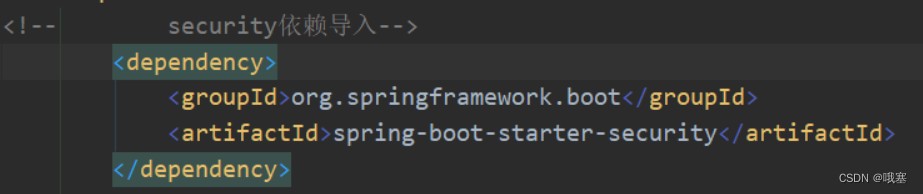
step01-先导入两个依赖
方式一:在核心配置文件下设定信息(不合理)
spring.security.user.password=123
spring.security.user.name=pan
方式二:根据数据库数据进行登录验证(userdetails)(重要)
step01-mysql的连接
spring.datasource.username=root
spring.datasource.password=123456
spring.datasource.url=jdbc:mysql:///test02?servertimezone=asia/shanghai
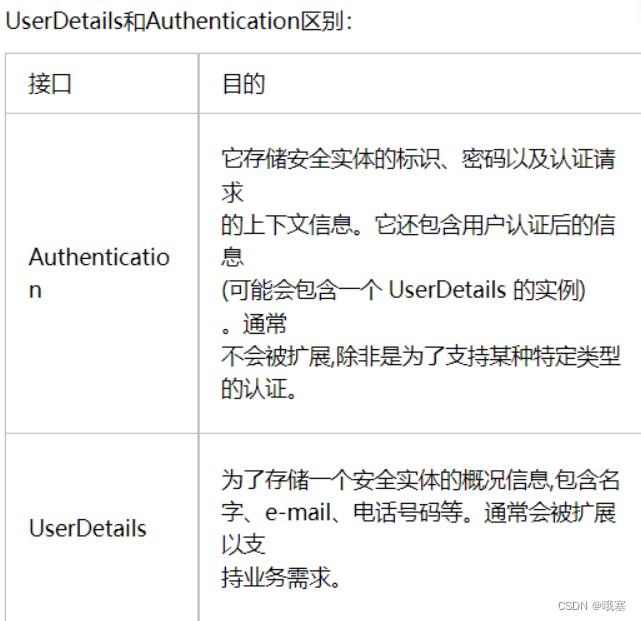
step02-实体类实现userdetails(是springsecurity中定义的用户定义规范)
//获取当前用户的权限/角色
	collection<? extends grantedauthority> getauthorities();
	//获取用户密码
    string getpassword();
	//如果springsecurity框架想要获取用户名就会调用改方法,返回的变量名叫什么都行
    string getusername();
	//判断当前用户账户是否没有过期,正常来说在数据库中,有一个字段可以显示该账户状态
    boolean isaccountnonexpired();
	//当前用户是否没有锁定
    boolean isaccountnonlocked();
	//账户密码是否没有过期
    boolean iscredentialsnonexpired();
	//当前用户是否可用,正常来说在数据库中,有一个字段可以显示该账户状态
    boolean isenabled();
public class user implements userdetails {
private integer id;
private string username;
private string address;
private string password;
private string favorites;
private integer gender;
private string grade;
private integer age;
private boolean enabled;
/**
* 获取当前用户的角色
* @return
*/
@override
public collection<? extends grantedauthority> getauthorities() {
return null;
}
/**
* 获取用户密码
* @return
*/
@override
public string getpassword() {
return password;
}
/**
* 如果 spring security 框架需要获取到用户名,他就会调用这个方法
*
* 所以,该方法返回值的变量名称,实际上无所谓,变成名称可以是任何名字
*
* @return
*/
@override
public string getusername() {
return username;
}
/**
* 判断当前账户是否过期,正常来说,应该在数据库中,有一个账户是否过期的字段,在这里直接返回即可
* @return
*/
@override
public boolean isaccountnonexpired() {
return true;
}
/**
* 账户是否没有锁定
* @return
*/
@override
public boolean isaccountnonlocked() {
return true;
}
/**
* 账户密码是否没有过期
* @return
*/
@override
public boolean iscredentialsnonexpired() {
return true;
}
/**
* 账户是否可用
* @return
*/
@override
public boolean isenabled() {
return enabled;
}
public void setenabled(boolean enabled) {
this.enabled = enabled;
}
public void setusername(string username) {
this.username = username;
}
public string getaddress() {
return address;
}
public void setaddress(string address) {
this.address = address;
}
public integer getid() {
return id;
}
public void setid(integer id) {
this.id = id;
}
public void setpassword(string password) {
this.password = password;
}
public string getfavorites() {
return favorites;
}
public void setfavorites(string favorites) {
this.favorites = favorites;
}
public integer getgender() {
return gender;
}
public void setgender(integer gender) {
this.gender = gender;
}
public string getgrade() {
return grade;
}
public void setgrade(string grade) {
this.grade = grade;
}
public integer getage() {
return age;
}
public void setage(integer age) {
this.age = age;
}
@override
public string tostring() {
return "user{" +
"id=" + id +
", username=" + username +
", address=" + address +
", password=" + password +
", favorites=" + favorites +
", gender=" + gender +
", grade=" + grade +
", age=" + age +
"}";
}
}第二步:在实现service层实现userdetailsservice,在loaduserbyusername中判断前端与数据库中的值是否一致,和shiro的realm相似
@service
public class userservice implements userdetailsservice {
    @autowired
    usermapper usermapper;
/**
     * 系统登录的时候,该方法会被自动调用
     */
    @override
    public userdetails loaduserbyusername(string username) throws usernamenotfoundexception {
        user user = usermapper.loaduserbyusername(username);
        if (user == null) {
            throw new usernamenotfoundexception("账户不存在");
        }
        //查询用户角色
        user.setroles(usermapper.getrolesbyuid(user.getid()));
        //返回给user类中,因为该类实现userdetails的方法中的很多方法,这些方法是将值给springsecurity
        return user;
    }
}
2.自制登录页面(securityfilterchain)
第一步:需要设置一个登录界面,还有在controller层输写一个登录界面的接口
第二步:配置类,改登录界面的路径
注意:security底层就是使用过滤器,一共有16个过滤器,称为过滤器链;
1.spring5以前,springboot2.7.7
@configuration
public class securityconfig {
    /**
    *spring5之前配置spring security的过滤器链
    */
    @bean
    securityfilterchain securityfilterchain(httpsecurity http) throws exception {
        http
                //开始过滤器的配置
                .authorizerequests()
                //拦截所有请求,这个就相当于 /**
                .anyrequest()
                //表示拦截下来的请求,都必须认证(登录)之后才能访问
                .authenticated()
                .and()
                //开始登录表单的配置,其实配置的是 usernamepasswordauthenticationfilter 过滤器
                .formlogin()
                //首先指定登录页面的地址
                //登录页面,默认是 /login get 请求
                .loginpage("/login")
                //指定登录接口的地址
                //默认情况下,登录接口也是 /login post 请求
                .loginprocessingurl("/dologin")
                //配置登录的用户名的 key,默认就是 username
                .usernameparameter("username")
                //配置登录的用户密码的 key,默认就是 password
                .passwordparameter("password")
                //登录成功之后的跳转页面,这个是服务端跳转,请求转发
//                .successforwardurl("/hello")
                //登录成功之后的跳转页面,这个是客户端跳转,重定向
                //假设一开始访问 /a,系统自动跳转到登录页面,登录成功之后,就会跳转回 /a,就是你想访问哪个网页的,等你登录后,直接访问该网页
                //假设一开始就访问登录页面,那么登录成功之后,才会来到 /hello
                .defaultsuccessurl("/hello")
                //允许登录表单的路径访问得到
                .permitall()
                .and()
                //禁用 csrf 保存策略,本质上就是从 security 过滤器链中移除 csrffilter 过滤器
                .csrf()
                .disable();
        return http.build();
        //第一个参数是拦截路径,第二个参数是写过滤器,这里没有写过滤器
        //这个配置表示拦截所有的请求,但是拦截下来的之后,不经过任意过滤器
//        return new defaultsecurityfilterchain(new antpathrequestmatcher("/**"), new arraylist<>());
    }
}
2.spring6之后,springboot3.0.1
@bean
    securityfilterchain securityfilterchain(httpsecurity http) throws exception {
        //这个配置表示拦截所有请求,但是拦截下来之后,不经过任何过滤器
//        return new defaultsecurityfilterchain(new antpathrequestmatcher("/**"));
        http.authorizehttprequests()
                // /login.css 这个地址,不需要登录就可以访问
//                .requestmatchers("/login.css").permitall()
                .requestmatchers("/hello").permitall()
                //拦截所有请求
                .requestmatchers("/**")
                //所有请求都必须登录之后才可以访问
                .authenticated()
                .and()
                //表示禁用 csrf 防御机制,这个禁用的本质就是将 csrffilter 从过滤器链中移除掉
                .csrf().disable()
                //开启表单登录,如果没有自己去配置 securityfilterchain,默认表单登录是开启的,但是如果自己配置了,则默认的表单登录就会被覆盖掉,所以要重新配置
                .formlogin()
                //配置登录接口,登录接口是 post 请求,这个地方,如果不配置,默认地址是 /login
                .loginprocessingurl("/dologin")
                //配置登录用户名的 key,默认就是 username
                .usernameparameter("name")
                //配置登陆密码的 key,默认是 password
                .passwordparameter("passwd")
                //配置登录页面,默认登录页面地址是 /login(get 请求)
                .loginpage("/login.html")
                //登录成功之后的跳转页面,这个跳转方式是请求转发(服务端跳转)
                //一般不用这种
//                .successforwardurl()
                //默认登录成功之后的跳转页面,这个是重定向跳转
                //如果用户首先访问 /a,但是因为没有登录,自动跳转到登录页面,登录成功之后,就会跳转回 /a
                //如果用户一开始直接就访问的是登录页面,那么登录成功之后,就会跳转到 /hello
//                .defaultsuccessurl("/hello")
                //登录成功的处理器
                //auth 表示当前登录成功的用户对象
                .successhandler((req, resp, auth) -> {
                    //获取当前登录成功的用户对象
                    user user = (user) auth.getprincipal();
                    user.setpassword(null);
                    resp.setcontenttype("application/json;charset=utf-8");
                    map<string, object> map = new hashmap<>();
                    map.put("status", 200);
                    map.put("message", "登录成功");
                    map.put("data", user);
                    resp.getwriter().write(new objectmapper().writevalueasstring(map));
                })
                //失败之后的跳转路径(请求转发)
//                .failureforwardurl()
                //失败路径
//                .failureurl()
                //配置失败的处理器
                .failurehandler((req, resp, e) -> {
                    resp.setcontenttype("application/json;charset=utf-8");
                    map<string, object> map = new hashmap<>();
                    map.put("status", 500);
                    map.put("message", "登录失败");
                    if (e instanceof badcredentialsexception) {
                        map.put("message", "用户名或者密码输入错误,登录失败");
                    } else if (e instanceof accountexpiredexception) {
                        map.put("message", "账户过期,登录失败");
                    } else if (e instanceof credentialsexpiredexception) {
                        map.put("message", "密码过期,登录失败");
                    } else if (e instanceof disabledexception) {
                        map.put("message", "账户被禁用,登录失败");
                    } else if (e instanceof lockedexception) {
                        map.put("message", "账户被锁定,登录失败");
                    }
                    resp.getwriter().write(new objectmapper().writevalueasstring(map));
                })
                .permitall();
        return http.build();
    }
3.放行策略
方法一:配置过滤器链(一般使用接口放行使用)
@bean
    securityfilterchain securityfilterchain(httpsecurity http) throws exception {
        http
                //开始过滤器的配置
                .authorizerequests()
                //允许/css/login.css匿名访问,就是给静态资源直接访问,不用拦截的,不能在anyrequest之后执行
                .antmatchers("/css/login.css")
            	//允许所有用户
            	.permitall()
            	//允许匿名用户访问,不允许登录用户访问,所以我们正常使用permitall
                //.anonymous()
                //拦截所有请求,这个就相当于 /**
                .anyrequest()
                //表示拦截下来的请求,都必须认证(登录)之后才能访问
                .authenticated()
方法二:配置一个websecuritycustomizer接口进行放行(一般静态资源选择用此放行规则)
    /**
     *spring6之后springboot3.0.1
     * 资源不用拦截,直接放行,有两种思路:
     *
     * 1. web.ignoring().requestmatchers("/login.css"); 这个放行方式,本质上。请求将不再经过 spring security 过滤器链
     * 2. .requestmatchers("/login.css").permitall() 这个放行方式,请求还是会经过 spring security 过滤器链,但是不会被拦截
     *
     * 如果要放行的资源,是静态资源,不需要进行 java 运算的,例如 html/css/js/mp3/mp4/图片,那么可以使用第一种放行方式
     * 如果是一个 java 接口,则建议使用第二种放行方式。
     * @return
     */
    @bean
    websecuritycustomizer websecuritycustomizer() {
        return new websecuritycustomizer() {
            @override
            public void customize(websecurity web) {
                //这个也是给资源放行
                web.ignoring().requestmatchers("/login.css");
            }
        };
    }
//spring5之前springboot2.7.7
    @bean
    websecuritycustomizer websecuritycustomizer() {
        return new websecuritycustomizer() {
            @override
            public void customize(websecurity web) {
                web.ignoring().antmatchers("css/login.css");
            }
        };
}注意:如果是静态资源就选择用第二种方式用接口websecuritycustomizer进行,但是如果是接口的放行那么就用第一种方式,因为当登录的时候,我们希望请求可以经过springsecurity的securitycontextpersistencefilter,这个过滤器将会从httpsession中获得登录用户的对象,然后存到securitycontextholder里面去,然后securitycontextholder本质上就是存储到threadlocal里面,保持线程一致性
4.登录的时候获取登录对象(securitycontextholder.getcontext().getauthentication())
1.在controller中获取登录对象
方式一:通过securitycontextholder来获取
@restcontroller
//@requestmapping("/user")
public class usercontroller {
    @getmapping("/hello")
    public string hello(httpsession session) {
//        获取当前登录成功的登录信息
        authentication authentication = securitycontextholder.getcontext().getauthentication();
//        获得登录用户的名称
        string name = authentication.getname();
        //从httpsession里面获取登录对象,一般不这样做,因为我们还是希望可以在同一个线程的
        //securitycontext spring_security_context = (securitycontext) session.getattribute("spring_security_context");
        //string name1 = spring_security_context.getauthentication().getname();
        //system.out.println("name1 = " + name1);
        return "hello:" + name;
    }
}
方式二:通过参数principal
	@getmapping("/hello")
    public string hello(principal principal) {
        //获取当前登录成功的用户名
        string name = principal.getname();
        system.out.println("name = " + name);
        return "hello";
    }
方式三:通过参数httpsession
2 .在service中获取登录的对象
方式一:通过securitycontextholder
@service
public class helloservice {
    public void hello() {
        securitycontext securitycontext = securitycontextholder.getcontext();
        authentication authentication = securitycontext.getauthentication();
        //获取当前登录成功的用户对象
        user user = (user) authentication.getprincipal();
        system.out.println("user = " + user);
    }
}
方式二:requestcontextholder.getrequestattributes()).getrequest()来获取request来获取session
@service
public class helloservice {
    public void hello() {
        httpservletrequest request = ((servletrequestattributes) requestcontextholder.getrequestattributes()).getrequest();
        httpsession session = request.getsession();
        new thread(new runnable() {
            @override
            public void run() {
                //获取当前请求对象
                securitycontext sc = (securitycontext) session.getattribute(httpsessionsecuritycontextrepository.spring_security_context_key);
                authentication authentication1 = sc.getauthentication();
                user user = (user) authentication1.getprincipal();
                system.out.println("fffffffff = " + user);
            }
        }).start();
    }
}
5.通过json来进行登录验证
引言:springsecurity是通过key-value的形式获取登录的账户和密码的
方式一:重写usernamepasswordauthenticationfilter类里的attemptauthentication方法
step01-重写attemptauthentication方法
public class myjsonfilter extends usernamepasswordauthenticationfilter {
    @override
    public authentication attemptauthentication(httpservletrequest request, httpservletresponse response) throws authenticationexception {
        if (!request.getmethod().equals("post")) {
            throw new authenticationserviceexception("authentication method not supported: " + request.getmethod());
        }
        if (request.getcontenttype().equalsignorecase(mediatype.application_json_value) || request.getcontenttype().equalsignorecase(mediatype.application_json_utf8_value)) {
            //此时就认为请求参数是 json 形式的
            user user = null;
            try {
                user = new objectmapper().readvalue(request.getinputstream(), user.class);
            } catch (ioexception e) {
                e.printstacktrace();
            }
            string username = user.getusername();
            username = (username != null) ? username.trim() : "";
            string password = user.getpassword();
            password = (password != null) ? password : "";
            usernamepasswordauthenticationtoken authrequest = usernamepasswordauthenticationtoken.unauthenticated(username,
                    password);
            // allow subclasses to set the "details" property
            setdetails(request, authrequest);
            return this.getauthenticationmanager().authenticate(authrequest);
        } else {
            return super.attemptauthentication(request, response);
        }
    }
}
step02-注入到spring容器中
@configuration
public class securityconfig {
    @autowired
    userservice userservice;
    /**
     * 这个过滤器,替代的是 usernamepasswordauthenticationfilter,所以我们之前关于表单的配置,现在都要配置给 myjsonfilter 才会生效
     *
     * @return
     */
    @bean
    myjsonfilter myjsonfilter() {
        myjsonfilter myjsonfilter = new myjsonfilter();
//        myjsonfilter.setfilterprocessesurl();
//        myjsonfilter.setusernameparameter();
//        myjsonfilter.setpasswordparameter();
        myjsonfilter.setauthenticationsuccesshandler((req, resp, auth) -> {
            resp.getwriter().write("success");
        });
        myjsonfilter.setauthenticationfailurehandler(new authenticationfailurehandler() {
            @override
            public void onauthenticationfailure(httpservletrequest request, httpservletresponse response, authenticationexception exception) throws ioexception, servletexception {
            }
        });
        myjsonfilter.setauthenticationmanager(authenticationmanager());
        return myjsonfilter;
    }
    /**
     * 这个是一个认证管理器
     * @return
     */
    @bean
    authenticationmanager authenticationmanager() {
        //daoauthenticationprovider 这个对象负责数据库密码的校验
        daoauthenticationprovider daoauthenticationprovider = new daoauthenticationprovider();
        daoauthenticationprovider.setuserdetailsservice(userservice);
        providermanager manager = new providermanager(daoauthenticationprovider);
        return manager;
    }
    @bean
    securityfilterchain securityfilterchain(httpsecurity http) throws exception {
        http.authorizerequests()
                .antmatchers("/**")
                .authenticated()
                .and()
                .csrf().disable();
        http.formlogin()
                //如果只配置登录页面,那么默认情况下,登录接口也是 /login.html
                .permitall();
        //新加一个过滤器进来,将之放到 usernamepasswordauthenticationfilter 过滤器所在的位置
        http.addfilterat(myjsonfilter(), usernamepasswordauthenticationfilter.class);
        return http.build();
    }
}
方式二:通过将json的值直接放入到usernamepasswordauthenticationtoken中,
step01-首先在配置类中获取authenticationmanager
@configuration
public class securityconfig {
	//获取的是登录成功的用户名
    @autowired
    userservice userservice;
    //和shiro中的安全管理器defaultwebsecuritymanager相似,userdetailsservice相当于shiro的realm
    /**
     * 这个是一个认证管理器
     * @return
     */
    @bean
    authenticationmanager authenticationmanager() {
        //调用authenticationprovider的子类daoauthenticationprovider来验证。
        //默认实例化authenticationprovider的一个实现:daoauthenticationprovider。daoauthenticationprovider通过接口userdetailsservice的实现类从内存或db中获取用户信息userdetails(userdetails十分类似authentication,也是一个接口,但是与authentication用途不同,不要搞混)。daoauthenticationprovider通过函数authenticate比较入参authentication与userdetails是否相符,来判断用户是否可以登录。如果相符,会将获得的userdetails中的信息补全到一个authentication实现类,并将该实现类作为认证实体返回。以后便可以通过当前上下文的认证实体authentication获取当前登录用户的信息。
        daoauthenticationprovider provider = new daoauthenticationprovider();
        provider.setuserdetailsservice(userservice);
        //调用authenticationmanager的实现类providermanager
        providermanager pm = new providermanager(provider);
        return pm;
    }
    @bean
    securityfilterchain securityfilterchain(httpsecurity http) throws exception {
        http.authorizerequests()
                .antmatchers("/login").permitall()
                .antmatchers("/**")
                .authenticated()
                .and()
                .csrf().disable();
        return http.build();
    }
step02-接口中直接获取json
@restcontroller
public class logincontroller {
    //设定一个json的登录参数,因为底层我们是根据key-value登录的
    @autowired
    authenticationmanager authenticationmanager;
    @postmapping("/dologin")
    //@requestbody是json的参数
    public string login(@requestbody user user) {
        usernamepasswordauthenticationtoken authrequest = usernamepasswordauthenticationtoken.unauthenticated(user.getusername(),user.getpassword());
        //执行认证操作
        try {
            //参数 authrequest 是一个未经认证的 authentication,而方法的返回值是一个认证后的 authentication
            authentication authentication = authenticationmanager.authenticate(authrequest);
            securitycontextholder.getcontext().setauthentication(authentication);
            return "success";
        } catch (authenticationexception e) {
            e.printstacktrace();
            return e.getmessage();
        }
    }
}
@restcontroller
public class logincontroller {
@autowired
authenticationmanager authenticationmanager;
@postmapping("/login")
public map<string, object> login(@requestbody user user) throws ioexception {
usernamepasswordauthenticationtoken token = usernamepasswordauthenticationtoken.unauthenticated(user.getusername(), user.getpassword());
try {
//这里就是执行具体的认证操作
//参数是一个未经认证的 authentication 对象,而 authenticate 方法返回值则是一个经过认证的 authentication 的对象
authentication auth = authenticationmanager.authenticate(token);
//将认证后的 auth 对象存入 securitycontextholder 中
securitycontextholder.getcontext().setauthentication(auth);
//获取当前登录成功的用户对象
user authuser = (user) auth.getprincipal();
authuser.setpassword(null);
map<string, object> map = new hashmap<>();
map.put("status", 200);
map.put("message", "登录成功");
map.put("data", authuser);
return map;
} catch (authenticationexception e) {
map<string, object> map = new hashmap<>();
map.put("status", 500);
map.put("message", "登录失败");
if (e instanceof badcredentialsexception) {
map.put("message", "用户名或者密码输入错误,登录失败");
} else if (e instanceof accountexpiredexception) {
map.put("message", "账户过期,登录失败");
} else if (e instanceof credentialsexpiredexception) {
map.put("message", "密码过期,登录失败");
} else if (e instanceof disabledexception) {
map.put("message", "账户被禁用,登录失败");
} else if (e instanceof lockedexception) {
map.put("message", "账户被锁定,登录失败");
}
return map;
}
}
}
6.注销,未登录访问的处理器
@bean
    securityfilterchain securityfilterchain(httpsecurity http) throws exception {
        http.authorizerequests()
                .antmatchers("/login").permitall()
                .antmatchers("/**")
                .authenticated()
                .and()
                .csrf().disable()
                //开启注销登录的配置
                .logout()
            //第一个参数是访问路径,第二个是请求的方法
                .logoutrequestmatcher(new antpathrequestmatcher("/a", "post"))
            //注销成功后的回调
                .logoutsuccesshandler((req, resp, auth) -> {
                    try {
                        resp.getwriter().write("/a logout success");
                    } catch (ioexception e) {
                        e.printstacktrace();
                    }
                })
                //是否清除认证信息(清除 securitycontextholder 中的信息,默认是true)
                .clearauthentication(true)
                //是否销毁 httpsession
                .invalidatehttpsession(true)
                .permitall()
                .and()
            //前端出现403,没有登录,禁止访问
                .exceptionhandling()
                //配置未认证访问的处理器
                .authenticationentrypoint(new authenticationentrypoint() {
                    /**
                     * 当用户没有认证,但是却访问了一个需要认证之后才能访问的接口,那么就会触发该方法
                     * @param request
                     * @param response
                     * @param authexception
                     * @throws ioexception
                     * @throws servletexception
                     */
                    @override
                    public void commence(httpservletrequest request, httpservletresponse response, authenticationexception authexception) throws ioexception, servletexception {
                        map<string, object> map = new hashmap<>();
                        map.put("status", 500);
                        map.put("message", "尚未登录,请登录");
                        //设置utf-8
                        response.setcontenttype(mediatype.application_json_utf8_value);
                        response.getwriter().write(new objectmapper().writevalueasstring(map));
                    }
                });
        return http.build();
    }
7.加密(passwordencoder)
1.密码的加密匹配器
以下是原理
接口(passwordencoder)自带盐
常用的实现类:delegatingpasswordencoder(代理密码加密)通过passwordencoderfactories来调用,默认使用的是bcryptpasswordencoder
public interface passwordencoder {
    //将传来的密码,加盐加密生成编码,例如当你注册的时候,将明文转成密文
    string encode(charsequence rawpassword);
    //判断密码是否正确,第一个参数是明文密码,第二个参数是加盐加密密码
    boolean matches(charsequence rawpassword, string encodedpassword);
    //升级密码
    default boolean upgradeencoding(string encodedpassword) {
        return false;
    }
}
注意**:1.你用什么实现类进行加盐加密的就得用什么实现类来进行比对
2.当没有配置加密匹配器的时候,就会用delegatingpasswordencoder密码匹配器进行调用默认的密码匹配器scryptpasswordencoder,因为它底层可以给其余的10种密码匹配器取名,我们只需要在数据库的密码中前面写:例如{noop}123,就是使用nooppasswordencode密码匹配器
//spring5+springboot2.7.7+jdk8
public final class passwordencoderfactories {
    private passwordencoderfactories() {
    }
    public static passwordencoder createdelegatingpasswordencoder() {
        string encodingid = "bcrypt";
        map<string, passwordencoder> encoders = new hashmap();
        encoders.put(encodingid, new bcryptpasswordencoder());
        encoders.put("ldap", new ldapshapasswordencoder());
        encoders.put("md4", new md4passwordencoder());
        encoders.put("md5", new messagedigestpasswordencoder("md5"));
        encoders.put("noop", nooppasswordencoder.getinstance());
        encoders.put("pbkdf2", new pbkdf2passwordencoder());
        encoders.put("scrypt", new scryptpasswordencoder());
        encoders.put("sha-1", new messagedigestpasswordencoder("sha-1"));
        encoders.put("sha-256", new messagedigestpasswordencoder("sha-256"));
        encoders.put("sha256", new standardpasswordencoder());
        encoders.put("argon2", new argon2passwordencoder());
        //第一个参数,表示的是默认的密码匹配器
        return new delegatingpasswordencoder(encodingid, encoders);
    }
}
//spring6+springboot3.0.1+jdk17
public final class passwordencoderfactories {
private passwordencoderfactories() {
}
public static passwordencoder createdelegatingpasswordencoder() {
string encodingid = "bcrypt";
map<string, passwordencoder> encoders = new hashmap();
encoders.put(encodingid, new bcryptpasswordencoder());
encoders.put("ldap", new ldapshapasswordencoder());
encoders.put("md4", new md4passwordencoder());
encoders.put("md5", new messagedigestpasswordencoder("md5"));
encoders.put("noop", nooppasswordencoder.getinstance());
encoders.put("pbkdf2", pbkdf2passwordencoder.defaultsforspringsecurity_v5_5());
encoders.put("pbkdf2@springsecurity_v5_8", pbkdf2passwordencoder.defaultsforspringsecurity_v5_8());
encoders.put("scrypt", scryptpasswordencoder.defaultsforspringsecurity_v4_1());
encoders.put("scrypt@springsecurity_v5_8", scryptpasswordencoder.defaultsforspringsecurity_v5_8());
encoders.put("sha-1", new messagedigestpasswordencoder("sha-1"));
encoders.put("sha-256", new messagedigestpasswordencoder("sha-256"));
encoders.put("sha256", new standardpasswordencoder());
encoders.put("argon2", argon2passwordencoder.defaultsforspringsecurity_v5_2());
encoders.put("argon2@springsecurity_v5_8", argon2passwordencoder.defaultsforspringsecurity_v5_8());
return new delegatingpasswordencoder(encodingid, encoders);
}
}step01-配置passwordencoder类,我们可以使用系统默认的代理密码匹配,也可以写自己想要的密码匹配器,只需要在配置类中修改 delegatingpasswordencoder passwordencoder = new delegatingpasswordencoder(encodingid, encoders) ,它会自带前缀
@configuration
public class securityconfig {
    /**
     * 配置了这个 bean 之后,项目中的密码加密都是用 bcryptpasswordencoder,那么就不需要额外指定密码加密方案了
     * @return
     */
    @bean
    passwordencoder passwordencoder() {
//        return new bcryptpasswordencoder();
        string encodingid = "bcrypt";
        map<string, passwordencoder> encoders = new hashmap();
        encoders.put(encodingid, new bcryptpasswordencoder());
        encoders.put("ldap", new ldapshapasswordencoder());
        encoders.put("md4", new md4passwordencoder());
        encoders.put("md5", new messagedigestpasswordencoder("md5"));
        encoders.put("noop", nooppasswordencoder.getinstance());
        encoders.put("pbkdf2", new pbkdf2passwordencoder());
        encoders.put("scrypt", new scryptpasswordencoder());
        encoders.put("sha-1", new messagedigestpasswordencoder("sha-1"));
        encoders.put("sha-256", new messagedigestpasswordencoder("sha-256"));
        encoders.put("sha256", new standardpasswordencoder());
        encoders.put("argon2", new argon2passwordencoder());
        delegatingpasswordencoder passwordencoder = new delegatingpasswordencoder(encodingid, encoders);
        return passwordencoder;
    }
}
2.密码升级(userdetailspasswordservice)
原因:当用户的密码需要实现升级的时候,也就是想要修改成别的密码匹配器时或者数据库中可能存在不同的加密匹配器的加密机制,想数据库中的密码全部升级为统一的密码加密机制时,就会用到密码升级
方式一:修改配置类的密码匹配器
步骤:step01-配置passwordencoder类
@configuration
public class securityconfig {
    /**
     * 配置了这个 bean 之后,项目中的密码加密都是用 bcryptpasswordencoder,那么就不需要额外指定密码加密方案了
     * @return
     */
    @bean
    passwordencoder passwordencoder() {
//        return new bcryptpasswordencoder();
        string encodingid = "bcrypt";
        map<string, passwordencoder> encoders = new hashmap();
        encoders.put(encodingid, new bcryptpasswordencoder());
        encoders.put("ldap", new ldapshapasswordencoder());
        encoders.put("md4", new md4passwordencoder());
        encoders.put("md5", new messagedigestpasswordencoder("md5"));
        encoders.put("noop", nooppasswordencoder.getinstance());
        encoders.put("pbkdf2", new pbkdf2passwordencoder());
        encoders.put("scrypt", new scryptpasswordencoder());
        encoders.put("sha-1", new messagedigestpasswordencoder("sha-1"));
        encoders.put("sha-256", new messagedigestpasswordencoder("sha-256"));
        encoders.put("sha256", new standardpasswordencoder());
        encoders.put("argon2", new argon2passwordencoder());
        delegatingpasswordencoder passwordencoder = new delegatingpasswordencoder(encodingid, encoders);
        return passwordencoder;
    }
}
step02-需要在service接口中继承userdetailspasswordservice接口,实现userdetailspasswordservice接口中的updatepassword方法
/**
     * 当用户登录的时候,系统会自动判断用户密码是否需要升级
     * @param user:登录时候的用户
     * @param newpassword 新的加密后的密码
     * @return
     */
    @override
    public userdetails updatepassword(userdetails user, string newpassword) {
        //条件构造器
        updatewrapper<user> uw = new updatewrapper<>();
        //将修改为新密码
        uw.lambda().set(user::getpassword, newpassword)
            //是根据哪个用户id
                .eq(user::getid, ((user) user).getid());
        //sql修改
        boolean update = update(uw);
        //((user) user).setpassword(newpassword);
        return user;
    }
@service
public class userservice implements userdetailsservice, userdetailspasswordservice {
@autowired
usermapper usermapper;
/**
* 根据用户名称查询用户对象,当用户登录的时候,这个方法会被自动触发
*
* @param username
* @return
* @throws usernamenotfoundexception
*/
@override
public userdetails loaduserbyusername(string username) throws usernamenotfoundexception {
user user = usermapper.loaduserbyusername(username);
if (user == null) {
throw new usernamenotfoundexception("用户名不存在");
}
return user;
}
/**
* 当用户每次登录的时候,都会去检查用户的密码是否需要升级,如果需要升级,则当前方法会被触发。
* 升级的情况:
* 1. 无论是系统默认配置的 delegatingpasswordencoder 还是开发者自己配置的 delegatingpasswordencoder,delegatingpasswordencoder 中都有一个默认的密码加密方案。那么当用户登录的时候,系统就会去检查用户当前的密码加密方案是否为 delegatingpasswordencoder 中默认的加密方案,如果不是,则当前方法就会被触发,系统会进行密码升级,将现有的密码加密方案改为 delegatingpasswordencoder 中默认的密码加密方案。
* 2. 同一种密码加密方案也可能存在升级的情况,例如 bcryptpasswordencoder 中,可以设置密码的强度,密码强度不同,也会导致密码自动升级
* @param user:实体类的user
* @param newpassword:新的加密后的密码
* @return
*/
@override
public userdetails updatepassword(userdetails user, string newpassword) {
user u = (user) user;
u.setpassword(newpassword);
//sql语句:修改数据库的密码
usermapper.updatepassword(u);
return user;
}
}step03-测试
如果数据库密码是{noop}123,就是升级为{bcrypt},系统默认的
方式二:修改密码匹配器的强度(参数)
@bean
passwordencoder passwordencoder() {
string encodingid = "bcrypt";
map<string, passwordencoder> encoders = new hashmap();
encoders.put(encodingid, new bcryptpasswordencoder(11));
encoders.put("ldap", new ldapshapasswordencoder());
encoders.put("md4", new md4passwordencoder());
encoders.put("md5", new messagedigestpasswordencoder("md5"));
encoders.put("noop", nooppasswordencoder.getinstance());
encoders.put("pbkdf2", new pbkdf2passwordencoder());
encoders.put("scrypt", new scryptpasswordencoder());
encoders.put("sha-1", new messagedigestpasswordencoder("sha-1"));
encoders.put("sha-256", new messagedigestpasswordencoder("sha-256"));
encoders.put("sha256", new standardpasswordencoder());
encoders.put("argon2", new argon2passwordencoder());
delegatingpasswordencoder passwordencoder = new delegatingpasswordencoder(encodingid, encoders);
return passwordencoder;
}8.remember me
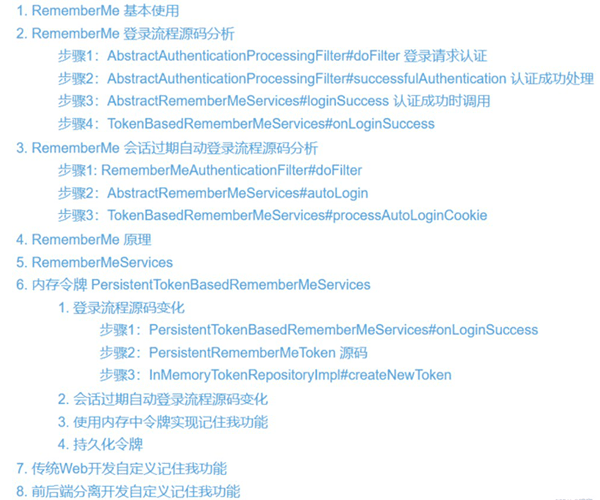
1.remember me的基本使用
1.与shiro的区别是:系统重启了,remember me还是存在
2.springboot3.0.1才有算法名
step01-接口
@restcontroller
public class hellocontroller {
    /**
     * 这里的参数 principal 就表示当前登录成功的用户对象
     * 设置这个接口remember me或者登录都可以访问
     * @param principal
     * @return
     */
    @getmapping("/hello")
    public string hello(principal principal) {
        return "hello";
    }
    /**
     * 设置这个接口只有通过rememeberme才能够访问
     * @return
     */
    @getmapping("/rm")
    public  string rm(){
        return "rm";
    }
    /**
     * 设置是账户密码登录时才可以登录
     * @return
     */
    @getmapping("/hello2")
    public string hello2(){
        return "密码登录的";
    }
}
step02-配置过滤器链
@bean
securityfilterchain securityfilterchain(httpsecurity http) throws exception {
http.authorizerequests()
//只能通过remember me才能够访问
.antmatchers("/rm").rememberme()
//只有时账户密码登录才能够访问
.antmatchers("/hello2").fullyauthenticated()
.anyrequest()
.authenticated()
.and()
.formlogin()
.permitall()
.and()
.rememberme()
//随便给一个key,以后系统重启了,remember me还是存在的,和shiro不太一样
.key("a")
.and()
.csrf()
.disable();
return http.build();
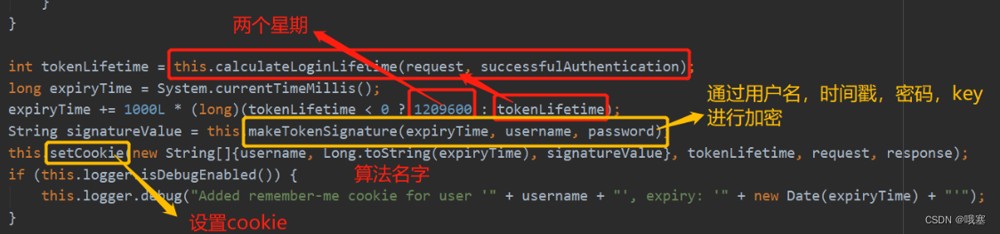
}2.持续化令牌

将用户登录的用户名,series,token存储起来,也是通过series,token来确定有没有被别人登陆了,每当自动登录的时候,token就会改变一次,提高安全性,当注销的时候存入到数据库的信息就会删除
step01-在数据库中执行上面的sql语句,创建表persistent_logins
step02-在配置文件中重新配置persistenttokenbasedremembermeservices里的persistenttokenrepository

@configuration
public class securityconfig {
    @autowired
    datasource datasource;
    @bean
    jdbctokenrepositoryimpl jdbctokenrepository() {
        jdbctokenrepositoryimpl repository = new jdbctokenrepositoryimpl();
        repository.setdatasource(datasource);
        return repository;
    }
    @bean
    securityfilterchain securityfilterchain(httpsecurity http) throws exception {
        http.authorizehttprequests()
                // /rm 必须是以 rememberme 的方式登录才可以访问
                .requestmatchers("/rm").rememberme()
                //这个表示必须用户名密码登录,才能访问 /hello2
                .requestmatchers("/hello2").fullyauthenticated()
                .requestmatchers("/**")
                .authenticated()
                .and()
                .formlogin()
                .permitall()
                .and()
                .rememberme()
                .key("123")
            //配置persistenttokenrepository
                .tokenrepository(jdbctokenrepository())
                .and()
                .csrf().disable();
        return http.build();
    }
}
9.会话管理
引言:如果在配置文件中设置了最大登录的是1个时,每一次登录的时候都会将另一个挤下去,或者登不上,是根据user实体类中的equals和hashcode来判断用户是否登录
step01-实体类user写equals和hashcode的方法
public class user implements userdetails {
    private integer id;
    private string username;
    private string password;
    private string address;
    private boolean enabled;
    @override
    public boolean equals(object o) {
        if (this == o) return true;
        if (o == null || getclass() != o.getclass()) return false;
        user user = (user) o;
        return objects.equals(username, user.username);
    }
    @override
    public int hashcode() {
        return objects.hash(username);
    }
    public integer getid() {
        return id;
    }
    public void setid(integer id) {
        this.id = id;
    }
    public void setusername(string username) {
        this.username = username;
    }
    public void setpassword(string password) {
        this.password = password;
    }
    public string getaddress() {
        return address;
    }
    public void setaddress(string address) {
        this.address = address;
    }
    public void setenabled(boolean enabled) {
        this.enabled = enabled;
    }
    /**
     * 获取当前用户的权限/角色
     * @return
     */
    @override
    public collection<? extends grantedauthority> getauthorities() {
        return null;
    }
    /**、
     * 获取用户密码
     * @return
     */
    @override
    public string getpassword() {
        return password;
    }
    /**
     * 获取用户名
     * @return
     */
    @override
    public string getusername() {
        return username;
    }
    /**
     * 账户是否没有过期
     * @return
     */
    @override
    public boolean isaccountnonexpired() {
        return true;
    }
    /**
     * 账户是否没有被锁定
     * @return
     */
    @override
    public boolean isaccountnonlocked() {
        return true;
    }
    /**
     * 密码是否没有过期
     * @return
     */
    @override
    public boolean iscredentialsnonexpired() {
        return true;
    }
    /**
     * 账户是否可用
     * @return
     */
    @override
    public boolean isenabled() {
        return enabled;
    }
}
step02-添加会话的配置信息
判断用户是可以同时在线几个是根据map<user,list<session>>
@configuration
public class securityconfig {
	@bean
    securityfilterchain securityfilterchain(httpsecurity http) throws exception {
        http.authorizerequests()
                .anyrequest().authenticated()
                .and()
                .formlogin()
                .permitall()
                .and()
                .sessionmanagement()
                /**
                 *map<user,list<session>>
                 * 底层逻辑是有一个映射表,map,map 的 key 是用户对象,value 则是一个集合,集合中保存了 session
                 */
            	//设置同一个用户的 session 并发数
                .maximumsessions(1)
                //当达到最大并发数的时候,是否禁止新的登录
                .maxsessionspreventslogin(true)
                .and()
            //防止会话攻击,(默认也是这个配置)
                .sessionfixation().migratesession()
                .and()
                .csrf()
                .disable();
        return http.build();
    }
	/**
	 * 当注销的时候,map里面还存着用户的session的,我们得通过这个bean来触发监听器
     * 这是一个事件发布器,这个会自动将 httpsession 销毁的事件发布出去,发布之后会被 map 感知到,进而移除 map 中的 session
     *
     * @return
     */
 	@bean
    httpsessioneventpublisher httpsessioneventpublisher() {
        return new httpsessioneventpublisher();
    }
}
10.防止csrf攻击
起因:黑客利用浏览器存在cookie,当你登录时,然后又访问了黑客访问的页面的端口,当你访问时就可以直接盗窃你的信息,甚至转账。(小程序和软件不存在这个问题)
解决:我们可以开启csrf,当我们自己访问post,delete,put也无法访问,黑客更加无法访问了,这是我们只需要在浏览器上添加过滤器给予你的csrf字符串,你就可以访问,黑客是无法获取csrf字符串的(可以获取cookie是因为浏览器存着,然后访问时直接调用)
情况一:csrf过滤器随机生成的值,我们要以参数的形式请求上去
//提交_csrf的参数过去,就可以访问了
<form action="/transfer" method="post">
    <input type="text" name="username">
    <input type="text" name="money">
    <input type="hidden" name="_csrf" th:value="${_csrf.token}">
    <input type="submit" value="转账">
</form>
情况二:用到ajax来进行访问,将cookie里面的参数提取出来,然后发送请求上去
<!doctype html>
<html lang="en">
<head>
    <meta charset="utf-8">
    <title>title</title>
    <!--    <script src="jquery-3.6.3.min.js"></script>-->
    <!--    <script src="jquery.min.js"></script>
        <script src="jquery.cookie.js"></script>-->
    <script src="https://cdnjs.cloudflare.com/ajax/libs/jquery/3.5.1/jquery.min.js"></script>
    <script src="https://cdnjs.cloudflare.com/ajax/libs/jquery-cookie/1.4.1/jquery.cookie.min.js"></script>
</head>
<body>
<input type="text" id="username" value="zhangsan">
<input type="text" id="password" value="123">
<button onclick="dotransfer()">登录</button>
<div id="result"></div>
<script>
    function dotransfer() {
        let token = $.cookie('xsrf-token');
        console.log("token>>>>", token)
        // _csrf: token:将配置中的
        $.post("/login", {username: $("#username").val(), password: $("#password").val(), _csrf: token},function (msg) {
            $("#result").html(msg);
        });
    }
</script>
</body>
</html>
@configuration
public class securityconfig {
@bean
securityfilterchain securityfilterchain(httpsecurity http) throws exception {
http.authorizerequests()
.anyrequest().authenticated()
.and()
.formlogin()
.permitall()
.and()
//添加了csrf安全过滤器,因为黑客可以通过你浏览的网址获取你登录时候的cookie,从而导致你的账户被获取,你可以添加csrf自动创建的字符串,加在后面,即便黑客获取cookie,但是无法获取你的字符串也没用,因为是看你请求的参数里面有没有csrf参数的,不是看你的coken
//这个将csrf存放在cookie里面的,然后通过js来将cookie的值读取出来,找到cookie中的_csrf中的值,作为普通请求的参数携带上。服务端是在你请求的参数上找有没有_csrf的,并不是在cookie中解析寻找的
.csrf().csrftokenrepository(cookiecsrftokenrepository.withhttponlyfalse());
return http.build();
}
}11.多个过滤器链
1.多个用户访问是不同的过滤器链
step01-接口
@restcontroller
public class hellocontroller {
    /**
     * 我希望,这个访问这个接口的请求,需要经过 concurrentsessionfilter 过滤器
     * @return
     */
    @getmapping("/user/hello")
    public string user() {
        return "hello uesr";
    }
    /**
     * 访问这个请求的地址,不需要经过 csrffilter
     * @return
     */
    @getmapping("/admin/hello")
    public string admin() {
        return "hello admin";
    }
    @getmapping("/hello")
    public string hello() {
        return "hello";
    }
}
step02-配置类
@configuration
public class securityconfig {
    @bean
    userdetailsservice us1() {
        inmemoryuserdetailsmanager manager = new inmemoryuserdetailsmanager();
        manager.createuser(user.withusername("zhangsan").password("{noop}123").roles("admin").build());
        return manager;
    }
    @bean
    userdetailsservice us2() {
        inmemoryuserdetailsmanager manager = new inmemoryuserdetailsmanager();
        manager.createuser(user.withusername("lisi").password("{noop}123").roles("user").build());
        return manager;
    }
    /**
     * 这个就是配置的第一个过滤器链
     * @param http
     * @return
     * @throws exception
     */
    @bean
    securityfilterchain securityfilterchain01(httpsecurity http) throws exception {
        //这个地方是在配置过滤器链,这个 antmatcher 方法表示如果你的请求格式是 /user/** 的话,那么就会进入到当前链中
        http.antmatcher("/user/**")
                .authorizerequests()
                .antmatchers("/user/**").hasauthority("user")
                .anyrequest().authenticated()
                .and()
                .formlogin()
                .loginprocessingurl("/user/login")
                .successhandler((req, resp, auth) -> {
                    resp.getwriter().write("success01");
                })
                .failurehandler((req, resp, e) -> {
                    resp.getwriter().write("failure01");
                })
                .permitall()
                .and()
                .sessionmanagement()
                .maximumsessions(1)
                .and()
                .and()
                .csrf().disable()
                //每一个过滤器链,可以对应不同的数据源,如果我们不为每一个过滤器链设置单独的数据源,那么也可以直接向 spring 容器中注册一个数据源,那么这个数据源就是公用的。
                .userdetailsservice(us1());
        return http.build();
    }
    /**
     * 这个就是配置的第二个过滤器链
     * @param http
     * @return
     * @throws exception
     */
    @bean
    securityfilterchain securityfilterchain02(httpsecurity http) throws exception {
        //这个地方是在配置过滤器链,这个 antmatcher 方法表示如果你的请求格式是 /admin/** 的话,那么就会进入到当前链中
        http.antmatcher("/admin/**")
                .authorizerequests()
                .antmatchers("/admin/**").hasauthority("admin")
                .anyrequest().authenticated()
                .and()
                .formlogin()
                .loginprocessingurl("/admin/login")
                .successhandler((req, resp, auth) -> {
                    resp.getwriter().write("success02");
                })
                .failurehandler((req, resp, e) -> {
                    resp.getwriter().write("failure02");
                })
                .permitall()
                .and()
                .csrf().disable()
                .userdetailsservice(us2());
        return http.build();
    }
    @bean
    securityfilterchain securityfilterchain03(httpsecurity http) throws exception {
        //任何用户都可以访问
        http.antmatcher("/**")
                .authorizerequests()
                .anyrequest().authenticated()
                .and()
                .csrf().disable();
        return http.build();
    }
}
2.多个数据源对应的过滤器链
多个数据源
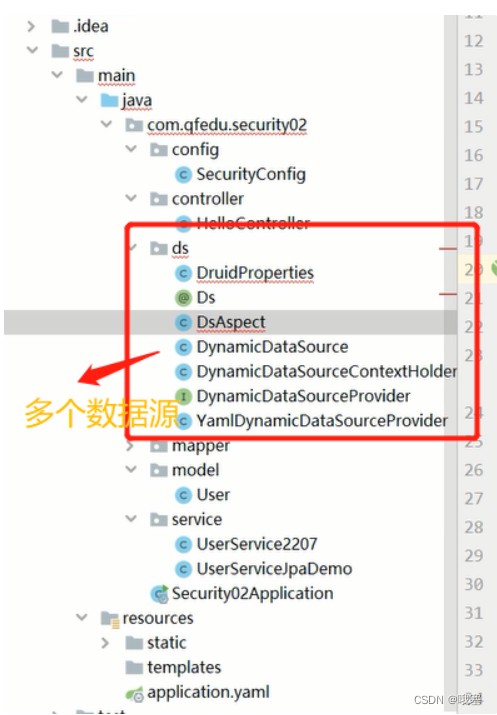
step01-配置多个数据源对应的登录userdetailsservice(这个相当于realm,用来获取前端的username)
@service
public class userservice2207 implements userdetailsservice {
    @autowired
    usermapper usermapper;
    /**
     * 根据用户名称查询用户对象,当用户登录的时候,这个方法会被自动触发
     *
     * @param username
     * @return
     * @throws usernamenotfoundexception
     */
    @override
    @ds("master")
    public userdetails loaduserbyusername(string username) throws usernamenotfoundexception {
        user user = usermapper.loaduserbyusername(username);
        if (user == null) {
            throw new usernamenotfoundexception("用户名不存在");
        }
        return user;
    }
}
@service
public class userservicejpademo implements userdetailsservice {
@autowired
usermapper usermapper;
/**
* 根据用户名称查询用户对象,当用户登录的时候,这个方法会被自动触发
*
* @param username
* @return
* @throws usernamenotfoundexception
*/
@override
@ds("slave")
public userdetails loaduserbyusername(string username) throws usernamenotfoundexception {
user user = usermapper.loaduserbyusername(username);
if (user == null) {
throw new usernamenotfoundexception("用户名不存在");
}
return user;
}
}step02-配置类,给对应的service匹配对应的过滤器链
@configuration
public class securityconfig {
    @autowired
    userservice2207 userservice2207;
    @autowired
    userservicejpademo userservicejpademo;
    /**
     * 提供一个这样的 bean,就是提供了一个过滤器链,这个过滤器链中约 10 多个过滤器
     *
     * @param http
     * @return
     * @throws exception
     */
    @bean
    securityfilterchain phonesecurityfilterchain(httpsecurity http) throws exception {
        http
                //这个表示配置当前过滤器链的拦截规则
                .securitymatcher("/phone/**")
                // userdetailsservice 分为两种,一种是全局的,另外一种是局部的,如果我们不给每一个过滤器链单独设置 userdetailsservice,则都使用的是全局的
                .userdetailsservice(userservice2207)
                .authorizehttprequests().requestmatchers("/**")
                .authenticated()
                .and()
                .formlogin()
                .loginprocessingurl("/phone/login")
                .successhandler((req,resp,auth)->{
                    resp.getwriter().write("phone login success");
                })
                .failurehandler((req,resp,e)->{
                    resp.getwriter().write(e.getmessage());
                })
                .permitall()
                .and()
                .csrf().disable();
        return http.build();
    }
    @bean
    securityfilterchain websecurityfilterchain(httpsecurity http) throws exception {
        http
                //这个表示配置当前过滤器链的拦截规则
                .securitymatcher("/web/**")
                .userdetailsservice(userservicejpademo)
                .authorizehttprequests().requestmatchers("/**")
                .authenticated()
                .and()
                .formlogin()
                .successhandler((req,resp,auth)->{
                    resp.getwriter().write("web login success");
                })
                .loginpage("/web/login")
                .loginprocessingurl("/web/login")
                .permitall();
        return http.build();
    }
}
12.jwt登录(无状态登录)
有状态登录携带的sessionid是没有含义的,就只是随机id;无状态的token是有含义的
1.httpbasic
只需要将formlogin()写成httpbasic()就可以实现了,但是有缺点:1.注销问题,无法注销 2.续期问题,不会自动重置时间 3.密码重置 4.把密码用户信息放在请求头,不安全,每一次调用一个接口都会显示,因为是无状态,它需要无时无刻校验
@configuration
public class securityconfig {
@bean
securityfilterchain securityfilterchain(httpsecurity http) throws exception {
http.authorizehttprequests()
.requestmatchers("/**")
.authenticated()
.and()
.httpbasic();
return http.build();
}
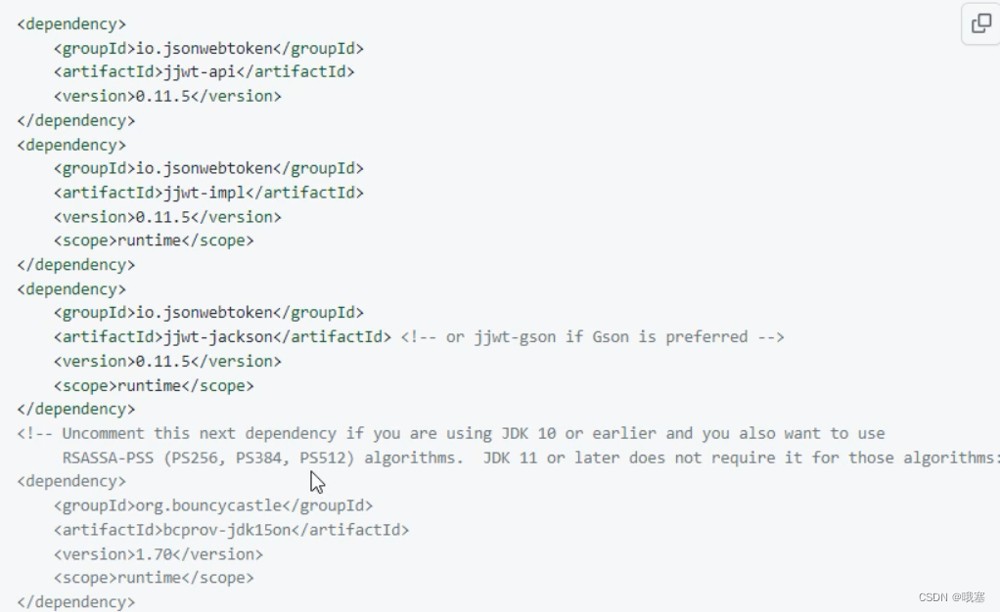
}2./jwtk/jjwt
step01-jwt专属·依赖
step02-配置类,如果成功登录就生成jwt字符串
@configuration
public class securityconfig {
    //可以随机是一段字符串
    public static final key key = keys.hmacshakeyfor("jfkdafljksajklf75894237uafkldsjfalkj8134784395jfkdafljksajklf75894237uafkldsjfalkj8134784395jfkdafljksajklf75894237uafkldsjfalkj8134784395jfkdafljksajklf75894237uafkldsjfalkj8134784395jfkdafljksajklf75894237uafkldsjfalkj8134784395jfkdafljksajklf75894237uafkldsjfalkj8134784395jfkdafljksajklf75894237uafkldsjfalkj8134784395".getbytes());
    //引入写好的过滤器
    @autowired
    jwtfilter jwtfilter;
    /**
     * 配置 spring security 的过滤器链
     *
     * @return
     */
    @bean
    securityfilterchain securityfilterchain(httpsecurity http) throws exception {
        //因为jwtfilter中有用户名,密码,权限的设置在usernamepasswordauthentication该类,所以在它前面执行
        http.addfilterbefore(jwtfilter, usernamepasswordauthenticationfilter.class);
        http.authorizehttprequests()
                .requestmatchers("/**")
                .authenticated()
                .and()
                //关闭 session 的创建,这样就不会产生sessionid了,实现无状态访问
                .sessionmanagement().sessioncreationpolicy(sessioncreationpolicy.never)
                .and()
                .formlogin()
                .successhandler((req, resp, auth) -> {
                    //保存的数据是需要map存储
                    map<string, string> map = new hashmap<>();
                    //获取当前登录成功的用户角色,是在user实体类的权限角色方法中获取的
                    collection<? extends grantedauthority> authorities = auth.getauthorities();
                    //  role_admin,role_user,使用stream流将获取的权限以,隔开
                    map.put("authorities", authorities.stream().map(a -> a.getauthority()).collect(collectors.joining(",")));
                    //生成 jwt 字符串
                    string jws = jwts.builder()
                            //配置主题
                            .setsubject(auth.getname())
                            //过期时间,七天之后过期
                            .setexpiration(new date(system.currenttimemillis() + 7 * 24 * 60 * 60 * 1000))
                            //令牌签发时间
                            .setissuedat(new date())
                            //这个里边可以保存比较丰富的数据类型
                            .setclaims(map)
                        //将key放入
                            .signwith(key).compact();
                    resp.getwriter().write(jws);
                })
                .failurehandler((req, resp, e) -> {
                    resp.getwriter().write("login error>>>" + e.getmessage());
                })
                .and()
                .csrf().disable()
            //抛出的异常可以在此获得
                .exceptionhandling().accessdeniedhandler(new accessdeniedhandler() {
            @override
            public void handle(httpservletrequest request, httpservletresponse response, accessdeniedexception accessdeniedexception) throws ioexception, servletexception {
                response.getwriter().write(accessdeniedexception.getmessage());
            }
        });
        return http.build();
    }
}
step03-写一个过滤器,用户每申请一个请求就触碰这个类来解析jwt字符串
/**
 * @author baize
 * @date 2023/1/5
 * @site www.qfedu.com
 * <p>
 * 这里专门用来解析 jwt 字符串,以后每个请求到达的时候都从这里去解析 jwt 字符串
 */
@component
public class jwtfilter extends genericfilterbean {
    @override
    public void dofilter(servletrequest servletrequest, servletresponse servletresponse, filterchain filterchain) throws ioexception, servletexception {
        httpservletrequest req = (httpservletrequest) servletrequest;
        //当是登录接口的时候就不需要执行下面的解析,而是直接往下别的过滤器执行
        if (req.getrequesturi().contains("/login")) {
            //说明是一个登录请求
            filterchain.dofilter(servletrequest, servletresponse);
            return;
        }
        //获取请求头参数是authorization来获取jwt字符串
        string authorization = req.getheader("authorization");
        //如果请求头中没有就在请求参数中获取
        if (authorization == null || "".equalsignorecase(authorization)) {
            authorization = req.getparameter("token");
        }
        //如果jwt字符串不为空
        if (authorization != null && !"".equals(authorization)) {
            //因为jwt字符串的开头是以bearer 存在的
            authorization = authorization.replace("bearer ", "");
            jws<claims> claimsjws = null;
            try {
                //开始解析,将key和jwt字符串放入
                claimsjws = jwts.parserbuilder().setsigningkey(securityconfig.key).build().parseclaimsjws(authorization);
            } catch (exception e) {
                servletresponse.getwriter().write("jwt error");
                return;
            }
            //获取配置文件中存储的丰富的数据类型的对象
            claims claims = claimsjws.getbody();
            //获取存储在map中的权限
            // role_admin,role_user
            string authorities = (string) claims.get("authorities");
            //将role_admin,role_user转为集合
            list<simplegrantedauthority> list = arrays.stream(authorities.split(",")).map(a -> new simplegrantedauthority(a)).collect(collectors.tolist());
            //获取用户名
            string username = claims.getsubject();
            //将获取的用户名和权限存入到该类中
            usernamepasswordauthenticationtoken token = new usernamepasswordauthenticationtoken(username, null, list);
            securitycontextholder.getcontext().setauthentication(token);
            filterchain.dofilter(servletrequest, servletresponse);
        } else {
//            throw new authenticationserviceexception("jwt error");
            servletresponse.getwriter().write("jwt error");
        }
    }
}
step04-在配置类中的抛出异常显示的权限不够可以用全局异常机制
@restcontrolleradvice
public class globalexception {
    @exceptionhandler(authenticationserviceexception.class)
    public string authenticationexception(authenticationserviceexception e) {
        return e.getmessage();
    }
}
13.用户名密码分开提示
1.创造一个类,让该类来返回登录成功或者失败的信息
public class respbean {
    private integer status;
    private string msg;
    private object data;
    public static respbean ok(string msg, object data) {
        return new respbean(200, msg, data);
    }
    public static respbean ok(string msg) {
        return new respbean(200, msg, null);
    }
    public static respbean error(string msg, object data) {
        return new respbean(500, msg, data);
    }
    public static respbean error(string msg) {
        return new respbean(500, msg, null);
    }
    private respbean() {
    }
    private respbean(integer status, string msg, object data) {
        this.status = status;
        this.msg = msg;
        this.data = data;
    }
    public integer getstatus() {
        return status;
    }
    public void setstatus(integer status) {
        this.status = status;
    }
    public string getmsg() {
        return msg;
    }
    public void setmsg(string msg) {
        this.msg = msg;
    }
    public object getdata() {
        return data;
    }
    public void setdata(object data) {
        this.data = data;
    }
}
2.配置登录时的配置类
@configuration
public class securityconfig {
    @bean
    securityfilterchain securityfilterchain(httpsecurity http) throws exception {
        http.authorizerequests()
                .anyrequest().authenticated()
                .and()
                .formlogin()
                //登陆成功时
                .successhandler((req, resp, authentication) -> {
                    resp.setcontenttype("application/json;charset=utf-8");
                    printwriter out = resp.getwriter();
                    respbean respbean = respbean.ok("登录成功", authentication.getprincipal());
//                    通过json将对象转成string类型传到前端
                    string s = new objectmapper().writevalueasstring(respbean);
                    out.write(s);
                })
                .failurehandler((req, resp, e) -> {
                    resp.setcontenttype("application/json;charset=utf-8");
                    printwriter out = resp.getwriter();
                    respbean respbean = null;
                    if (e instanceof badcredentialsexception) {
                        respbean = respbean.error("密码输入错误,登录失败");
                    } else if (e instanceof usernamenotfoundexception) {
                        respbean = respbean.error("用户名输入错误,登录失败");
                    } else if (e instanceof accountexpiredexception) {
                        respbean = respbean.error("账户过期,登录失败");
                    } else if (e instanceof lockedexception) {
                        respbean = respbean.error("账户被锁定,登录失败");
                    } else if (e instanceof credentialsexpiredexception) {
                        respbean = respbean.error("密码过期,登录失败");
                    } else if (e instanceof disabledexception) {
                        respbean = respbean.error("账户被禁用,登录失败");
                    } else {
                        respbean = respbean.error("登录失败");
                    }
                    string s = new objectmapper().writevalueasstring(respbean);
                    out.write(s);
                })
                .and()
                .csrf()
                .disable()
                .exceptionhandling()
                //当访问一个需要认证的地址时,会调用到该方法
                .authenticationentrypoint((req, resp, authexception) -> {
                    resp.setcontenttype("application/json;charset=utf-8");
                    printwriter out = resp.getwriter();
                    respbean respbean = respbean.error("尚未登录,请登录");
                    string s = new objectmapper().writevalueasstring(respbean);
                    out.write(s);
                })
            //当权限不足的时候,抛出异常,会在这里被捕获
                //即 throw new accessdeniedexception("权限不足,请联系管理员");抛出的异常,在这里处理
                .accessdeniedhandler((req, resp, e) -> {
                    resp.setcontenttype("application/json;charset=utf-8");
                    respbean respbean = respbean.error(e.getmessage());
                    resp.getwriter().write(new objectmapper().writevalueasstring(respbean));
                })
            ;
        return http.build();
    }
}
如果你想账户和密码分开提示,在.formlogin()上加这段代码
//对象后置处理器,spring security 默认已经帮我们处理好了 daoauthenticationprovider bean,该 bean 即将注册到 spring 容器中,这里是一个对象的后置处理器,就是可以在这里对 bean 的属性再做一次修改
                .withobjectpostprocessor(new objectpostprocessor<usernamepasswordauthenticationfilter>() {
                    @override
                    public <o extends usernamepasswordauthenticationfilter> o postprocess(o object) {
                        daoauthenticationprovider daoauthenticationprovider = new daoauthenticationprovider();
                        daoauthenticationprovider.sethideusernotfoundexceptions(false);
                        inmemoryuserdetailsmanager manager = new inmemoryuserdetailsmanager();
                        manager.createuser(user.withusername("zhangsan").password("{noop}123").roles("admin").build());
                        daoauthenticationprovider.setuserdetailsservice(manager);
                        object.setauthenticationmanager(new providermanager(daoauthenticationprovider));
                        return object;
                    }
                })
二.权限与角色
1.权限和角色的配置
step01-设置接口,每一种权限对应不同的接口访问
@restcontroller
public class hellocontroller {
/**
* 只要用户登录了就可以访问这个接口
*
* @return
*/
@getmapping("/hello")
public string hello() {
return "hello";
}
/**
* 用户登录之后,必须具备 admin 这个角色才可以访问
* @return
*/
@getmapping("/admin/hello")
public string admin() {
return "hello admin";
}
/**
* 用户登录之后,必须具备 user 角色才可以访问
* @return
*/
@getmapping("/user/hello")
public string user() {
return "hello user";
}
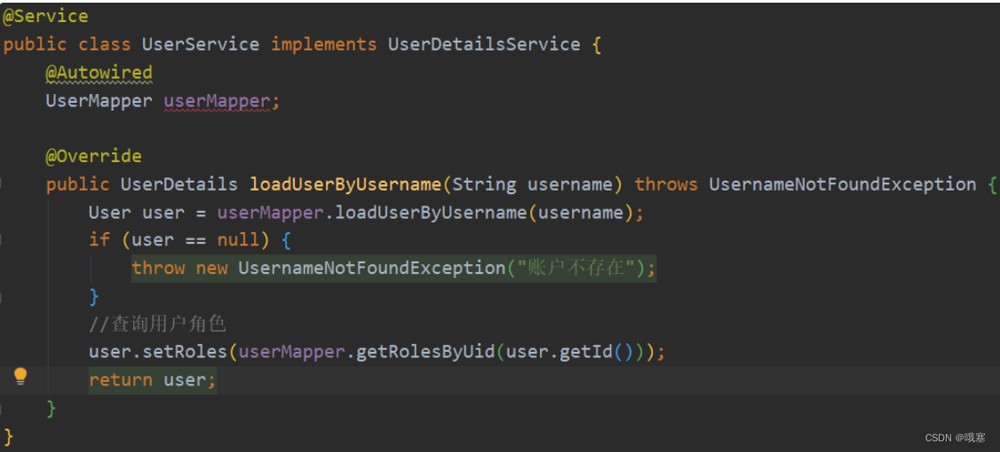
}step02-在userservice中,因为在登录的时候就要查看有什么权限了,所以在这里设置好权限返回给user实体类
@service
public class userservice implements userdetailsservice {
@autowired
usermapper usermapper;
/**
* 根据用户名称查询用户对象,当用户登录的时候,这个方法会被自动触发
*
* @param username
* @return
* @throws usernamenotfoundexception
*/
@override
public userdetails loaduserbyusername(string username) throws usernamenotfoundexception {
user user = usermapper.loaduserbyusername(username);
if (user == null) {
throw new usernamenotfoundexception("用户名不存在");
}
user.setroles(usermapper.getuserrolesbyuserid(user.getid()));
return user;
}
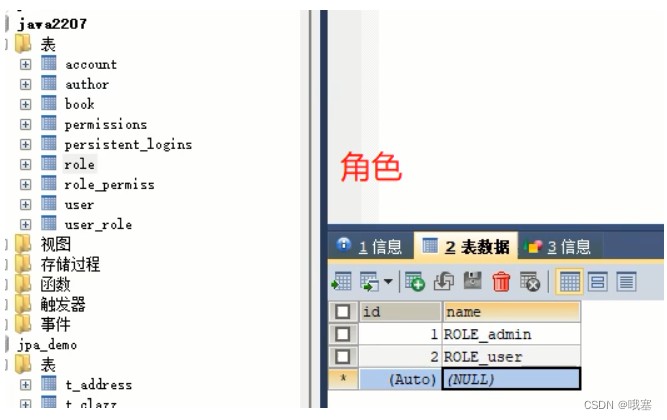
}mapper接口
@mapper
public interface usermapper {
    user loaduserbyusername(string username);
    list<role> getuserrolesbyuserid(integer uid);
}
<?xml version="1.0" encoding="utf-8" ?>
<!doctype mapper
public "-//mybatis.org//dtd mapper 3.0//en"
"http://mybatis.org/dtd/mybatis-3-mapper.dtd">
<mapper namespace="com.qfedu.authorize.mapper.usermapper">
<select resulttype="com.qfedu.authorize.model.user" id="loaduserbyusername">
select * from user where username=#{username};
</select>
<select id="getuserrolesbyuserid" resulttype="com.qfedu.authorize.model.role">
select r.* from role r,user_role ur where r.`id`=ur.`rid` and ur.`uid`=#{uid}
</select>
</mapper>step03-定义role的实体类,user实体类中可能有多个role还有配置权限的方法
public class role {
    private integer id;
    private string name;
    public integer getid() {
        return id;
    }
    public void setid(integer id) {
        this.id = id;
    }
    public string getname() {
        return name;
    }
    public void setname(string name) {
        this.name = name;
    }
}
public class user implements userdetails {
private integer id;
private string username;
private string password;
private string address;
private boolean enabled;
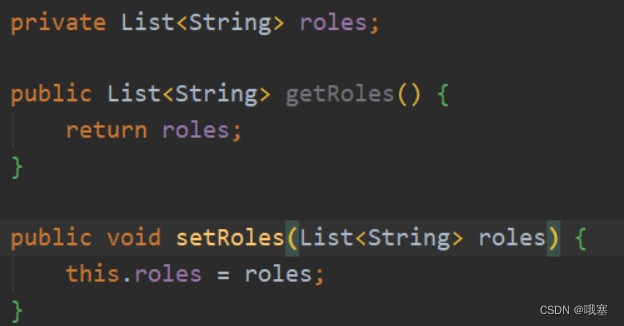
//一个用户可能有多个角色
private list<role> roles;
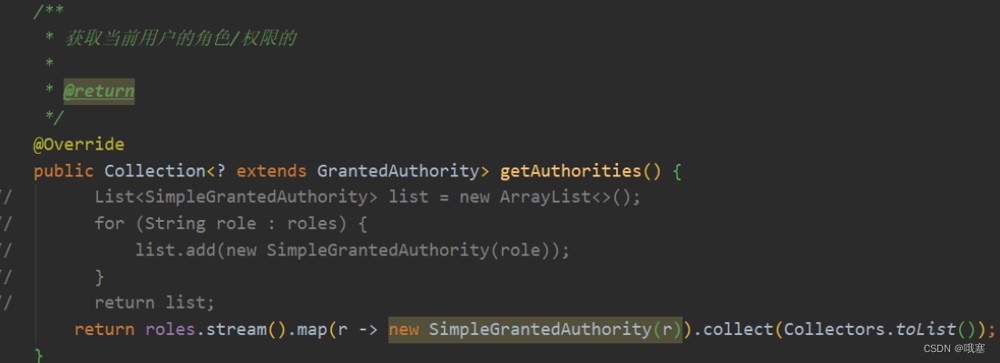
/**
* 获取当前用户的权限/角色
*
* 当系统需要知道当前用户的角色/权限的时候,都是调用这个方法。这块跟 shiro 不同,在 spring security 中,用户的权限和角色都是通过这个方法来返回的
*
* @return
*/
@override
public collection<? extends grantedauthority> getauthorities() {
// list<simplegrantedauthority> authorities = new arraylist<>();
// for (role role : roles) {
// simplegrantedauthority authority = new simplegrantedauthority(role.getname());
// authorities.add(authority);
// }
return roles.stream().map(r -> new simplegrantedauthority(r.getname())).collect(collectors.tolist());
}step04-配置角色
注意:角色记得要在数据库的前面加role_
@configuration
public class securityconfig {
    @bean
    securityfilterchain securityfilterchain(httpsecurity http) throws exception {
        http.authorizerequests()
                //访问 /admin/** 必须具备 admin 这个角色
                //无论是 hasrole 还是 hasauthority,最终调用的权限判断方法都是同一个,仅仅只是从参数上去区分到底是权限还是角色,如果参数是以 role_ 开始的,则表示这是一个角色;否则就是一个权限字符串
                .antmatchers("/admin/**").hasrole("admin")
                //这里会自动给角色加上 role_ 前缀
                .antmatchers("/user/**").hasrole("user")
                //剩下的所有请求,都必须登录之后才可以访问
                .anyrequest().authenticated()
                .and()
                .formlogin()
                .permitall()
                .and()
                .csrf().disable();
        return http.build();
    }
}
2.通过注解来处理角色
1.角色权限的登录
step01-设置角色的注解,在controller层,方法接口上写:@preauthorize("hasrole('user')"):方法执行之前进行校验有没有此角色,也可以用过@preauthorize("hasauthortity('teacher:create')")权限
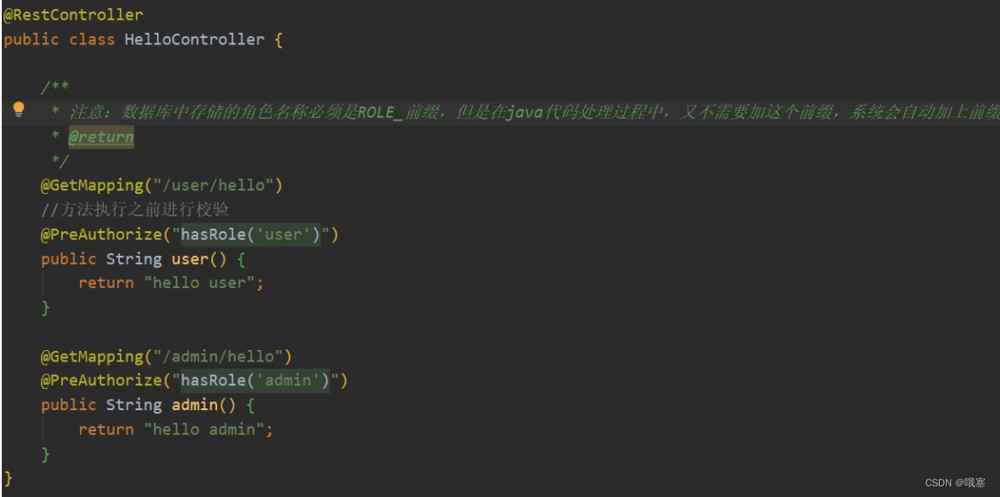
step02-还要在配置类中,开启上面的注解的权限:@enableglobalmethodsecurity(prepostenabled = true)

step03-在service层,在登录验证的时候,顺便获取角色查询,但是在数据库中role字段的值必须有前缀role_
step04-通过user方法里的方法setroles,将从数据库中用户roles数据存入到内存中
step05-然后通过获取的roles放入到secutity里面,这是从数据库中获得的角色权限,这样就可以联想到@preauthorize("hasrole('user')")进行对比,这个用户是否有权限
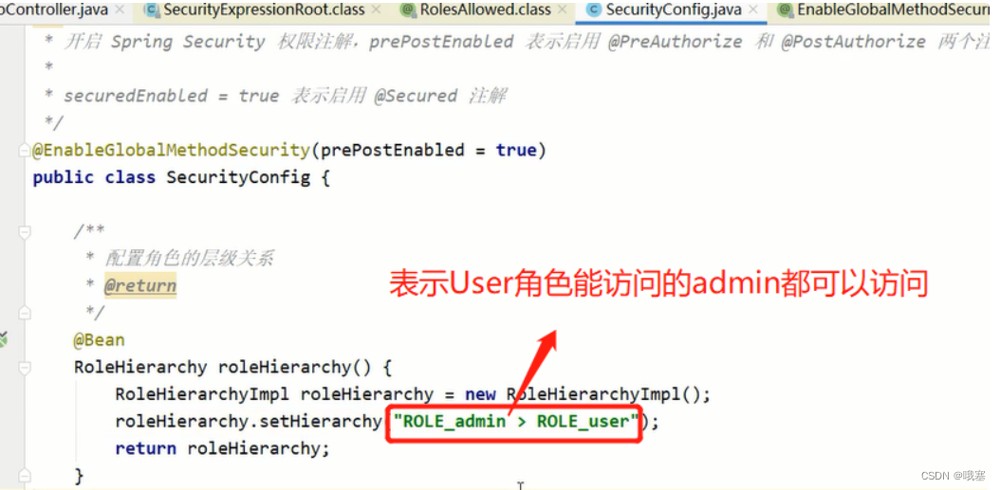
2.角色的继承,层次关系(hierarchy)
\r\n可以接着配多个层次关系
3.自定义权限匹配方法
1.spel(spring express language)
    @test
    void contextloads() {
        //定义的表达式
        string exp1 = "1+2";
        //表达式解析器
        spelexpressionparser parser = new spelexpressionparser();
        //解析字符串,将字符串的内容当成一个表达式执行
        expression expression = parser.parseexpression(exp1);
        //获取执行的结果
        object value = expression.getvalue();
        system.out.println("value = " + value);
    }
    @test
    public void test01() {
        user user = new user();
        user.setusername("张三");
        //这个是计算的上下文对象
        standardevaluationcontext ctx = new standardevaluationcontext();
        ctx.setvariable("user", user);
        //这个表达式表示获取 user 对象中的 username 属性值
        // #user 表示获取 user 对象
        string exp = "#user.username";
        spelexpressionparser parser = new spelexpressionparser();
        expression expression = parser.parseexpression(exp);
        object value = expression.getvalue(ctx);
        system.out.println("value = " + value);
    }
 @test
    public void test02() {
        //设置上下文对象
        standardevaluationcontext ctx = new standardevaluationcontext();
        //获得user类
        user user = new user();
        ctx.setvariable("user", user);
        //调用user对象的方法
        string exp = "#user.sahello()";
        //表达式分析器
        spelexpressionparser parser = new spelexpressionparser();
        //解析字符串
        expression expression = parser.parseexpression(exp);
        object value = expression.getvalue(ctx);
        system.out.println("value = " + value);
    }
到此这篇关于springsecurity使用实战指南的文章就介绍到这了,更多相关springsecurity使用内容请搜索代码网以前的文章或继续浏览下面的相关文章希望大家以后多多支持代码网!


发表评论