正文
nsthread的对象就代表一条线程,轻量级的线程操作,生命周期需要程序员控制,当任务执行完毕之后被释放掉。
创建和启动线程
有三种创建方式 代码:
- 1、
alloc init创建线程,需要手动启动线程
- (void)createnewthread1{
    //1.创建线程
    // 第三个参数object: 前面调用方法需要传递的参数 可以为nil
    nsthread *thread = [[nsthread alloc]initwithtarget:self selector:@selector(run:) object:@"rc"];
    //设置线程的名字
    thread.name = @"线程rc";
    //设置优先级  取值范围 0.0 ~ 1.0 之间 最高是1.0 默认优先级是0.5
    thread.threadpriority = 1.0;
    /*
     ios8.0之后新增  线程优先级
     @property nsqualityofservice qualityofservice;
     nsqualityofserviceuserinteractive --> main thread
     nsqualityofserviceuserinitiated   --> high
     nsqualityofserviceutility         --> low
     nsqualityofservicebackground      --> background
     nsqualityofservicedefault         --> default
     */
   // thread.qualityofservice = nsqualityofservicedefault;
    //2.启动线程
    [thread start];
}
- 2、分离子线程,自动启动线程
-(void)createnewthread2{
    [nsthread detachnewthreadselector:@selector(run:) totarget:self withobject:@"分离子线程"];
}
- 3、开启一条后台线程,自动启动
-(void)createnewthread3{
    [self performselectorinbackground:@selector(run:) withobject:@"开启后台线程"];
}
-(void)run:(nsstring *)param{
    nslog(@"---run----%@---%@",[nsthread currentthread],param);
}
打印:
rcnsthreaddemo[4644:223899] ---run----<nsthread: 0x600000a98480>{number = 3, name = 线程rc}---rc
rcnsthreaddemo[4644:223901] ---run----<nsthread: 0x600000a98a00>{number = 4, name = (null)}---分离子线程
rcnsthreaddemo[4644:223902] ---run----<nsthread: 0x600000a99740>{number = 5, name = (null)}---开启后台线程
- 主线程相关用法
+ (nsthread *)mainthread; // 获得主线程
- (bool)ismainthread; // 是否为主线程
+ (bool)ismainthread; // 是否为主线程
- 获得当前线程
nsthread *current = [nsthread currentthread];
线程的状态
线程存在5种状态:新建 、就绪、运行、阻塞、死亡
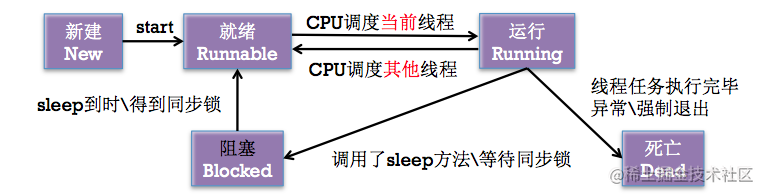
- 启动线程:进入就绪状态 -> 运行状态。当线程任务执行完毕,自动进入死亡状态
- (void)start;
- 阻塞(暂停)线程:进入阻塞状态
+ (void)sleepuntildate:(nsdate *)date;
+ (void)sleepfortimeinterval:(nstimeinterval)ti;
- 强制停止线程:进入死亡状态
+ (void)exit;
注意:一旦线程停止(死亡)了,就不能再次开启任务
线程安全
因为同一块资源可能会被多个线程共享,也就是多个线程可能会访问同一块资源,比如:比如多个线程访问同一个对象、同一个变量、同一个文件 当多个线程访问同一块资源时,很容易引发数据错乱和数据安全问题
苹果官方提供的安全隐患分析图:
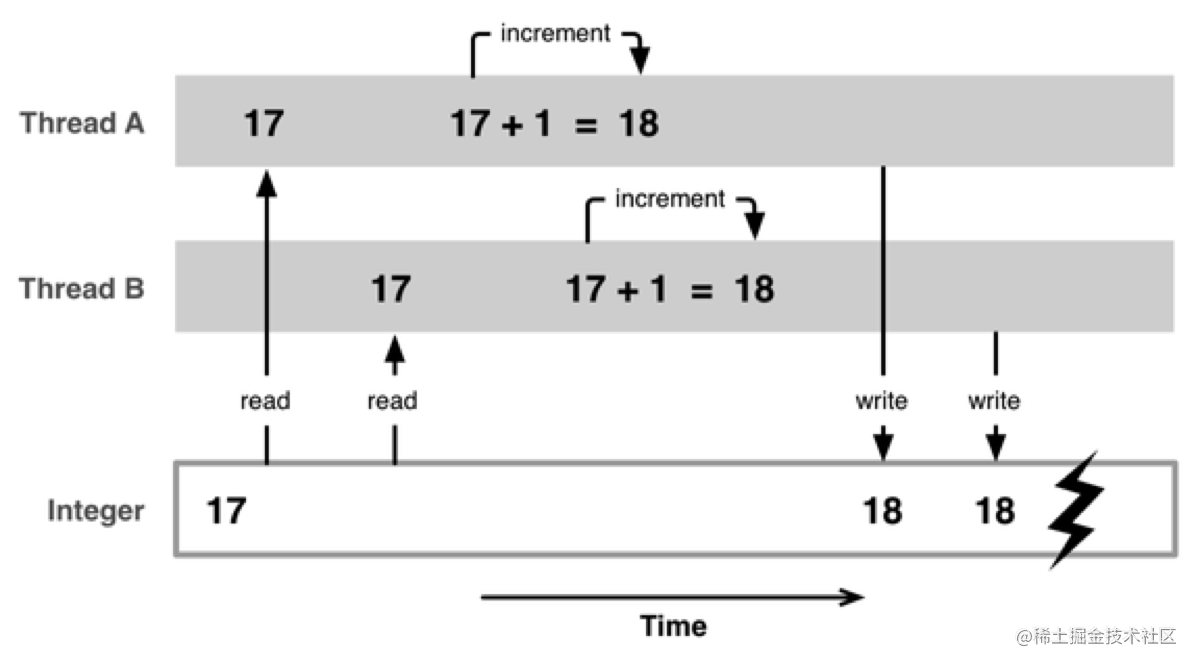
如上图:有2个线程a、b同时read同一个地址获得17,a进行加1得到18后写入,此时b将拿到的17进行加1得到18后再写入。 很明显的,17做了两次+1的操作,最后得到结果却是18!!! 对于这种多个线程访问同一对象获得的结果是不可以预期的就出现了安全隐患。 对此苹果官方也给出了解决办法:
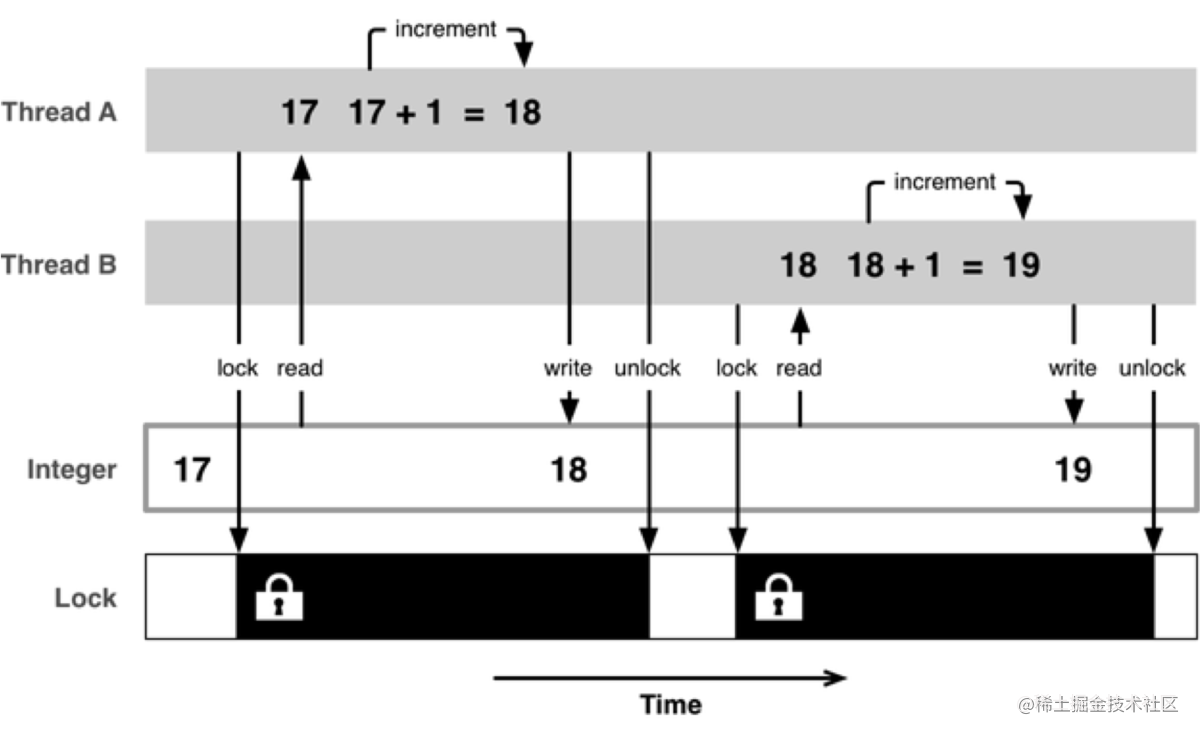
如上图:当threada 在访问资源之前,先添加了一把锁,执行lock操作。再读取资源, 执行+ 1 操作,结束后写入,同时将资源解锁,执行unlock操作。在这期间,其他的任何thread是无法访问这片资源的,必须等unlock操作结束后才可以访。此时的其他thread是出于等待状态。
注意:加锁是要消耗资源的。
关于锁可以看看这篇ios线程锁及其性能
再引申一下:
原子和非原子属性
oc在定义属性时有nonatomic和atomic两种选择,想必我们大部分人用的都是nonatomic
- atomic:原子属性,实际就是为setter方法加锁(默认就是atomic),上面说过了,加锁之后的线程是安全的,但是会消耗大量的资源。
- nonatomic:非原子属性,不会为setter方法加锁,非线程安全,适合内存小的移动设备
建议是:所有属性都声明为nonatomic;尽量避免多线程抢夺同一块资源;尽量将加锁、资源抢夺的业务逻辑交给服务器端处理,减小移动客户端的压力。
下面模拟线程安全隐患,创建3个线程,从开始0作+1操作,直到大于10 停止 代码:
//使用nonatomic定义属性
@property (nonatomic,assign) nsinteger totalcount;
- (void)createsafethread{
    self.threada = [[nsthread alloc]initwithtarget:self selector:@selector(gettotal) object:nil];
    self.threadb = [[nsthread alloc]initwithtarget:self selector:@selector(gettotal) object:nil];
    self.threadc = [[nsthread alloc]initwithtarget:self selector:@selector(gettotal) object:nil];
    [self.threada start];
    [self.threadb start];
    [self.threadc start];
}
- (void)gettotal{
    while (1) {
        nsinteger count = self.totalcount;
        if(count < 10) {
            // 添加一个耗时操作,效果更明显
            for (nsinteger i = 0; i<88888; i++) {
                nsinteger a = 1;
                nsinteger b = 1;
                a = a + b;
            }
            self.totalcount = count + 1;
            nslog(@"--*-**----%ld",self.totalcount);
        }else{
            break;
        }
    }
}
我们预期的打印应该是:从1~10依次打印出来,但是我们看真实的打印结果:
打印:
// 截取部分打印
rcnsthreaddemo[1763:182366] ------1
rcnsthreaddemo[1763:182365] ------2
rcnsthreaddemo[1763:182364] ------2
rcnsthreaddemo[1763:182365] ------3
rcnsthreaddemo[1763:182364] ------4
rcnsthreaddemo[1763:182366] ------3
rcnsthreaddemo[1763:182365] ------5
rcnsthreaddemo[1763:182364] ------5
rcnsthreaddemo[1763:182366] ------6
rcnsthreaddemo[1763:182364] ------7
一眼就能看出有问题,其实如果用gcd来模拟会更加明显,在并发队列中for循环添加异步任务看来复制,会造成坏内存访问而程序崩溃。
上面也说了添加一个互斥锁就会解决以上问题,这里使用的是:
@synchronized
使用格式:@synchronized(锁对象) { // 需要锁定的代码 },其中的锁对象必须是唯一的,一般传self或当前一个全局的变量,如self.threada。
注意:锁定1份代码只用1把锁,用多把锁是无效的
互斥锁的优缺点
- 优点:能有效防止因多线程抢夺资源造成的数据安全问题
- 缺点:需要消耗大量的cpu资源
使用前提:多条线程抢夺同一块资源 互斥锁会造成 线程同步 ,即多条线程在同一条线上执行(按顺序地执行任务)
上代码:
- (void)gettotal{
    while (1) {
        @synchronized (self) {
            nsinteger count = self.totalcount;
            if(count < 10) {
                // 添加一个耗时操作,效果更明显
                for (nsinteger i = 0; i<88888; i++) {
                    nsinteger a = 1;
                    nsinteger b = 1;
                    a = a + b;
                }
                self.totalcount = count + 1;
                nslog(@"------%ld",self.totalcount);
            }else{
                break;
            }
        }
    }
}
线程间通信
线程间通信常用方法
- (void)performselectoronmainthread:(sel)aselector withobject:(id)arg waituntildone:(bool)wait;
- (void)performselector:(sel)aselector onthread:(nsthread *)thr withobject:(id)arg waituntildone:(bool)wait;
以下载图片为例: 代码:
- (void)downloadimage{
    [nsthread detachnewthreadselector:@selector(download) totarget:self withobject:nil];
}
- (void)download{
    nsurl *url = [nsurl urlwithstring:@"http://00.minipic.eastday.com/20170227/20170227134901_e45455144ba23b7cee75f292229151b1_21.jpeg"];
    nsdata *imagedata = [nsdata datawithcontentsofurl:url];
    uiimage *image = [uiimage imagewithdata:imagedata];
    //主线程显示图片  waituntildone :是否等待,指的是后面代码的执行是否需要等待本次操作结束
    // 第一种
   // [self performselector:@selector(showimage:) onthread:[nsthread mainthread] withobject:image waituntildone:yes];
    // 第二种
    [self.imageview performselectoronmainthread:@selector(setimage:) withobject:image waituntildone:yes];
}
//更新ui操作
-(void)showimage:(uiimage *)image{
    self.imageview.image = image;
    nslog(@"ui----%@",[nsthread currentthread]);
}
很简单,开启一个子线程来下载图片,再去主线程更新ui。
以上就是ios中nsthread使用示例详解的详细内容,更多关于ios中nsthread使用的资料请关注代码网其它相关文章!


发表评论