tabbarview
tabbarview 是 material 组件库中提供了 tab 布局组件,通常和 tabbar 配合使用。
tabbarview 封装了 pageview,它的构造方法:
 tabbarview({
  key? key,
  required this.children, // tab 页
  this.controller, // tabcontroller
  this.physics,
  this.dragstartbehavior = dragstartbehavior.start,
})
tabcontroller 用于监听和控制 tabbarview 的页面切换,通常和 tabbar 联动。如果没有指定,则会在组件树中向上查找并使用最近的一个 defaulttabcontroller 。
tabbar
tabbar 为 tabbarview 的导航标题,如下图所示

tabbar 有很多配置参数,通过这些参数我们可以定义 tabbar 的样式,很多属性都是在配置 indicator 和 label,拿上图来举例,label 是每个tab 的文本,indicator 指 “新闻” 下面的白色下划线。
const tabbar({
  key? key,
  required this.tabs, // 具体的 tabs,需要我们创建
  this.controller,
  this.isscrollable = false, // 是否可以滑动
  this.padding,
  this.indicatorcolor,// 指示器颜色,默认是高度为2的一条下划线
  this.automaticindicatorcoloradjustment = true,
  this.indicatorweight = 2.0,// 指示器高度
  this.indicatorpadding = edgeinsets.zero, //指示器padding
  this.indicator, // 指示器
  this.indicatorsize, // 指示器长度,有两个可选值,一个tab的长度,一个是label长度
  this.labelcolor,
  this.labelstyle,
  this.labelpadding,
  this.unselectedlabelcolor,
  this.unselectedlabelstyle,
  this.mousecursor,
  this.ontap,
  ...
})
tabbar 通常位于 appbar 的底部,它也可以接收一个 tabcontroller ,如果需要和 tabbarview 联动, tabbar 和 tabbarview 使用同一个 tabcontroller 即可,注意,联动时 tabbar 和 tabbarview 的孩子数量需要一致。如果没有指定 controller,则会在组件树中向上查找并使用最近的一个 defaulttabcontroller 。另外我们需要创建需要的 tab 并通过 tabs 传给 tabbar, tab 可以是任何 widget,不过material 组件库中已经实现了一个 tab 组件,我们一般都会直接使用它:
const tab({
  key? key,
  this.text, //文本
  this.icon, // 图标
  this.iconmargin = const edgeinsets.only(bottom: 10.0),
  this.height,
  this.child, // 自定义 widget
})
注意,text 和 child 是互斥的,不能同时制定。
全部代码:
import 'package:flutter/material.dart';
/// @author wywinstonwy
/// @date 2022/1/18 9:09 上午
/// @description:
class mytabbarview1 extends statefulwidget {
  const mytabbarview1({key? key}) : super(key: key);
  @override
  _mytabbarview1state createstate() => _mytabbarview1state();
}
class _mytabbarview1state extends state<mytabbarview1>with singletickerproviderstatemixin {
  list<string> tabs =['头条','新车','导购','小视频','改装赛事'];
  late tabcontroller tabcontroller;
  @override
  void initstate() {
    // todo: implement initstate
    super.initstate();
    tabcontroller = tabcontroller(length: tabs.length, vsync: this);
  }
  @override
  void dispose() {
    tabcontroller.dispose();
    super.dispose();
  }
  @override
  widget build(buildcontext context) {
    return scaffold(
      appbar: appbar(
        title: text('tabbarview',textalign: textalign.center,),
        bottom:tabbar(
            unselectedlabelcolor: colors.white.withopacity(0.5),
            labelcolor: colors.white,
            // indicatorsize:tabbarindicatorsize.label,
            indicator:const underlinetabindicator(),
            controller: tabcontroller,
            tabs: tabs.map((e){
              return tab(text: e,);
            }).tolist()) ,
      ),
      body: column(
      children: [
        expanded(
          flex: 1,
          child:  tabbarview(
            controller: tabcontroller,
            children: tabs.map((e){
              return center(child: text(e,style: textstyle(fontsize: 50),),);
            }).tolist()),)
      ],),
    );
  }
}
运行效果:

滑动页面时顶部的 tab 也会跟着动,点击顶部 tab 时页面也会跟着切换。为了实现 tabbar 和 tabbarview 的联动,我们显式创建了一个 tabcontroller,由于 tabcontroller 又需要一个 tickerprovider (vsync 参数), 我们又混入了 singletickerproviderstatemixin;
由于 tabcontroller 中会执行动画,持有一些资源,所以我们在页面销毁时必须得释放资源(dispose)。综上,我们发现创建 tabcontroller 的过程还是比较复杂,实战中,如果需要 tabbar 和 tabbarview 联动,通常会创建一个 defaulttabcontroller 作为它们共同的父级组件,这样它们在执行时就会从组件树向上查找,都会使用我们指定的这个 defaulttabcontroller。
我们修改后的实现如下:
class tabviewroute2 extends statelesswidget {
  @override
  widget build(buildcontext context) {
    list tabs = ["新闻", "历史", "图片"];
    return defaulttabcontroller(
      length: tabs.length,
      child: scaffold(
        appbar: appbar(
          title: text("app name"),
          bottom: tabbar(
            tabs: tabs.map((e) => tab(text: e)).tolist(),
          ),
        ),
        body: tabbarview( //构建
          children: tabs.map((e) {
            return keepalivewrapper(
              child: container(
                alignment: alignment.center,
                child: text(e, textscalefactor: 5),
              ),
            );
          }).tolist(),
        ),
      ),
    );
  }
}
可以看到我们无需去手动管理 controller 的生命周期,也不需要提供 singletickerproviderstatemixin,同时也没有其它的状态需要管理,也就不需要用 statefulwidget 了,这样简单很多。
tabbarview+项目实战
实现导航信息流切换效果并缓存前面数据:

1 构建导航头部搜索框

import 'package:flutter/material.dart';
import 'package:qctt_flutter/constant/colors_definition.dart';
enum searchbartype { home, normal, homelight }
class searchbar extends statefulwidget {
  final searchbartype searchbartype;
  final string hint;
  final string defaulttext;
  final void function()? inputboxclick;
  final void function()? cancelclick;
  final valuechanged<string>? onchanged;
  searchbar(
      {this.searchbartype = searchbartype.normal,
      this.hint = '搜一搜你感兴趣的内容',
      this.defaulttext = '',
      this.inputboxclick,
      this.cancelclick,
      this.onchanged});
  @override
  _searchbarstate createstate() => _searchbarstate();
}
class _searchbarstate extends state<searchbar> {
  @override
  widget build(buildcontext context) {
    return container(
      color: colors.white,
      height: 74,
      child: searchbarview,
    );
  }
  widget get searchbarview {
    if (widget.searchbartype == searchbartype.normal) {
      return _gennormalsearch;
    }
    return _homesearchbar;
  }
  widget get _gennormalsearch {
    return container(
        color: colors.white,
        padding: edgeinsets.only(top: 40, left: 20, right: 60, bottom: 5),
        child: container(
          height: 30,
          decoration: boxdecoration(
              borderradius: borderradius.circular(6),
              color: colors.grey.withopacity(0.5)),
          padding: edgeinsets.only(left: 5, right: 5),
          child: row(
            children: [
              const icon(
                icons.search,
                color: colors.grey,
                size: 24,
              ),
              container(child: _inputbox),
              const icon(
                icons.clear,
                color: colors.grey,
                size: 24,
              )
            ],
          ),
        ),);
  }
  //可编辑输入框
  widget get _homesearchbar{
    return  container(
      padding: edgeinsets.only(top: 40, left: 20, right: 40, bottom: 5),
      decoration: boxdecoration(gradient: lineargradient(
          colors: [maincolor,maincolor.withopacity(0.2)],
          begin:alignment.topcenter,
          end: alignment.bottomcenter
      )),
      child: container(
        height: 30,
        decoration: boxdecoration(
            borderradius: borderradius.circular(6),
            color: colors.grey.withopacity(0.5)),
        padding: edgeinsets.only(left: 5, right: 5),
        child: row(
          children: [
            const icon(
              icons.search,
              color: colors.grey,
              size: 24,
            ),
            container(child: _inputbox),
          ],
        ),
      ),);
  }
 //构建文本输入框
  widget get _inputbox {
    return expanded(
      child: textfield(
        style: const textstyle(
            fontsize: 18.0, color: colors.black, fontweight: fontweight.w300),
        decoration: inputdecoration(
//                   contentpadding: edgeinsets.fromltrb(1, 3, 1, 3),
//                   contentpadding: edgeinsets.only(bottom: 0),
            contentpadding:
                const edgeinsets.symmetric(vertical: 0, horizontal: 12),
            border: inputborder.none,
            hinttext: widget.hint,
            hintstyle: textstyle(fontsize: 15),
            enabledborder: const outlineinputborder(
              // borderside: borderside(color: color(0xffdcdfe6)),
              borderside: borderside(color: colors.transparent),
              borderradius: borderradius.all(radius.circular(4.0)),
            ),
            focusedborder: const outlineinputborder(
                borderradius: borderradius.all(radius.circular(8)),
                borderside: borderside(color: colors.transparent))),
      ),
    );
    ;
  }
}
通常一个应该会出现多出输入框,但是每个地方的输入框样式和按钮功能类型会有一定的区别,可以通过初始化传参的方式进行区分。如上面事例中enum searchbartype { home, normal, homelight }枚举每个功能页面出现searchbar的样式和响应事件。
2 构建导航头部tabbar
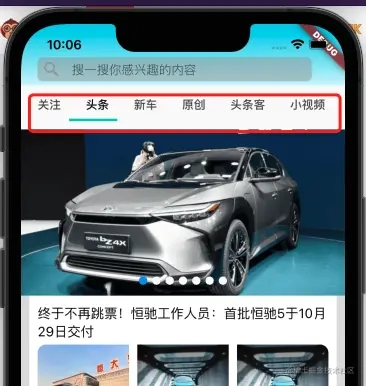
//导航tabar 关注 头条 新车 ,,。
_buildtabbar() {
  return tabbar(
      controller: _controller,
      isscrollable: true,//是否可滚动
      labelcolor: colors.black,//文字颜色
      labelpadding: const edgeinsets.fromltrb(20, 0, 10, 5),
      //下划线样式设置
      indicator: const underlinetabindicator(
        borderside: borderside(color: color(0xff2fcfbb), width: 3),
        insets: edgeinsets.fromltrb(0, 0, 0, 10),
      ),
      tabs: tabs.map<tab>((homechannelmodel model) {
        return tab(
          text: model.name,
        );
      }).tolist());
}
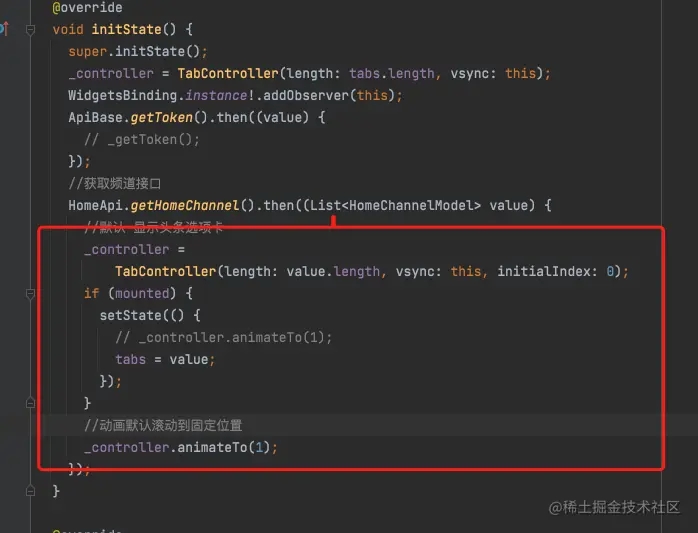
因为tabbar需要和tabbarview进行联动,需要定义一个tabcontroller进行绑定
3 构建导航底部tabbarview容器

//tabbarview容器 信息流列表
_buildtabbarpageview() {
  return keepalivewrapper(child:expanded(
      flex: 1,
      child: container(
        color: colors.grey.withopacity(0.3),
        child: tabbarview(
          controller: _controller,
          children: _builditems(),
        ),
      )));
}
4 构建导航底部结构填充
底部内容结构包含轮播图左右切换,信息流上下滚动,下拉刷新,上拉加载更多、刷新组件用到smartrefresher,轮播图和信息流需要拼接,需要用customscrollview。
代码如下:
_buildrefreshview() {
  //刷新组件
  return smartrefresher(
    controller: _refreshcontroller,
    enablepulldown: true,
    enablepullup: true,
    onloading: () async {
      page++;
      print('onloading $page');
      //加载频道数据
      widget.homechannelmodel.termid == 0 ? _gettthomenews() : _gethomenews();
    },
    onrefresh: () async {
      page = 1;
      print('onrefresh $page');
      //加载频道数据
      widget.homechannelmodel.termid == 0 ? _gettthomenews() : _gethomenews();
    },
    //下拉头部ui样式
    header: const waterdropheader(
      idleicon: icon(
        icons.car_repair,
        color: colors.blue,
        size: 30,
      ),
    ),
    //上拉底部ui样式
    footer: customfooter(
      builder: (buildcontext context, loadstatus? mode) {
        widget body;
        if (mode == loadstatus.idle) {
          body = const text("pull up load");
        } else if (mode == loadstatus.loading) {
          body = const cupertinoactivityindicator();
        } else if (mode == loadstatus.failed) {
          body = const text("load failed!click retry!");
        } else if (mode == loadstatus.canloading) {
          body = const text("release to load more");
        } else {
          body = const text("no more data");
        }
        return container(
          height: 55.0,
          child: center(child: body),
        );
      },
    ),
    //customscrollview拼接轮播图和信息流。
    child: customscrollview(
      slivers: [
        slivertoboxadapter(
                child: _buildfuturescroll()
              ),
        sliverlist(
          delegate: sliverchildbuilderdelegate((content, index) {
            newsmodel newsmodel = newslist[index];
            return _buildchannelitems(newsmodel);
          }, childcount: newslist.length),
        )
      ],
    ),
  );
}
5 构建导航底部结构轮播图
轮播图单独封装swiperview小组件
//首页焦点轮播图数据获取
_buildfuturescroll(){
  return futurebuilder(
      future: _gethomefocus(),
      builder: (buildcontext context, asyncsnapshot<focusdatamodel> snapshot){
        print('轮播图数据加载 ${snapshot.connectionstate} 对应数据:${snapshot.data}');
        container widget;
        switch(snapshot.connectionstate){
          case connectionstate.done:
            if(snapshot.data != null){
              widget = snapshot.data!.focuslist!.isnotempty?container(
                height: 200,
                width: mediaquery.of(context).size.width,
                child: swiperview(snapshot.data!.focuslist!,
                    mediaquery.of(context).size.width),
              ):container();
            }else{
              widget = container();
            }
            break;
          case connectionstate.waiting:
            widget = container();
            break;
          case connectionstate.none:
            widget = container();
            break;
          default :
            widget = container();
            break;
        }
        return widget;
      });
}
轮播图组件封装,整体基于第三方flutter_swiper_tv
import "package:flutter/material.dart";
import 'package:flutter_swiper_tv/flutter_swiper.dart';
import 'package:qctt_flutter/http/api.dart';
import 'package:qctt_flutter/models/home_channel.dart';
import 'package:qctt_flutter/models/home_focus_model.dart';
class swiperview extends statelesswidget {
  // const swiperview({key? key}) : super(key: key);
  final double width;
  final list<focusitemmodel> items;
  const swiperview(this.items,this.width,{key? key}) : super(key: key);
  @override
  widget build(buildcontext context) {
    return swiper(
      itemcount: items.length,
      itemwidth: width,
      containerwidth: width,
      itembuilder: (buildcontext context,int index){
        focusitemmodel focusitemmodel = items[index];
        return stack(children: [
          container(child:image.network(focusitemmodel.picurllist![0],fit: boxfit.fitwidth,width: width,))
        ],
        );
      },
      pagination: const swiperpagination(),
      // control: const swipercontrol(),
    );
  }
}
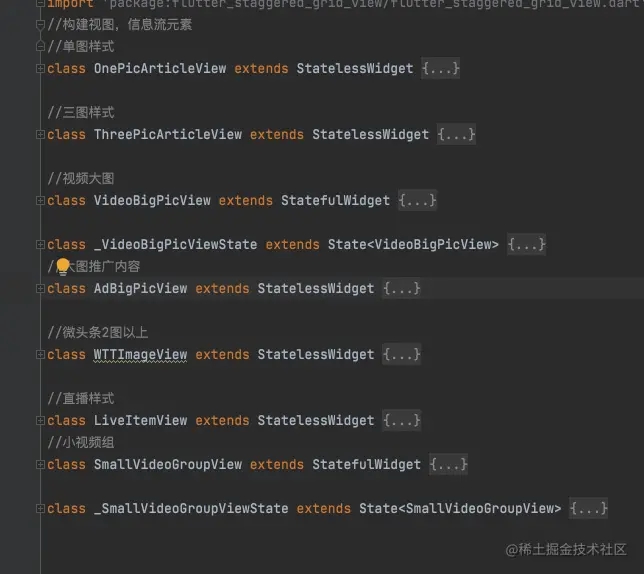
6 构建导航底部结构信息流
信息流比较多,每条信息流样式各一,具体要根据服务端返回的数据进行判定。如本项目不至于22种样式,
  _buildchannelitems(newsmodel model) {
    //0,无图,1单张小图 3、三张小图 4.大图推广 5.小图推广 6.专题(统一大图)
// 8.视频小图,9.视频大图 ,,11.banner广告,12.车展,
// 14、视频直播 15、直播回放 16、微头条无图 17、微头条一图
// 18、微头条二图以上 19分组小视频 20单个小视频 22 文章折叠卡片(关注频道)
    switch (model.style) {
      case '1':
        return gesturedetector(
          child: onepicarticleview(model),
          ontap: ()=>_jumptopage(model),
        );
      case '3':
        return gesturedetector(
          child: threepicarticleview(model),
          ontap: ()=>_jumptopage(model),
        );
      case '4':
        return gesturedetector(
          child: adbigpicview(newsmodel: model,),
            ontap: ()=>_jumptopage(model),) ;
      case '9':
        return gesturedetector(
          child: container(
          padding: const edgeinsets.only(left: 10, right: 10),
          child: videobigpicview(model),
        ),
        ontap: ()=>_jumptopage(model),
        );
      case '15':
        return gesturedetector(
          child: container(
            width: double.infinity,
            padding: const edgeinsets.only(left: 10, right: 10),
            child: liveitemview(model),
          ),
          ontap: ()=>_jumptopage(model),
        );
      case '16'://16、微头条无图
        return gesturedetector(
          child: container(
            width: double.infinity,
            padding: const edgeinsets.only(left: 10, right: 10),
            child: wttimageview(model),
          ),
          ontap: ()=>_jumptopage(model),
        );
      case '17'://17、微头条一图
        return gesturedetector(
          child: container(
            width: double.infinity,
            padding: const edgeinsets.only(left: 10, right: 10),
            child: wttimageview(model),
          ),
          ontap:()=> _jumptopage(model),
        );
      case '18'://18、微头条二图以上
        //18、微头条二图以上
        return gesturedetector(
          child: container(
            width: double.infinity,
            padding: const edgeinsets.only(left: 10, right: 10),
            child: wttimageview(model),
          ),
          ontap: ()=>_jumptopage(model),
        );
      case '19': //19分组小视频
        return container(
          width: double.infinity,
          padding: const edgeinsets.only(left: 10, right: 10),
          child: smallvideogroupview(model.videolist),
        );
      case '20':
      //20小视频 左上方带有蓝色小视频标记
        return container(
          padding: const edgeinsets.only(left: 10, right: 10),
          child: videobigpicview(model),
        );
      default:
        return container(
          height: 20,
          color: colors.blue,
        );
    }
  }
每种样式需要单独封装cell组件视图。
通过_buildchannelitems(newsmodel model)方法返回的是单独的cell视图,需要提交给对应的list进行组装:
sliverlist(
  delegate: sliverchildbuilderdelegate((content, index) {
    newsmodel newsmodel = newslist[index];
    return _buildchannelitems(newsmodel);
  }, childcount: newslist.length),
)
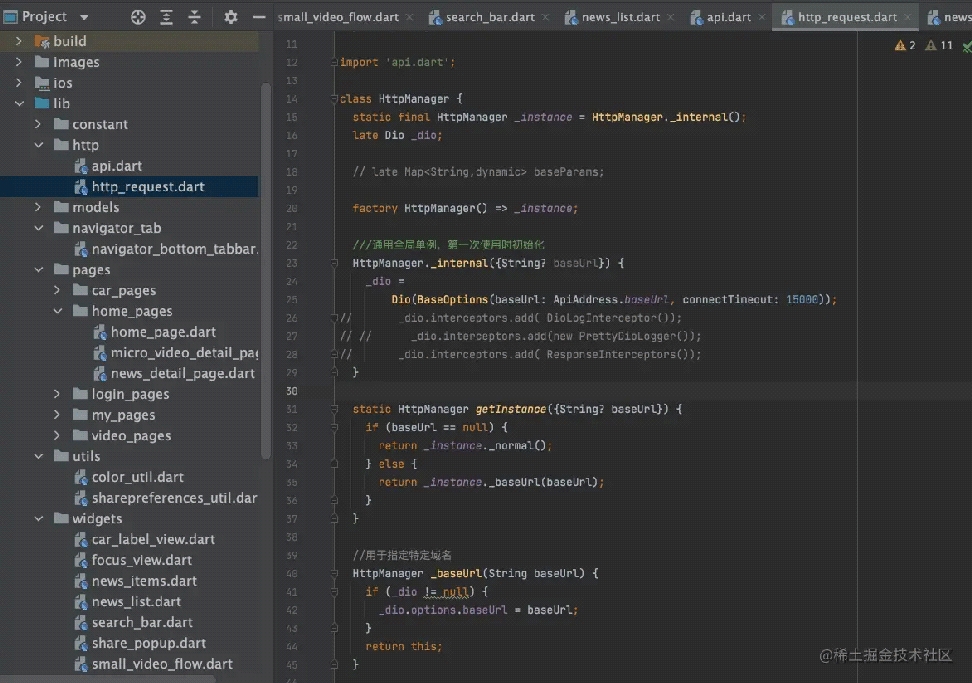
这样整个app首页的大体结构就完成了,包含app顶部搜索,基于tabbar的头部频道导航。tabbarview头部导航联动。customscrollview对轮播图信息流进行拼接,等。网络数据是基于dio进行了简单封装,具体不在这里细说。具体接口涉及隐私,不展示。
至于底部bottomnavigationbar会在后续组件介绍的时候详细介绍到。
总结
本章主要介绍了tabbarview的基本用法以及实际复杂项目中tabbarview的组合使用场景,更多关于flutter tabbarview组件的资料请关注代码网其它相关文章!

发表评论