springboot读取配置文件的6种方式
在springboot中,可以使用以下6种方式读取 yml、properties配置:
- 使用@value注解:读取springboot全局配置文件单个配置。
- 使用environment接口:通过environment接口动态获取配置。(将yml全部数据封装到environment对象)
- 使用@configurationproperties注解:在配置类上使用@configurationproperties注解并指定加载配置项的前缀,就可以批量读取配置注入自定义类的成员变量中。(自定义类需要提供setter方法)
- 使用propertysource注解:加载properties文件配置,然后在字段上使用@value获取配置。
- 配置propertysourcesplaceholderconfigurer的bean加载自定义yml文件,然后在字段上使用@value获取配置。
- java原生方式获取配置。(io流)
1. 使用@value注解读取单个配置
(1)编写application.yml文件配置:
student:
  name: 张三
  age: 20
(2)使用@value读取配置:
@springboottest
@slf4j
public class valuetest {
    @value("${student.name}")
    private string name;

    @value("${student.age}")
    private integer age;

    @test
    public void test() {
    log.info("@value 配置获取 name:{},age:{}",name,age);
    }

}
@value注意事项:
@value 注解只能读取单个配置进行赋值,无法读取整个配置文件批量赋值。当使用@value注解读取配置时,确保配置在yml中存在,否则启动程序时就会报错。
注解中属性名引用方式如下:
@value("${一级属性名.二级属性名...}")当使用 @value 注解引用属性时,可以在属性名称后面使用冒号(: default-value )的形式添加默认值。
这样,如果在配置文件中找不到对应的属性,就会使用默认值。如果在配置文件中找到了属性,其值将会覆盖默认值。
//可以使用各种类型的默认值,包括字符串、数字、布尔值等
@value("${student.name:aopmin}")
private string name;

@value("${student.age:18}")
private integer age;
//表示一个空字符串作为默认值
@value("${student.name:}")
private string name;@value注解只能用于被spring管理的bean中使用,如使用@component、@service、@controller等注解修饰的类,或者使用java配置编写的@configuration类中。@value注解可以用于字段、构造函数参数、方法参数和方法上。当将它放在方法上时,spring容器初始化时会调用该方法,并将配置属性的值作为方法的参数传递进去。
/*
@value注解被用于构造函数参数、setter方法和普通方法上。容器初始化时,会将配置属性的值作为参数传递到构造函数、setter方法和普通方法中。
*/

@component
public class mybean {

    private string myproperty;

    @autowired
    public mybean(@value("${my.property}") string myproperty) {
        this.myproperty = myproperty;
    }

    @value("${another.property}")
    public void setanotherproperty(string anotherproperty) {
        // do something with anotherproperty...
    }

    @value("${yet.another.property}")
    public void processvalue(string value) {
        // do something with value...
    }

}
@value 注解不能在 static 修饰的字段上使用。因为@value注解是通过访问spring容器中的上下文来解析属性值并注入到目标字段中的。
由于static字段不属于对象实例,无法通过实例访问容器,所以在静态字段上使用@value注解是无效的。
2. 使用@configurationproperties注解批量绑定
(1)编写application.yml文件配置:
student:
  name: zhangsan
  age: 18
(2)使用@configurationproperties批量绑定:
package cn.hk.pojo;

import lombok.data;
import org.springframework.boot.context.properties.configurationproperties;
import org.springframework.stereotype.component;

/**
 * 参数配置类   (需要提供setter方法)
 */

//将这个类与配置文件前缀为student的配置绑定,然后把yml、properties中关于student的配置信息注入到当前类的成员变量中
@component
@data
@configurationproperties(prefix = "student")
public class studentproperties {
    private string name;

}
(3)测试
@springboottest
public class configurationpropertiestest {

    @autowired
    private studentproperties studentproperties;

    @test
    public void test() {
        system.out.println("读取配置: name==="+studentproperties.getname());
    }

}
@configurationproperties注意事项:
- 确保添加了@enableconfigurationproperties注解:为了使@configurationproperties生效,需要在主配置类上添加@enableconfigurationproperties(value=xxxxproperties.class)注解,开启@configurationproperties注解自动装配功能。
- 配置文件中的属性名与类字段名的映射规则:默认情况下,@configurationproperties会将配置文件中的属性名与类字段名进行映射。例如,配置文件中的属性student.name会自动映射到类字段name上。如果配置文件中的属性名与类字段名不一致,可以使用@value注解或通过setter方法来指定映射关系。
- 类必须是spring管理的bean:被@configurationproperties注解标记的类必须是由spring容器管理的bean,因此需要确保该类被@component或其他相关注解标记,以便spring能够扫描并创建该类的实例。
- 支持类型转换:@configurationproperties支持自动类型转换,将配置文件中的字符串值转换为目标字段的类型。例如,将字符串转换为整数、布尔值等。如果无法进行类型转换,会抛出异常。
- 默认值和可选属性:可以为@configurationproperties注解的字段设置默认值,以防止配置文件中缺少对应的属性。可以使用":“符号指定默认值,例如@value(”${my.property:default-value}")。另外,可以使用required属性来指定某个属性是否为必需的。
- 配置项的验证和校验:可以使用jsr-303/349规范的注解对@configurationproperties注解的字段进行验证和校验。例如,使用@notblank、@min、@max等注解来限制属性值的有效性。
3. 使用environment动态获取配置
(1)编写application.yml文件配置:
student:
  name: zhangsan
  age: 18
(2)使用environment动态获取配置:(将environment对象自动装配,然后调用getproperty()方法获取指定属性值)
package cn.hk.test;

import lombok.extern.slf4j.slf4j;
import org.junit.jupiter.api.test;
import org.springframework.boot.test.context.springboottest;
import org.springframework.core.env.environment;
import javax.annotation.resource;

/**
 * environment是springboot核心的环境配置接口,它提供了一些方法用于访问应用程序配置属性。
 * 包括系统属性、操作系统环境变量、命令行参数、以及配置文件中定义的属性等等
 */

@slf4j
@springboottest
public class environmenttest {

    @resource
    private environment env;

    @test
    public void test() {
        string name = env.getproperty("student.name");
        // 逻辑处理...(也可以控制某一个bean是否生效)
        log.info("environment配置读取: name:{}", name);
    }
}
除了自动装配方式,也可以从spring容器中获取bean:
@slf4j
@springboottest
public class environmenttest2 implements environmentaware {

    private environment env;

    @test
    public void test() {
        string name = env.getproperty("student.name");
        log.info("environment配置读取: name:{}", name);
    }

    @override
    public void setenvironment(environment environment) {
        // 逻辑处理...(也可以控制某一个bean是否生效)
        this.env = environment;
    }

}
aware是spring框架提供的一组特殊接口,可以让bean从spring容器中拿到一些资源信息。
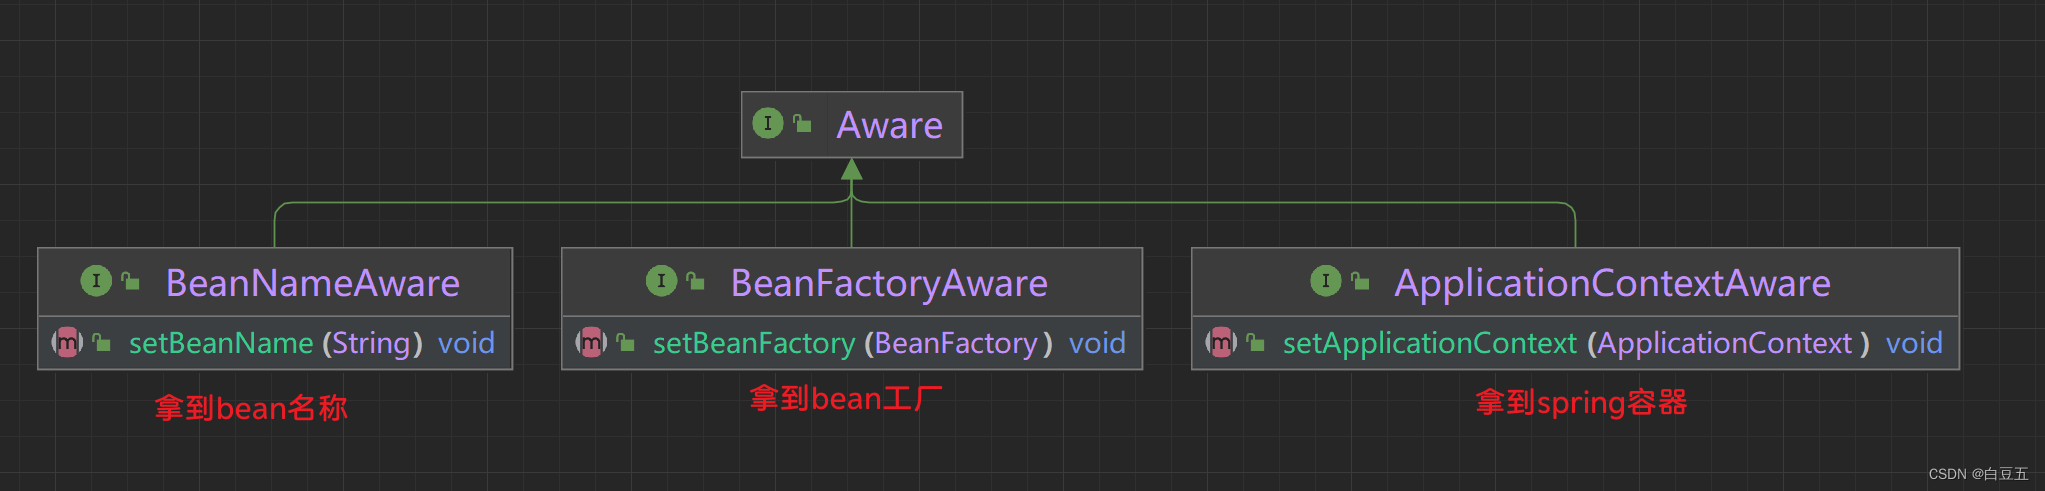
aware接口是一种回调机制,当bean被实例化并注册到spring容器中时,容器会自动调用bean中实现了特定aware接口的方法,将相应的资源或信息传递给bean。
以下是几个常用的aware接口:
- applicationcontextaware:通过实现该接口,bean可以访问applicationcontext对象,从而获取spring容器的相关信息。
- beanfactoryaware:通过实现该接口,bean可以访问beanfactory对象,从而获取bean在容器中的相关信息。
- environmentaware:通过实现该接口,bean可以访问environment对象,从而获取环境相关的配置属性,比如系统属性、环境变量等。
- resourceloaderaware:通过实现该接口,bean可以访问resourceloader对象,从而获取资源加载器,用于加载类路径下的资源文件。
- messagesourceaware:通过实现该接口,bean可以访问messagesource对象,从而获取国际化消息。
4.使用@propertysources注解获取外部配置
前3种都是从springboot全局配置文件中获取配置,如果获取外部自定义文件就不可以啦,我们可以通过@propertysources注解获取==.properties==文件配置。
1、在resources目录下创建student.properties文件:
student.id=1001
student.name=hello
2、在配置类中使用@propertysources注解绑定配置:
package cn.hk.pojo;

import lombok.data;
import org.springframework.beans.factory.annotation.value;
import org.springframework.context.annotation.configuration;
import org.springframework.context.annotation.propertysource;

/**
 * 绑定自定义properties配置
 */

@data
@configuration
@propertysource(value = "classpath:student.properties", encoding = "utf-8")
public class propertysourcesconf {

    @value("${student.id}")
    private integer id;

    @value("${student.name}")
    private string name;

}
3、测试
@springboottest
@slf4j
public class propertysourcestest {

    @resource
    private propertysourcesconf propertysourcesconf;

    @test
    public void test() {
       log.info("propertysources配置读取 id: {}", propertysourcesconf.getid());
       log.info("name: {}", propertysourcesconf.getname());
    }

}
5. 配置propertysourcesplaceholderconfigurer的bean获取外部配置
1、编写student.yml配置:
file:
  type: text
2、 配置propertysourcesplaceholderconfigurer获取自定义yml文件配置:
package cn.hk.config;

import org.springframework.beans.factory.config.yamlpropertiesfactorybean;
import org.springframework.context.annotation.bean;
import org.springframework.context.annotation.configuration;
import org.springframework.context.support.propertysourcesplaceholderconfigurer;
import org.springframework.core.io.classpathresource;
import java.util.objects;

/**
 * 配置propertysourcesplaceholderconfigurer读取yml配置
 */

@configuration
public class myyamlconfig {

    @bean
    public static propertysourcesplaceholderconfigurer yamlconfigurer() {

        propertysourcesplaceholderconfigurer configurer = new propertysourcesplaceholderconfigurer();
        yamlpropertiesfactorybean yaml = new yamlpropertiesfactorybean();
        yaml.setresources(new classpathresource("student.yml"));//自定义yml文件

        //objects.requirenonnull()方法的作用是如果对象为空,则抛出空指针异常,否则返回对象本身。
        configurer.setproperties(objects.requirenonnull(yaml.getobject()));
        return configurer;

    }

}
3、测试
@springboottest
public class loadyamltest {

    @value("${file.type}")
    private string filetype;

    @test
    public void test() {
        system.out.println("读取yaml配置:"+filetype);
    }

}
6. java原生方式获取配置
通过io流读取配置,然后放入propertis配置对象中。
package cn.hk.test;

import org.junit.jupiter.api.test;
import org.springframework.boot.test.context.springboottest;
import java.io.ioexception;
import java.io.inputstream;
import java.io.inputstreamreader;
import java.nio.charset.standardcharsets;
import java.util.properties;


@springboottest
public class customtest {

    @test
    public void test() {
        // 配置对象
        properties props = new properties();
        inputstreamreader input = null;
        try {
            // 输入流 (字节流转字符流)
            input = new inputstreamreader(
                    //通过类加载器来获取指定路径下的资源文件,并返回一个inputstream对象
                    this.getclass().getclassloader().getresourceasstream("student.properties"), standardcharsets.utf_8); //指定编码格式

            // 加载配置
            props.load(input);
        } catch (ioexception e) {
            throw new runtimeexception(e);
        } finally {
            if (input!=null)
                try {
                    input.close();
                } catch (ioexception e) {
                    e.printstacktrace();
                }
        }

        // 获取配置
        system.out.println("id:" + props.getproperty("student.id") + ", name:" + props.getproperty("student.name"));
    }

}
总结
以上为个人经验,希望能给大家一个参考,也希望大家多多支持代码网。


发表评论