前言
今天我们重点聊聊授权方式的另外一种:基于httpservletrequest配置权限
基于httpservletrequest配置权限
一个典型的配置demo
http.authorizehttprequests(requestmatcherregstry ->
// /admin/** 需要有amind角色
	requestmatcherregstry.requestmatchers("/admin/**").hasrole("admin")
			// /log/** 只要有amind、user角色之一
          .requestmatchers("/log/**").hasanyrole("admin", "user")
			// 任意请求 只要登录了即可访问
          .anyrequest().authenticated()
);
从这里也可以看出,要实现基于rbac,还是比较容易的。也比较容易使用。但是如果想要动态的增加角色,就需要我们定制authorizationmanager。
配置原理
httpsecurity是负责构建defaultsecurityfilterchain的。而这个安全过滤器链,则是允许我们进行配置的。而authorizehttprequests方法,正是配置authorizationfilter的。而我们传入的入参-lambada表达式-则是指引如何配置authorizationfilter的。
/**
 * 这个方法是httpsecurity的方法。
 * 作用是配置authorizationfilter。
 * 其入参authorizehttprequestscustomizer正是让我们配置authorizationfilter的关键。
 * customizer:就是定制。原理比较容易理解,就是我把你需要配置的东西丢给你,你往里面赋值。
 * authorizehttprequestsconfigurer<httpsecurity>:这个是configurer的实现,负责引入过滤器的。这里明显就是引入authorizationfilter
 * authorizationmanagerrequestmatcherregistry:这个就是我们最终配置的东西。而这个配置的正是我们上面的requestmatcherdelegatingauthorizationmanager。说白了就是往里面添加哪些路径对应哪些authorizationmanager。只不过,为了方便使用,也帮我们都封装好了。不妨继续往后看看。
 */
public httpsecurity authorizehttprequests(
			customizer<authorizehttprequestsconfigurer<httpsecurity>.authorizationmanagerrequestmatcherregistry> authorizehttprequestscustomizer)
			throws exception {
		applicationcontext context = getcontext();
		// 这里干了三个事情:
		// 1. 如果当前httpsecurity不存在authorizehttprequestsconfigurer,则创建一个,并注册到当前的httpsecurity对象中。
		// 2. 从authorizehttprequestsconfigurer拿到他的注册器也就是authorizationmanagerrequestmatcherregistry
		// 3. 调用传入的参数的customize。如此,我们传入的lambda表达式就被调用了。
		authorizehttprequestscustomizer
			.customize(getorapply(new authorizehttprequestsconfigurer<>(context)).getregistry());
		return httpsecurity.this;
	}
public final class authorizationmanagerrequestmatcherregistry
extends abstractrequestmatcherregistry<authorizedurl> {
/**
* 这是父类的方法
* c代表的是authorizedurl
*/
public c requestmatchers(string... patterns) {
// 调用的重载方法第一个参数为httpmethod,也就是说,我们还可以指定http请求的方法,例如:post、get等
return requestmatchers(null, patterns);
}
@override
protected authorizedurl chainrequestmatchers(list<requestmatcher> requestmatchers) {
this.unmappedmatchers = requestmatchers;
return new authorizedurl(requestmatchers);
}
}
public class authorizedurl {
private final list<? extends requestmatcher> matchers;
public authorizationmanagerrequestmatcherregistry permitall() {
return access(permitallauthorizationmanager);
}
public authorizationmanagerrequestmatcherregistry hasrole(string role) {
return access(withrolehierarchy(authorityauthorizationmanager.hasrole(role)));
}
public authorizationmanagerrequestmatcherregistry hasanyauthority(string... authorities) {
return access(withrolehierarchy(authorityauthorizationmanager.hasanyauthority(authorities)));
}
public authorizationmanagerrequestmatcherregistry authenticated() {
return access(authenticatedauthorizationmanager.authenticated());
}
public authorizationmanagerrequestmatcherregistry access(
authorizationmanager<requestauthorizationcontext> manager) {
assert.notnull(manager, "manager cannot be null");
return authorizehttprequestsconfigurer.this.addmapping(this.matchers, manager);
}
}
public final class authorizehttprequestsconfigurer<h extends httpsecuritybuilder<h>>
extends abstracthttpconfigurer<authorizehttprequestsconfigurer<h>, h> {
private authorizationmanagerrequestmatcherregistry addmapping(list<? extends requestmatcher> matchers,
authorizationmanager<requestauthorizationcontext> manager) {
for (requestmatcher matcher : matchers) {
this.registry.addmapping(matcher, manager);
}
return this.registry;
}
}我们通过lambda表达式:
requestmatcherregstry -> requestmatcherregstry.requestmatchers("/admin/**").hasrole("admin")配置的正是authorizationmanagerrequestmatcherregistry
requestmachers方法,构建出authorizedurl,然后通过这个类的hasrole方法注册当前路径所对应的权限/角色。这个对应关系由requestmatcherentry保存。key:requestmatcher requestmatcher;value: authorizationmanager。
值得一提的是,这个lambda表达式以及其链式调用看起来简单方便,但是其内部涉及多个类的方法调用,实在很容易犯迷糊,这是我觉得比较诟病的地方。在我看来,链式调用还是同一个返回值(每次都返回this)才能做到在方便至于也能清晰明了,容易理解。
而这里在lambda表达式内部:
- 第一个方法是
requestmatcherregstry.requestmatchers
是abstractrequestmatcherregistry,也就是我们的authorizationmanagerrequestmatcherregistry的父类。方法返回值是authorizedurl。
- 第二个方法是
authorizedurl.hasrole
而该方法的返回值为authorizationmanagerrequestmatcherregistry。
发现什么了吗?链式调用还能玩起递归,又回到最开始的第一个方法了。而要是我们配置httpsecurity,直接一连串的链式调用,那更是没谱了。经常就是,你只能看着别人这样配置,然后照猫画虎。这个链式调用咋调回来的,一头雾。因为中间可能跨越好几个不同的类。。。
ps:可能官方也有些意识到这点,所以sample工程都是类似于本文开头的那样,传入一个基于lambda表达式的customizer。一个方法配置一个过滤器的securityconfigurer。但,如果你翻看源码,你看到的就是一连串的链式调用。最为明显的一个证明就是httpsecurity#and方法过期了。因此个人推荐大家用文章开头的那种方法,相对清晰易理解。
我想说,这么玩是深怕别人搞明白了是吗???更绝的是,即便你知晓了原理也没有办法直接注册对应关系,除非你使用反射!
这里给大家提个醒,如果你想搞明白你在使用springsecurity究竟在配置些什么,那么你就必须要搞明白上面的套路。
设计方案
spring security在5.5版本之后,在鉴权架构上,进行了较大的改动。以至于官方也出了迁移指南
| 组件 | 5.5之前 | 5.5之后 |
|---|---|---|
| 过滤器 | filtersecurityinterceptor | authorizationfilter |
| 鉴权管理器 | accessdecisionmanager | authorizationmanager |
| 访问决策投票员 | accessdecisionvoter | - |
而原来的设计方案,相较于新的方案,更为复杂。这里给大家一张官方的uml感受感受:
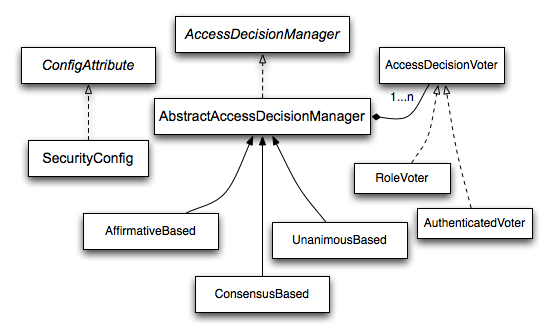
除却过滤器外,还需要三个组件来构建完整的鉴权:
accessdecisionmanager 、accessdecisionvoter 、configattribute。
感兴趣的同学可以自己琢磨琢磨,但已经废弃的方案,这里就不讨论了。
5.6之后的新方案
新方案只有一个包罗万象、且极具扩展性的authorizationmanager
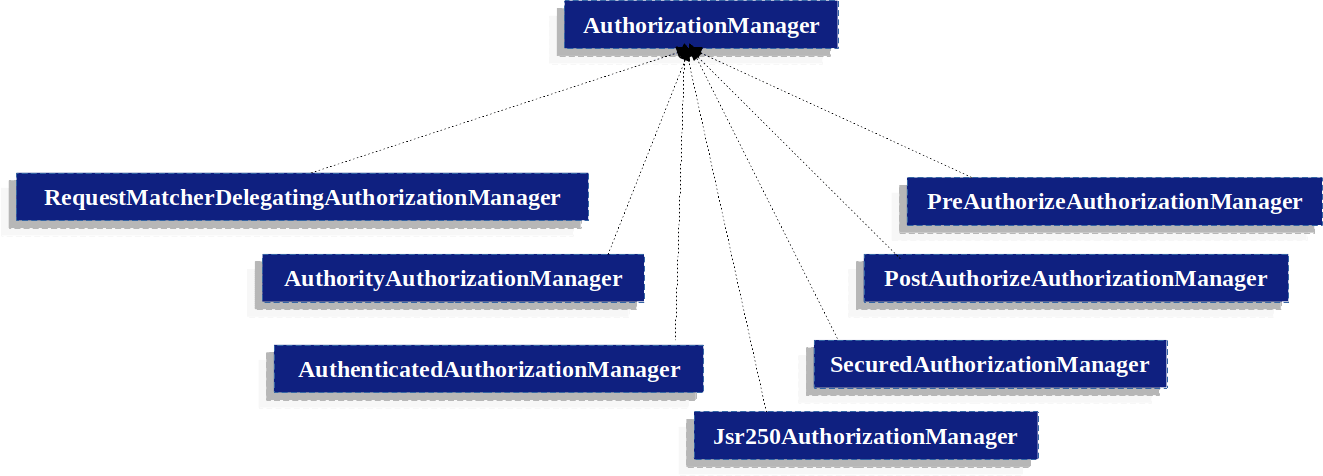
我们前面的配置demo,本质上都是在配置requestmatcherdelegatingauthorizationmanager。他主要是记录每一个路径对应的authorizationmanager<httpservletrequest>。当有请求过来时,只需要遍历每一个路径,当找到匹配者就委托该authorizationmanager<httpservletrequest>进行鉴权。
在我们的配置demo中,对应的是authoriztyauthorizationmanager和authenticatedauthorizationmanager。前者,意味着我们配置的是角色/权限,后者对应的是authenticated()这个方法。
如果你认真看了这个关系图,那么一定会发现右边的4个实现类正是我们在上一文讲述基于方法配置权限中所使用到的。
鉴权源码分析
权限过滤的入口:authorizationfilter
public class authorizationfilter extends genericfilterbean {
	@override
	public void dofilter(servletrequest servletrequest, servletresponse servletresponse, filterchain chain)
			throws servletexception, ioexception {
		// 类型转换
		httpservletrequest request = (httpservletrequest) servletrequest;
		httpservletresponse response = (httpservletresponse) servletresponse;
		// 是否需要执行鉴权
		if (this.observeonceperrequest && isapplied(request)) {
			chain.dofilter(request, response);
			return;
		}
		// /error和异步请求不处理
		if (skipdispatch(request)) {
			chain.dofilter(request, response);
			return;
		}
		// 是否已经执行过鉴权逻辑了
		string alreadyfilteredattributename = getalreadyfilteredattributename();
		request.setattribute(alreadyfilteredattributename, boolean.true);
		try {
			// 从securitycontextholder中获取凭证,并通过authorizationmanager做出决策
			authorizationdecision decision = this.authorizationmanager.check(this::getauthentication, request);
			// 发布鉴权事件
			this.eventpublisher.publishauthorizationevent(this::getauthentication, request, decision);
			if (decision != null && !decision.isgranted()) {
				// 拒绝访问异常
				throw new accessdeniedexception("access denied");
			}
			// 正常执行后续业务逻辑
			chain.dofilter(request, response);
		}
		finally {
			// 处理完业务逻辑后,为当前请求清理标识
			request.removeattribute(alreadyfilteredattributename);
		}
	}
}
requestmatcherdelegatingauthorizationmanager
public final class requestmatcherdelegatingauthorizationmanager implements authorizationmanager<httpservletrequest> {
@override
	public authorizationdecision check(supplier<authentication> authentication, httpservletrequest request) {
		// 遍历每一个已经登录好的路径,找到对应的authorizationmanager<requestauthorizationcontext>>
		for (requestmatcherentry<authorizationmanager<requestauthorizationcontext>> mapping : this.mappings) {
			requestmatcher matcher = mapping.getrequestmatcher();
			// 匹配当前请求
			matchresult matchresult = matcher.matcher(request);
			if (matchresult.ismatch()) {
				// 找到匹配的authorizationmanager就直接调用check方法并返回鉴权结果
				authorizationmanager<requestauthorizationcontext> manager = mapping.getentry();
				return manager.check(authentication,
						new requestauthorizationcontext(request, matchresult.getvariables()));
			}
		}
		// 没有匹配的authorizationmanager则返回拒绝当前请求
		return deny;
	}
}
可见,在没有匹配的authorizationmanager的情况下,默认是拒绝请求的。
总结
1.我们在配置中配置的url被封装成requestmatcher,而hasrole被封装成authorityauthorizationmanager。进行注册,在请求过来时,便通过遍历所有注册好的requestmatch进行匹配,存在匹配就调用authorizationmanager<requestauthorizationcontext>#check方法。
2.配置的链式调用,会跨越多个不同的类,最终又回到第一个对象的类型。
后记
本文我们聊了基于httprequest配置权限的方方面面。相信这里有一个点应该会引起大家的注意:配置。下一次,我们聊聊spring security的配置体系。


发表评论