一、技术选型
ocr服务:推荐使用百度ai
二、实现
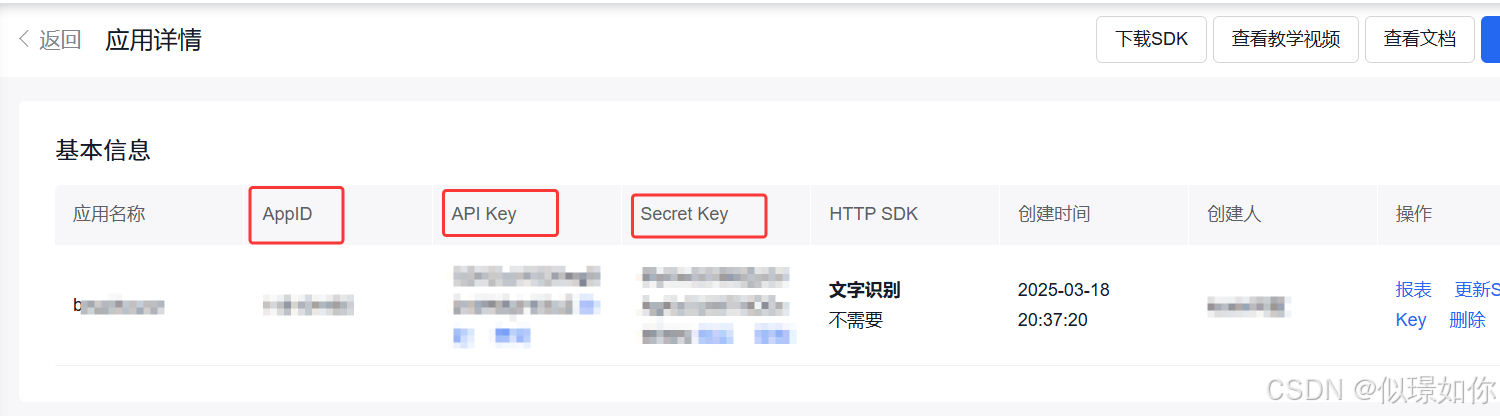
1.注册一个服务
百度智能云控制台
https://console.bce.baidu.com/ai-engine/ocr/overview/index?_=1742309417611
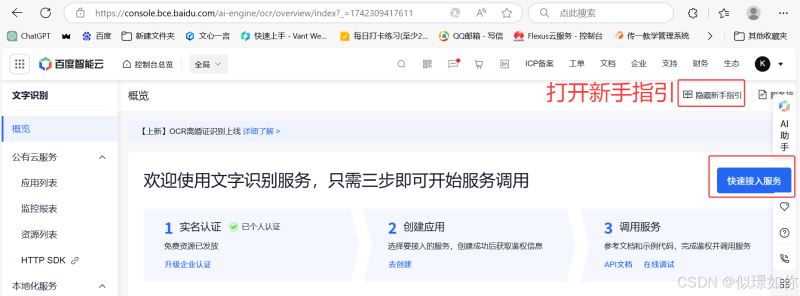
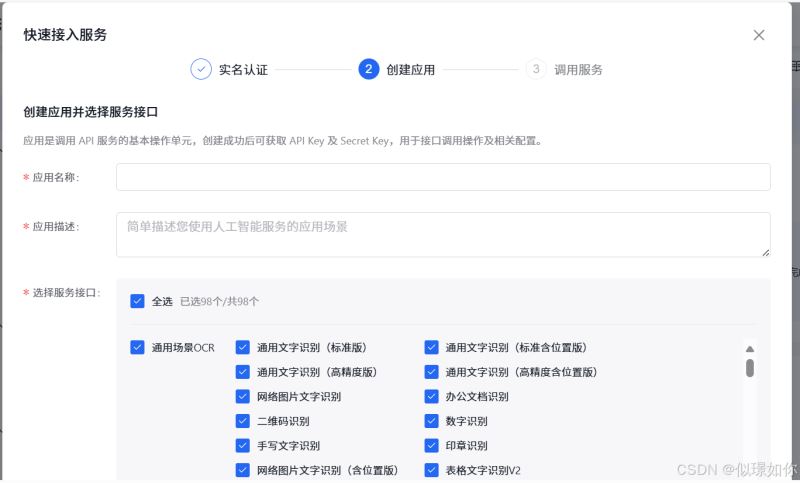
填写完之后可以获取到app-id、apikey、secretkey这三个后面文件配置会用到
2、导入依赖
        <!-- spring boot web -->
        <dependency>
            <groupid>org.springframework.boot</groupid>
            <artifactid>spring-boot-starter-web</artifactid>
            <version>2.6.13</version>
        </dependency>
        <!-- 百度ai sdk(示例) -->
        <dependency>
            <groupid>com.baidu.aip</groupid>
            <artifactid>java-sdk</artifactid>
            <version>4.16.13</version>
        </dependency>
        <!--json依赖-->
        <dependency>
            <groupid>com.alibaba</groupid>
            <artifactid>fastjson</artifactid>
            <version>2.0.40</version>
        </dependency>
3、配置文件
spring:
  servlet:
    multipart:
      max-request-size: 10mb # 文件上传最大值
      max-file-size: 10mb # 单个文件最大值
baidu:
  ai:
    app-id: ***** 换成自己的
    secret-key: ***** 换成自己的
    api-key: ***** 换成自己的
4、编写ocr工具类
import com.baidu.aip.ocr.aipocr;
import org.json.jsonobject;
import org.springframework.beans.factory.annotation.value;
import org.springframework.stereotype.component;
import org.springframework.web.multipart.multipartfile;
import java.util.hashmap;
import java.util.map;
@component
public class ocrservice {
    @value("${baidu.ai.app-id}")
    private string appid;
    @value("${baidu.ai.api-key}")
    private string apikey;
    @value("${baidu.ai.secret-key}")
    private string secretkey;
    public map<string, string> recognizeidcard(multipartfile file, boolean isfront) throws exception {
        aipocr client = new aipocr(appid, apikey, secretkey);
        // 读取图片字节
        byte[] imgdata = file.getbytes();
        // 设置身份证正反面
        string idcardside = isfront ? "front" : "back";
        // 设置其他识别选项(如果有)
        hashmap<string, string> options = new hashmap<string, string>();
        // 可以在这里添加其他选项,例如:
        // options.put("detect_direction", "true"); // 检测图像朝向
        // 调用身份证识别接口
        jsonobject res = client.idcard(imgdata, idcardside, options);
        // 检查返回结果
        if (res == null || !res.has("words_result")) {
            throw new exception("ocr 识别失败: 返回结果为空或不包含 words_result");
        }
        // 解析结果
        map<string, string> result = new hashmap<string, string>();
        jsonobject words = res.getjsonobject("words_result");
        // 根据正反面提取不同字段
        if (isfront) {
            result.put("姓名", words.optstring("姓名", ""));
            result.put("性别", words.optstring("性别", ""));
            result.put("民族", words.optstring("民族", ""));
            result.put("出生日期", words.optstring("出生年月日", ""));
            result.put("住址", words.optstring("住址", ""));
            result.put("身份证号", words.optstring("公民身份号码", ""));
        } else {
            result.put("签发机关", words.optstring("签发机关", ""));
            result.put("有效期限", words.optstring("失效日期", ""));
        }
        return result;
    }
}
5、文件上传接口
import com.alibaba.fastjson.json;
import com.cykj.service.ocrservice;
import org.springframework.beans.factory.annotation.autowired;
import org.springframework.http.responseentity;
import org.springframework.web.bind.annotation.postmapping;
import org.springframework.web.bind.annotation.requestmapping;
import org.springframework.web.bind.annotation.requestparam;
import org.springframework.web.bind.annotation.restcontroller;
import org.springframework.web.multipart.multipartfile;
import java.util.hashmap;
import java.util.map;
@restcontroller
@requestmapping("/api/idcard")
/**
 * 身份证识别控制器
 * 提供身份证图片上传和识别功能
 */
public class idcardcontroller {
    @autowired
    private ocrservice ocrservice;
    /**
     * 上传身份证图片并进行识别
     *
     * @param frontfile 身份证正面图片
     * @param backfile 身份证反面图片
     * @return 身份证信息的map,包括正面和反面的识别结果
     */
    @postmapping("/upload")
    public responseentity<?> uploadidcard(
            @requestparam("frontfile") multipartfile frontfile,
            @requestparam("backfile") multipartfile backfile) {
        system.out.println(frontfile);
        system.out.println(backfile);
        try {
            // 识别正面信息
            map<string, string> frontinfo = ocrservice.recognizeidcard(frontfile, true);
            system.out.println("front info: " + frontinfo);
            // 识别反面信息
            map<string, string> backinfo = ocrservice.recognizeidcard(backfile, false);
            system.out.println("back info: " + backinfo);
            // 合并结果
            map<string, string> combined = new hashmap<string, string>();
            combined.putall(frontinfo);
            combined.putall(backinfo);
            // 身份证校验(示例)
            string idnumberjson = combined.get("身份证号");
            //解析获取身份证号
            com.alibaba.fastjson.jsonobject jsonobject = json.parseobject(idnumberjson);
            string idnumber = jsonobject.getstring("words");
            if (!validateidcard(idnumber)) {
                return responseentity.badrequest().body("身份证号校验失败");
            }
            return responseentity.ok(combined);
        } catch (exception e) {
            e.printstacktrace();
            return responseentity.status(500).body("识别失败: " + e.getmessage());
        }
    }
    /**
     * 简单身份证号校验(正则表达式)
     *
     * @param idnumber 身份证号码字符串
     * @return 校验通过返回true,否则返回false
     */
    private boolean validateidcard(string idnumber) {
        string regex = "^[1-9]\\d{5}(19|20)\\d{2}(0[1-9]|1[0-2])(0[1-9]|[12]\\d|3[01])\\d{3}[\\dxx]$";
        return idnumber != null && idnumber.matches(regex);
    }
}
三、前端写个测试页面
这边的action路径要改成自己的路径
<!doctype html>
<html lang="en">
<head>
    <meta charset="utf-8">
    <title>title</title>
</head>
<body>
<form action="http://localhost:8086/api/idcard/upload" method="post" enctype="multipart/form-data">
    <input type="file" name="frontfile" accept="image/*" required>
    <input type="file" name="backfile" accept="image/*" required>
    <button type="submit">上传并识别</button>
</form>
</body>
</html>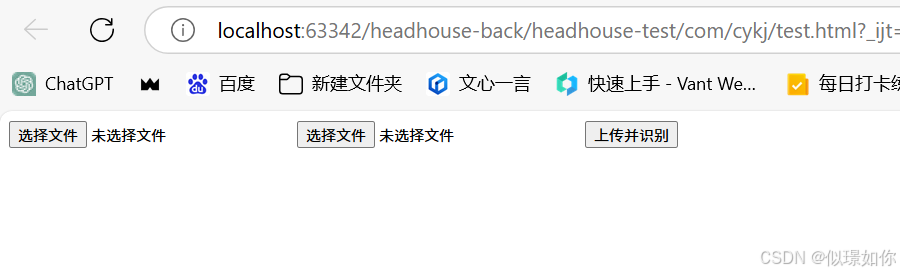
第一张为身份证正面(人)
第二张上传为身份证反面(国徽那面)
测试成功在页面和控制台都可以看见自己提取出来的信息就成功啦!
四、二要素校验
身份证上传也不能保证信息准确,毕竟还可以进行p图技术进行修改嘛
为了保证信息的正确,就得要引入二要素校验==》对姓名和身份证号码进行校验
(1)配置
https://www.apispace.com/explore/service
打开网址
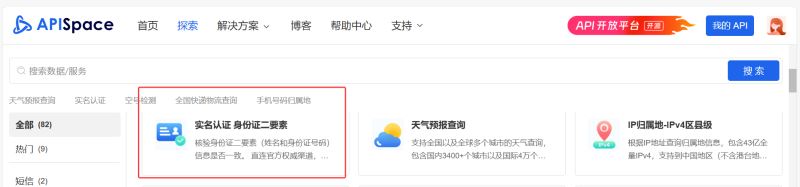
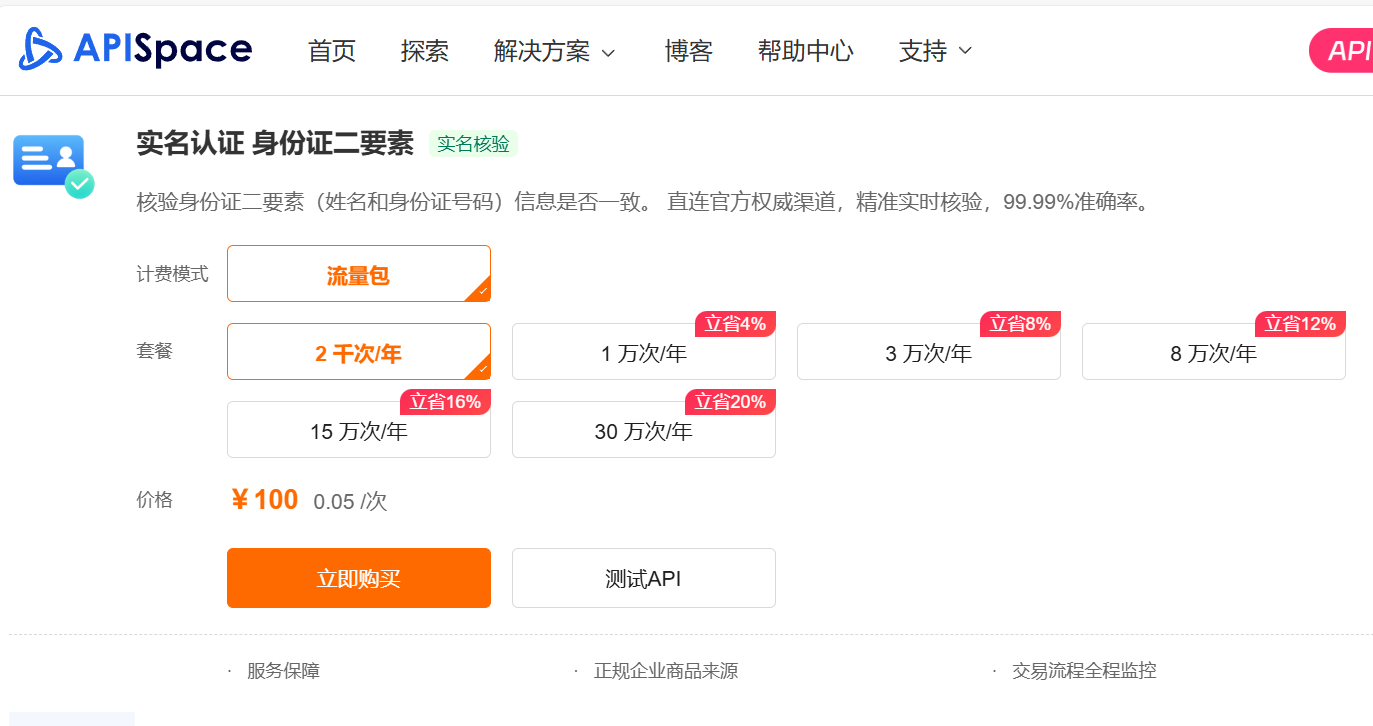
首次购买有20次的免费使用!!! ,购买完如下~
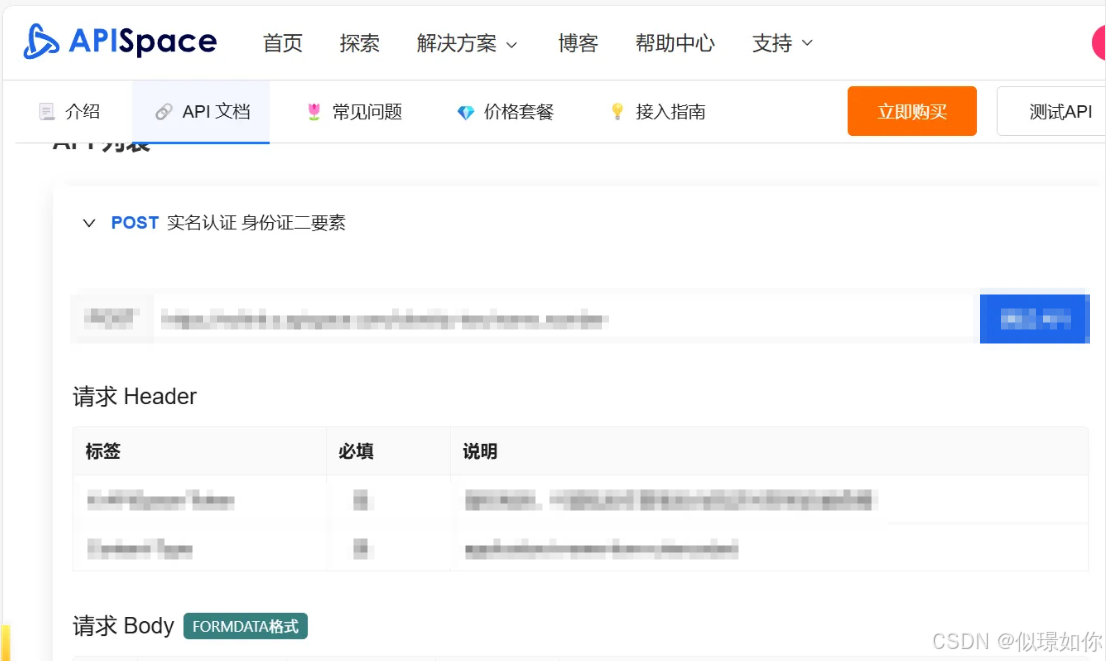
往下滑可以看见主要的代码
(2)代码实现
/**
* 二要素校验
* @param idnumber 身份证
* @param realname 姓名
* @return true则为一致,匹配正确
* @throws ioexception
*/
private boolean validateidcardandname(string idnumber, string realname) throws ioexception {
// 示例:判断身份证号和姓名是否匹配
okhttpclient client = new okhttpclient();
//校验身份和姓名是否匹配 ==》二要素校验
requestbody body = requestbody.create(okhttp3.mediatype.get("application/x-www-form-urlencoded"),
"realname=" + realname + "&idcard=" + idnumber
);
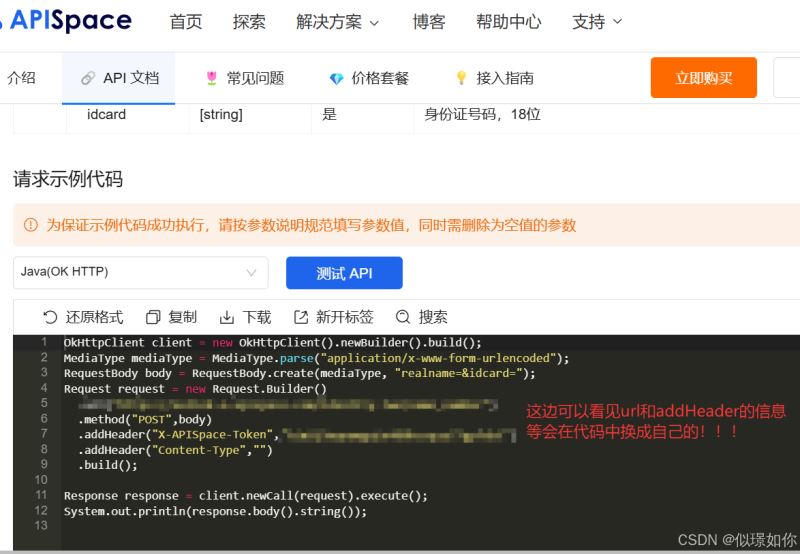
//下面的addheader和url都可以在上面购买完可以看见信息
request request = new request.builder()
.url("换成自己的!!!!!!!!!!")
.method("post", body)
.addheader("x-apispace-token", "换成自己的!!!!!!!!!!")
.build(); // 移除重复的 content-type 头
response response = client.newcall(request).execute();
//system.out.println(response.body().string());
//打印出来的{"requestid":"f20067dac6633685bd348f9e388b","data":{"valid":false,"incorrect":101,"message":"不一致"},"code":0,"message":"success"}
if (response.code() != 200) {
return false;
}
if (response.body() == null) {
return false;
}
try {
jsonobject responsejson = json.parseobject(response.body().string());
if (responsejson.containskey("data") && responsejson.getjsonobject("data").containskey("message")) {
jsonobject datajson = responsejson.getjsonobject("data");
string datamessage = datajson.getstring("message");
return "一致".equals(datamessage);
} else {
system.out.println("响应缺少必要字段");
return false;
}
} catch (exception e) {
e.printstacktrace();
return false;
}
}
// 获取姓名
            string nameinfo = combined.get("姓名");
            jsonobject namejson = json.parseobject(nameinfo);
            string realname = namejson.getstring("words");
            //校验姓名和身份证是否匹配
            boolean validateidcardandname = validateidcardandname(idnumber, realname);
            if (!validateidcardandname){
                //说明当前身份证于当前姓名不匹配
                return responseentity.badrequest().body("姓名和身份不匹配,请检查填写信息是否正确");
            }
到此这篇关于springboot实现调用百度ocr实现身份识别+二要素校验的文章就介绍到这了,更多相关springboot身份识别+二要素校验内容请搜索代码网以前的文章或继续浏览下面的相关文章希望大家以后多多支持代码网!


发表评论