一、ioc与di
名词解释:
- spring是一个装了众多工具对象的ioc容器。
- ioc思想:对象交给spring管理,就是ioc思想。
- ioc:inversion of control,控制反转。
控制权反转,需要某个对象时, 传统开发模式中需要⾃⼰通过 new 创建对象, 现在不需要再进⾏创建, 把创建对象的任务交给容器(ioc容器. spring是⼀个ioc容器, 所以有时spring 也称为spring容器), 程序中只需要依赖注⼊ (dependency injection, di)就可以了.
1.1 ioc
实现下面的需求:

在传统的实现中,我们将每个模块当成一个类:
public class newcarexample {
	 public static void main(string[] args) {
	 	car car = new car();
	 	car.run();
	 }
 /**
 * 汽⻋对象
 */
 static class car {
 	private framework framework;
 	public car() {
	 	 framework = new framework();
		 system.out.println("car init....");
	 }
	 public void run(){
	 	system.out.println("car run...");
	 }
 }
 /**
 * ⻋⾝类
 */
 static class framework {
	 private bottom bottom;
	 public framework() {
		 bottom = new bottom();
		 system.out.println("framework init...");
	 }
 }
 /**
 * 底盘类
 */
 static class bottom {
 	private tire tire;
	public bottom() {
		this.tire = new tire();
		system.out.println("bottom init...");
	 }
 }
 /**
 * 轮胎类
 */
 static class tire {
 // 尺⼨
	 private int size;
	 public tire(){
	 	this.size = 17;
	 	system.out.println("轮胎尺⼨:" + size);
	 }
	 }
}
但是如上面的代码,如果我们要修改一个参数,会导致整个调用链都跟着修改。
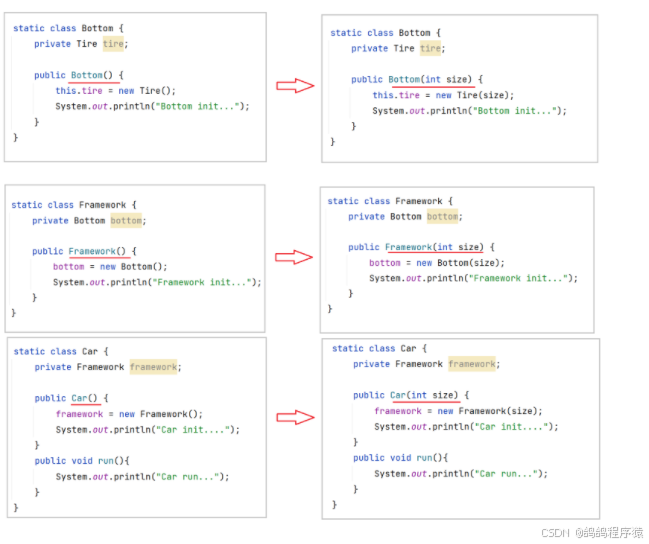
我们为解决上面耦合度过高,可以采取:
把由⾃⼰创建的下级类,改为传递的⽅式(也就是注⼊的⽅式),
每次调整只需要调整对应那个类的代码即可。
这样⽆论底层类如何变化,整个调⽤链是不⽤做任何改变的。
public class ioccarexample {
	 public static void main(string[] args) {
		 tire tire = new tire(20);
		 bottom bottom = new bottom(tire);
		 framework framework = new framework(bottom);
		 car car = new car(framework);
		 car.run();
 	}
	 static class car {
		 private framework framework;
		 public car(framework framework) {
		 	this.framework = framework;
			system.out.println("car init....");
	 	}
		 public void run() {
		 	system.out.println("car run...");
		 }
 	}
	 static class framework {
		 private bottom bottom;
		 public framework(bottom bottom) {
			this.bottom = bottom;
		 	system.out.println("framework init...");
		 }
 	}
	 static class bottom {
		 private tire tire;
		 public bottom(tire tire) {
			 this.tire = tire;
			 system.out.println("bottom init...");
		 }
	 }
	 static class tire {
		 private int size;
		 public tire(int size) {
		 	this.size = size;
		 	system.out.println("轮胎尺⼨:" + size);
		 }
	 }
}
1.2 di
di: dependency injection(依赖注⼊)
容器在运⾏期间, 动态的为应⽤程序提供运⾏时所依赖的资源,称之为依赖注⼊。
就像上面调用关系中:
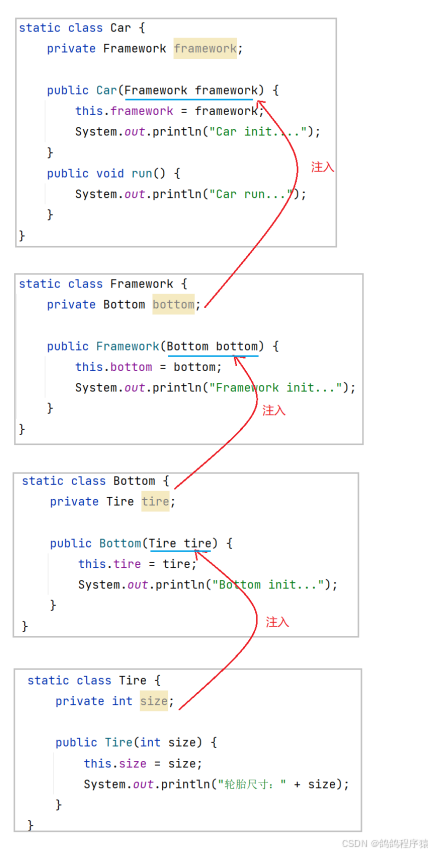
二、ioc与di的使用
spring 是⼀个 ioc(控制反转)容器,作为容器, 那么它就具备两个最基础的功能:
• 存
• 取
spring 容器 管理的主要是对象, 这些对象, 我们称之为"bean". 我们把这些对象交由spring管理, 由 spring来负责对象的创建和销毁. 我们程序只需要告诉spring, 哪些需要存, 以及如何从spring中取出对象
我们实现这样的功能,主要靠两个注解:
- service层及dao层的实现类,交给spring管理: 使⽤注解: @component
- 在controller层 和service层 注⼊运⾏时依赖的对象: 使⽤注解 @autowired
像把前面的图书管理系统的bookcontroller重构。
bookcontroller类:
package com.example.project.controller;
import com.example.project.model.bookinfo;
import com.example.project.service.bookservice;
import org.springframework.beans.factory.annotation.autowired;
import org.springframework.stereotype.component;
import org.springframework.web.bind.annotation.requestmapping;
import org.springframework.web.bind.annotation.restcontroller;
import java.util.list;
@requestmapping("/book")
@restcontroller
@component
public class bookcontroller {
    @autowired
    private bookservice bookservice;
    @requestmapping("/getlist")
    public list<bookinfo> getlist() {
        return bookservice.getlist();
    }
}
bookservice类:
package com.example.project.service;
import com.example.project.dao.bookdao;
import com.example.project.model.bookinfo;
import org.springframework.beans.factory.annotation.autowired;
import org.springframework.stereotype.component;
import java.util.arraylist;
import java.util.list;
@component
public class bookservice {
    @autowired
    bookdao bookdao ;
    public list<bookinfo> getlist() {
        list<bookinfo> books = new arraylist<>();
        books = bookdao.mockdata();
        for (bookinfo book:
                books) {
            if(book.getstatus() == 1) {
                book.setstatuscn("可借阅");
            } else {
                book.setstatuscn("不可借阅");
            }
        }
        return books;
    }
}
bookdao类:
package com.example.project.dao;
import com.example.project.model.bookinfo;
import org.springframework.stereotype.component;
import java.math.bigdecimal;
import java.util.arraylist;
import java.util.list;
import java.util.random;
@component
public class bookdao {
    public list<bookinfo> mockdata() {
        list<bookinfo> books = new arraylist<>();
        for (int i = 0; i < 5; i++) {
            bookinfo book = new bookinfo();
            book.setid(i);
            book.setbookname("书籍" + i);
            book.setauthor("作者" + i);
            book.setcount(i * 5 + 3);
            book.setprice(new bigdecimal(new random().nextint(100)));
            book.setpublish("出版社" + i);
            book.setstatus(1);
            books.add(book);
        }
        return books;
    }
}
可以看到在类的调用之间,我们是使用的注解,将类作为另一个类的成员。不用自己去new实例。
三、ioc详解
3.1 bean的存储
bean在上面我们也说了,就是spring管理起来的对象。
实现将对象交给spring管理,
共有两类注解类型可以:
- 类注解:@controller、@service、@repository、@component、@configuration.
- ⽅法注解:@bean.
3.2 @controller(控制器存储)
先使用@controller将类存储:
package com.example.springioc.controller;
import org.springframework.stereotype.controller;
@controller
public class usercontroller {
    public void hello() {
        system.out.println("hello");
    }
}
从spring容器中获取对象:
先获取spring上下⽂对象
从spring上下⽂中获取对象
package com.example.springioc.controller;
import org.springframework.boot.springapplication;
import org.springframework.boot.autoconfigure.springbootapplication;
import org.springframework.context.applicationcontext;
@springbootapplication
public class springiocdemoapplication {
    public static void main(string[] args) {
    //先获取spring上下⽂对象
        applicationcontext context = springapplication.run(springiocdemoapplication.class,args);
        //从spring上下⽂中获取对象
        usercontroller usercontroller = context.getbean(usercontroller.class);
        usercontroller.hello();
    }
}
3.3 获取bean对象
获取bean对象主要是applicationcontext 类下的getbean方法,有下图中重载。

使用五大类注解让spring管理bean对象的默认取名方式如下官方文档:
- 将类名转换为小驼峰形式。
usercontroller -》 usercontroller - 当前面是两个即多个大写字母连在一起,bean对象名就是类名。
uscontroller -》 uscontroller
bean对象名也可以使用注解指定名称,在使用五大注解加上括号即可。栗子: @controller("name")
使用如下:
package com.example.springioc.controller;
import org.springframework.boot.springapplication;
import org.springframework.boot.autoconfigure.springbootapplication;
import org.springframework.context.applicationcontext;
@springbootapplication
public class springiocdemoapplication {
    public static void main(string[] args) {
        applicationcontext context = springapplication.run(springiocdemoapplication.class,args);
        usercontroller bean1 = context.getbean(usercontroller.class);
        bean1.hello();
        usercontroller bean2 = (usercontroller) context.getbean("usercontroller");
        bean2.hello();
        usercontroller bean3 =  context.getbean("usercontroller", usercontroller.class);
        bean3.hello();
    }
}
3.4 @service(服务存储)
使用就加上@service注解,拿到bean对象方法不变。
package com.example.springioc.service;
import org.springframework.stereotype.service;
@service
public class userservice {
    void print() {
        system.out.println("do service");
    }
}
3.5 @repository(仓库存储)
使用就加上@repository 注解,拿到bean对象方法不变。
package com.example.springioc.service;
import org.springframework.stereotype.repository;
@repository
public class userrepository {
    void print() {
        system.out.println("do repository");
    }
}
3.6 @component(组件存储)
使用就加上@component 注解,拿到bean对象方法不变。
package com.example.springioc.service;
import org.springframework.stereotype.component;
@component
public class usercomponent {
    void print() {
        system.out.println("do component");
    }
}
3.7 @configuration(配置存储)
使用就加上@configuration注解,拿到bean对象方法不变。
package com.example.springioc.service;
import org.springframework.context.annotation.configuration;
@configuration
public class userconfiguration {
    void print() {
        system.out.println("do configuration");
    }
}
3.8 五大注解区别
@controller @service @repository @configuration这四个注解都是@component注解的衍生注解。
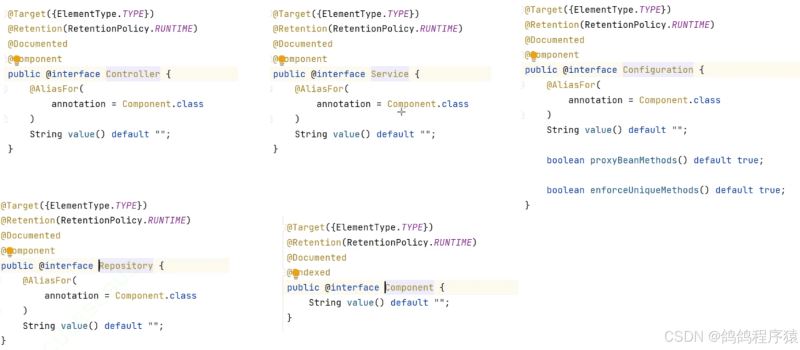
分这么多注解就是为了更好地分层(边界在使用中也没非常清晰):
- @controller代表控制层。接收参数返回响应,控制层一定要使用@controller
- @service代表服务层
- @repository代表数据层
- @configuration代表配置层
- @component代表组件层
3.9 ⽅法注解@bean
使用:
package com.example.springioc.controller;
import com.example.springioc.model.user;
import org.springframework.context.annotation.bean;
import org.springframework.stereotype.controller;
@controller
public class usercontroller {
    @bean
    public user user() {
        return new user("zhangsan",11);
    }
    public void hello() {
        system.out.println("hello");
    }
}
package com.example.springioc.controller;
import com.example.springioc.model.user;
import org.springframework.boot.springapplication;
import org.springframework.boot.autoconfigure.springbootapplication;
import org.springframework.context.applicationcontext;
@springbootapplication
public class springiocdemoapplication {
public static void main(string[] args) {
applicationcontext context = springapplication.run(springiocdemoapplication.class,args);
user bean1 = (user) context.getbean("user");
system.out.println(bean1.getname());
}
}注意事项:
- 使用@bean注解默认方法名就是管理的bean对象名。
- @bean对象重命名可以直接加括号
@bean("name1"),还可以使用name属性@bean(name = "name1"),还可以使用value属性@bean(value = "name1"),并且可以传string数组。
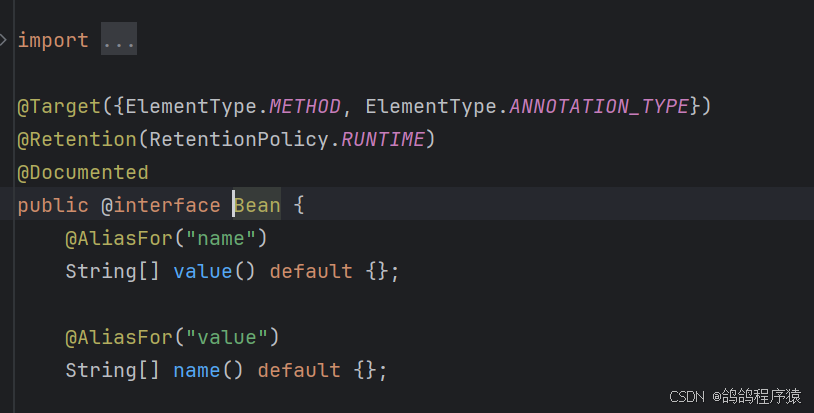
- @bean注解必须搭配五大类注解使用。
- 当方法有参数的时候,spring会从容器中根据参数类型去找,是否有这个类型的对象,如果没有,或者有多个不唯一都会报错,有唯一一个就会拿这个对象赋值。
四、spring扫描路径
spring默认的扫描路径是启动类所在路径及其子路径。
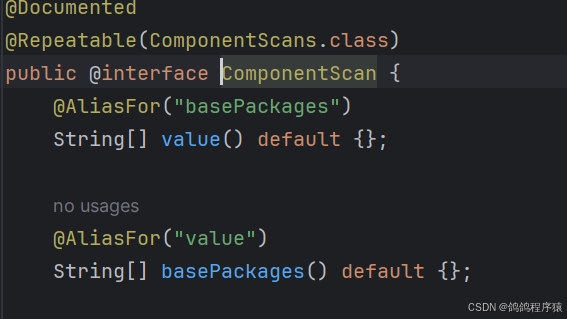
当我们要扫描其它路径的时候,可以使用注解@componentscan("需要扫描路径"),可以传数组。
其实不怎么用这个注解,直接启动类放在所有需要扫描的路径的最上层包下即可。
五、di详解
依赖注⼊是⼀个过程,是指ioc容器在创建bean时, 去提供运⾏时所依赖的资源,⽽资源指的就是对象。
依赖注⼊, spring给我们提供了三种⽅式:
- 属性注⼊(field injection)
- 构造⽅法注⼊(constructor injection)
- setter 注⼊(setter injection)
5.1属性注入@autowired
属性注⼊是使⽤ @autowired 注解实现的
注意事项:
- 注入的对象必须是容器中已经有的,也就是使用五大类注解交给spring管理的。
- @autowired不能修饰final修饰的成员。
使用:
package com.example.springioc.controller;
import com.example.springioc.service.userservice;
import org.springframework.beans.factory.annotation.autowired;
import org.springframework.stereotype.controller;
@controller
public class usercontroller {
    @autowired
    private userservice us;
    public void hello() {
        system.out.println("hello");
        us.print();
    }
}
package com.example.springioc;
import com.example.springioc.controller.usercontroller;
import org.springframework.boot.springapplication;
import org.springframework.boot.autoconfigure.springbootapplication;
import org.springframework.context.applicationcontext;
@springbootapplication
public class springiocdemoapplication {
public static void main(string[] args) {
applicationcontext context = springapplication.run(springiocdemoapplication.class,args);
usercontroller bean = context.getbean(usercontroller.class);
bean.hello();
}
}打印结果为
hello
do service、
5.2 构造方法注入
直接使用构造函数,将上面代码改成如下也可以使用。
package com.example.springioc.controller;
import com.example.springioc.service.userservice;
import org.springframework.stereotype.controller;
@controller
public class usercontroller {
    private userservice us;
    public usercontroller(userservice us) {
        this.userservice = us;
    }
    public void hello() {
        system.out.println("hello");
        us.print();
    }
}
注意事项:
- 当只有一个构造函数的时候,直接可以注入。
- 当有两个及以上构造函数的时候,spring无法辨别使用哪一个构造函数注入,需要在使用的构造函数前加上@autowired注解。
- 只能在一个构造方法上加上@autowired注解。
5.3 setter方法注入
直接加上set方法,加上@autowired注解,将上面代码改成如下也可以使用。
package com.example.springioc.controller;
import com.example.springioc.service.userservice;
import org.springframework.stereotype.controller;
@controller
public class usercontroller {
    private userservice us;
    @autowired
    public void setuserservice(userservice us) {
        this.us = us;
    }
    public void hello() {
        system.out.println("hello");
        us.print();
    }
}
注意事项:
- set方法必须加上@autowired注解,可以给多个set方法使用注解。
- 不能修饰final修饰的成员的set方法。
优缺点比较:
- 属性注⼊
- 优点:简洁,使⽤⽅便;
- 缺点:
- 只能⽤于 ioc 容器,如果是⾮ ioc 容器不可⽤,并且只有在使⽤的时候才会出现npe(空指针异常)
- 不能注⼊⼀个final修饰的属性
- 构造函数注⼊(spring 4.x推荐)
- 优点:
- 可以注⼊final修饰的属性
- 注⼊的对象不会被修改
- 依赖对象在使⽤前⼀定会被完全初始化,因为依赖是在类的构造⽅法中执⾏的,⽽构造⽅法是在类加载阶段就会执⾏的⽅法.
- 通⽤性好,构造⽅法是jdk⽀持的, 所以更换任何框架,他都是适⽤的
- 缺点:
- 注⼊多个对象时, 代码会⽐较繁琐
- setter注⼊(spring 3.x推荐)
- 优点:⽅便在类实例之后, 重新对该对象进⾏配置或者注⼊
- 缺点:
- 不能注⼊⼀个final修饰的属性
- 注⼊对象可能会被改变, 因为setter⽅法可能会被多次调⽤,就有被修改的⻛险
5.4 @autowired注解问题及解决
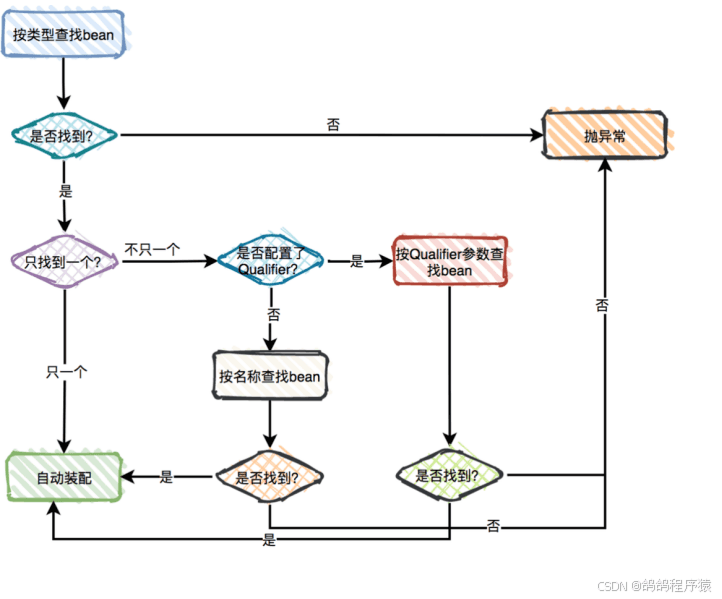
当一个类交给spring多个对象后,使用@autowired注解,会无法分辨。
package com.example.springioc.service;
import com.example.springioc.model.user;
import org.springframework.beans.factory.annotation.autowired;
import org.springframework.context.annotation.bean;
import org.springframework.context.annotation.primary;
import org.springframework.stereotype.service;
@service
public class userservice {
    @bean
    public user u1(string name) {
        return new user(name,11);
    }
    @bean
    public user u2() {
        return new user("lisi",18);
    }
    @bean
    public string name () {
        return "zhangsan";
    }
    public void print() {
        system.out.println("do service");
    }
}
package com.example.springioc.controller;
import com.example.springioc.model.user;
import jakarta.annotation.resource;
import org.springframework.stereotype.controller;
@controller
public class usercontroller {
@resource(name = "u1")
private user user;
public void hello() {
system.out.println("hello");
system.out.println(user.tostring());
}
}报错信息:

解决方法:
提供了以下⼏种注解解决:
- @primary
- @qualifier
- @resource
使⽤@primary注解:当存在多个相同类型的bean注⼊时,加上@primary注解,来确定默认的实现。例如上面代码:
 @bean
 @primary
    public string name () {
        return "zhangsan";
    }
使⽤@qualifier注解:指定当前要注⼊的bean对象。在@qualifier的value属性中,指定注⼊的bean的名称,必须与@autowired一起用。例如上面代码:
@autowired
@qualifier("u1")
    private user user;
使⽤@resource注解:是按照bean的名称进⾏注⼊。通过name属性指定要注⼊的bean的名称。@resource是jdk提供的注解。
例如上面代码:
@resource(name = "u2")
    private user user;
@autowired工作流程
到此这篇关于springioc与springdi的文章就介绍到这了,更多相关springioc与springdi内容请搜索代码网以前的文章或继续浏览下面的相关文章希望大家以后多多支持代码网!


发表评论