微信小程序实现多张照片上传
1.功能实现
当选择图片后,生成对象tempfilepaths文件路径。在通过for循环依次的图片的src上传到服务器。当服务器的状态码为200且图片上传完毕后将图片的src转化为json字符串存在数组中以便将其添加到数据库
2.代码实现
1.mp-uploader
<view class="page">
<view class="page__bd">
<mp-cells>
<mp-cell>
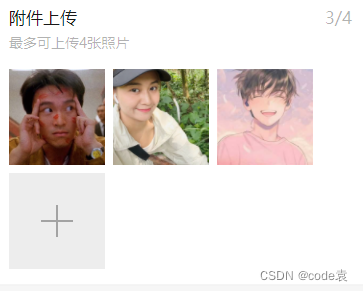
<mp-uploader select="{{selectfile}}" upload="{{uplaodfile}}" files="{{files}}" max-count="4" title="附件上传" tips="最多可上传4张照片"></mp-uploader>
</mp-cell>
</mp-cells>
</view>
</view>//data中
this.setdata({
selectfile: this.selectfile.bind(this),
uplaodfile: this.uplaodfile.bind(this)
}) uplaodfile(files) {
console.log('upload files', files)
console.log('upload files', files)
// 文件上传的函数,返回一个promise
return new promise((resolve, reject) => {
const tempfilepaths = files.tempfilepaths;
//上传返回值
const that = this;
const object = {};
for (var i = 0; i < tempfilepaths.length; i++) {
let filepath = tempfilepaths[i]
wx.uploadfile({
filepath: filepath,
name: 'file',
url: 'http://localhost:3000/upload/upload',
success: function(res){
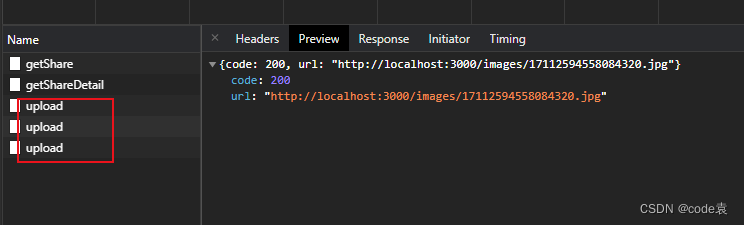
console.log('444',res.statuscode)
if (res.statuscode=== 200 ) {
const url = json.parse(res.data).url
that.data.files.push(url)
if (that.data.files.length === tempfilepaths.length) {
object.urls = that.data.files;
resolve(object) //这就是判断是不是最后一张已经上传了,用来返回,
}
} else {
reject('error')
}
}
})
}
})
// 文件上传的函数,返回一个promise
},
2.chooseimage
<view>
<block wx:for="{{images}}" wx:for-item="src">
  <image  src="{{src}}"></image>
</block>
<view bindtap="upload">上传</view>
upload(){
let that = this;
wx.chooseimage({//异步方法
count: 9,//最多选择图片数量
sizetype: ['original', 'compressed'],//选择的图片尺寸 原图,压缩图
sourcetype: ['album', 'camera'],//相册选图,相机拍照
success(res) {
//tempfilepaths可以作为图片标签src属性
const tempfilepaths = res.tempfilepaths
console.log("选择成功", res)
for (let i = 0; i < tempfilepaths.length; i++) {//多个图片的循环上传
wx.cloud.uploadfile({//上传至微信云存储
cloudpath: 'myimage/' + new date().gettime() + "_" + math.floor(math.random() * 1000) + ".jpg",//使用时间戳加随机数作为上传至云端的图片名称
filepath: tempfilepaths[i],// 本地文件路径
success: res => {
// 返回文件 id
console.log("上传成功", res.fileid)
that.setdata({
images: res.fileid//获取上传云端的图片在页面上显示
})
wx.showtoast({
title: '上传成功',
})
}
})
}
}
})
}3.页面展示
图片的src在数据库中是以字符串的形式存储。当需要展示时我们只需要将字符串转化为数组对象即可
原始数据 “http://localhost:3000/images/17112466754606371.jpg”,“http://localhost:3000/images/17112466755133666.jpg”,“http://localhost:3000/images/17112466756494564.jpg”]
 getshare().then(res=>{
        const list=res.data
         list.foreach(obj => {
            console.log('8888',obj.img)
         const imgstring = obj.img;
         const trimmedstring = imgstring.replace('["', '').replace('\"]', '');
         const imgarray = trimmedstring.split('"\,\"');
         console.log('444',imgarray)
         obj.img = imgarray;
        })
        this.setdata({
            sharelist:list
        })
       })
🎉写在最后
🍻伙伴们,如果你已经看到了这里,觉得这篇文章有帮助到你的话不妨点赞👍或 star ✨支持一下哦!手动码字,如有错误,欢迎在评论区指正💬~
到此这篇关于微信小程序实现多张照片上传的文章就介绍到这了,更多相关小程序多张照片上传内容请搜索代码网以前的文章或继续浏览下面的相关文章希望大家以后多多支持代码网!


![js定时显示广告的实现代码[已测]](/images/newimg/nimg6.png)
发表评论