一、漏桶算法
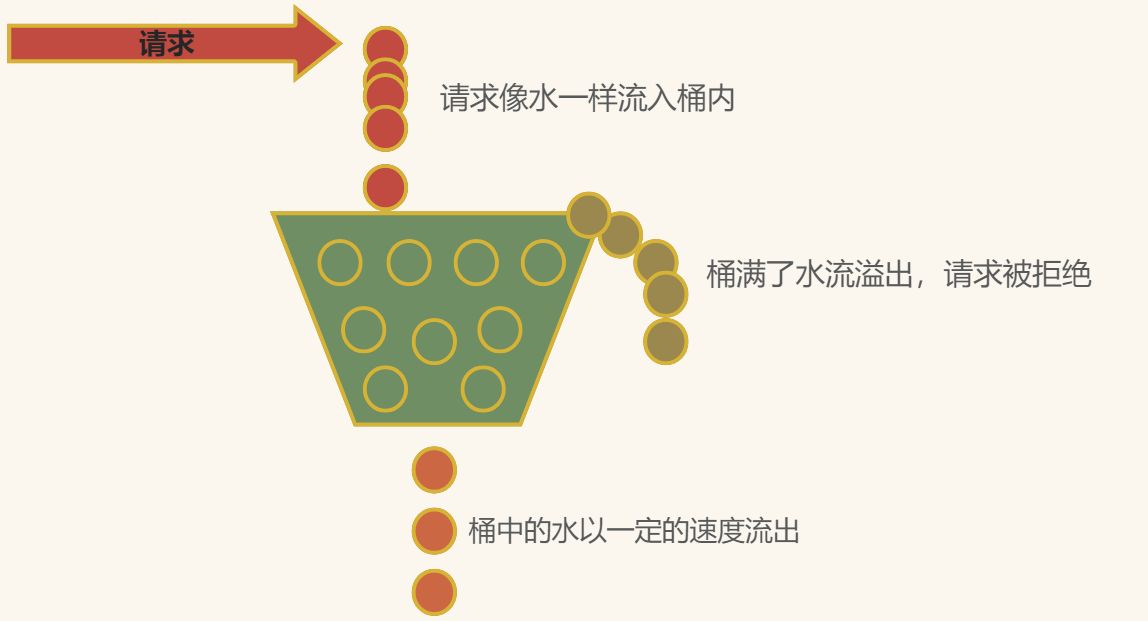
1.漏桶算法的思想和原理
1.固定容量的漏桶:系统维护一个固定容量的漏桶,用来存放请求。
2.请求入桶:当一个请求到达系统时,相当于将水倒入漏桶。如果漏桶已满,多余的请求会被丢弃或拒绝。
3.恒定速率的出桶:漏桶以恒定的速率处理请求,就像漏斗中的水稳定地漏出一样。
4.平滑流量:通过漏桶的出水速率,可以平滑流入系统的请求,避免突发流量。
5.限流判断:当一个请求到达时,会检查漏桶是否已满,如果漏桶已满,则触发限流机制,拒绝请求。
漏桶算法的实现步骤是,先声明一个队列用来保存请求,这个队列相当于漏斗,当队列容量满了之后就放弃新来的请求,然后重新声明一个线程定期(指定速率)从任务队列中获取一个或多个任务进行执行,这样就实现了漏桶算法。
优点:可以有效控制流量,避免突发请求的冲击,保持系统稳定性;
缺点:可能会影响请求响应时间,且不使用大并发量的请求系统;
2.具体实现
import java.util.concurrent.executors;
import java.util.concurrent.scheduledexecutorservice;
import java.util.concurrent.timeunit;
import java.util.concurrent.atomic.atomiclong;

public class leakybucket {
    private final long capacity; // 桶容量
    private final long rate; // 漏水速率
    private long water; // 当前水量
    private long lastleaktime; // 上一次漏水时间
    private final atomiclong requestcount; // 请求计数

    public leakybucket(long capacity, long rate) {
        this.capacity = capacity;
        this.rate = rate;
        this.water = 0;
        this.lastleaktime = system.currenttimemillis();
        this.requestcount = new atomiclong(0);

        //以固定的速率漏水
        scheduledexecutorservice scheduler = executors.newscheduledthreadpool(1);
        scheduler.scheduleatfixedrate(this::leakwater, 0, 1, timeunit.seconds);
    }

    //限流
    public synchronized boolean allowrequest() {
        long currenttime = system.currenttimemillis();
        long elapsedtime = currenttime - lastleaktime;
        water = math.max(0, water - elapsedtime * rate); // 漏水
        lastleaktime = currenttime;

        if (water < capacity) {
            water++;
            requestcount.incrementandget();
            return true; // 请求通过
        }
        return false; // 漏桶已满,限流
    }

    public long getrequestcount() {
        return requestcount.get();
    }

    //以固定速率漏水
    private synchronized void leakwater() {
        long currenttime = system.currenttimemillis();
        long elapsedtime = currenttime - lastleaktime;
        water = math.max(0, water - elapsedtime * rate); // 漏水
        lastleaktime = currenttime;
    }

    public static void main(string[] args) {
        // 创建一个容量为 10,速率为 2/s的漏桶
        leakybucket leakybucket = new leakybucket(10, 2);

        // 模拟请求
        for (int i = 0; i < 20; i++) {
            boolean allowed = leakybucket.allowrequest();
            if (allowed) {
                system.out.println("request " + (i + 1) + ": allowed");
            } else {
                system.out.println("request " + (i + 1) + ": limited");
            }
        }

        // 输出总请求数
        system.out.println("total requests: " + leakybucket.getrequestcount());
    }
}
二、令牌桶算法
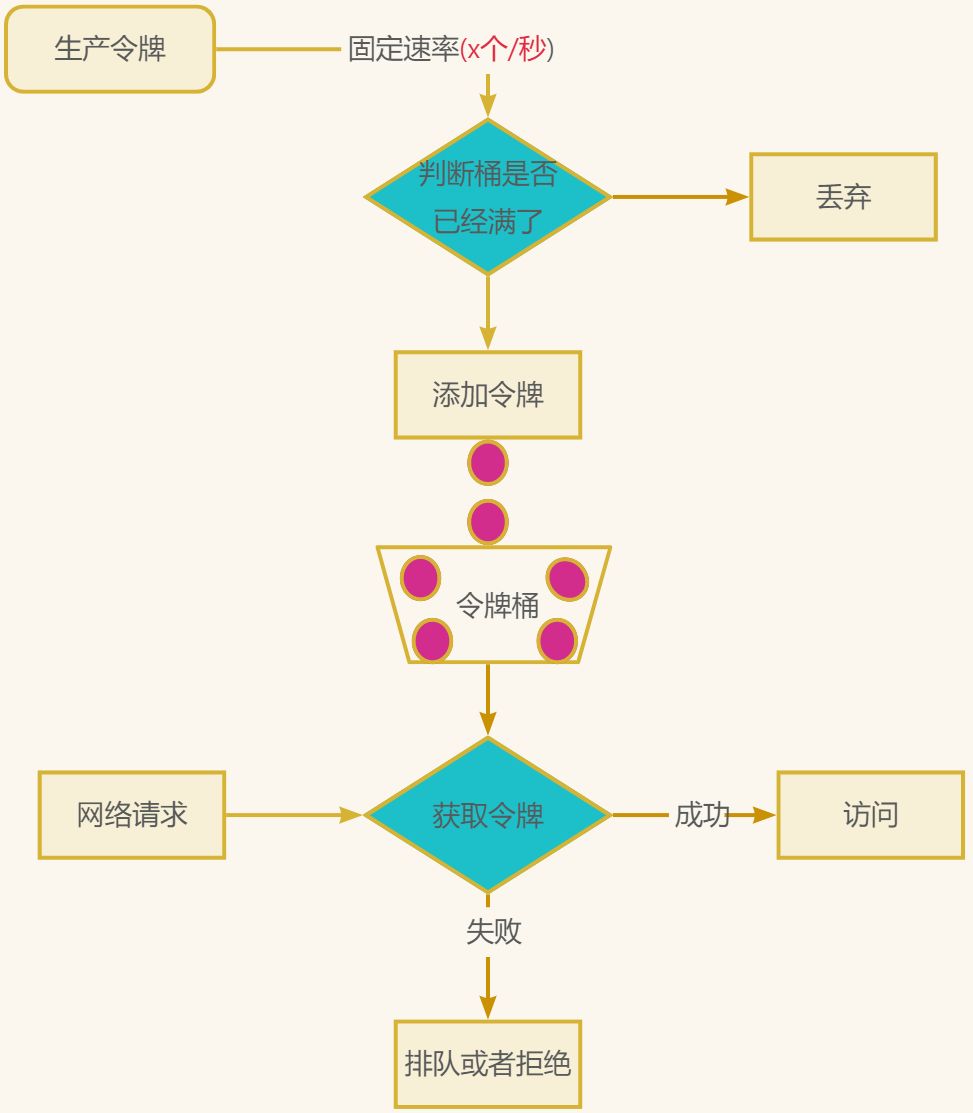
1.令牌桶算法流程:
1.放入令牌到桶:按照固定的速率被放入令牌桶中,比如每秒放5个、10个、100个令牌到桶中。
2.获取令牌:所有的请求在处理之前都需要拿到一个可用的令牌才会被处理。
3.令牌桶满了拒绝:桶中最多能放1000个令牌,当桶满时,就不能继续放入了,新添加的令牌要么被丢弃,要么就直接拒绝。
优点:
1.避免了突发流量对系统的冲击。
2.可以根据需求调整令牌生成速率和令牌桶的容量,以适应不同的流星控制需求。
缺点:1.不适合瞬时突发流量,令牌桶算法可能无法处理突然涌入的大量请求,因为令牌桶的令牌生成速率是固定的。
2.如果请求需要等待令牌桶中的令牌,可能会导致一些请求的响应时间增加。
2.具体实现
2.1 编程实现
import java.util.concurrent.executors;
import java.util.concurrent.scheduledexecutorservice;
import java.util.concurrent.scheduledfuture;
import java.util.concurrent.timeunit;
import java.util.concurrent.atomic.atomiclong;

public class tokenbucket {
    private final long capacity; // 令牌桶容量
    private final long rate; // 令牌生成速率
    private atomiclong tokens; // 当前令牌数量
    private scheduledexecutorservice scheduler;

    public tokenbucket(long capacity, long rate) {
        this.capacity = capacity;
        this.rate = rate;
        this.tokens = new atomiclong(0);
        this.scheduler = executors.newscheduledthreadpool(1);

        scheduledfuture<?> future = scheduler.scheduleatfixedrate(this::addtoken, 0, 1, timeunit.seconds);
    }

    public boolean allowrequest() {
        long currenttokens = tokens.get();
        if (currenttokens > 0) {
            tokens.decrementandget();
            return true; // 有令牌,允许请求通过
        }
        return false; // 无令牌,限流
    }

    //添加令牌
    private void addtoken() {
        long newtokens = math.min(capacity, tokens.get() + rate);
        tokens.set(newtokens);
    }

    public void shutdown() {
        scheduler.shutdown();
    }

    public static void main(string[] args) {
        tokenbucket tokenbucket = new tokenbucket(10, 2); // 创建容量为10,速率为2的令牌桶

        // 模拟请求
        for (int i = 0; i < 20; i++) {
            boolean allowed = tokenbucket.allowrequest();
            if (allowed) {
                system.out.println("request " + (i + 1) + ": allowed");
            } else {
                system.out.println("request " + (i + 1) + ": limited");
            }
        }

        tokenbucket.shutdown();
    }
}
2.2 使用 google 开源的 guava 包
(1)导入依赖
<!-- https://mvnrepository.com/artifact/com.google.guava/guava -->
<dependency>
    <groupid>com.google.guava</groupid>
    <artifactid>guava</artifactid>
    <version>28.2-jre</version>
</dependency>
(2)代码实现
import java.lang.annotation.*;
import java.util.concurrent.timeunit;

@target(elementtype.method)
@retention(retentionpolicy.runtime)
@documented
public @interface limiter {
    int not_limited = 0;
    string limit_error = "使用太频繁了,稍后再试..." ;

    /**
     * 限流key,唯一
     *
     * @return
     */
    string key() default "";


    /**
     * 时间单位内允许的次数
     *
     * @return
     */
    double qps() default not_limited;

    /**
     * 最大等待时间
     *
     * @return
     */
    int timeout() default not_limited;


    /**
     * 最大等待时间单位
     *
     * @return
     */
    timeunit timeunit() default timeunit.milliseconds;
}
import cn.hutool.core.util.strutil;
import com.google.common.util.concurrent.ratelimiter;
import com.hytera.annotation.limiter;
import lombok.extern.slf4j.slf4j;
import org.aspectj.lang.proceedingjoinpoint;
import org.aspectj.lang.annotation.around;
import org.aspectj.lang.annotation.aspect;
import org.aspectj.lang.reflect.methodsignature;
import org.springframework.core.annotation.annotationutils;
import org.springframework.stereotype.component;
import utils.iputil;
import java.lang.reflect.method;
import java.util.concurrent.concurrenthashmap;
import java.util.concurrent.concurrentmap;

/**
 * @author: zt  2024/1/9 17:48
 * @createtime: 2024/1/9 17:48
 * @描述:限流
 **/
@slf4j
@aspect
@component
public class ratelimiteraspect {

    private static final concurrentmap<string, ratelimiter> rate_limiter_cache = new concurrenthashmap<>();


    @around("@annotation(com.hytera.annotation.limiter)")
    public object pointcut(proceedingjoinpoint point) throws throwable {
        methodsignature signature = (methodsignature) point.getsignature();
        method method = signature.getmethod();
        limiter ratelimiter = annotationutils.findannotation(method, limiter.class);
        if (ratelimiter != null && ratelimiter.qps() > limiter.not_limited) {
            double qps = ratelimiter.qps();
            string ip = iputil.getipaddress();
            string key = strutil.isempty(ratelimiter.key())?method.getname()+"-"+iputil.getipaddress():ratelimiter.key()+"-"+ ip;
            ratelimiter limiter = rate_limiter_cache.get(key);
            if (limiter == null) {
                rate_limiter_cache.put(key, ratelimiter.create(qps));
                log.debug("【{}】的qps设置为: {}", method.getname(), rate_limiter_cache.get(key).getrate());
            }else {
                //超时或者获取不到令牌,则报错
                boolean b = limiter.tryacquire(ratelimiter.timeout(), ratelimiter.timeunit());
                if (b) {
                    throw new runtimeexception(limiter.limit_error);//自定义异常
                }
            }
        }
        return point.proceed();
    }
}
三、nginx限流
nginx 提供了两种限流手段:一是控制速率,二是控制并发连接数。
一、控制速率
我们需要使用 limit_req_zone 用来限制单位时间内的请求数,即速率限制,示例配置如下:
#限制每个 ip 访问的速度为 2r/s,因为 nginx 的限流统计是基于毫秒的,我们设置的速度是 2r/s,转换一下就是 500ms 内单个 ip 只允许通过 1 个请求,从 501ms 开始才允许通过第 2 个请求。
limit_req_zone $binary_remote_addr zone=mylimit:10m rate=2r/s;
server {
    location / {
        limit_req zone=mylimit;
    }
}
#使用 burst 关键字,控制一个 ip 单位总时间内的总访问次数
#burst=4,设置一个大小为4的缓冲区域,当大量请求到来,请求数量超过限流频率时,将其放入缓冲区域
limit_req_zone $binary_remote_addr zone=mylimit:10m rate=2r/s;
server {
    location / {
        limit_req zone=mylimit burst=4;
    }
}
二、控制并发连接数
#limit_conn perip 10 表示限制单个 ip 同时最多能持有 10 个连接;
#limit_conn perserver 100 表示 server 同时能处理并发连接的总数为 100 个。
limit_conn_zone $binary_remote_addr zone=perip:10m;
limit_conn_zone $server_name zone=perserver:10m;
server {
    ...
    limit_conn perip 10;
    limit_conn perserver 100;
}
四、redis+lua限流
1.lua介绍
lua 是一种轻量小巧的脚本语言,用标准c语言编写并以源代码形式开放, 其设计目的是为了嵌入应用程序中,从而为应用程序提供灵活的扩展和定制功。
2.lua优势:
(1)减少网络开销: 不使用 lua 的代码需要向 redis 发送多次请求, 而脚本只需一次即可, 减少网络传输;
(2)原子操作: redis 将整个脚本作为一个原子执行, 无需担心并发, 也就无需事务;(3)复用: 脚本会永久保存 redis 中, 其他客户端可继续使用。
3.具体实现:
(1)编写lua脚本(将其放在resources/scripts/redis目录下):
-- 下标从 1 开始
local key = keys[1]
local now = tonumber(argv[1])
local ttl = tonumber(argv[2])
local expired = tonumber(argv[3])
-- 最大访问量
local max = tonumber(argv[4])

-- 清除过期的数据
-- 移除指定分数区间内的所有元素,expired 即已经过期的 score
-- 根据当前时间毫秒数 - 超时毫秒数,得到过期时间 expired
redis.call('zremrangebyscore', key, 0, expired)

-- 获取 zset 中的当前元素个数
local current = tonumber(redis.call('zcard', key))
local next = current + 1

if next > max then
  -- 达到限流大小 返回 0
  return 0;
else
  -- 往 zset 中添加一个值、得分均为当前时间戳的元素,[value,score]
  redis.call("zadd", key, now, now)
  -- 每次访问均重新设置 zset 的过期时间,单位毫秒
  redis.call("pexpire", key, ttl)
  return next
end
(2)代码实现:
import org.springframework.context.annotation.bean;
import org.springframework.context.annotation.configuration;
import org.springframework.core.io.classpathresource;
import org.springframework.data.redis.core.script.defaultredisscript;
import org.springframework.data.redis.core.script.redisscript;
import org.springframework.scripting.support.resourcescriptsource;


@configuration
public class redisconfig {
    @bean
    @suppresswarnings("unchecked")
    public redisscript<long> limitredisscript() {
        defaultredisscript redisscript = new defaultredisscript<>();
        redisscript.setscriptsource(new resourcescriptsource(new classpathresource("scripts/redis/limit.lua")));
        redisscript.setresulttype(long.class);
        return redisscript;
    }
}
import org.springframework.core.annotation.aliasfor;
import org.springframework.core.annotation.annotationutils;
import java.lang.annotation.*;
import java.util.concurrent.timeunit;

@target(elementtype.method)
@retention(retentionpolicy.runtime)
@documented
public @interface ratelimiter {
    long default_request = 10;

    /**
     * max 最大请求数
     */
    @aliasfor("max") long value() default default_request;

    /**
     * 限流key
     */
    string key() default "";

    /**
     * 超时时长,默认1分钟
     */
    long timeout() default 1;

    /**
     * 超时时间单位,默认 分钟
     */
    timeunit timeunit() default timeunit.minutes;
}
import cn.hutool.core.util.strutil;
import com.xkcoding.ratelimit.redis.annotation.ratelimiter;
import com.xkcoding.ratelimit.redis.util.iputil;
import lombok.requiredargsconstructor;
import lombok.extern.slf4j.slf4j;
import org.aspectj.lang.proceedingjoinpoint;
import org.aspectj.lang.annotation.around;
import org.aspectj.lang.annotation.aspect;
import org.aspectj.lang.annotation.pointcut;
import org.aspectj.lang.reflect.methodsignature;
import org.springframework.beans.factory.annotation.autowired;
import org.springframework.core.annotation.annotationutils;
import org.springframework.data.redis.core.stringredistemplate;
import org.springframework.data.redis.core.script.redisscript;
import org.springframework.stereotype.component;
import java.lang.reflect.method;
import java.time.instant;
import java.util.collections;
import java.util.concurrent.timeunit;

/**
 * <p>
 * 限流切面
 * </p>
 *
 * @author yangkai.shen
 * @date created in 2019-09-30 10:30
 */
@slf4j
@aspect
@component
@requiredargsconstructor(onconstructor_ = @autowired)
public class ratelimiteraspect {
    private final static string separator = ":";
    private final static string redis_limit_key_prefix = "limit:";
    private final stringredistemplate stringredistemplate;
    private final redisscript<long> limitredisscript;


    @around("@annotation(com.xkcoding.ratelimit.redis.annotation.ratelimiter)")
    public object pointcut(proceedingjoinpoint point) throws throwable {
        methodsignature signature = (methodsignature) point.getsignature();
        method method = signature.getmethod();
        // 通过 annotationutils.findannotation 获取 ratelimiter 注解
        ratelimiter ratelimiter = annotationutils.findannotation(method, ratelimiter.class);
        if (ratelimiter != null) {
            string key = ratelimiter.key();
            // 默认用类名+方法名做限流的 key 前缀
            if (strutil.isblank(key)) {
                key = method.getdeclaringclass().getname() + strutil.dot + method.getname();
            }
            // 最终限流的 key 为 前缀 + ip地址
            key = key + separator + iputil.getipaddr();

            long max = ratelimiter.max();
            long timeout = ratelimiter.timeout();
            timeunit timeunit = ratelimiter.timeunit();
            boolean limited = shouldlimited(key, max, timeout, timeunit);
            if (limited) {
                throw new runtimeexception("手速太快了,慢点儿吧~");
            }
        }

        return point.proceed();
    }

    private boolean shouldlimited(string key, long max, long timeout, timeunit timeunit) {
        // 最终的 key 格式为:
        // limit:自定义key:ip
        // limit:类名.方法名:ip
        key = redis_limit_key_prefix + key;
        // 统一使用单位毫秒
        long ttl = timeunit.tomillis(timeout);
        // 当前时间毫秒数
        long now = instant.now().toepochmilli();
        long expired = now - ttl;
        long executetimes = stringredistemplate.execute(limitredisscript, collections.singletonlist(key), now + "", ttl + "", expired + "", max + "");
        if (executetimes != null) {
            if (executetimes == 0) {
                log.error("【{}】在单位时间 {} 毫秒内已达到访问上限,当前接口上限 {}", key, ttl, max);
                return true;
            } else {
                log.info("【{}】在单位时间 {} 毫秒内访问 {} 次", key, ttl, executetimes);
                return false;
            }
        }
        return false;
    }
总结
到此这篇关于java常见限流算法具体实现的文章就介绍到这了,更多相关java常见限流算法内容请搜索代码网以前的文章或继续浏览下面的相关文章希望大家以后多多支持代码网!


发表评论