在mongodb如果需要启用变更监听功能(watch),mongodb需要在replicaset或者cluster方式下运行。
replicaset和cluster从部署难度相比,replicaset要简单许多。如果所存储的数据量规模不算太大的情况下,那么使用replicaset方式部署mongodb是一个不错的选择。
安装环境
mongodb版本:mongodb-6.0.5
两台主机:主机1(192.168.1.11)、主机2(192.168.1.12)
docker方式mongodb集群安装
在主机1和主机2上安装好docker,并确保两台主机能正常通信
目录与key准备
在启动mongodb前,先准备好对应的目录与访问key
#在所有主机都创建用于存储mongodb数据的文件夹
mkdir -p ~/mongo-data/{data,key,backup}
#设置key文件,用于在集群机器间互相访问,各主机的key需要保持一致
cd ~/mongo-data
#在某一节点创建key
openssl rand -base64 123 > key/mongo-rs.key
sudo chown 999 key/mongo-rs.key
#不能是755, 权限太大不行.
sudo chmod 600 key/mongo-rs.key
#将key复制到他节点
scp key/mongo-rs.key root@192.168.1.12:/root/mongo-data/key
以上操作在各主机中创建了 ~/mongo-data/{data,key,backup} 这3个目录,且mongo-rs.key的内容一致。
运行mongodb
执行下列命令,启动mongodb
sudo docker run --name mongo --network=host -p 27017:27017 -v ~/mongo-data/data:/data/db -v ~/mongo-data/backup:/data/backup -v ~/mongo-data/key:/data/key -v /etc/localtime:/etc/localtime -e mongo_initdb_root_username=admin -e mongo_initdb_root_password=123456 -d mongo:6.0.5 --replset haiyangreplset --auth --keyfile /data/key/mongo-rs.key --bind_ip_all
上面主要将27017端口映射到主机中,并设了admin的默认密码为123456。
–replset为指定开启replicaset,后面跟的为副本集的名称。
配置节点
进入某一节点,进行集群配置
sudo docker exec -it mongo bash
mongosh
初始化集群前先登录验证超级管理员admin
use admin
db.auth(“admin”,“123456”)
再执行以下命令进行初始化
var config={
     _id:"haiyangreplset",
     members:[
         {_id:0,host:"192.168.1.11:27017"},
         {_id:1,host:"192.168.1.12:27017"},
]};
rs.initiate(config)
执行成功后,可以看到一个节点为主节点,另一个节点为从节点

其他相关命令
#查看副本集状态
rs.status()
#查看副本集配置
rs.conf()
#添加节点
rs.add( { host: "ip:port"} )
#删除节点
rs.remove('ip:port')
官方客户端验证
在mongodb安装好后,再用客户端连接验证一下。
官方mongodb的客户端下载地址为:https://www.mongodb.com/try/download/compass
下载完毕后,在客户端中新建连接。
在本例中,则mongodb的连接地址为:
mongodb://admin:123456@192.168.1.11:27017,192.168.1.12:27017/?authmechanism=default&authsource=admin&replicaset=haiyangreplset
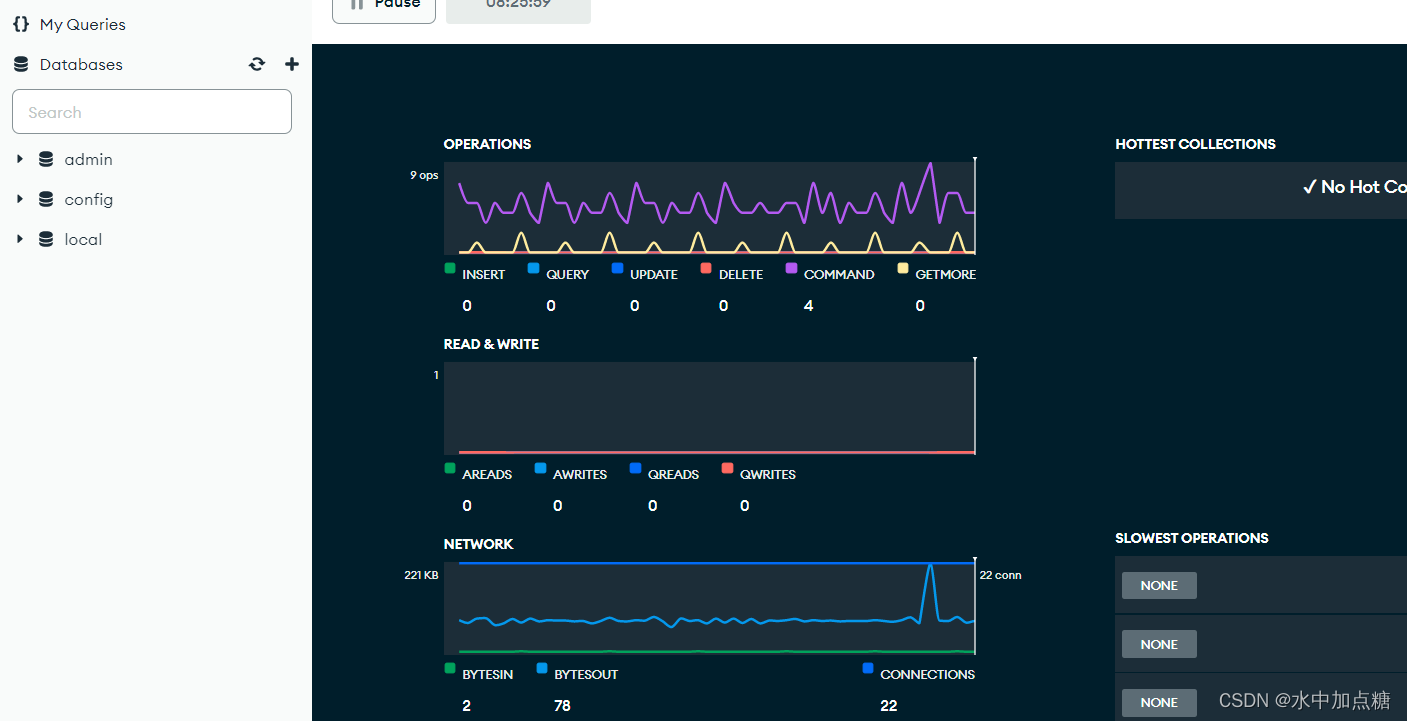
库与监控信息一目了然~
变更监听
对于mongodb操作的api在mongodb的官网有比较完备的文档,java的文档连接为:https://www.mongodb.com/docs/drivers/java/sync/v4.9/
这里试一下mongodb中一个比较强悍的功能,记录的变更监听。
用这项功能来做一些审计的场景则会非常方便。
官方链接为:https://www.mongodb.com/docs/drivers/java/sync/v4.9/usage-examples/watch/
这里以java客户端为例写个小demo,试一下对于mongodb中集合的创建及watch功能。
package io.github.puhaiyang;

import com.google.common.collect.lists;
import com.mongodb.client.*;
import org.apache.commons.lang3.stringutils;
import org.bson.document;
import org.bson.conversions.bson;
import org.slf4j.logger;
import org.slf4j.loggerfactory;

import java.util.arraylist;
import java.util.arrays;
import java.util.list;
import java.util.objects;
import java.util.optional;
import java.util.scanner;
import java.util.concurrent.completablefuture;

/**
 * @author puhaiyang
 * @since 2023/3/30 20:01
 * mongodbwatchtestmain
 */
public class mongodbwatchtestmain {

    public static void main(string[] args) throws exception {
        string uri = "mongodb://admin:123456@192.168.1.11:27017,192.168.1.12:27017/?replicaset=haiyangreplset";
        mongoclient mongoclient = mongoclients.create(uri);
        mongodatabase mongodatabase = mongoclient.getdatabase("my-test-db");
        string mytestcollectionname = "mytestcollection";
        //获取出collection
        mongocollection<document> mongocollection = initcollection(mongodatabase, mytestcollectionname);
        //进行watch
        completablefuture.runasync(() -> {
            while (true) {
                list<bson> pipeline = lists.newarraylist(
                        aggregates.match(filters.in("ns.coll", mytestcollectionname)),
                        aggregates.match(filters.in("operationtype", arrays.aslist("insert", "update", "replace", "delete")))
                );
                changestreamiterable<document> changestream = mongodatabase.watch(pipeline)
                        .fulldocument(fulldocument.update_lookup)
                        .fulldocumentbeforechange(fulldocumentbeforechange.when_available);

                changestream.foreach(event -> {
                    string collectionname = objects.requirenonnull(event.getnamespace()).getcollectionname();
                    system.out.println("--------> event:" + event.tostring());
                });
            }
        });

        //数据变更测试
        {
            thread.sleep(3_000);
            insertoneresult insertresult = mongocollection.insertone(new document("test", "sample movie document"));
            system.out.println("success! inserted document id: " + insertresult.getinsertedid());
            updateresult updateresult = mongocollection.updateone(new document("test", "sample movie document"), updates.set("field2", "sample movie document update"));
            system.out.println("updated " + updateresult.getmodifiedcount() + " document.");
            deleteresult deleteresult = mongocollection.deleteone(new document("field2", "sample movie document update"));
            system.out.println("deleted " + deleteresult.getdeletedcount() + " document.");
        }

        new scanner(system.in).next();
    }

    private static mongocollection<document> initcollection(mongodatabase mongodatabase, string mytestcollectionname) {
        arraylist<document> existscollections = mongodatabase.listcollections().into(new arraylist<>());
        optional<document> existscollinfoopl = existscollections.stream().filter(doc -> stringutils.equals(mytestcollectionname, doc.getstring("name"))).findfirst();
        existscollinfoopl.ifpresent(collinfo -> {
            //确保开启了changestreampreandpost
            document changestreampreandpostimagesenable = collinfo.get("options", document.class).get("changestreampreandpostimages", document.class);
            if (changestreampreandpostimagesenable != null && !changestreampreandpostimagesenable.getboolean("enabled")) {
                document mod = new document();
                mod.put("collmod", mytestcollectionname);
                mod.put("changestreampreandpostimages", new document("enabled", true));
                mongodatabase.runcommand(mod);
            }
        });
        if (!existscollinfoopl.ispresent()) {
            createcollectionoptions collectionoptions = new createcollectionoptions();
            //创建collection时开启changestreampreandpostimages
            collectionoptions.changestreampreandpostimagesoptions(new changestreampreandpostimagesoptions(true));
            mongodatabase.createcollection(mytestcollectionname, collectionoptions);
        }
        return mongodatabase.getcollection(mytestcollectionname);
    }
}
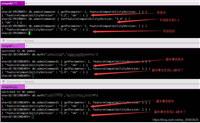
输出结果如下:
--------> event:changestreamdocument{ operationtype=insert, resumetoken={"_data": "8264255a0f000000022b022c0100296e5a10046a3e3757d6a64df59e6d94dc56a9210446645f6964006464255a105a91f005cfb2e6d20004"}, namespace=my-test-db.mytestcollection, destinationnamespace=null, fulldocument=document{{_id=64255a105a91f005cfb2e6d2, test=sample movie document}}, fulldocumentbeforechange=null, documentkey={"_id": {"$oid": "64255a105a91f005cfb2e6d2"}}, clustertime=timestamp{value=7216272998402097154, seconds=1680169487, inc=2}, updatedescription=null, txnnumber=null, lsid=null, walltime=bsondatetime{value=1680169487686}}
success! inserted document id: bsonobjectid{value=64255a105a91f005cfb2e6d2}
updated 1 document.
--------> event:changestreamdocument{ operationtype=update, resumetoken={"_data": "8264255a0f000000032b022c0100296e5a10046a3e3757d6a64df59e6d94dc56a9210446645f6964006464255a105a91f005cfb2e6d20004"}, namespace=my-test-db.mytestcollection, destinationnamespace=null, fulldocument=document{{_id=64255a105a91f005cfb2e6d2, test=sample movie document, field2=sample movie document update}}, fulldocumentbeforechange=document{{_id=64255a105a91f005cfb2e6d2, test=sample movie document}}, documentkey={"_id": {"$oid": "64255a105a91f005cfb2e6d2"}}, clustertime=timestamp{value=7216272998402097155, seconds=1680169487, inc=3}, updatedescription=updatedescription{removedfields=[], updatedfields={"field2": "sample movie document update"}, truncatedarrays=[], disambiguatedpaths=null}, txnnumber=null, lsid=null, walltime=bsondatetime{value=1680169487708}}
--------> event:changestreamdocument{ operationtype=delete, resumetoken={"_data": "8264255a0f000000042b022c0100296e5a10046a3e3757d6a64df59e6d94dc56a9210446645f6964006464255a105a91f005cfb2e6d20004"}, namespace=my-test-db.mytestcollection, destinationnamespace=null, fulldocument=null, fulldocumentbeforechange=document{{_id=64255a105a91f005cfb2e6d2, test=sample movie document, field2=sample movie document update}}, documentkey={"_id": {"$oid": "64255a105a91f005cfb2e6d2"}}, clustertime=timestamp{value=7216272998402097156, seconds=1680169487, inc=4}, updatedescription=null, txnnumber=null, lsid=null, walltime=bsondatetime{value=1680169487721}}
deleted 1 document.
到此这篇关于mongodb使用docker搭建replicaset集群与变更监听的文章就介绍到这了,更多相关mongodb搭建replicaset集群内容请搜索代码网以前的文章或继续浏览下面的相关文章希望大家以后多多支持代码网!

发表评论