一、tomcat相关配置类如何加载的?
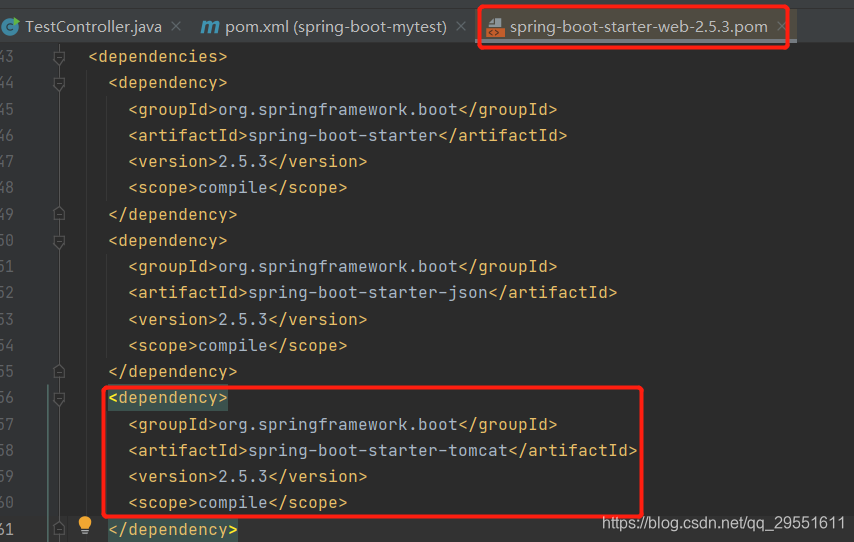
在springboot项目中,我们只需要引入spring-boot-starter-web依赖,启动服务成功,我们一个web服务就搭建好了,没有明显的看到tomcat。
其实打开spring-boot-starter-web依赖,我们可以看到:依赖了tomcat。
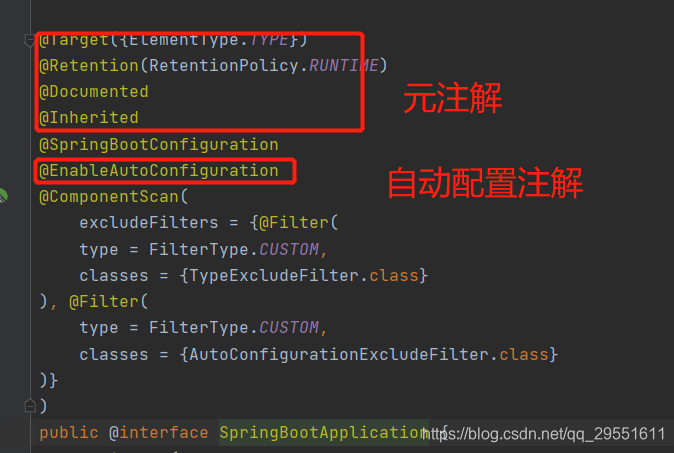
1.进入springboot启动类
我们加入springboot最核心的注解@springbootapplication,源码如下图:重点看注解@enableautoconfiguration,
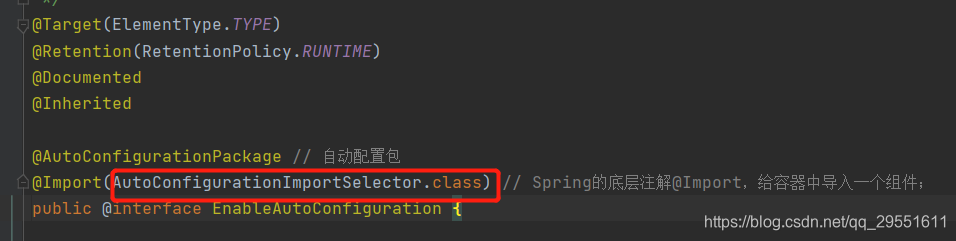
2.进入注解@enableautoconfiguration
如下图:该注解通过@import注解导入了autoconfigurationimportselector类。
其实这个类,就是导入通过加载配置文件,加载了很多工厂方法的配置类。
3.进入autoconfigurationimportselector类
首先调用selectimport()方法,在该方法中调用了 getautoconfigurationentry()方法,在之中又调用了getcandidateconfigurations()方法, getcandidateconfigurations()方法就去meta-inf/spring.factory配置文件中加载相关配置类。
详细讲解如下:也就是下图的,方法1调用方法2,方法2调用方法3:
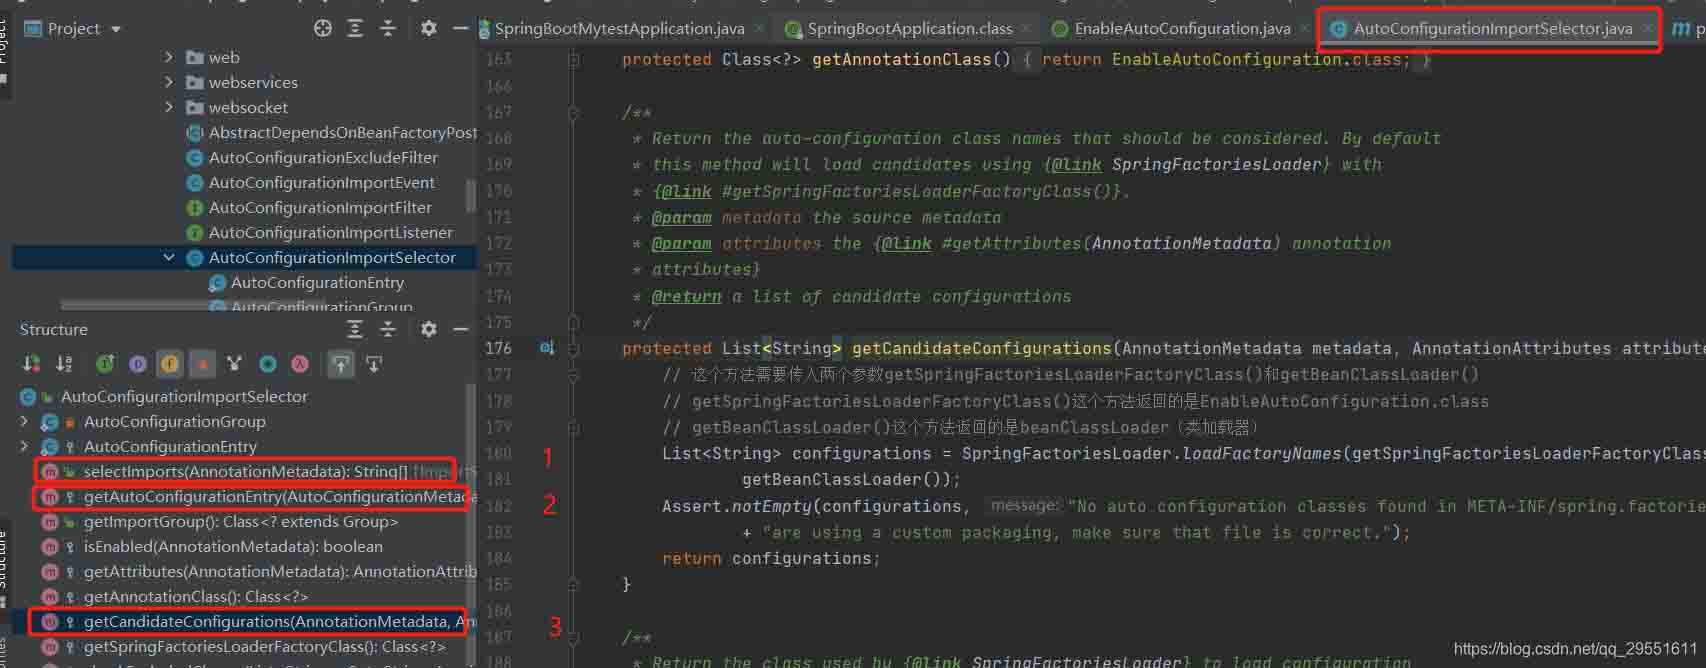
到了这里加载了 meta-inf/spring.factories文件:
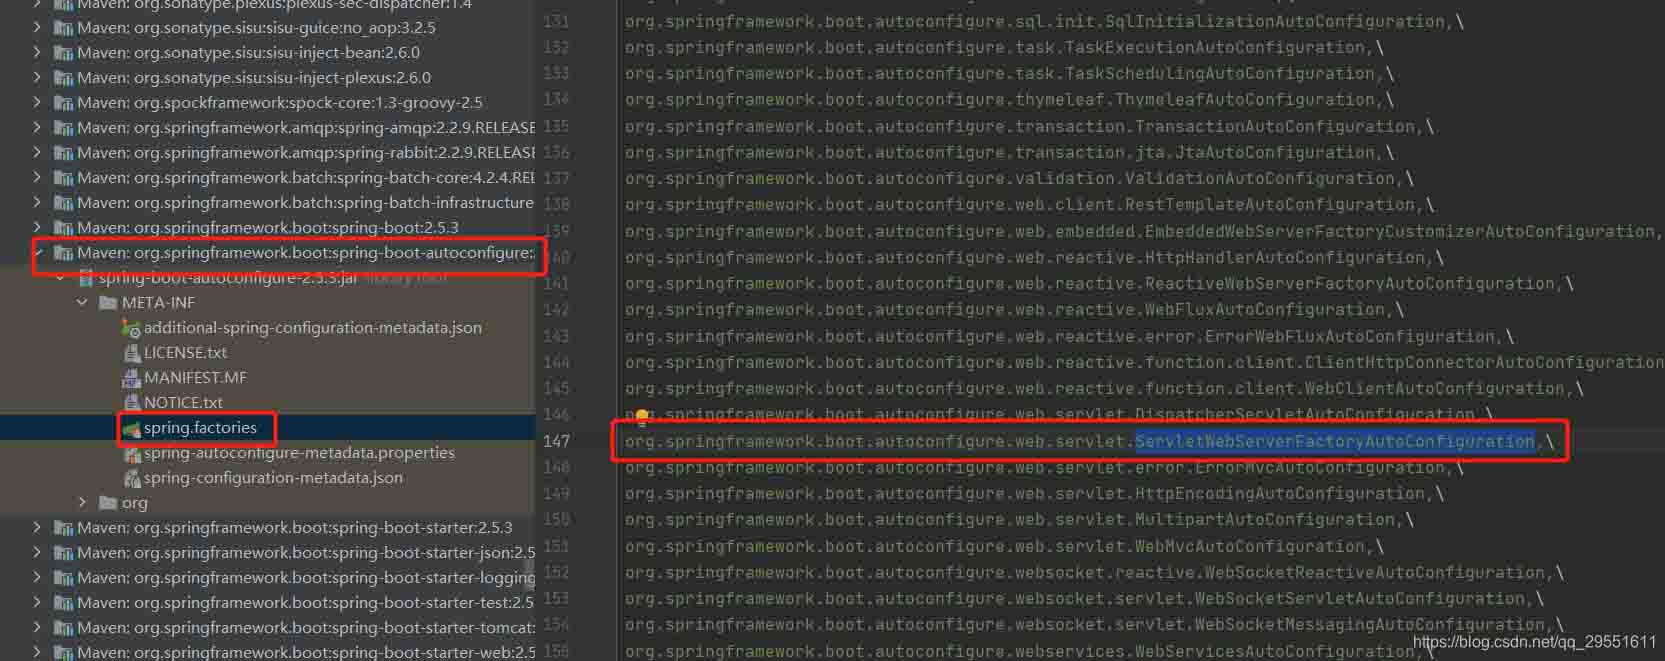
4.我们看到
加载了servletwebserverfactoryautoconfiguration这个配置类,web工厂配置类。
@configuration(proxybeanmethods = false)
@autoconfigureorder(ordered.highest_precedence)
@conditionalonclass(servletrequest.class)
@conditionalonwebapplication(type = type.servlet)
@enableconfigurationproperties(serverproperties.class)
@import({ servletwebserverfactoryautoconfiguration.beanpostprocessorsregistrar.class,
		servletwebserverfactoryconfiguration.embeddedtomcat.class,
		servletwebserverfactoryconfiguration.embeddedjetty.class,
		servletwebserverfactoryconfiguration.embeddedundertow.class })
public class servletwebserverfactoryautoconfiguration {
  ...
}
从这个配置工厂类,我们看出通过@import注解加载了tomcat,jetty,undertow三个web服务器的配置类。
由于没有导入jetty和undertow的相关jar包,这两个类实例的不会真正的加载。
5.进入embeddedtomcat类
创建了tomcatservletwebserverfactory类的对象。
@configuration(proxybeanmethods = false)
class servletwebserverfactoryconfiguration {

	@configuration(proxybeanmethods = false)
	@conditionalonclass({ servlet.class, tomcat.class, upgradeprotocol.class })
	@conditionalonmissingbean(value = servletwebserverfactory.class, search = searchstrategy.current)
	static class embeddedtomcat {

		@bean
		tomcatservletwebserverfactory tomcatservletwebserverfactory(
				objectprovider<tomcatconnectorcustomizer> connectorcustomizers,
				objectprovider<tomcatcontextcustomizer> contextcustomizers,
				objectprovider<tomcatprotocolhandlercustomizer<?>> protocolhandlercustomizers) {
			tomcatservletwebserverfactory factory = new tomcatservletwebserverfactory();
			factory.gettomcatconnectorcustomizers()
					.addall(connectorcustomizers.orderedstream().collect(collectors.tolist()));
			factory.gettomcatcontextcustomizers()
					.addall(contextcustomizers.orderedstream().collect(collectors.tolist()));
			factory.gettomcatprotocolhandlercustomizers()
					.addall(protocolhandlercustomizers.orderedstream().collect(collectors.tolist()));
			return factory;
		}
	}
6.进入tomcatservletwebserverfactory类
关注getwebserver()方法:
	@override
	public webserver getwebserver(servletcontextinitializer... initializers) {
		if (this.disablembeanregistry) {
			registry.disableregistry();
		}
		//实例化一个tomcat
		tomcat tomcat = new tomcat();
		file basedir = (this.basedirectory != null) ? this.basedirectory : createtempdir("tomcat");
		//设置tomcat的工作临时目录
		tomcat.setbasedir(basedir.getabsolutepath());
		//默认使用http11nioprotocal实例化connector
		connector connector = new connector(this.protocol);
		connector.setthrowonfailure(true);
		//给service添加connector
		tomcat.getservice().addconnector(connector);
		customizeconnector(connector);
		tomcat.setconnector(connector);
		//关闭热部署
		tomcat.gethost().setautodeploy(false);
		//配置engine
		configureengine(tomcat.getengine());
		for (connector additionalconnector : this.additionaltomcatconnectors) {
			tomcat.getservice().addconnector(additionalconnector);
		}
		preparecontext(tomcat.gethost(), initializers);
		// 实例化tomcatwebserver时会将dispatcherservlet以及一些filter添加到tomcat中
		return gettomcatwebserver(tomcat);
	}
getwebserver()方法在当前类,调用了gettomcatwebserver()方法,其实又new tomcatwebserver()对象:
	protected tomcatwebserver gettomcatwebserver(tomcat tomcat) {
		return new tomcatwebserver(tomcat, getport() >= 0);
	}
7.进入tomcatwebserver类
这个类才是真正的做tomcat启动的类:
(1)构造方法:调用了initialize()方法
public tomcatwebserver(tomcat tomcat, boolean autostart) {
		assert.notnull(tomcat, "tomcat server must not be null");
		this.tomcat = tomcat;
		this.autostart = autostart;
		initialize();
}(2)进入initialize()方法,这个方法:this.tomcat.start(),启动tomcat容器了。
private void initialize() throws webserverexception {
logger.info("tomcat initialized with port(s): " + getportsdescription(false));
synchronized (this.monitor) {
try {
addinstanceidtoenginename();
context context = findcontext();
context.addlifecyclelistener((event) -> {
if (context.equals(event.getsource()) && lifecycle.start_event.equals(event.gettype())) {
// remove service connectors so that protocol binding doesn't
// happen when the service is started.
removeserviceconnectors();
}
});
// tomcat在这里启动了
this.tomcat.start();
// we can re-throw failure exception directly in the main thread
rethrowdeferredstartupexceptions();
try {
contextbindings.bindclassloader(context, context.getnamingtoken(), getclass().getclassloader());
}
catch (namingexception ex) {
// naming is not enabled. continue
}
// unlike jetty, all tomcat threads are daemon threads. we create a
// blocking non-daemon to stop immediate shutdown
startdaemonawaitthread();
}
catch (exception ex) {
stopsilently();
destroysilently();
throw new webserverexception("unable to start embedded tomcat", ex);
}
}
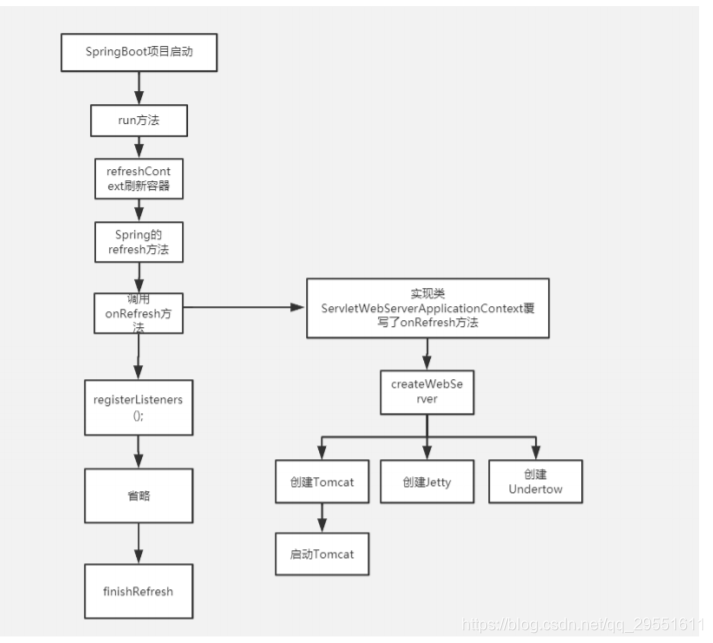
}二、getwebserver()的调用分析,也就是tomcat何时启动的
上面分析了tomcat的配置到启动的方法,我们现在来分析,tomcat是何时启动的。
1.首先进入springboot启动类的run方法
	public static void main(string[] args) {
		springapplication.run(springbootmytestapplication.class, args);
	}
最终调用了本类的一个同名方法:
public configurableapplicationcontext run(string... args) {
		//记录程序运行时间
		stopwatch stopwatch = new stopwatch();
		stopwatch.start();
		// configurableapplicationcontext spring 的上下文
		configurableapplicationcontext context = null;
		collection<springbootexceptionreporter> exceptionreporters = new arraylist<>();
		configureheadlessproperty();
		//【1、获取并启动监听器】
		springapplicationrunlisteners listeners = getrunlisteners(args);
		listeners.starting();
		try {
			applicationarguments applicationarguments = new defaultapplicationarguments(args);
			//【2、构造应用上下文环境】
			configurableenvironment environment = prepareenvironment(listeners, applicationarguments);
			//处理需要忽略的bean
			configureignorebeaninfo(environment);
			//打印banner
			banner printedbanner = printbanner(environment);
			///【3、初始化应用上下文】
			context = createapplicationcontext();
			//实例化springbootexceptionreporter.class,用来支持报告关于启动的错误
			exceptionreporters = getspringfactoriesinstances(springbootexceptionreporter.class,
					new class[] { configurableapplicationcontext.class }, context);
			//【4、刷新应用上下文前的准备阶段】
			preparecontext(context, environment, listeners, applicationarguments, printedbanner);
			//【5、刷新应用上下文】
			refreshcontext(context);
			//【6、刷新应用上下文后的扩展接口】
			afterrefresh(context, applicationarguments);
			//时间记录停止
			stopwatch.stop();
			if (this.logstartupinfo) {
				new startupinfologger(this.mainapplicationclass).logstarted(getapplicationlog(), stopwatch);
			}
			//发布容器启动完成事件
			listeners.started(context);
			callrunners(context, applicationarguments);
		}
		catch (throwable ex) {
			handlerunfailure(context, ex, exceptionreporters, listeners);
			throw new illegalstateexception(ex);
		}

		try {
			listeners.running(context);
		}
		catch (throwable ex) {
			handlerunfailure(context, ex, exceptionreporters, null);
			throw new illegalstateexception(ex);
		}
		return context;
	}
这个方法大概做了以下几件事:
- 1)获取并启动监听器 通过加载meta-inf/spring.factories 完成了 springapplicationrunlistener实例化工作
- 2)构造容器环境,简而言之就是加载系统变量,环境变量,配置文件
- 3)创建容器
- 4)实例化springbootexceptionreporter.class,用来支持报告关于启动的错误
- 5)准备容器
- 6) 刷新容器
- 7)刷新容器后的扩展接口
2.那么内置tomcat启动源码
就是隐藏在上面第六步:refreshcontext方法里面,该方法最终会调 用到abstractapplicationcontext类的refresh()方法,进入refreshcontext()方法,如图:
	private void refreshcontext(configurableapplicationcontext context) {
		refresh(context);
		if (this.registershutdownhook) {
			try {
				context.registershutdownhook();
			}
			catch (accesscontrolexception ex) {
				// not allowed in some environments.
			}
		}
	}
refreshcontext()调用了refresh()方法:
public void refresh() throws beansexception, illegalstateexception {
        synchronized(this.startupshutdownmonitor) {
            this.preparerefresh();
            configurablelistablebeanfactory beanfactory = this.obtainfreshbeanfactory();
            this.preparebeanfactory(beanfactory);

            try {
                this.postprocessbeanfactory(beanfactory);
                this.invokebeanfactorypostprocessors(beanfactory);
                this.registerbeanpostprocessors(beanfactory);
                this.initmessagesource();
                this.initapplicationeventmulticaster();
                this.onrefresh();
                this.registerlisteners();
                this.finishbeanfactoryinitialization(beanfactory);
                this.finishrefresh();
            } catch (beansexception var9) {
                if (this.logger.iswarnenabled()) {
                    this.logger.warn("exception encountered during context initialization - cancelling refresh attempt: " + var9);
                }

                this.destroybeans();
                this.cancelrefresh(var9);
                throw var9;
            } finally {
                this.resetcommoncaches();
            }

        }
    }
refresh()方法调用了this.onrefresh():
	@override
	protected void onrefresh() {
		super.onrefresh();
		try {
			//核心方法:会获取嵌入式的servlet容器工厂,并通过工厂来获取servlet容器
			createwebserver();
		}
		catch (throwable ex) {
			throw new applicationcontextexception("unable to start web server", ex);
		}
	}
如下面的代码:createwebserver() 方法调用了一个factory.getwebserver()。
	private void createwebserver() {
		webserver webserver = this.webserver;
		servletcontext servletcontext = getservletcontext();
		if (webserver == null && servletcontext == null) {
			//先获取嵌入式servlet容器工厂
			servletwebserverfactory factory = getwebserverfactory();
			this.webserver = factory.getwebserver(getselfinitializer());
		}
		else if (servletcontext != null) {
			try {
				getselfinitializer().onstartup(servletcontext);
			}
			catch (servletexception ex) {
				throw new applicationcontextexception("cannot initialize servlet context", ex);
			}
		}
		initpropertysources();
	}
到了这里getwebserver()方法,下一步就是创建tomcatwebserver对象,创建该对象,就在构造方法启动了tomcat。详细代码在第一部分有。
总结
tomcat启动流程
以上为个人经验,希望能给大家一个参考,也希望大家多多支持代码网。


发表评论