概述
在前面介绍了如何在 openlayers 中进行长度和面积的测量,可以参考:《openlayers 实现长度测量》,《》。
那么如何在 openlayers 中进行角度的测量呢?很遗憾ol/sphere模块中没有提供对应角度测量的 api 或方法,但是我们可以自己实现。
实践
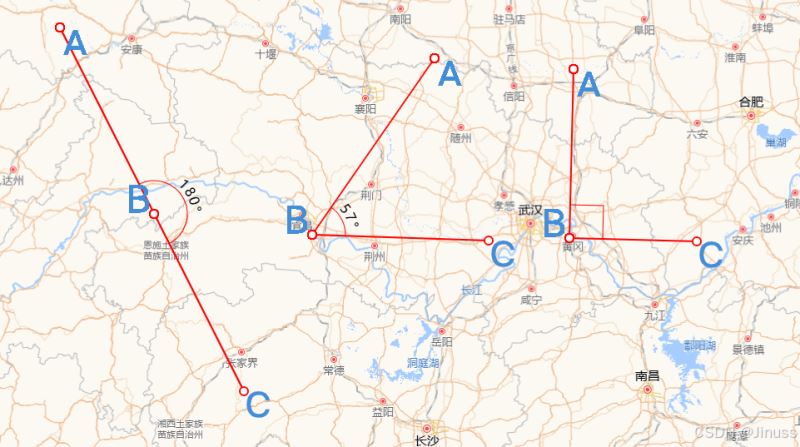
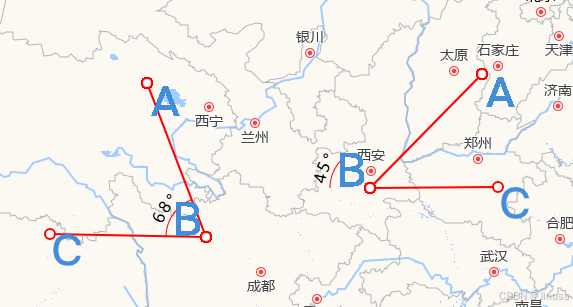
效果展示
角度量测绘制
结果
实现思路
实现思路主要有两点:一是计算夹角的度数;二则是夹角的圆弧表示,上图中表示角度的圆弧,可以是 0 - 180° 中的任意一个角度,且它总是包裹在夹角内,连接夹角的两边。
夹角的度数计算
- 确定夹角
数学常识可知,夹角度数的区间必定是[0°,180°],而且,夹角是由三个坐标点的位置确定大小的,如上图中的顶点a、b、c。因此,我们可以内定顶点 ∠abc是我们需要测量的夹角。
- 确定顶点坐标位置
可以在地图上随机取三个点作为顶点,但是这样并不科学,这样无法满足绘制特定角度的需求。选点还是通过ol/interaction模块的draw api 进行拾取。
但geom.getcoordinates()返回的坐标个数达到四个时,就调用this.draw.finishdrawing()方法结束绘制。因为它的返回值倒数的两个坐标都是一样的,因此即使我们只需要三个点的坐标,也需要等到它的返回值长度是4。
实现代码如下:
this.draw.on(
  "drawstart",
  (evt: { feature: feature<geometry>, coordinate: coordinate }) => {
    const { feature, coordinate } = evt;
    this.listengeometrychange = feature.getgeometry().on("change", (evt) => {
      const geom = evt.target;
      let startpoint = geom.getfirstcoordinate();
      this.addmarker({ coordinate: startpoint, symbolid: "a", anchor: [0, 0] });
      const coordinates = geom.getcoordinates().slice(0, -1);
      if (coordinates.length > 1) {
        this.addmarker({
          coordinate: coordinates[1],
          symbolid: "b",
          anchor: [1, 1],
        });
      }
      const pointscount = geom.getcoordinates();
      if (pointscount.length >= 4) {
        this.addmarker({
          coordinate: coordinates[2],
          symbolid: "c",
          anchor: [0, 0],
        });
        this.addanglemark({
          coordinate: coordinates[1],
          angles: calculateangle(coordinates),
        });
        this.draw.finishdrawing();
      }
    });
  }
);- 如何计算夹角
两点的坐标位置决定了两点之间的距离,即当我们知道a、b和c的坐标后,就可以知道线段ab和bc的长度了,然后通过数据计算就可以知道 ∠abc的大小了。前面提到夹角的区间范围,因为在电脑中,夹角也可以是负值,这个取决于它对应的方向是顺时针还是逆时针方向,因此要保证夹角的范围在区间[0°,180°]内。
封装的计算夹角的方法calculateangle如下:
const calculateangle = (points: coordinate[]) => {
  // 提取坐标点 a, b, c
  const [a, b, c] = points;
  // 计算向量 ab 和 bc
  const ab = { x: b[0] - a[0], y: b[1] - a[1] };
  const bc = { x: c[0] - b[0], y: c[1] - b[1] };
  // 计算点积
  const dotproduct = ab.x * bc.x + ab.y * bc.y;
  // 计算向量的模
  const magnitudeab = math.sqrt(ab.x ** 2 + ab.y ** 2);
  const magnitudebc = math.sqrt(bc.x ** 2 + bc.y ** 2);
  // 计算余弦值
  const costheta = dotproduct / (magnitudeab * magnitudebc);
  // 确保 costheta 在 -1 和 1 之间
  const clippedcostheta = math.max(-1, math.min(1, costheta));
  // 计算夹角(弧度转换为度)
  const angleinradians = math.acos(clippedcostheta);
  const angleindegrees = angleinradians * (180 / math.pi);
  // 计算方向(使用叉积)
  const crossproduct = ab.x * bc.y - ab.y * bc.x;
  // 如果叉积为负
  const angle = crossproduct < 0 ? angleindegrees - 180 : 180 - angleindegrees;
  return angle;
};- 夹角的圆弧
通过上面可以计算得到 ∠abc夹角的度数了,因为是自由绘制选点,因此无法保证ba或者bc是否与水平方向平行一致。小学时代,用量角器测量时,第一步就是需要保证量角器的底边与夹角的一边对齐,这样的测量结果才准确。但是在 openlayers 中,我们就是需要去实现这样一个量角器,无论在地图上选择哪三个顶点,圆弧都能准确表示角度。并且这个圆弧的长度不固定。
这个需求可以使用canvas或者svg实现,例子中是使用svg实现的。
- svg 画一个圆弧
效果如下:
拖动滑块,可以动态绘制任意一段圆弧,其代码如下:
<svg width="200" height="200">
  <path id="arc" fill="none" stroke="blue" stroke-width="2" />
  <line
    id="radial1"
    x1="100"
    y1="100"
    stroke="red"
    stroke-width="2"
    stroke-dasharray="5,5"
  />
  <line
    id="radial2"
    x1="100"
    y1="100"
    stroke="red"
    stroke-width="2"
    stroke-dasharray="5,5"
  />
  <text fill="black" font-size="16" text-anchor="middle">
    <textpath href="#arc" rel="external nofollow"  startoffset="50%" side="left">
      <tspan dy="-5" id="text"></tspan>
    </textpath>
  </text>
</svg>
function drawarc(adjustedangle) {
const endy = centery + radius * math.cos((adjustedangle * math.pi) / 180);
const endx = centerx - radius * math.sin((adjustedangle * math.pi) / 180);
const starty = centerx;
const startx = centery - radius;
const largearcflag = adjustedangle > 180 ? 0 : 1;
const d_1 = `m ${startx} ${starty} a ${radius} ${radius} 0 ${largearcflag} 1 ${endx} ${endy}`; //表示非直角
const d_2 = `m ${endx} ${endy} l ${startx} ${endy} l${startx} ${starty}`; //表示直角
const angle = math.abs(adjustedangle);
let lastd = d_1;
if (angle == 540) {
lastd = d_2;
}
arcpath.setattribute("d", lastd);
radial1.setattribute("x2", startx);
radial1.setattribute("y2", starty);
radial2.setattribute("x2", endx);
radial2.setattribute("y2", endy);
}- 圆弧贴图
现在需要将圆弧以overlay的方式添加到 ∠abc处就完事了,结果如下:
上面的情形就很诡异,因为圆弧始终是在水平位置,而我们选点是随意的,因此圆弧需要旋转一定的角度,使得圆弧的两边与夹角的两边对齐。但是具体旋转多少角度,逆时针旋转还是顺时针旋转?这个就取决于线段ba与bc的倾斜角度,准确来说是以顶点b为原点建立坐标系,水平方向为x轴且向右为x轴正半轴,垂直方向为y轴且向上为y轴正半轴。那么圆弧的旋转角度和方向就取决于ba和bc与x 轴负半轴的夹角。
和 css 中transform的rotate规则报纸一致,规定圆弧逆时针旋转为负,顺时针旋转为正。因此,我们可以规定如果ba(或者bc)在第三象限或者是第四象限,则它与x轴负半轴的夹角为负值;反之,如果在第一象限则为正数钝角,第二象限则为正数锐角
计算 ba 或者 bc 与 x 轴负半轴夹角
主要还是用到数学知识,代码如下:
function calculateanglepoint(points) {
  const [a, b, c] = points;
  const [ax, ay] = a;
  const [bx, by] = b;
  const [cx, cy] = c;
  // 计算向量 ba 和 bc
  const ba = { x: ax - bx, y: ay - by }; // ba 向量(从 b 到 a)
  const bc = { x: cx - bx, y: cy - by }; // bc 向量(从 b 到 c)
  // 计算 ba 和 bc 向量与 x 轴的夹角(单位:度)
  let angleba = math.atan2(ba.y, ba.x) * (180 / math.pi); // [-180, 180] 范围
  let anglebc = math.atan2(bc.y, bc.x) * (180 / math.pi); // [-180, 180] 范围
  // 计算 ba 向量与 x 轴负半轴的夹角
  if (angleba >= 0 && angleba < 90) {
    // 第一象限,夹角为正钝角
    angleba = 180 - angleba;
  } else if (angleba >= 90 && angleba <= 180) {
    // 第二象限,夹角为正锐角
    angleba = 180 - angleba;
  } else if (angleba < 0 && angleba >= -90) {
    // 第四象限,夹角为负钝角
    angleba = math.abs(angleba) - 180;
  } else {
    // 第三象限,夹角为负锐角
    angleba = math.abs(angleba) - 180;
  }
  // 计算 bc 向量与 x 轴负半轴的夹角
  if (anglebc >= 0 && anglebc < 90) {
    // 第一象限,夹角为正钝角
    anglebc = 180 - anglebc;
  } else if (anglebc >= 90 && anglebc <= 180) {
    // 第二象限,夹角为正锐角
    anglebc = 180 - anglebc;
  } else if (anglebc < 0 && anglebc >= -90) {
    // 第四象限,夹角为负钝角
    anglebc = math.abs(anglebc) - 180;
  } else {
    // 第三象限,夹角为负锐角
    anglebc = math.abs(anglebc) - 180;
  }
  return {
    angleba: angleba, // ba 向量与 x 轴负半轴的夹角
    anglebc: anglebc, // bc 向量与 x 轴负半轴的夹角
  };
}- 确定旋转角度
由上得到了angleba和anglebc,毫无疑问,如果ba和bc在第一二象限,则圆弧需要顺时针旋转,且旋转角度为math.min(angleba,anglebc),反之都在第三四象限,则旋转角度为- math.max(math.abs(angleba),math.abs(anglebc)),如果ba和bc在不同象限,那就要分情况讨论了,具体判断规则如下:
let rotate = 0;
if (angleba < 0 && anglebc < 0) {
  rotate = -math.max(math.abs(angleba), math.abs(anglebc));
}
if (angleba > 0 && anglebc > 0) {
  rotate = math.min(math.abs(angleba), math.abs(anglebc));
}
//第一二三象限 不同象限
if (angleba >= 135 && angleba <= 180 && anglebc <= -45 && anglebc >= -90) {
  rotate = angleba;
}
if (anglebc >= 135 && anglebc <= 180 && angleba <= -45 && angleba >= -90) {
  rotate = anglebc;
}
if (angleba >= 135 && angleba <= 180 && anglebc <= 0 && anglebc >= -45) {
  rotate = anglebc;
}
if (anglebc >= 135 && anglebc <= 180 && angleba <= 0 && angleba >= -45) {
  rotate = angleba;
}
if (angleba >= 90 && angleba <= 135 && anglebc <= 0 && anglebc >= -45) {
  rotate = anglebc;
}
if (anglebc >= 90 && anglebc <= 135 && angleba <= 0 && angleba >= -45) {
  rotate = angleba;
}
if (angleba >= 90 && angleba <= 135 && anglebc >= -90 && anglebc <= -45) {
  rotate = angleba;
}
if (anglebc >= 90 && anglebc <= 135 && angleba >= -90 && angleba <= -45) {
  rotate = anglebc;
}
if (angleba >= 0 && angleba <= 90 && anglebc <= 0 && anglebc >= -90) {
  rotate = anglebc;
}
if (anglebc >= 0 && anglebc <= 90 && angleba <= 0 && angleba >= -90) {
  rotate = angleba;
}
//第一二四象限不同象限
if (anglebc >= -180 && anglebc <= -90 && angleba <= 180 && angleba >= 90) {
  rotate = angleba;
}
if (angleba >= -180 && angleba <= -90 && anglebc <= 180 && anglebc >= 90) {
  rotate = anglebc;
}
if (anglebc >= -135 && anglebc <= -90 && angleba >= 0 && angleba <= 45) {
  rotate = anglebc;
}
if (anglebc >= -135 && anglebc <= -90 && angleba >= 45 && angleba <= 90) {
  rotate = angleba;
}
if (angleba >= -135 && angleba <= -90 && anglebc >= 0 && anglebc <= 45) {
  rotate = angleba;
}
if (angleba >= -135 && angleba <= -90 && anglebc >= 45 && anglebc <= 90) {
  rotate = anglebc;
}
if (anglebc >= -180 && anglebc <= -135 && angleba >= 0 && angleba <= 45) {
  rotate = anglebc;
}
if (anglebc >= -180 && anglebc <= -135 && angleba >= 45 && angleba <= 90) {
  rotate = angleba;
}
if (angleba >= -180 && angleba <= -135 && anglebc >= 0 && anglebc <= 45) {
  rotate = angleba;
}
if (angleba >= -180 && angleba <= -135 && anglebc >= 45 && anglebc <= 90) {
  rotate = anglebc;
}
总结
在 openlayers 中测量角度主要还是要用到一些数据的基础知识,重难点就是圆弧的旋转表示,理解基本原理后发现也就那么一回事。
到此这篇关于openlayers实现角度测量的方法的文章就介绍到这了,更多相关openlayers角度测量内容请搜索代码网以前的文章或继续浏览下面的相关文章希望大家以后多多支持代码网!


发表评论