在现代软件开发中,高效的输入输出(i/o)操作是提高程序性能的关键之一。go语言提供了丰富的i/o操作接口,使得文件读写、网络通信等任务变得简单而高效。
go语言的i/o操作主要通过标准库中的io包和os包实现。o包提供了一系列用于输入和输出操作的基本接口和原语。这些接口和原语构成了go语言中处理i/o操作的基础,支持多种i/o设备的读写操作,包括文件、网络连接、内存缓冲区等。而os包则提供了对操作系统功能的封装,包括文件操作、进程管理等。
一、os包简介
os包是go语言标准库中的一个重要包,提供了操作系统相关的功能接口。通过os包,我们可以执行各种底层操作,如读取和写入文件、获取系统信息、执行外部命令等。
二、常用函数与示例
1. 文件操作
1.1 获取文件信息
stat:获取文件信息对象,符号链接会跳转。
lstat:获取文件信息对象,符号链接不跳转。
package main
import (
"fmt"
"os"
)
//看下fileinfo接口
// file
// fileinfo
/*
type fileinfo interface {
name() string // base name of the file
size() int64 // length in bytes for regular files; system-dependent for others
mode() filemode // file mode bits : 权限
modtime() time.time // modification time
isdir() bool // abbreviation for mode().isdir()
// 获取更加详细的文件信息, *syscall.stat_t 反射来获取
sys() any // underlying data source (can return nil)
*/
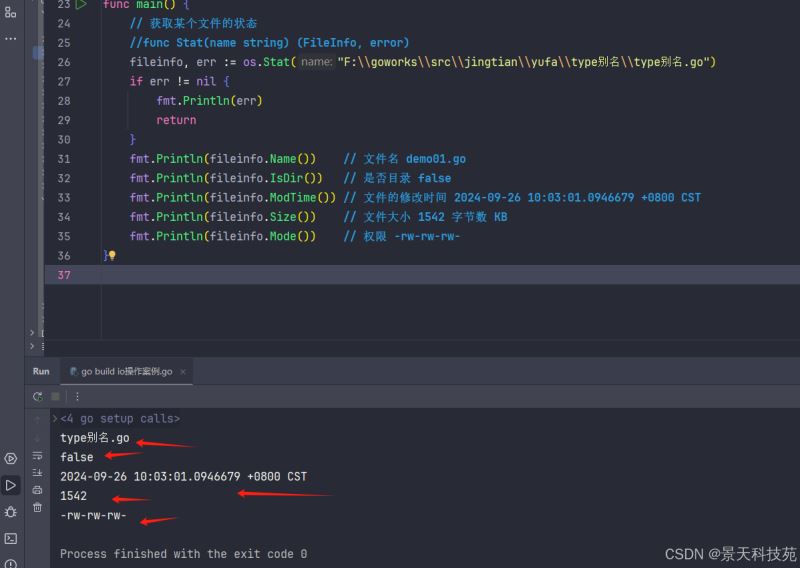
func main() {
// 获取某个文件的状态
//func stat(name string) (fileinfo, error)
fileinfo, err := os.stat("f:\\goworks\\src\\jingtian\\yufa\\type别名\\type别名.go")
if err != nil {
fmt.println(err)
return
}
fmt.println(fileinfo.name()) // 文件名 demo01.go
fmt.println(fileinfo.isdir()) // 是否目录 false
fmt.println(fileinfo.modtime()) // 文件的修改时间 2024-09-26 10:03:01.0946679 +0800 cst
fmt.println(fileinfo.size()) // 文件大小 1542 字节数
fmt.println(fileinfo.mode()) // 权限 -rw-rw-rw-
}
1.2 创建文件
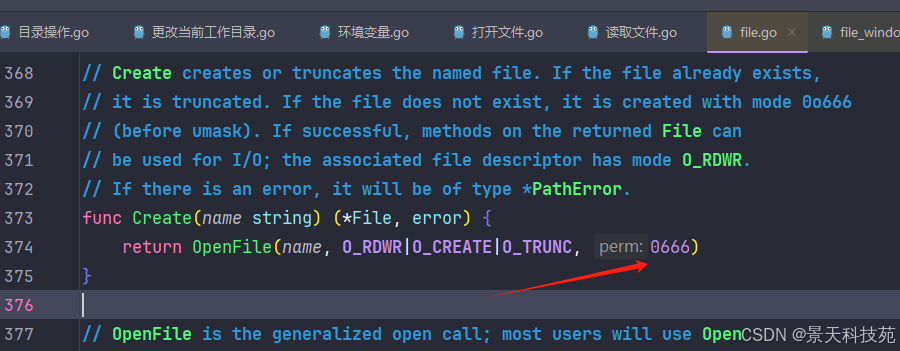
create:创建文件,如果文件存在,则清空原文件。
package main

import (
    "fmt"
    "os"
)

func main() {
    //创建文件,文件不存在就创建文件,如果文件存在,则清空原文件。
        // func create(name string) (*file, error)

    file, err := os.create("example.txt")
    if err != nil {
        fmt.println(err)
        return
    }
    //关闭文件,延迟执行
    defer file.close()

    //向文件中写内容
    // func (f *file) writestring(s string) (n int, err error)
    _, err = file.writestring("hello, world!")
    if err != nil {
        fmt.println(err)
    }
    fmt.println("file created successfully")
}
文件创建,并且写入成功
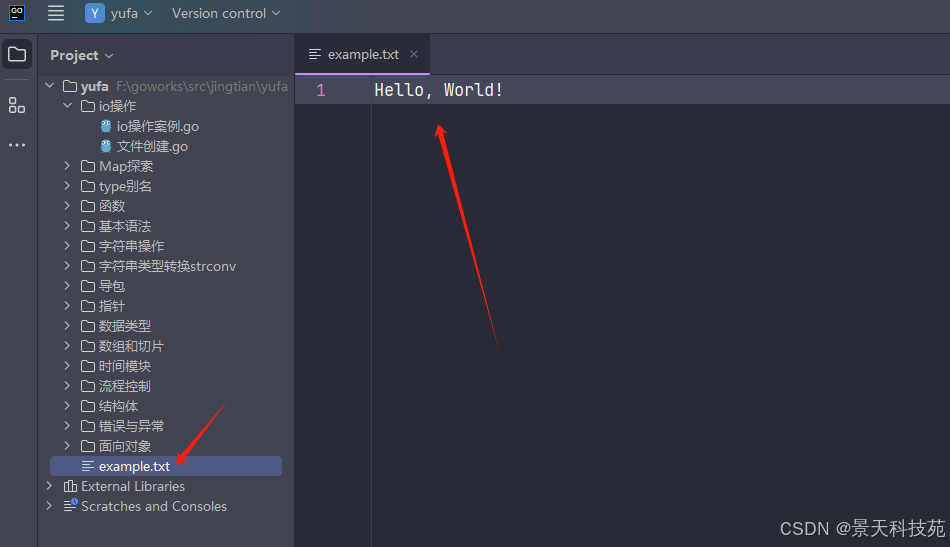
创建的文件默认权限是0666
1.3 删除文件
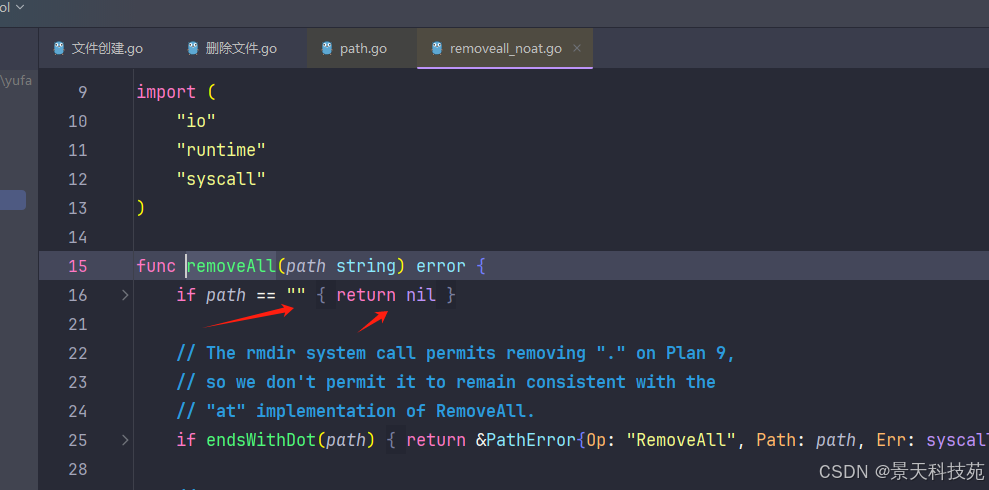
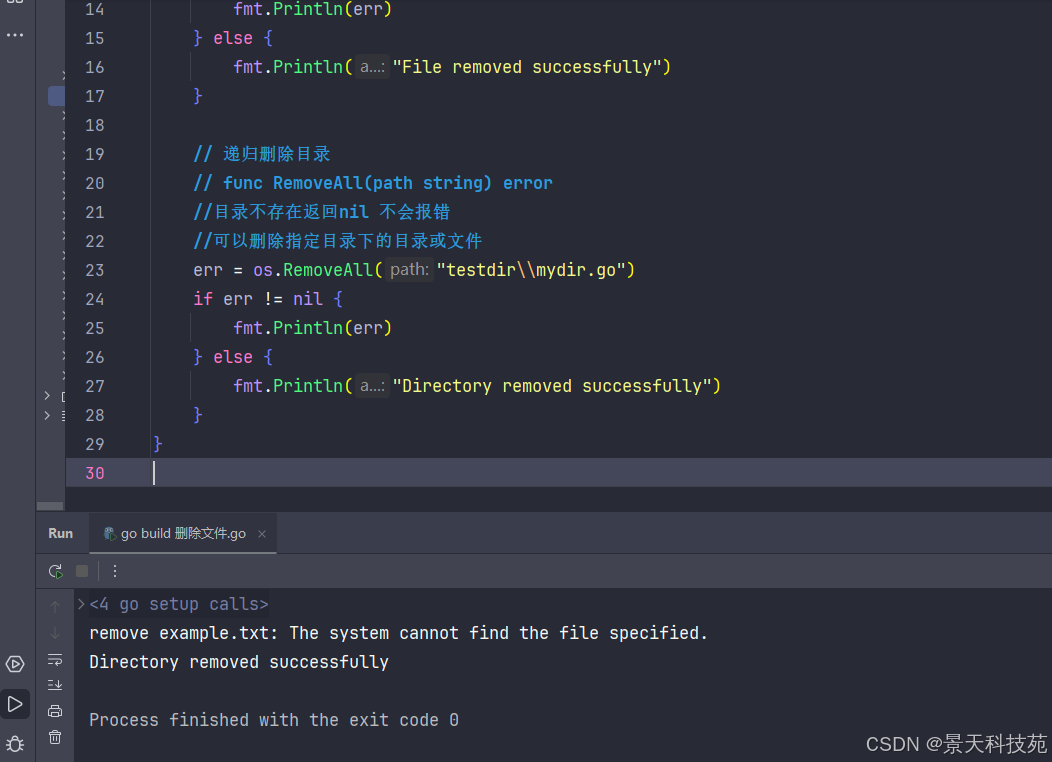
remove:删除文件或目录(单一文件)只能删除空文件夹,文件不存在会报错。如果文件夹中有文件也删不掉
removeall:递归删除文件或目录,文件或目录不存在不报错,返回nil。
package main

import (
    "fmt"
    "os"
)

func main() {
    // 删除文件
    // func remove(name string) error
    //文件不存在会报错
    err := os.remove("example.txt")
    if err != nil {
        fmt.println(err)
    } else {
        fmt.println("file removed successfully")
    }

    // 递归删除目录
    // func removeall(path string) error
    //目录不存在返回nil 不会报错
    //可以删除指定目录下的目录或文件
    err = os.removeall("testdir\\mydir.go")
    if err != nil {
        fmt.println(err)
    } else {
        fmt.println("directory removed successfully")
    }
}
1.4 重命名或移动文件
rename:重命名文件或移动文件。
package main

import (
    "fmt"
    "os"
)

func main() {
    // 重命名文件
    // func rename(oldpath, newpath string) error
    err := os.rename("张三.txt", "新张三.txt")
    if err != nil {
        fmt.println(err)
    } else {
        fmt.println("file renamed successfully")
    }

    // 移动文件
    err = os.rename("新张三.txt", "testdir\\新张三.txt")
    if err != nil {
        fmt.println(err)
    } else {
        fmt.println("file moved successfully")
    }
}
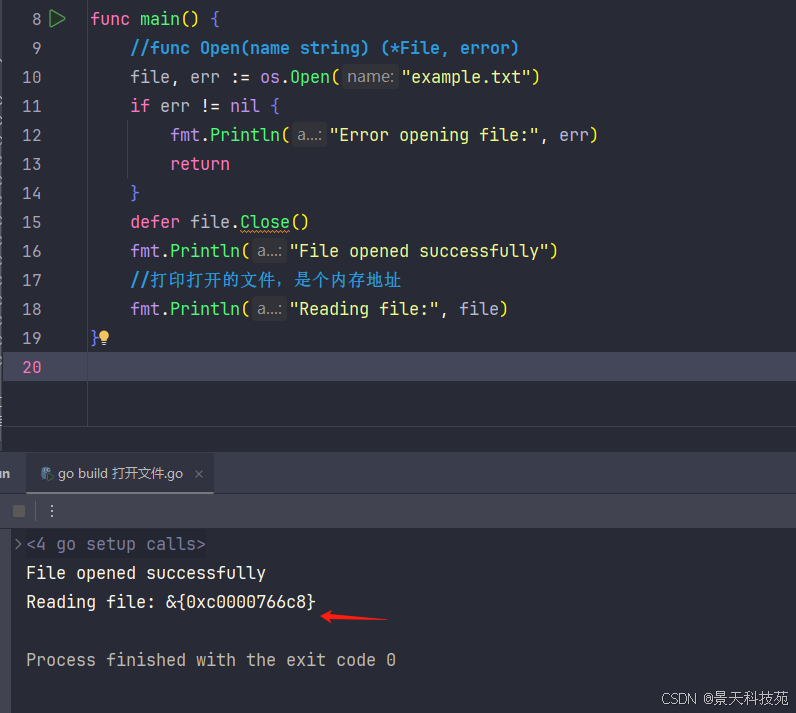
1.5 打开文件
使用os.open函数可以打开一个文件,返回一个*os.file类型的文件对象。如果文件打开失败,会返回一个错误。
package main

import (
    "fmt"
    "os"
)

func main() {
    //func open(name string) (*file, error)
    file, err := os.open("example.txt")
    if err != nil {
        fmt.println("error opening file:", err)
        return
    }
    defer file.close()
    fmt.println("file opened successfully")
    //打印打开的文件,是个内存地址
    fmt.println("reading file:", file)
}
打开文件常用方式二:os.openfile
在go语言中,文件的读写操作是使用非常频繁的功能之一。os.openfile函数是go标准库中用于打开文件的强大工具,它允许以多种模式打开文件,并可以设置文件的权限。
os.openfile函数简介
os.openfile函数用法如下:
func openfile(name string, flag int, perm filemode) (file, error)
name:要打开的文件名或路径。
flag:打开文件的模式,可以是多个标志的按位或组合。常见的标志包括:
os.o_rdonly:只读模式。
os.o_wronly:只写模式。
os.o_rdwr:读写模式。
os.o_append:追加模式,在文件末尾写入数据而不覆盖原有数据。只要有这个参数,就会采用追加模式
os.o_create:如果文件不存在则创建文件。
os.o_excl:与o_create一起使用,可执行权限。
os.o_sync:同步模式,将文件更改刷新到磁盘。
os.o_trunc:截断模式,清空文件内容。
perm:文件权限,表示文件的读写权限,默认为0666(即所有用户都可读写)。
返回值是一个指向打开文件的file对象和一个可能出现的错误。如果文件打开成功,则可以通过该文件对象进行读取和写入操作。
使用os.openfile写文件
以下是一个使用os.openfile函数写文件的示例:
package main

import (
    "fmt"
    "os"
)

func main() {
    // 以追加、创建、读写模式打开文件
    file, err := os.openfile("./example.txt", os.o_append|os.o_create|os.o_rdwr, 0666)
    if err != nil {
        fmt.println("打开文件失败:", err)
        return
    }
    defer file.close() // 确保在函数执行完毕后关闭文件

    // 写入文件
    _, err = file.write([]byte("hello, go!\n"))
    if err != nil {
        fmt.println("写入文件失败:", err)
        return
    }

    fmt.println("文件写入成功")
}
将内容追加到文件中
1.6 读取文件
使用os.file对象的read方法可以从文件中读取数据。read方法会将数据读取到一个字节切片中,并返回读取的字节数和可能发生的错误。
需要借助 file.read([]byte)读取 ,将file中的数据读取到 []byte 中, n,err n读取到的行数,err 错误,eof错误,就代表文件读取完毕了
一直调用read,就代表光标往后移动…
以下是一个使用os.open函数读文件的示例:
package main
import (
"fmt"
"os"
)
// 读取文件数据
func main() {
// 我们习惯于在建立连接时候通过defer来关闭连接,保证程序不会出任何问题,或者忘记关闭
// 建立连接
file, _ := os.open("example.txt")
// 关闭连接
defer file.close()
// 读代码 ,go 的错误机制,让我们专心可以写业务代码。
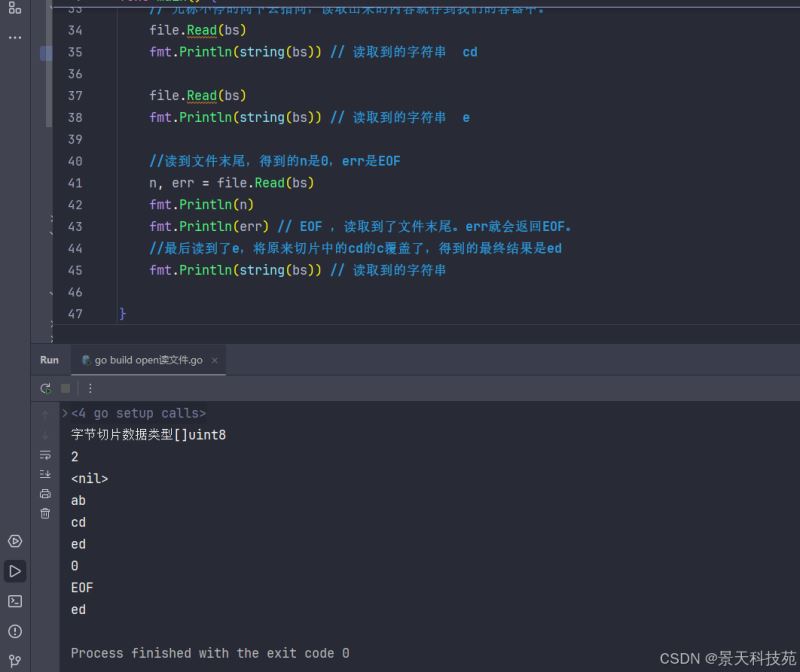
// 1、创建一个容器 (二进制文本文件--0100101010 => 读取流到一个容器 => 读取容器的数据)
//一次性读取的内容长度为切片的长度,切片长度为2,容量为1024
bs := make([]byte, 2, 1024) // 缓冲区,可以接受我们读取的数据 这里设置的是一次性读取两个字节
fmt.printf("字节切片数据类型%t\n", bs)
// 2、读取到缓冲区中。 // 汉字一个汉字占 3个字节
// func (f *file) read(b []byte) (n int, err error) 返回读到的字节数和错误
// at end of file, read returns 0, io.eof. 读到文件末尾返回0和io.eof
n, err := file.read(bs)
fmt.println(n)
fmt.println(err)
//每次读取光标移动切片的长度,将读取的内容存到切片中。如果读取的文件是文本数据,可以通过string方法将切片中的内容转换为字符串
//如果是mp4呀,音乐,图片等文件,就不要用string转换了
fmt.println(string(bs)) // 读取到的字符串 ab
//继续往下读
// 光标不停的向下去指向,读取出来的内容就存到我们的容器中。
file.read(bs)
fmt.println(string(bs)) // 读取到的字符串 cd
file.read(bs)
fmt.println(string(bs)) // 读取到的字符串 e
//读到文件末尾,得到的n是0,err是eof
n, err = file.read(bs)
fmt.println(n)
fmt.println(err) // eof ,读取到了文件末尾。err就会返回eof。
//最后读到了e,将原来切片中的cd的c覆盖了,得到的最终结果是ed
fmt.println(string(bs)) // 读取到的字符串
}
1.7 io写
写的话,要考虑文件的权限问题,大致流程如下
建立连接 (设置权限:可读可写,扩充这个文件的append) os.openfile
关闭连接
写入文件常用的方法
- file.write
- file.writestring
先看下example.txt文件

package main

import (
    "fmt"
    "os"
)

func main() {

    filename := "example.txt"
    // 权限:如果我们要向一个文件中追加内容, o_append, 如果没有,就是从头开始写
    file, _ := os.openfile(filename, os.o_wronly|os.o_rdonly|os.o_append, os.modeperm)
    defer file.close()

    // 操作 字节切片写入
    bs := []byte{65, 66, 67, 68, 69} // a b c d e  ascii编码
    // func (f *file) write(b []byte) (n int, err error)
    //write方法 写入的是二进制数据字节流,即字节切片
    n, err := file.write(bs)
    if err != nil {
        fmt.println(err)
    }
    fmt.println(n)

    // string类型的写入,可以直接将字符串写入到文件中
    n, err = file.writestring("hhahahahah哈哈哈哈哈哈哈")
    if err != nil {
        fmt.println(err)
    }
    fmt.println(n)
}
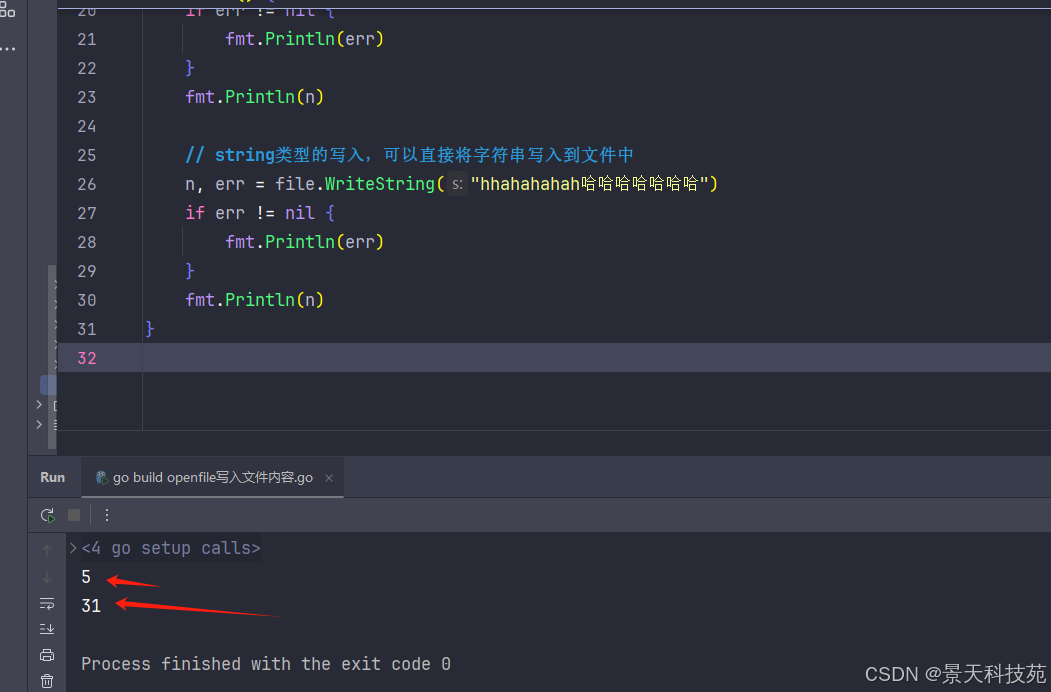
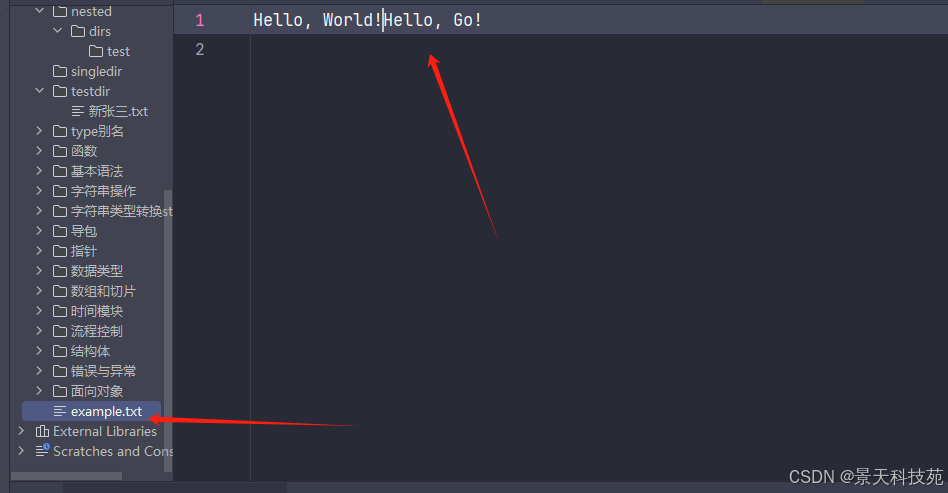
再看下example.txt文件,可以看到我们写入的内容全部追加到文件末尾
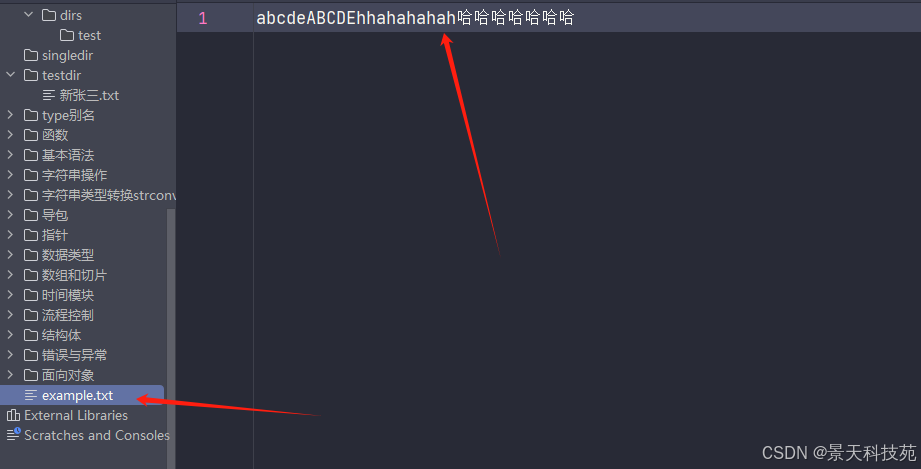
如果打开文件的方式不包含os.o_append 则是将源文件覆盖写。os.o_append的意思是,在打开文件时,将光标移动到文件末尾
2. 目录操作
2.1 创建目录
mkdir:使用指定的权限和名称创建一个目录,目录存在会报错。
mkdirall:递归创建目录,包括任何必要的上级目录,目录存在不报错。
package main

import (
    "fmt"
    "os"
)

func main() {
    // 创建单个目录
    // func mkdir(name string, perm filemode) error
    // os.modeperm 是0777的权限
    //mkidr创建目录,目录存在的情况下,会报错 cannot create a file when that file already exists.
    err := os.mkdir("singledir", os.modeperm)
    if err != nil {
        fmt.println(err)
    } else {
        fmt.println("single directory created successfully")
    }

    // 递归创建目录,目录存在不报错
    // func mkdirall(path string, perm filemode) error
    err = os.mkdirall("nested/dirs/test", os.modeperm)
    if err != nil {
        fmt.println(err)
    } else {
        fmt.println("nested directories created successfully")
    }
}
2.2 更改当前工作目录
getwd:获取当前工作目录。
chdir:修改当前工作目录。
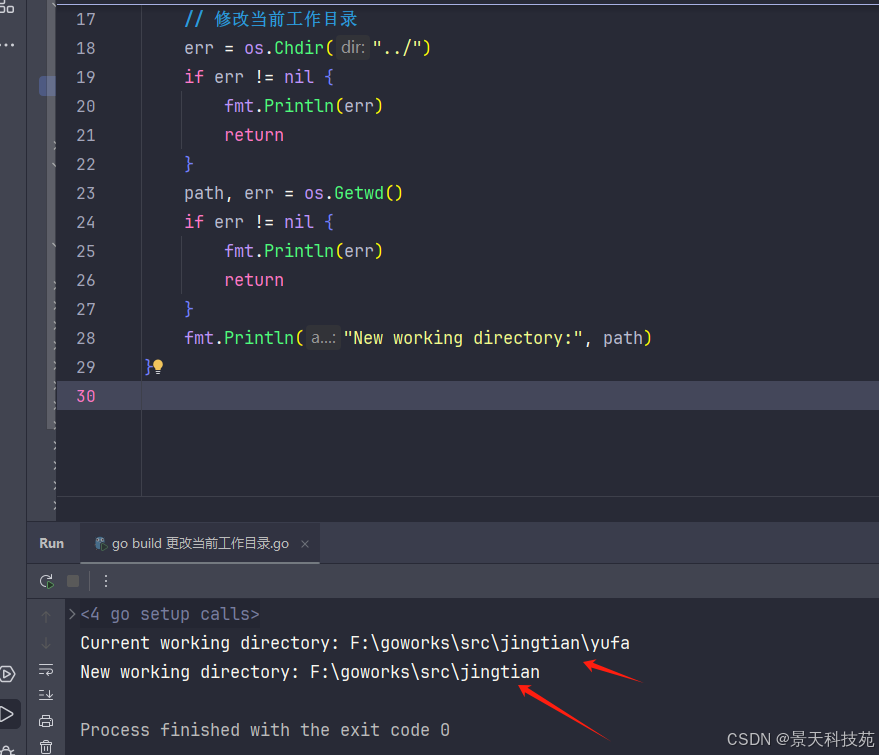
package main

import (
    "fmt"
    "os"
)

func main() {
    // 获取当前工作目录
    path, err := os.getwd()
    if err != nil {
        fmt.println(err)
        return
    }
    fmt.println("current working directory:", path)

    // 修改当前工作目录
    err = os.chdir("../")
    if err != nil {
        fmt.println(err)
        return
    }
    path, err = os.getwd()
    if err != nil {
        fmt.println(err)
        return
    }
    fmt.println("new working directory:", path)
}
3. 环境变量
3.1 获取环境变量
environ:返回所有的环境变量,格式为“key=value”的字符串切片。
getenv:检索并返回名为key的环境变量的值,如果不存在则返回空字符串。
setenv:
函数定义:func setenv(key, value string) error
功能:设置名为key的环境变量,如果出错会返回该错误。
package main

import (
    "fmt"
    "os"
    "strings"
)

func main() {
    // 设置环境变量
    err := os.setenv("my_env_var", "my_value")
    if err != nil {
        fmt.println(err)
    } else {
        fmt.println("environment variable set successfully")
    }

    // 获取并打印刚设置的环境变量
    value := os.getenv("my_env_var")
    fmt.println("my_env_var:", value)

    //查看所有环境变量
    envs := os.environ()
    for _, env := range envs {
        cache := strings.split(env, "=")
        fmt.printf("key=%v value=%v\n", cache[0], cache[1])

    }

    // 清除所有环境变量(谨慎使用)
    // err = os.clearenv()
    // if err != nil {
    //     fmt.println(err)
    // } else {
    //     fmt.println("all environment variables cleared")
    // }
}

4. 程序退出
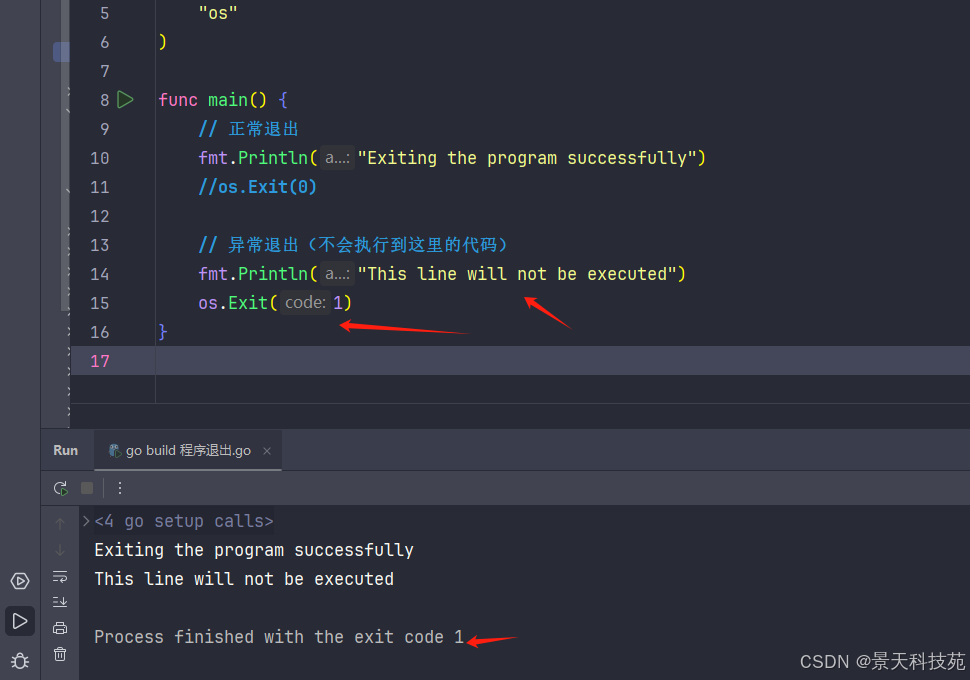
exit:让当前程序以给出的状态码code退出。一般来说,状态码0表示成功,非0表示出错。程序会立刻终止,并且defer的函数不会被执行。
package main

import (
    "fmt"
    "os"
)

func main() {
    // 正常退出
    fmt.println("exiting the program successfully")
    //os.exit(0)

    // 异常退出(不会执行到这里的代码)
    fmt.println("this line will not be executed")
    os.exit(1)
}
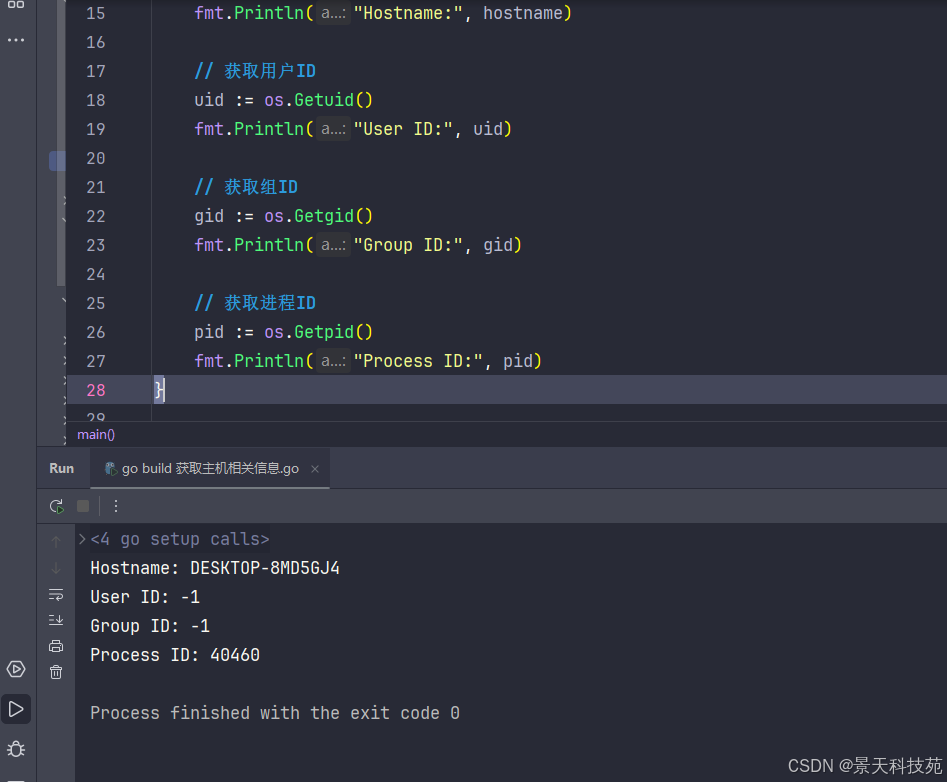
5. 获取系统信息
hostname:返回内核提供的主机名。
getuid:返回调用者的用户id。
getgid:返回调用者的组id。
getpid:返回调用者所在进程的进程id。
package main

import (
    "fmt"
    "os"
)

func main() {
    // 获取主机名
    hostname, err := os.hostname()
    if err != nil {
        fmt.println(err)
        return
    }
    fmt.println("hostname:", hostname)

    // 获取用户id
    uid := os.getuid()
    fmt.println("user id:", uid)

    // 获取组id
    gid := os.getgid()
    fmt.println("group id:", gid)

    // 获取进程id
    pid := os.getpid()
    fmt.println("process id:", pid)
}
6. 执行外部命令
os/exec包用于执行外部命令,它提供了更高级别的接口来创建和管理进程。
1. 执行简单命令
package main

import (
    "fmt"
    "os/exec"
)

func main() {

    //查看系统中是否安装有该命令
    cmd_path, err := exec.lookpath("ipconfig")
    if err != nil {
        fmt.println(err)
        return
    }
    fmt.println("系统中有该命令,命令路径为:", cmd_path)
    //command每个参数都不能包含空格。多个参数,用引号包裹,逗号隔开
    cmd := exec.command("ipconfig")
        // 如果不需要命令的输出,直接调用cmd.run()即可

    err2 := cmd.run()
    if err2 != nil {
        fmt.println("error:", err2)
    } else {
        fmt.println("command executed successfully")
    }
}
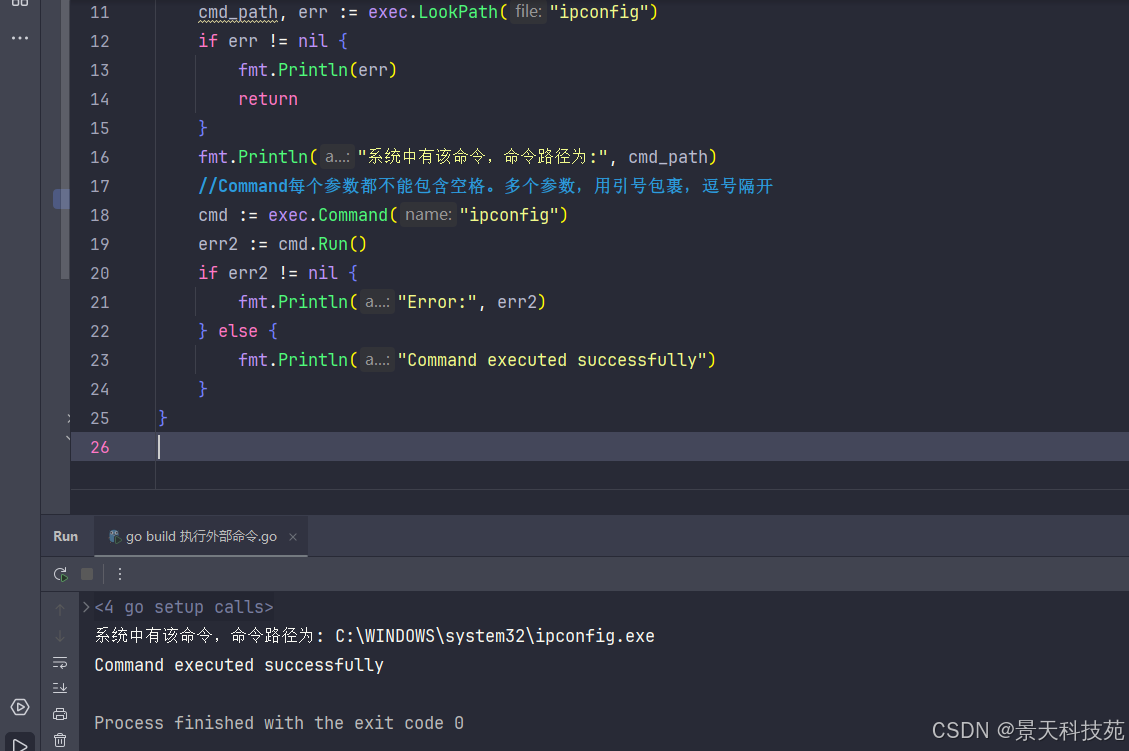
使用exec.command函数创建一个代表外部命令的cmd对象,然后使用run方法执行命令并等待其完成。
我们使用 exec.command() 创建了一个执行 ipconfig 命令的 *exec.cmd,然后使用 run() 方法启动了命令。
请注意,使用 exec.command() 创建的命令默认不会有任何输出。如果我们想获取命令的标准输出,我们可以使用 output() 或 combinedoutput() 方法。如果我们想获取命令的标准错误输出,我们需要单独设置 cmd.stderr 字段。
2. 获取命令输出
使用output方法运行命令并返回其标准输出的内容。
package main

import (
    "fmt"
    "os/exec"
)

func main() {
    //查看系统中是否安装有该命令
    cmd_path, err := exec.lookpath("ipconfig")
    if err != nil {
        fmt.println(err)
        return
    }
    fmt.println("系统中有该命令,命令路径为:", cmd_path)
    cmd := exec.command("ipconfig")
    output, err := cmd.output()
    if err != nil {
        fmt.println("error:", err)
    } else {
        fmt.println("command output:", string(output))
    }
}
3. 处理标准输出和标准错误
combinedoutput
func (c *cmd) combinedoutput() ([]byte, error)
说明:运行命令并返回组合到一起的标准输出和标准错误
package main

import (
    "fmt"
    "os/exec"
)

func main() {

    //查看系统中是否安装有该命令
    cmd_path, err := exec.lookpath("ping")
    if err != nil {
        fmt.println(err)
        return
    }
    fmt.println("系统中有该命令,命令路径为:", cmd_path)

    // 创建一个新的命令,例如运行dir命令
    cmd := exec.command("ping", "www.baidu.com")

    //获取标准输出
    out, err := cmd.combinedoutput()
    if err != nil {
        fmt.println(err)
        return
    }
    fmt.println("标准输出为:", string(out))

}

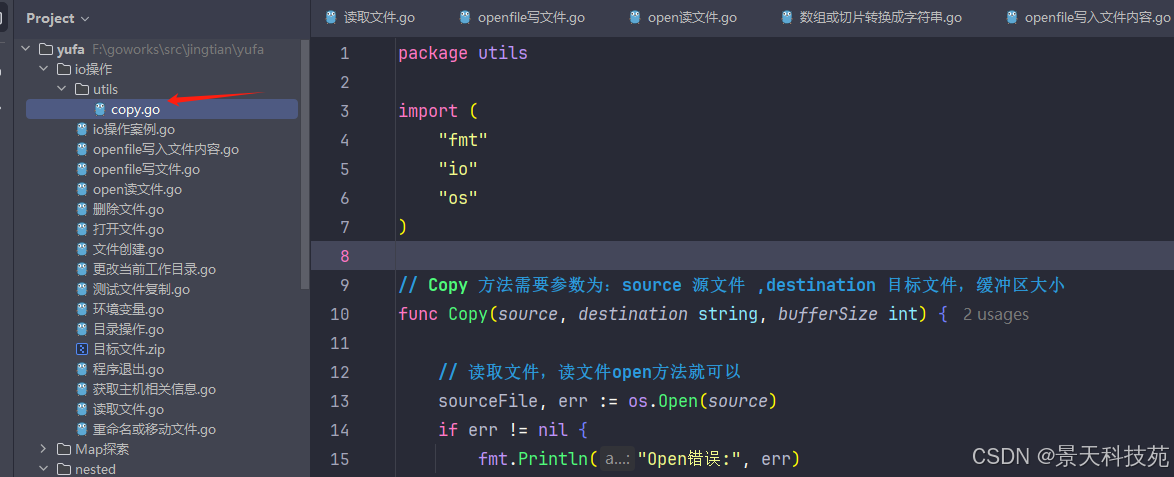
三、文件复制
文件复制需要考虑的问题:
1、拿到需求,分析需求,编辑函数 copy()
2、编写参数(源文件,目标地址,缓冲区大小)
3、读取源文件,保存到缓冲区中
4、读取缓冲区的内容,将内容写入到新文件中
5、确保源文件读取完毕了,使用到for()循环。循环结束标志 io.eof或者读取到的字节数为0
1. 自定义的文件复制实现
我们创建个目录utils。里面创建个copy.go
package utils

import (
    "fmt"
    "io"
    "os"
)

// copy 方法需要参数为:source 源文件 ,destination 目标文件,缓冲区大小
func copy(source, destination string, buffersize int) {

    // 读取文件,读文件open方法就可以
    sourcefile, err := os.open(source)
    if err != nil {
        fmt.println("open错误:", err)
    }

    // 输出文件 o_wronly , o_create 如果不不存在,则会创建
    destinationfile, err := os.openfile(destination, os.o_wronly|os.o_create, os.modeperm)
    if err != nil {
        fmt.println("openfile错误:", err)
    }
    // 关闭连接
    defer sourcefile.close()
    defer destinationfile.close()

    // 专注业务代码,拷贝
    // 创建缓冲区大小
    buf := make([]byte, buffersize)
    // 循环读取,写入
    for {
        //一次读取设置的缓冲区大小的数据
        n, err := sourcefile.read(buf)
        // 循环结束标志
        if n == 0 || err == io.eof {
            fmt.println("读取完毕源文件,复制完毕")
            break
        } else if err != nil {
            fmt.println("读取错误:", err)
            return // 错误之后,必须要return终止函数执行。
        }
        // 将缓冲区的东西写出到目标文件
        // 因为循环写入过程中没有关闭文件,所以可以持续写入
        //根据实际读取的长度写入,防止最后一次读取时,读取的少于缓冲区长度
        _, err = destinationfile.write(buf[:n])
        if err != nil {
            fmt.println("写出错误:", err)
        }
    }

}
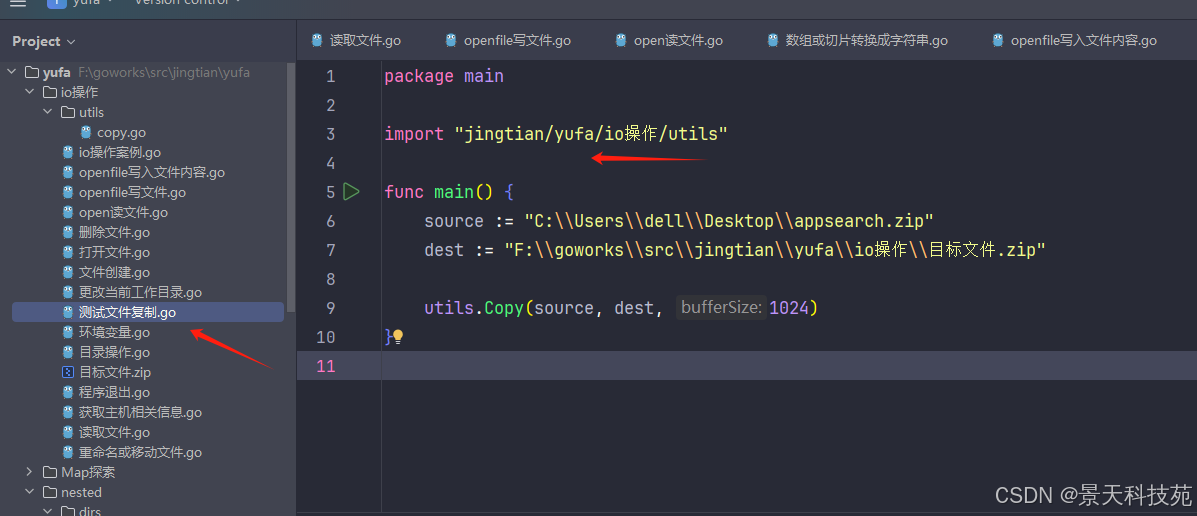
调用我们的copy方法,实现文件copy
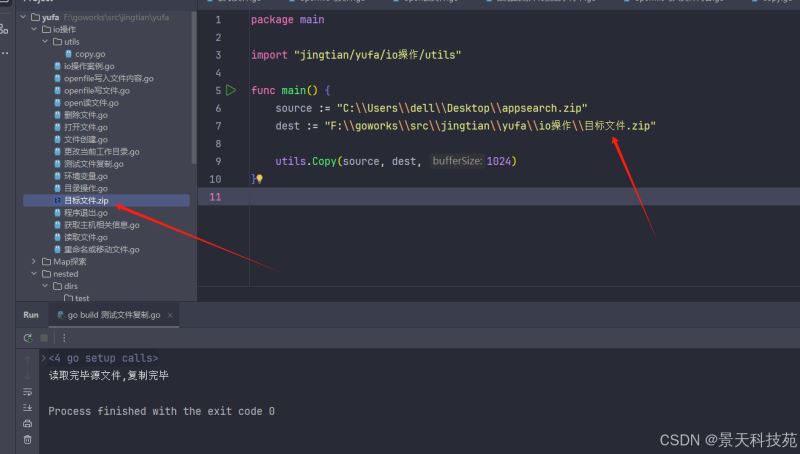
package main

import "jingtian/yufa/io操作/utils"

func main() {
    source := "c:\\users\\dell\\desktop\\appsearch.zip"
    dest := "f:\\goworks\\src\\jingtian\\yufa\\io操作\\目标文件.zip"

    utils.copy(source, dest, 1024)
}
运行,可以将源文件复制到目标地址
2. 使用系统自带的io.copy()方法复制
// copy2 使用系统自带的io.copy方法
func copy2(source, destination string) {
    // 读取文件
    sourcefile, err := os.open(source)
    if err != nil {
        fmt.println("open错误:", err)
    }
    // 输出文件 o_wronly , o_create 如果不不存在,则会创建
    destinationfile, err := os.openfile(destination, os.o_wronly|os.o_create, os.modeperm)
    if err != nil {
        fmt.println("openfile错误:", err)
    }
    // 关闭
    defer sourcefile.close()
    defer destinationfile.close()

    // 具体的实现
    // 不用我们自己写循环读取写入了,直接调用系统的io.copy()方法
    // func copy(dst writer, src reader) (written int64, err error) 返回写入的字节数和错误
    written, err := io.copy(destinationfile, sourcefile)
    if err != nil {
        fmt.println("复制时出现错误", err)
        return
    }
    fmt.println("文件的字节大小:", written)
}
3. 使用os.readfile和os.writefile来实现读取写入,从而实现复制
// copy3 使用os.readfile和os.writefile来实现读取写入,从而实现复制
func copy3(source, destination string) {
    // func readfile(name string) ([]byte, error)
    filebuffer, _ := os.readfile(source)
    //func writefile(name string, data []byte, perm filemode) error
    err := os.writefile(destination, filebuffer, 0644)
    if err != nil {
        fmt.println(err)
        return
    }
    fmt.println("文件复制完成")

}
4. io.copybuffer() 适合大文件复制
// copy4 io.copybuffer() 适合大文件
func copy4(source, destination string, buffersize int) {
    // 读取文件
    sourcefile, err := os.open(source)
    if err != nil {
        fmt.println("open错误:", err)
    }
    // 输出文件 o_wronly , o_create 如果不不存在,则会创建
    destinationfile, err := os.openfile(destination, os.o_wronly|os.o_create, os.modeperm)
    if err != nil {
        fmt.println("openfile错误:", err)
    }
    // 关闭
    defer sourcefile.close()
    defer destinationfile.close()

    // 具体的实现

    // 创建缓冲区大小
    buf := make([]byte, buffersize)
    // 不用我们自己写循环读取写入了,直接调用系统的io.copy()方法
    //io.copy这个适合小文件,大文件使用io.copybuffer
    // func copybuffer(dst writer, src reader, buf []byte) (written int64, err error)
    written, err := io.copybuffer(destinationfile, sourcefile, buf)
    if err != nil {
        fmt.println("复制时出现错误", err)
        return
    }
    fmt.println("文件的字节大小:", written)
}
以上就是关于go语言中的io操作详解的详细内容,更多关于go语言io操作的资料请关注代码网其它相关文章!


发表评论