一、初步理解
springsecurity的原理其实就是一个过滤器链,内部包含了提供各种功能的过滤器。
当前系统中springsecurity过滤器链中有哪些过滤器及它们的顺序。

核心过滤器:
- (认证)usernamepasswordauthenticationfilter:负责处理我们在登陆页面填写了用户名密码后的登陆请求
- exceptiontranslationfilter:处理过滤器链中抛出的任何accessdeniedexception和 authenticationexception
- (授权)filtersecurityinterceptor:负责权限校验的过滤器
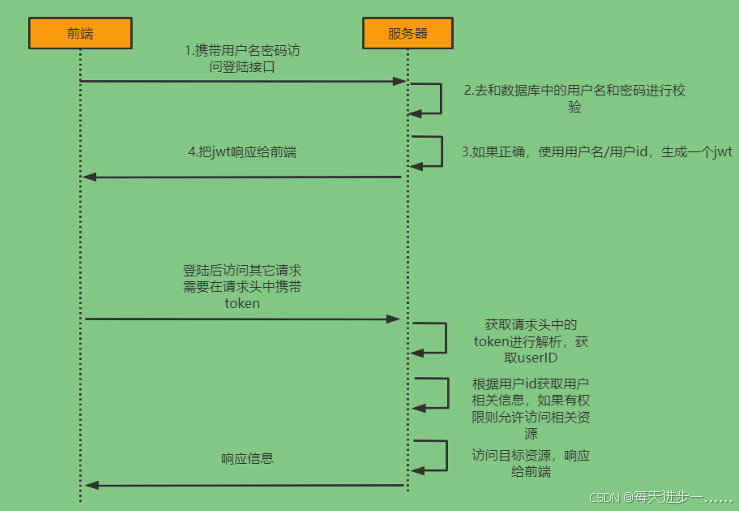
二、token(jwt)登录校验流程
三、具体认证授权细节
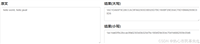
下图是usernamepasswordauthenticationfilter处理用户名、密码,然后将用户名、密码、权限信息封装到authentication对象中,再放到securitycontextholder中。
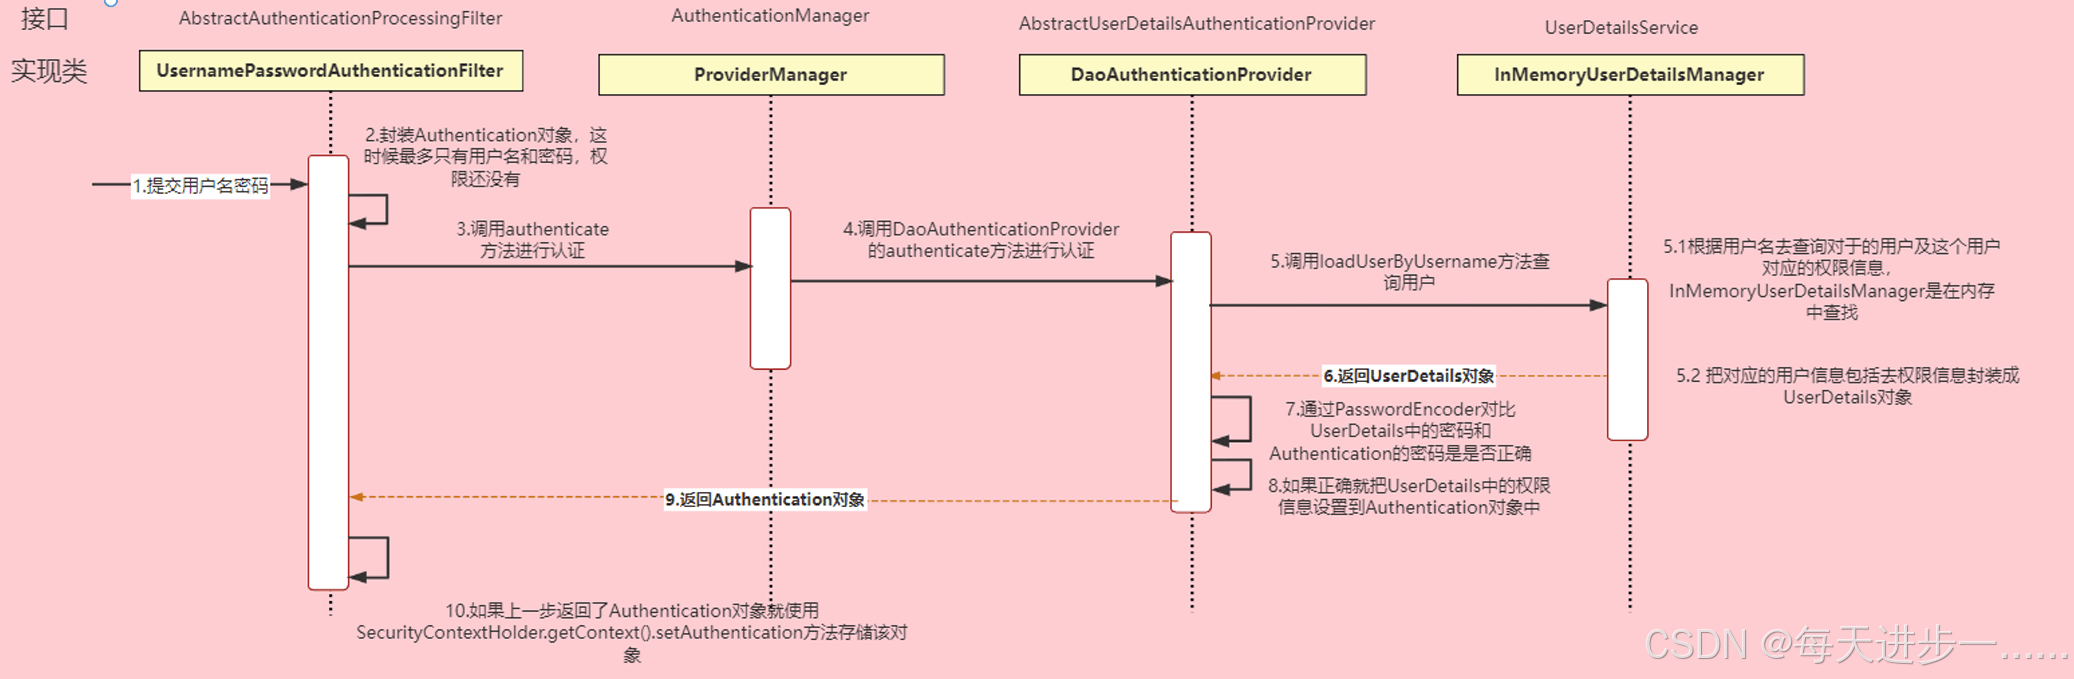
authentication接口: 它的实现类,表示当前访问系统的用户,封装了用户相关信息。
authenticationmanager接口:定义了认证authentication的方法
userdetailsservice接口:加载用户特定数据的核心接口。里面定义了一个根据用户名查询用户信息的 方法。
userdetails接口:提供核心用户信息。通过userdetailsservice根据用户名获取处理的用户信息要封装 成userdetails对象返回。然后将这些信息封装到authentication对象中。
认证
- 当用户登录时,前端将用户输入的用户名、密码信息传输到后台,后台用一个类对象将其封装起来,通常使用的是usernamepasswordauthenticationtoken这个类。
- 程序负责验证这个类对象。验证方法是调用service根据username从数据库中取用户信息到实体类的实例中,比较两者的密码,如果密码正确就成功登陆,同时把包含着用户的用户名、密码、所具有的权限等信息(用户id、昵称、是否管理员)的类对象放到securitycontextholder(安全上下文容器,类似session)中去。
- 用户访问一个资源的时候,首先判断是否是受限资源。如果是的话还要判断当前是否未登录,没有的话就跳到登录页面。
- 如果用户已经登录,访问一个受限资源的时候,程序要根据url去数据库中取出该资源所对应的所有可以访问的角色,然后拿着当前用户的所有角色一一对比,判断用户是否可以访问(这里就是和权限相关)。
授权
- 在springsecurity中,会使用默认的filtersecurityinterceptor来进行权限校验。在filtersecurityinterceptor中会从securitycontextholder获取其中的authentication,然后获取其中的权限信息。当前用户是否拥有访问当前资源所需的权限。
- 所以我们在项目中只需要把当前登录用户的权限信息也存入authentication。然后设置我们的资源所需要的权限即可。
自定义登录认证接口:①调用providermanager的方法进行认证;②如果认证通过生成jwt;③把用户信息存入redis中
自定义权限信息查询:在userdetailsservice这个实现类中去查询数据库
四、自定义权限查询
修改usernamepasswordauthenticationfilter上图最右边的授权部分。
1.自定义登陆接口
@restcontroller
@requestmapping("/user")
public class usercontroller {
    @autowired
    private userservice userservice;
    @postmapping("/login")
    public r login(@requestbody user user) {
        string jwt = userservice.login(user);
        if (stringutils.haslength(jwt)) {
            return r.ok().message("登陆成功").data("token", jwt);
        }
        return r.error().message("登陆失败");
    }
}
2.配置数据库校验登录用户
从之前的分析我们可以知道,我们可以自定义一个userdetailsservice,让springsecurity使用我们的 userdetailsservice。我们自己的userdetailsservice可以从数据库中查询用户名和密码。
创建一个类实现userdetailsservice接口,重写loaduserbyusername方法
@service
public class userdetailsserviceimpl implements userdetailsservice {
     @autowired
     private usermapper usermapper;
     @override
     public userdetails loaduserbyusername(string username) throws usernamenotfoundexception {
         //查询用户信息
         querywrapper<user> querywrapper=new querywrapper<>();
         querywrapper.eq("user_name",username);
         user user = usermapper.selectone(querywrapper);
         //如果没有查询到用户,就抛出异常
         if(objects.isnull(user)){
             throw  new runtimeexception("用户名或密码错误");
         }
         //todo 查询用户对应的权限信息
         细节见springsecurity(二)——授权实现
         //如果有,把数据封装成userdetails对象返回
         return new loginuser(user);
    }
}
五、jwt认证过滤器(自定义过滤器)
(1)在接口中我们通过authenticationmanager的authenticate方法来进行用户认证,所以需要在 securityconfig中配置把authenticationmanager注入容器。
@enablewebsecurity
@configuration
@enableglobalmethodsecurity(prepostenabled = true)
public class securityconfig{
    /**
     * 登录时需要调用authenticationmanager.authenticate执行一次校验
     */
    @bean
    public authenticationmanager authenticationmanager(authenticationconfiguration config) throws exception {
        return config.getauthenticationmanager();
    }
}
(2)登录的业务逻辑层实现类
第一次登录,生成jwt存入redis
@service
public class userserviceimpl extends serviceimpl<usermapper, user> implements userservice {
    @autowired
    private authenticationmanager authenticationmanager;
    @autowired
    private stringredistemplate stringredistemplate;
    @override
    public string login(user user) {
        //1.封装authentication对象 ,密码校验,自动完成
        usernamepasswordauthenticationtoken authentication =
                new usernamepasswordauthenticationtoken(user.getusername(), user.getpassword());
        //2.进行校验
        authentication authenticate = authenticationmanager.authenticate(authentication);
        //3.如果authenticate为空
        if (objects.isnull(authenticate)) {
            throw new runtimeexception("登录失败"); //todo 登录失败
        }
        //4.得到用户信息
        loginuser loginuser = (loginuser) authenticate.getprincipal();
        //生成jwt,使用fastjson的方法,把对象转成字符串
        string loginuserstring = json.tojsonstring(loginuser);
        //调用jwt工具类,生成jwt令牌
        string jwt = jwtutils.createjwt(loginuserstring, null);
        //5.把生成的jwt存到redis
        string tokenkey = "token_" + jwt;
        stringredistemplate.opsforvalue().set(tokenkey, jwt, jwtutils.jwt_ttl / 1000);
        map<string, object> map = new hashmap<>();
        map.put("token", jwt);
        map.put("username", loginuser.getusername());
        return jwt;
    }
}
(3)jwt认证校验过滤器
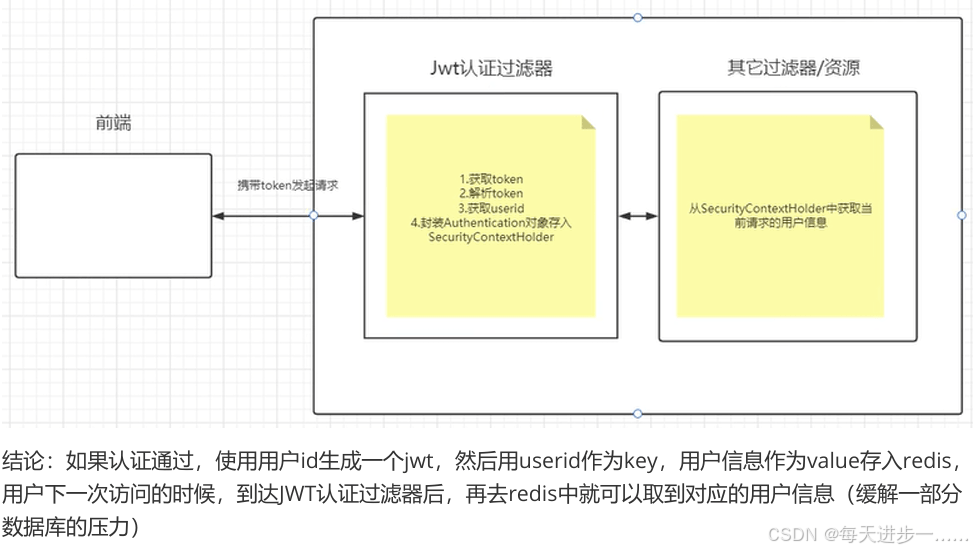
我们需要自定义一个过滤器,这个过滤器会去获取请求头中的token,对token进行解析取出其中的 userid。 使用userid去redis中获取对应的loginuser对象。
然后封装authentication对象存入securitycontextholder
/**
 * token验证过滤器   //每一个servlet请求,只会执行一次
 */
@component
public class jwtauthenticationtokenfilter extends onceperrequestfilter {
    @autowired
    private loginfailurehandler loginfailurehandler;
    @autowired
    private stringredistemplate stringredistemplate;
    @override
    protected void dofilterinternal(httpservletrequest request, httpservletresponse response,
                                    filterchain filterchain)
            throws servletexception, ioexception {
        try {
            //1.获取当前请求的url地址
            string url = request.getrequesturi();
            //如果当前请求不是登录请求,则需要进行token验证
            if (!url.equals("/user/login")) {
                //2.验证token
                this.validatetoken(request);
            }
        } catch (authenticationexception e) {
            system.out.println(e);
            loginfailurehandler.onauthenticationfailure(request, response, e);
        }
        //3.登录请求不需要验证token
        dofilter(request, response, filterchain);
    }
    /**
     * 验证token
     */
    private void validatetoken(httpservletrequest request) throws authenticationexception {
        //1.获取token
        string token = request.getheader("authorization");
        //如果请求头部没有获取到token,则从请求的参数中进行获取
        if (objectutils.isempty(token)) {
            token = request.getparameter("authorization");
        }
        if (objectutils.isempty(token)) {
            throw new customerauthenticationexception("token不存在");
        }
        //2.redis进行校验
        string redisstr = stringredistemplate.opsforvalue().get("token_" + token);
        if(objectutils.isempty(redisstr)) {
            throw new customerauthenticationexception("token已过期");
        }
        //3.解析token
        claims claims = null;
        try {
            claims = jwtutils.parsejwt(token);
        } catch (exception e) {
            throw new customerauthenticationexception("token解析失败");
        }
        //4.获取到用户信息
        string loginuserstring = claims.getsubject();
        //把字符串转成loginuser对象
        loginuser loginuser = json.parseobject(loginuserstring, loginuser.class);
        //创建身份验证对象
        usernamepasswordauthenticationtoken authenticationtoken =
                new usernamepasswordauthenticationtoken(loginuser, null, loginuser.getauthorities());
        //5.设置到spring security上下文
        securitycontextholder.getcontext().setauthentication(authenticationtoken);
    }
}
(4)把jwt过滤器注册到springsecurity过滤器链中
放在usernamepasswordauthenticationfilter前面
@enablewebsecurity
@configuration
@enableglobalmethodsecurity(prepostenabled = true)
public class securityconfig{
    //自定义jwt校验过滤器
    @autowired
    private jwtauthenticationtokenfilter jwtauthenticationtokenfilter;
    @bean
    public securityfilterchain filterchain(httpsecurity http) throws exception {
        //配置关闭csrf机制
        http.csrf(csrf -> csrf.disable());
        //登陆失败处理器
        http.formlogin(configurer -> {
            configurer.failurehandler(loginfailurehandler);
        });
        http.sessionmanagement(configurer ->
                // stateless(无状态): 表示应用程序是无状态的,不会创建会话。
                configurer.sessioncreationpolicy(sessioncreationpolicy.stateless)
        );
        //请求拦截方式
        http.authorizehttprequests(auth -> auth
                .requestmatchers("/user/login").permitall()
                .anyrequest().authenticated()
        );
        //!!!!!注册jwt过滤器!!!!!!!
        http.addfilterbefore(jwtauthenticationtokenfilter,
                             usernamepasswordauthenticationfilter.class);
        //异常处理器
        http.exceptionhandling(configurer -> {
            configurer.accessdeniedhandler(customeraccessdeniedhandler);
            configurer.authenticationentrypoint(anonymousauthenticationhandler);
        });
        return http.build();   //允许跨域
    }
    /**
     * 登录时需要调用authenticationmanager.authenticate执行一次校验
     */
    @bean
    public authenticationmanager authenticationmanager(authenticationconfiguration config) throws exception {
        return config.getauthenticationmanager();
    }
}
到此这篇关于springsecurity 认证实现的文章就介绍到这了,更多相关springsecurity 认证内容请搜索代码网以前的文章或继续浏览下面的相关文章希望大家以后多多支持代码网!


发表评论