一、容器介绍
1、容器是什么?
轻量级虚拟化技术
应用场景:
1、快速构建业务环境
2、便于业务迁移,避免兼容性问题
2、与传统虚拟化区别
- 创建速度快, 秒级
- 无虚拟硬件
- 共享物理机内核、io速度快
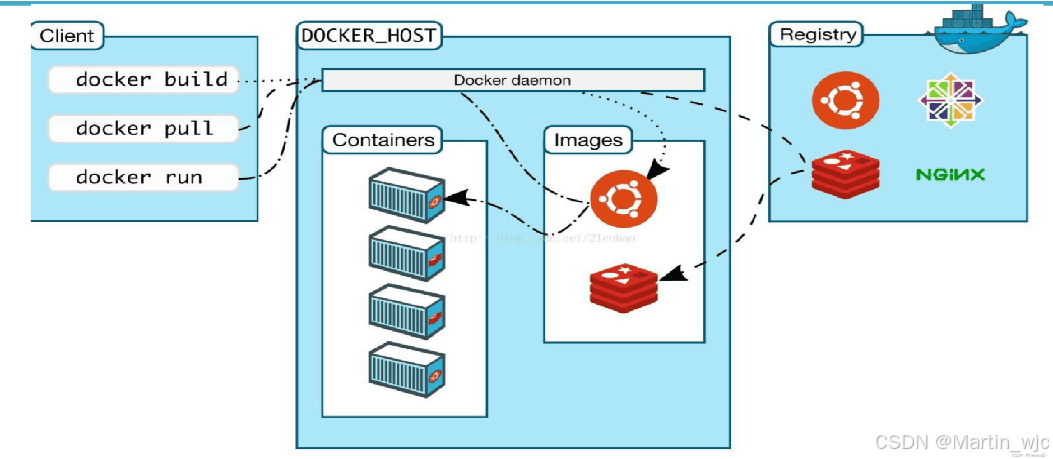
3、容器的三要素
容器、镜像、仓库
4、容器核心技术
namespace技术 命名空间
实现资源(文件目录、用户、端口、进程)隔离cgroup技术
实现容器的资源限制(cpu、内存)
5、容器管理工具/软件
- docker
docker-ce、docker-ee - podman
- containerd
二、安装docker
1、配置docker软件仓库
[root@martin-host ~]# wget -o /etc/yum.repos.d/centos-base.repo https://mirrors.aliyun.com/repo/centos-7.repo

[root@martin-host ~]# cat /etc/yum.repos.d/docker-ce.repo
[docker-ce]
name=docker-ce
baseurl=https://mirrors.aliyun.com/docker-ce/linux/centos/7.9/x86_64/stable/
enabled=1
gpgcheck=0
2、安装docker, 启动docker服务
[root@martin-host ~]# yum install -y docker-ce

[root@martin-host ~]# rpm -q docker-ce
docker-ce-26.1.4-1.el7.x86_64

[root@martin-host ~]# systemctl enable --now docker
created symlink from /etc/systemd/system/multi-user.target.wants/docker.service to /usr/lib/systemd/system/docker.service.
[root@martin-host ~]#
3、配置国内docker镜像仓库
[root@martin-host ~]# cat /etc/docker/daemon.json
{
  "registry-mirrors": ["https://rywdmoco.mirror.aliyuncs.com"]
}
[root@martin-host ~]#
[root@martin-host ~]# systemctl restart docker
4、主机网络变化
// docker0虚拟网卡,默认作为所有容器的网关使用
[root@martin-host ~]# ip addr show docker0
3: docker0: <no-carrier,broadcast,multicast,up> mtu 1500 qdisc noqueue state down group default
    link/ether 02:42:81:00:b2:4b brd ff:ff:ff:ff:ff:ff
    inet 172.17.0.1/16 brd 172.17.255.255 scope global docker0
       valid_lft forever preferred_lft forever

// 路由转发
[root@martin-host ~]# cat /proc/sys/net/ipv4/ip_forward
1

// docker网段的snat规则
[root@martin-host ~]# iptables -t nat -nl
chain prerouting (policy accept)
target     prot opt source               destination
docker     all  --  0.0.0.0/0            0.0.0.0/0            addrtype match dst-type local

chain input (policy accept)
target     prot opt source               destination

chain output (policy accept)
target     prot opt source               destination
docker     all  --  0.0.0.0/0           !127.0.0.0/8          addrtype match dst-type local

chain postrouting (policy accept)
target     prot opt source               destination
masquerade  all  --  172.17.0.0/16        0.0.0.0/0

chain docker (2 references)
target     prot opt source               destination
return     all  --  0.0.0.0/0            0.0.0.0/0
三、镜像基础操作
1、查看镜像
[root@martin-host ~]# docker image ls
repository   tag       image id       created       size
httpd        latest    dabbfbe0c57b   2 years ago   144mb
nginx        1.18      c2c45d506085   3 years ago   133mb
2、搜索镜像
[root@martin-host ~]# docker search 关键字
3、下载镜像
[root@martin-host ~]# docker pull 镜像名称:标记
4、导入镜像
[root@martin-host ~]# docker load -i centos7.tar
174f56854903: loading layer [==================================================>]  211.7mb/211.7mb
loaded image: centos:7
5、导出镜像
[root@martin-host ~]# docker save -o tomcat.tar tomcat:latest
总结
到此这篇关于docker容器环境安装及镜像基础操作的文章就介绍到这了,更多相关docker容器环境安装内容请搜索代码网以前的文章或继续浏览下面的相关文章希望大家以后多多支持代码网!


发表评论