前言导读
三层架构:view(视图层)service(业务层)dao(持久层)
- 使用了jdbctemplate技术,封装了原生的jdbc技术操作mysql数据库(dao层)
- 实现了登录功能和注册功能(service层)
- 使用servlet操作前端表单提供的数据,进行登录和注册,以及完成页面跳转的需求实现(view层)
第一步:创建javaweb项目,在pom.xml中配置相关依赖
pom.xml
不要把我的项目名也一起复制了,只复制依赖<dependency>和插件部分<build>
<project xmlns="http://maven.apache.org/pom/4.0.0" xmlns:xsi="http://www.w3.org/2001/xmlschema-instance"
  xsi:schemalocation="http://maven.apache.org/pom/4.0.0 http://maven.apache.org/maven-v4_0_0.xsd">
  <modelversion>4.0.0</modelversion>
  <groupid>org.example</groupid>
  <artifactid>maven_9_11</artifactid>
  <packaging>war</packaging>
  <version>1.0-snapshot</version>
  <name>maven_9_11 maven webapp</name>
  <url>http://maven.apache.org</url>
  <dependencies>
    <!-- junit单元测试-->
    <dependency>
      <groupid>junit</groupid>
      <artifactid>junit</artifactid>
      <version>4.12</version>
      <scope>test</scope>
    </dependency>
    <!--mysql数据库连接驱动jar包-->
    <dependency>
      <groupid>mysql</groupid>
      <artifactid>mysql-connector-java</artifactid>
      <version>8.0.28</version>
    </dependency>
    <!-- servlet依赖支持-->
    <dependency>
      <groupid>javax.servlet</groupid>
      <artifactid>javax.servlet-api</artifactid>
      <version>3.1.0</version>
      <scope>provided</scope>
    </dependency>
    <!--jdbctemplate依赖支持,因为jdbctemplate是spring框架封装的一个工具类,因此需要导入spring相关依赖-->
    <dependency>
      <groupid>org.springframework</groupid>
      <artifactid>spring-jdbc</artifactid>
      <version>5.3.4</version>
    </dependency>
    <dependency>
      <groupid>org.springframework</groupid>
      <artifactid>spring-orm</artifactid>
      <version>5.3.4</version>
    </dependency>
    <dependency>
      <groupid>org.springframework</groupid>
      <artifactid>spring-context</artifactid>
      <version>5.2.8.release</version>
    </dependency>

  </dependencies>
  <build>
    <!--配置项目名 -->
    <finalname>web</finalname>
    <plugins>
    <!--配置jetty服务器插件支持-->
    <plugin>
      <groupid>org.eclipse.jetty</groupid>
      <artifactid>jetty-maven-plugin</artifactid>
      <version>9.3.14.v20161028</version>
    </plugin>
      <!--配置tomcat服务器插件支持-->
    <plugin>
      <groupid>org.apache.tomcat.maven</groupid>
      <artifactid>tomcat7-maven-plugin</artifactid>
      <version>2.1</version>
      <configuration>
        <port>8080</port>
        <path>/</path>
        <uriencoding>utf-8</uriencoding>
        <server>tomcat7</server>
      </configuration>
    </plugin>
    </plugins>
  </build>
</project>
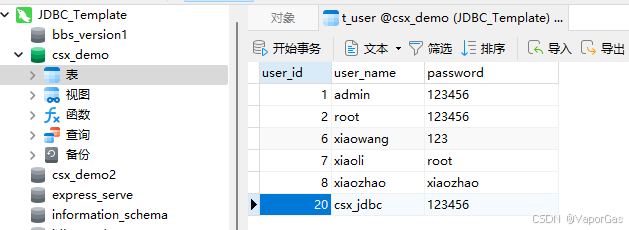
第二步:创建数据库表和实体类并导入jdbctemplate工具类
数据库表t_user:
这里不介绍如何创建这样的一个数据库了(保证user_id为主键即可)
user实体类:
package com.csx.entity;

import java.io.serializable;

public class user implements serializable {
    private integer userid;
    private string username;
    private string password;

    public user(){}

    public user(integer userid, string username, string password) {
        this.userid = userid;
        this.username = username;
        this.password = password;
    }

    @override
    public string tostring() {
        return "user{" +
                "userid=" + userid +
                ", username='" + username + '\'' +
                ", password='" + password + '\'' +
                '}';
    }

    public integer getuserid() {
        return userid;
    }

    public void setuserid(integer userid) {
        this.userid = userid;
    }

    public string getusername() {
        return username;
    }

    public void setusername(string username) {
        this.username = username;
    }

    public string getpassword() {
        return password;
    }

    public void setpassword(string password) {
        this.password = password;
    }
}
工具类:
package com.csx.util;

import org.springframework.jdbc.core.jdbctemplate;
import org.springframework.jdbc.datasource.datasourceutils;
import org.springframework.jdbc.datasource.drivermanagerdatasource;
import org.springframework.transaction.support.transactionsynchronizationmanager;

import javax.sql.datasource;
import java.io.inputstream;
import java.sql.connection;
import java.sql.sqlexception;
import java.util.properties;

public class jdbcutils {
    private static datasource datasource =null;

    static{
        try (
                inputstream is=jdbcutils.class.getresourceasstream("/jdbcutils.properties")
        ){
            properties p = new properties();
            p.load(is);
            datasource = new drivermanagerdatasource(p.getproperty("url"), p.getproperty("username"), p.getproperty("password"));
        } catch (exception e) {
            throw new runtimeexception(e);
        }
    }
    public static jdbctemplate getjdbctemplate(){
        //创建jdbctemplate对象并传入数据库连接池
        jdbctemplate template = new jdbctemplate(datasource);
        return template;
    }

    /**
     * 获取数据库连接池
     * @return
     */
    public static datasource getdatasource(){
        return datasource;
    }

    /**
     * 开始线程绑定 +获取连接
     * @return
     */
    public static connection starttransaction(){
        if (!transactionsynchronizationmanager.issynchronizationactive()){
            transactionsynchronizationmanager.initsynchronization();
        }
        connection connection =datasourceutils.getconnection(datasource);
        try {
            connection.setautocommit(false);
        } catch (sqlexception e) {
            throw new runtimeexception(e);
        }
        return connection;
    }

    /**
     * 提交事务
     * @param conn
     */
    public static void commit(connection conn){
        try {
            conn.commit();
        } catch (sqlexception e) {
            throw new runtimeexception(e);
        }finally {
            clear(conn);
        }
    }

    /**
     * 回滚事务
     * @param conn
     */
    public static void rollback(connection conn){
        try {
            conn.rollback();
        } catch (sqlexception e) {
            throw new runtimeexception(e);
        }finally {
            clear(conn);
        }
    }

    /**
     * 解除线程绑定+释放资源+归还连接到线程池
     * @param conn
     */
    public static void clear(connection conn){
        //清除线程绑定的资源
        transactionsynchronizationmanager.clear();
        transactionsynchronizationmanager.unbindresourceifpossible(datasource);
        //归还数据库连接至连接池
        if (conn!=null){//非空判断,判断为空再归还
            datasourceutils.releaseconnection(conn,datasource);
        }
    }
}
在resources资源目录下创建jdbcutils.properties目录
jdbcutils.properties
url=jdbc:mysql://localhost:3306/csx_demo?useunicode=true&characterencoding=utf-8&usessl=false&servertimezone=asia/shanghai
username=root
password=root
第三步:创建dao层,书写sql支持
userdao接口:
package com.csx.dao;

import com.csx.entity.user;

public interface userdao {
    /**
     * 根据用户名和密码指定用户是否存在
     * @param username
     * @return
     */
    public user selectuserbyusername(string username,string password);

    /**
     * 新增用户信息
     * @param user
     * @return
     */
    public int insertuser(user user);
}
userdaoimpl实现类:
package com.csx.dao.impl;

import com.csx.dao.userdao;
import com.csx.entity.user;
import com.csx.service.userservice;
import com.csx.util.jdbcutils;
import org.springframework.jdbc.core.beanpropertyrowmapper;
import org.springframework.jdbc.core.jdbctemplate;

import java.util.list;

public class userdaoimpl implements userdao {
    private jdbctemplate template = jdbcutils.getjdbctemplate();

    /**
     * 根据用户名和密码指定用户是否存在
     *
     * @param username
     * @param password
     * @return
     */
    @override
    public user selectuserbyusername(string username, string password) {
        string sql="select * from t_user where user_name=? and password=? ";
        list<user> list = template.query(sql, new beanpropertyrowmapper<>(user.class), username, password);
        return list.isempty()?null:list.get(0);
    }

    /**
     * 新增用户信息
     *
     * @param user
     * @return
     */
    @override
    public int insertuser(user user) {
        string sql="insert into t_user(user_name,password) values(?,?)";
        return template.update(sql, user.getusername(), user.getpassword());
    }
}
第四步:创建service层,书写登录和注册逻辑
userservice接口:
package com.csx.service;

public interface userservice {
    /**
     * 用户登录功能
     * @param username
     * @param password
     * @return
     */
    public boolean login(string username,string password);

    /**
     * 用户注册功能
     * @return
     */
    public boolean register(string username,string password);
}
userserviceimpl实现类:
package com.csx.service.impl;

import com.csx.dao.userdao;
import com.csx.dao.impl.userdaoimpl;
import com.csx.entity.user;
import com.csx.service.userservice;
import com.csx.util.jdbcutils;

import java.sql.connection;

public class userserviceimpl implements userservice {
    private userdao userdao =new userdaoimpl();

    /**
     * 用户登录功能
     *
     * @param username
     * @param password
     * @return
     */
    @override
    public boolean login(string username, string password) {
        boolean boo =false;
        connection conn =null;
        try{
            conn= jdbcutils.starttransaction();
            //业务功能
            user user = userdao.selectuserbyusername(username,password);
            //判断用户名是否存在
            if (user!=null){
                //判断密码是否正确
                if (user.getpassword().equals(password)){
                    boo=true;
                }else {
                    throw new runtimeexception("密码错误!");
                }
            }else {
                throw new runtimeexception("用户不存在!");
            }
            jdbcutils.commit(conn);
        }catch (exception e){
            jdbcutils.rollback(conn);
            throw new runtimeexception(e);
        }
        return boo;

    }

    /**
     * 用户注册功能
     *
     * @param username
     * @param password
     * @return
     */
    @override
    public boolean register(string username, string password) {
        boolean boo=false;
        connection conn=null;
        try {
            conn = jdbcutils.starttransaction();
            //业务功能
            user u = userdao.selectuserbyusername(username,password);
            if (u == null) {
                user user = new user(null, username, password);
                userdao.insertuser(user);
                boo = true;
            } else {
                throw new runtimeexception("用户名重复,注册失败!");
            }
            jdbcutils.commit(conn);
        }catch (exception e){
            jdbcutils.rollback(conn);
            throw  new runtimeexception(e);
        }
        return boo;
    }
}
第五步:书写servlet接收页面传入的数据,并响应
loginservlet:
package com.csx.servlet;

import com.csx.service.userservice;
import com.csx.service.impl.userserviceimpl;

import javax.servlet.servletexception;
import javax.servlet.annotation.webservlet;
import javax.servlet.http.httpservlet;
import javax.servlet.http.httpservletrequest;
import javax.servlet.http.httpservletresponse;
import java.io.ioexception;
import java.io.printwriter;

@webservlet("/login")
public class loginservlet extends httpservlet {
    private userservice userservice =new userserviceimpl();

    @override
    protected void doget(httpservletrequest req, httpservletresponse resp) throws servletexception, ioexception {
        dopost(req,resp);
    }

    @override
    protected void dopost(httpservletrequest request, httpservletresponse response) throws servletexception, ioexception {

        string name = request.getparameter("username");
        string pwd =request.getparameter("password");
        try {
            boolean login = userservice.login(name, pwd);
            if (login){
                system.out.println("登录成功!");
                response.sendredirect("login_success.html");
            }else {

                }
        } catch (exception e) {
            system.out.println("登录失败");
            response.sendredirect("login_failed.html");
        }

    }
}
registerservlet:
package com.csx.servlet;

import com.csx.service.userservice;
import com.csx.service.impl.userserviceimpl;

import javax.servlet.servletexception;
import javax.servlet.annotation.webservlet;
import javax.servlet.http.httpservlet;
import javax.servlet.http.httpservletrequest;
import javax.servlet.http.httpservletresponse;
import java.io.ioexception;

@webservlet("/register")
public class registerservlet extends httpservlet {
    private userservice userservice =new userserviceimpl();
    @override
    protected void dopost(httpservletrequest request, httpservletresponse response) throws servletexception, ioexception {
        string name = request.getparameter("username");
        string pwd =request.getparameter("password");
        try {
            boolean login = userservice.register(name, pwd);
            if (login){
                system.out.println("注册成功!");
//                response.sendredirect("register_success.html");
                response.sendredirect("register_success.html");
            }
        } catch (exception e) {
            system.out.println("注册失败!");
            response.sendredirect("register_failed.html");
        }
    }

    @override
    protected void doget(httpservletrequest req, httpservletresponse resp) throws servletexception, ioexception {
        dopost(req,resp);
    }
}
web.xml配置
创建一个javaweb项目,想要使用注解@webservlet来配置servlet路径映射,需要将webapp目录下的wbe-inf目录下的web.xml中配置3.0 以上的配置头,例如:
<?xml version="1.0" encoding="utf-8"?>
<web-app xmlns="http://xmlns.jcp.org/xml/ns/javaee"
         xmlns:xsi="http://www.w3.org/2001/xmlschema-instance"
         xsi:schemalocation="http://xmlns.jcp.org/xml/ns/javaee
         http://xmlns.jcp.org/xml/ns/javaee/web-app_3_1.xsd"
         version="3.1">

</web-app>
第六步:在webapp目录下创建html页面
login.html:
<!doctype html>
<html lang="zh">
<head>
    <meta charset="utf-8">
    <meta name="viewport" content="width=device-width, initial-scale=1.0">
    <title>login form</title>
    <style>
        /* 简单的样式来美化表单 */
        body {
            font-family: arial, sans-serif;
            display: flex;
            justify-content: center;
            align-items: center;
            height: 100vh;
            background-color: #f0f0f0;
        }
        .login-form {
            padding: 20px;
            background: white;
            border-radius: 8px;
            box-shadow: 0 0 10px rgba(0,0,0,0.1);
        }
        .login-form h2 {
            margin-bottom: 20px;
        }
        .login-form input[type="text"],
        .login-form input[type="password"] {
            width: calc(100% - 22px);
            padding: 10px;
            margin-bottom: 10px;
            border: 1px solid #ccc;
            border-radius: 4px;
        }
        .login-form input[type="submit"] {
            background-color: #ff0000;
            color: white;
            padding: 10px 20px;
            border: none;
            border-radius: 4px;
            cursor: pointer;
        }
        .login-form input[type="submit"]:hover {
            background-color: #0056b3;
        }
    </style>
</head>
<body>

<div class="login-form">
    <h2>login</h2>
    <form action="/login" method="post">
        <label for="username">username:</label>
        <input type="text" id="username" name="username" required>

        <label for="password">password:</label>
        <input type="password" id="password" name="password" required>

        <input type="submit" value="login">
    </form>
</div>
</body>
</html>
login_success.html:
<!doctype html>
<html lang="en">
<head>
    <meta charset="utf-8">
    <title>title</title>
</head>
<body>
<h1>登录成功!</h1>
</body>
<script>alert('登录成功!')</script>
</html>
login_failed:
<!doctype html>
<html lang="en">
<head>
    <meta charset="utf-8">
    <title>title</title>
</head>
<body>
<h1>登录失败</h1>
</body>
<script>
    alert('登录失败')
</script>
</html>
register.html:
<!doctype html>
<html lang="en">
<head>
    <meta charset="utf-8">
    <meta name="viewport" content="width=device-width, initial-scale=1.0">
    <title>registration form</title>
    <style>
        /* 简单的样式来美化表单 */
        body {
            font-family: arial, sans-serif;
            display: flex;
            justify-content: center;
            align-items: center;
            height: 100vh;
            background-color: #f0f0f0;
        }
        .registration-form {
            padding: 20px;
            background: white;
            border-radius: 8px;
            box-shadow: 0 0 10px rgba(0,0,0,0.1);
        }
        .registration-form h2 {
            margin-bottom: 20px;
        }
        .registration-form input[type="text"],
        .registration-form input[type="password"] {
            width: calc(100% - 22px);
            padding: 10px;
            margin-bottom: 10px;
            border: 1px solid #ccc;
            border-radius: 4px;
        }
        .registration-form input[type="submit"] {
            background-color: #28a745;
            color: white;
            padding: 10px 20px;
            border: none;
            border-radius: 4px;
            cursor: pointer;
        }
        .registration-form input[type="submit"]:hover {
            background-color: #218838;
        }
    </style>
</head>
<body>

<div class="registration-form">
    <h2>registration</h2>
    <form action="/register" method="post">
        <label for="username">username:</label>
        <input type="text" id="username" name="username" required>

        <label for="password">password:</label>
        <input type="password" id="password" name="password" required>

        <input type="submit" value="register">
    </form>
</div>

</body>
</html>
register_success:
<!doctype html>
<html lang="zh">
<head>
    <meta charset="utf-8">
    <meta name="viewport" content="width=device-width, initial-scale=1.0">
    <title>login form</title>
    <style>
        /* 简单的样式来美化表单 */
        body {
            font-family: arial, sans-serif;
            display: flex;
            justify-content: center;
            align-items: center;
            height: 100vh;
            background-color: #f0f0f0;
        }
        .login-form {
            padding: 20px;
            background: white;
            border-radius: 8px;
            box-shadow: 0 0 10px rgba(0,0,0,0.1);
        }
        .login-form h2 {
            margin-bottom: 20px;
        }
        .login-form input[type="text"],
        .login-form input[type="password"] {
            width: calc(100% - 22px);
            padding: 10px;
            margin-bottom: 10px;
            border: 1px solid #ccc;
            border-radius: 4px;
        }
        .login-form input[type="submit"] {
            background-color: #ff0000;
            color: white;
            padding: 10px 20px;
            border: none;
            border-radius: 4px;
            cursor: pointer;
        }
        .login-form input[type="submit"]:hover {
            background-color: #0056b3;
        }
    </style>
</head>
<body>

<div class="login-form">
    <h2>login</h2>
    <form action="/login" method="post">
        <label for="username">username:</label>
        <input type="text" id="username" name="username" required>

        <label for="password">password:</label>
        <input type="password" id="password" name="password" required>

        <input type="submit" value="login">
    </form>
</div>
</body>
<script>
    alert(' 注册成功,请登录!');

   </script>
</html>
register_failed:
<!doctype html>
<html lang="en">
<head>
    <meta charset="utf-8">
    <meta name="viewport" content="width=device-width, initial-scale=1.0">
    <title>registration form</title>
    <style>
        /* 简单的样式来美化表单 */
        body {
            font-family: arial, sans-serif;
            display: flex;
            justify-content: center;
            align-items: center;
            height: 100vh;
            background-color: #f0f0f0;
        }
        .registration-form {
            padding: 20px;
            background: white;
            border-radius: 8px;
            box-shadow: 0 0 10px rgba(0,0,0,0.1);
        }
        .registration-form h2 {
            margin-bottom: 20px;
        }
        .registration-form input[type="text"],
        .registration-form input[type="password"] {
            width: calc(100% - 22px);
            padding: 10px;
            margin-bottom: 10px;
            border: 1px solid #ccc;
            border-radius: 4px;
        }
        .registration-form input[type="submit"] {
            background-color: #28a745;
            color: white;
            padding: 10px 20px;
            border: none;
            border-radius: 4px;
            cursor: pointer;
        }
        .registration-form input[type="submit"]:hover {
            background-color: #218838;
        }
    </style>
</head>
<body>

<div class="registration-form">
    <h2>registration</h2>
    <form action="/register" method="post">
        <label for="username">username:</label>
        <input type="text" id="username" name="username" required>

        <label for="password">password:</label>
        <input type="password" id="password" name="password" required>

        <input type="submit" value="register">
    </form>
</div>

</body>
<script>
    alert("注册失败!")
</script>
</html>
第七步:项目启动与测试
项目启动,参考我的这篇博客:javaweb项目启动
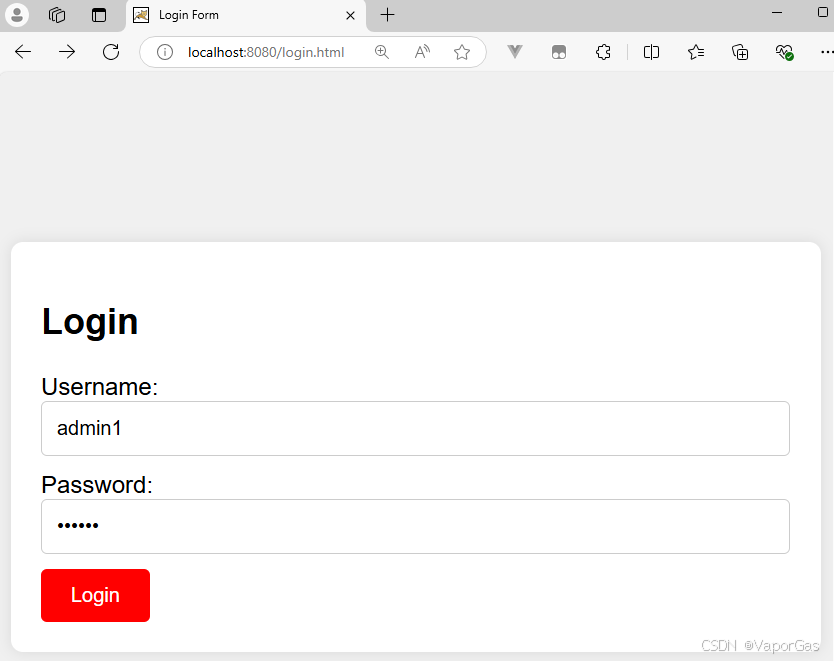
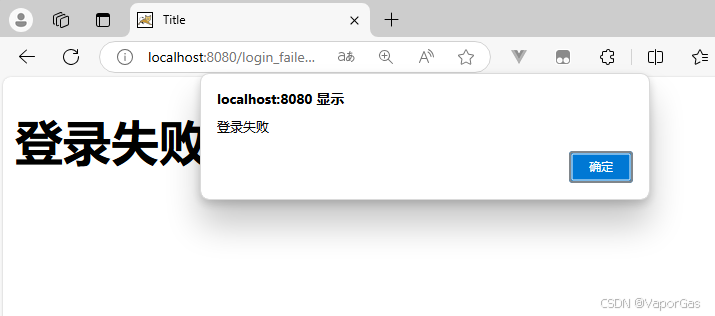
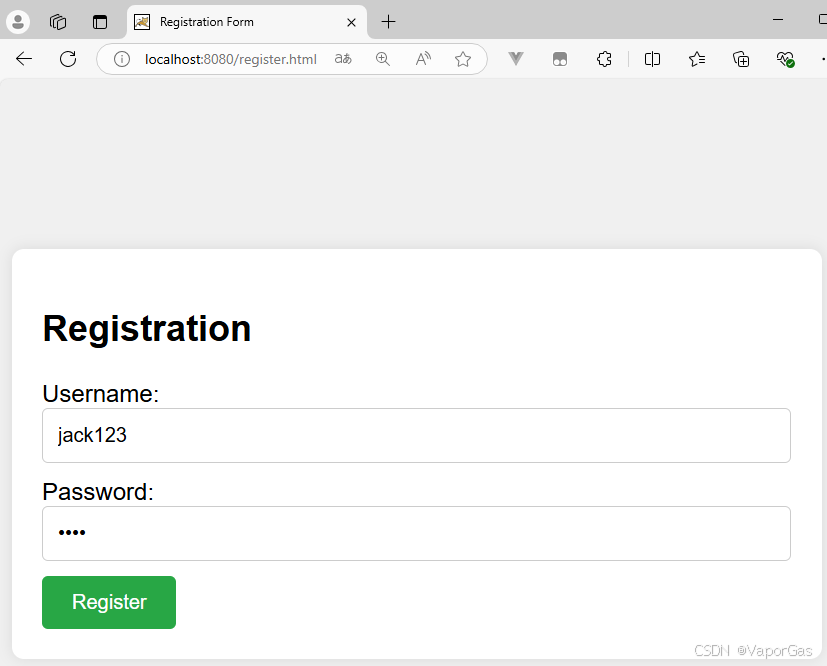
运行测试
登录
登录失败
登录成功

注册
注册成功
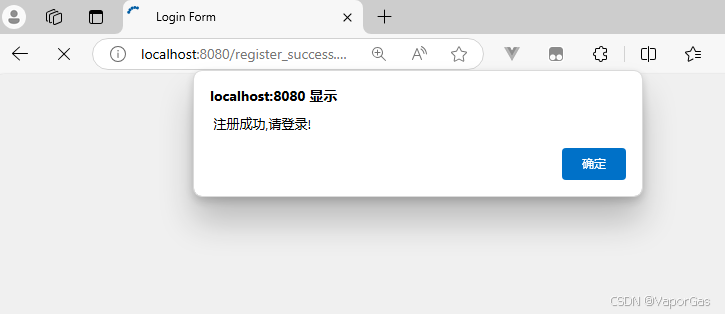
注册成功会直接跳转到登录页面
注册失败
注册失败,弹出警告框,并且返回注册页面
总结
整体结构图
忽略我没有在博客书写的类和html页面,它们是我自己测试时使用的,不影响整体功能执行
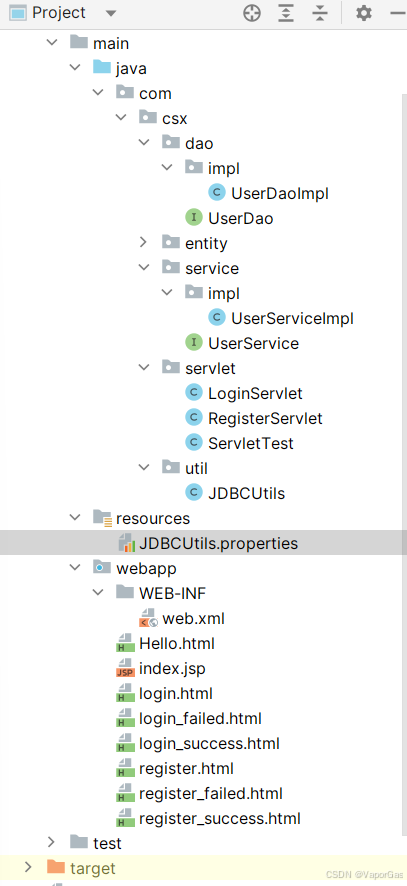
基于三层架构和servlet进行登录和注册功能的实现项目
总结
到此这篇关于java web实战之使用三层架构与servlet构建登录注册模块的文章就介绍到这了,更多相关java web构建登录注册模块内容请搜索代码网以前的文章或继续浏览下面的相关文章希望大家以后多多支持代码网!


发表评论