一、sringboot整合flowable
1.引入依赖
springboot使用2.7.1,亲测3.3.0不能用,jdk使用1.8
建议slf4j版本如下,不会报错,太高了报错
<dependency>
            <groupid>org.springframework.boot</groupid>
            <artifactid>spring-boot-starter-web</artifactid>
        </dependency>

        <dependency>
            <groupid>org.projectlombok</groupid>
            <artifactid>lombok</artifactid>
            <optional>true</optional>
        </dependency>
        <dependency>
            <groupid>org.springframework.boot</groupid>
            <artifactid>spring-boot-starter-test</artifactid>
            <scope>test</scope>
        </dependency>
        <dependency>
            <groupid>org.flowable</groupid>
            <artifactid>flowable-spring-boot-starter</artifactid>
            <version>6.7.2</version>
            <!--关闭自带的权限认证-->
             <exclusions>
                <exclusion>
                    <groupid>org.flowable</groupid>
                    <artifactid>flowable-spring-security</artifactid>
                </exclusion>
            </exclusions>
        </dependency>
        <dependency>
            <groupid>mysql</groupid>
            <artifactid>mysql-connector-java</artifactid>
            <version>8.0.21</version>
        </dependency>
        <dependency>
            <groupid>com.alibaba</groupid>
            <artifactid>druid-spring-boot-starter</artifactid>
            <version>1.2.1</version>
        </dependency>
        <dependency>
            <groupid>junit</groupid>
            <artifactid>junit</artifactid>
            <version>4.13.2</version>
            <scope>test</scope>
        </dependency>
<!--        日志-->
        <dependency>
            <groupid>org.slf4j</groupid>
            <artifactid>slf4j-api</artifactid>
            <version>1.7.30</version>
        </dependency>
        <dependency>
            <groupid>org.slf4j</groupid>
            <artifactid>slf4j-log4j12</artifactid>
            <version>2.0.0</version>
        </dependency>
2.安装流程图绘制插件
flowable bpmn visualizer

3.yml配置
server:
  port: 8080

spring:
  datasource:
    driver-class-name: com.mysql.cj.jdbc.driver
    #nullcatalogmeanscurrent=true 设置为只查当前连接的schema库
    url: jdbc:mysql://localhost:3306/flowable?servertimezone=asia/shanghai&useunicode=true&characterencoding=utf-8&zerodatetimebehavior=converttonull&usessl=false&allowpublickeyretrieval=true&nullcatalogmeanscurrent=true
    username: root
    password: root
flowable:
  #关闭定时任务
  async-executor-activate: true
  #数据库表与flowable最新表不一致会进行更新
  database-schema-update: true
logging:
  level:
    org:
      flowable: debug
二、spring环境下的应用
1.流程部署与启动
  @autowired
    processengine processengine;
    @autowired
    repositoryservice repositoryservice;
    @autowired
    runtimeservice runtimeservice;
    @autowired
    taskservice taskservice;

    @test
    void deployflow(){
        //流程引擎的配置对象,关联相关数据源
        deployment deploy = repositoryservice.createdeployment()
                //一次部署所有processes文件夹内的流程
                .name("第一次部署")
                .deploy();
        system.out.println("deploy.getid()="+deploy.getid());
    }

    /**
     * 启动流程实例
     * 在流程定义表中动态维护 act_re_procdef
     */
    @test
    void startflow(){
        string processid="ask_for_leave.bpmn20:1:4";
        string processkey="ask_for_leave.bpmn20";
        //1.根据流程定义di启动流程实例
        runtimeservice.startprocessinstancebyid(processid);
        //2.根据流程定义key启动流程实例
        //runtimeservice.startprocessinstancebykey(processkey);
    }
	/**
     * 任务的审批
     * 需要数据:任务id
     */
    @test
    void compeletetask(){
        taskservice.complete("2506");
    }
每启动一个流程,会在act_hi_procinst中维护一条数据。
启动一个流程,可以在act_ru_task表中看到对应的记录,该表记录的都是当前待办的记录信息。
act_ru_execution记录流程的分支
流程定义:相当于java中的类
流程实例:相当于java中的对象
注意:在spring环境下,spring会自动扫描processes文件夹,若不指定文件路径,则一次把所有bpmn流程全部部署,也就是一次创建所有流程定义。一个部署对应多个流程定义
 @test
    void deployflow(){
        deployment deploy = repositoryservice.createdeployment()
            	//如果再添加部署文件,会部署两次,导致流程定义中出现新版本的流程定义
                .addclasspathresource("processes/ask_for_leave.bpmn20.xml")
                .name("部署名称")
                .deploy();
        system.out.println("deploy.getid()="+deploy.getid());
    }
常用:1.通过bpmn部署。2.通过zip压缩包部署。3.自己创建model模型,然后保存到数据库中,再通过模型部署。
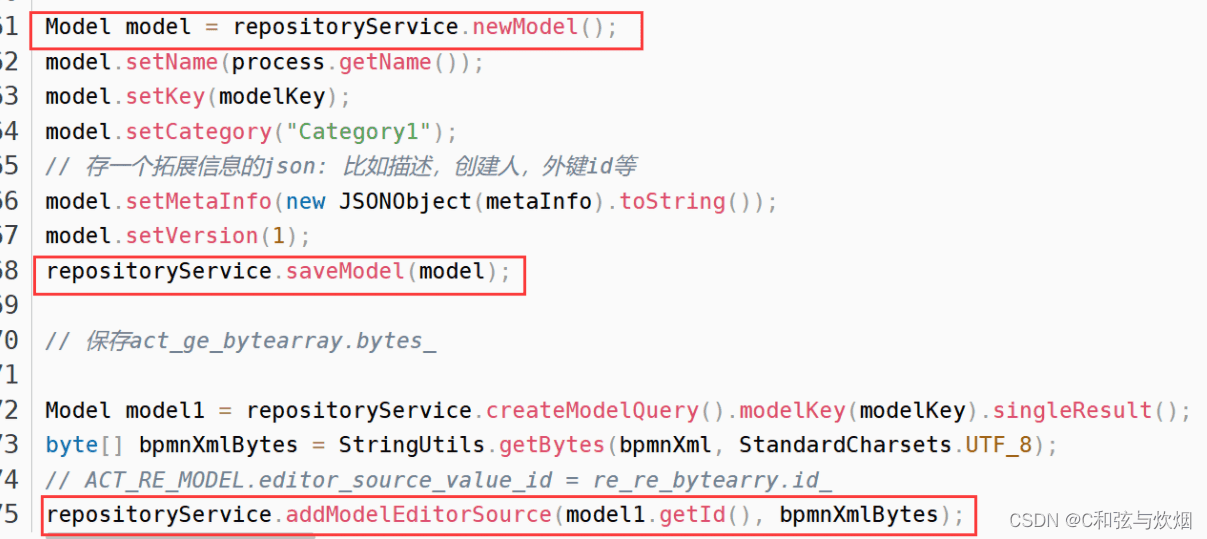
创建好model之后保存到act_re_model表中(上图仅仅是举个3的例子)。部署也是先从表中获取model部署。
2.表结构
act_re: repository,包含流程定义和流程静态资源(图片,规则等)
act_ru: runtime,运行时的表,包含实例,任务,变量,异步任务,运行中的数据等
act_hi:history,流程的历史数据,如历史流程实例,变量,任务。
- act_ge:general,通用数据。
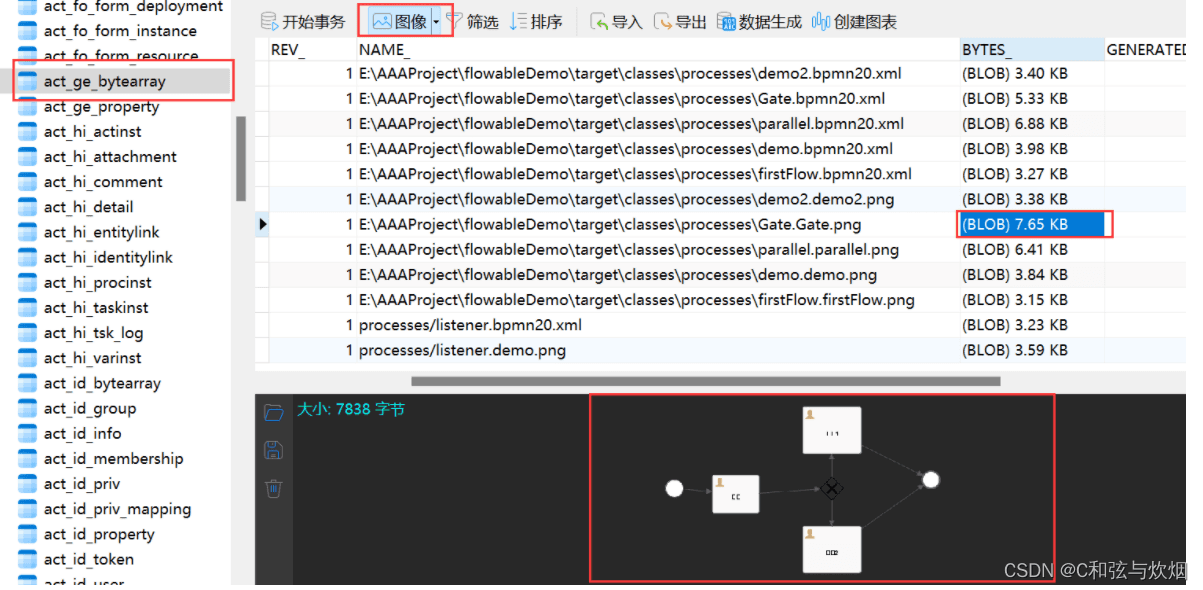
act_ge_bytearray(重要),存放了流程定义的png图片。
act_id:identity组织机构。包含标识的信息,如用户,用户组等。
cmmn 表示这都是跟 cmmn 协议相关的表。
co(content)表示这都是跟内容引擎相关的表。
dmn 表示这都是跟 dmn 协议相关的表。
fo(form)表示这都是跟表单相关的表。
3.流程挂起和激活
 /**
     * 流程定义的挂起和激活
     *act_re_procdef
     */
    @test
    void suspendedactivity(){
        string processdefinitionid="ask_for_leave.bpmn20:1:4";
        processdefinition processdefinition = repositoryservice.createprocessdefinitionquery()
                .processdefinitionid(processdefinitionid)
                .singleresult();
        //获取当前流程定义的状态
        boolean suspended = processdefinition.issuspended();
        if (suspended) {
            //挂起-->激活
            system.out.println("激活流程");
            repositoryservice.activateprocessdefinitionbyid(processdefinitionid);
        }else {
            //激活-->挂起
            system.out.println("挂起流程");
            repositoryservice.suspendprocessdefinitionbyid(processdefinitionid);
        }
    }
已经挂起的流程定义,不允许启动。
已经启动的流程,不受影响。
可以挂起已经启动的流程实例,该流程实例不允许审批。
4.任务分配表达式assignee
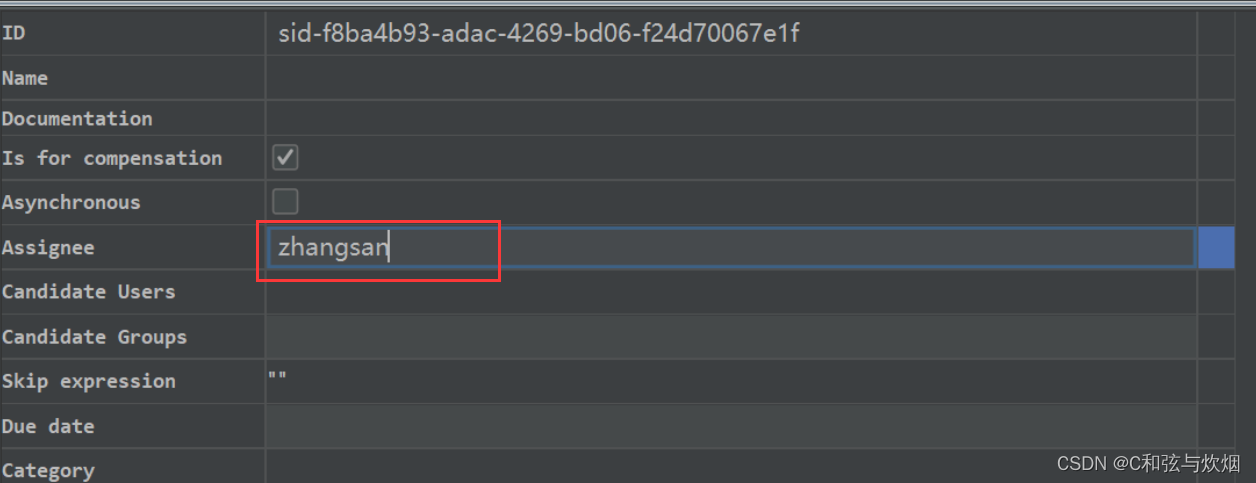
assignee也可以写表达式
值表达式
${ assign1 },assign1是自己定义的变量。
方法表达式
${ mybean.getassignee() }
/**
     * 任务的审批
     * 需要数据:任务id,hashmap  "assign1","lisi"
     * 把当前任务分给lisi审批,运行后lisi可以查到待办
     */
    @test
    void compeleteassign1(){
        hashmap<string, object> variables = new hashmap<>();
        variables.put("assign1","lisi");
        //完成任务审批,根据任务id绑定对应表达式的值
        taskservice.complete("taskid",variables);
    }
(act_ru_actinst)出现了lisi
  @test
    void findflow(){
        //任务实例通过taskservice来实现
        taskservice taskservice = getengine().gettaskservice();
        //获取到 act_ru_task中 assignee是lisi的记录
        list<task> tasks = taskservice.createtaskquery()
                .taskassignee("lisi")
                .list();
        tasks.foreach(system.out::println);
        //task[id=15004, name=second]
    }
得到结果task[id=15004, name=second],此时还需要审批。
------ 方法表达式${ mybean.getassignee() } -------
//mybean加入容器
@component
public class mybean {
public string getassignee(){
system.out.println("getassignee执行...");
return "王五";
}
}
    @test
    void compeleteassign1(){
        taskservice taskservice = getengine().gettaskservice();
        //再执行审批时,会去mybean中执行该方法
        taskservice.complete("15004");
    }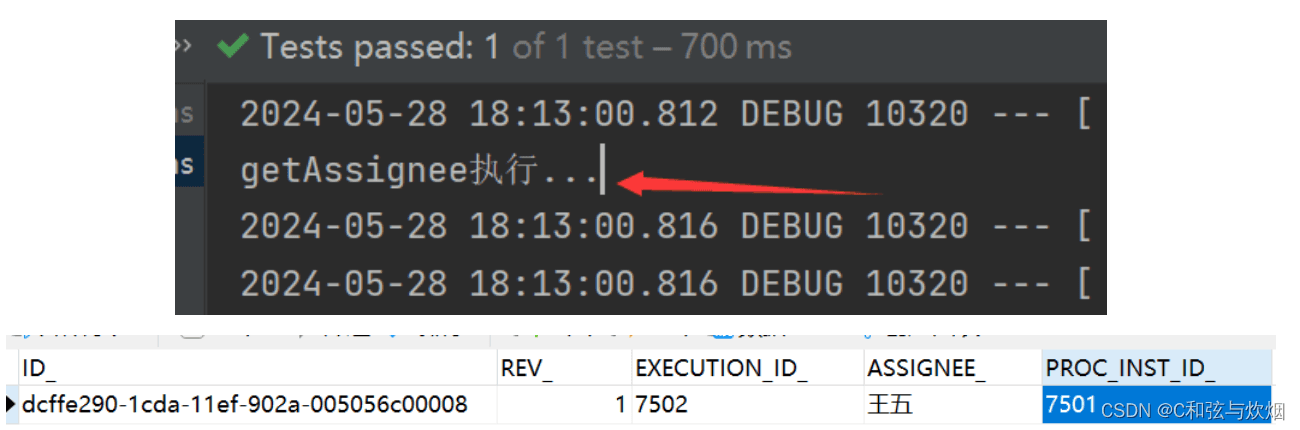
拿到id后再执行审批。
5.流程变量
运行时变量
全局变量
局部变量
历史变量
 @test
    void startflow(){
        string processid="firstflow:2:637173cf-1ce6-11ef-8399-005056c00008";
        //在流程启动时就可以绑定对应表达式的值,因为第一个人就需要指定人
        map<string,object> variables =new hashmap<>();
        variables.put("var1","test1");
        variables.put("var2","test2");
        variables.put("var3","test3");
        //全局变量存在了act_ru_variable
        runtimeservice.startprocessinstancebyid(processid,variables);
    }

    /**
     * 获取流程全局变量
     */
    @test
    //全局变量存在了act_ru_variable
    void getvariables(){
        string execution ="06a934bf-1ce7-11ef-870f-005056c00008";
        //还能直接设置
        //runtimeservice.setvariable(execution,"var4","test4");
        //设置局部变量,和taskid相关,节点没了变量就没了
        //runtimeservice.setvariableslocal(execution,"var4","test4");
        map<string, object> variables = runtimeservice.getvariables(execution);
        system.out.println(variables);
    }
输出{var3=test3, var2=test2, var1=test1}
6.候选人

可以指定多个候选人,在启动流程时进行赋值就好。
	/**
     * 根据候选人查询任务
     * 候选人需要拾取任务才能变成审批人
     *只有一个人能变为审批人,审批人还可以归还,变成候选人
     */
    @test
    void claimtask(){
        //act_ru_task中
        list<task> tasks = taskservice.createtaskquery()
                //这里有改变
                .taskcandidateuser("张三")
                .list();
        for (task task : tasks) {
            //拾取
            taskservice.claim(task.getid(),"张三");
            //归还unclaim(task.getid(),"张三")
            //指派taskservice.setassignee(task.getid(),"xxx")
        }
    }

   @test
    void findflow(){
        //act_ru_task中
        list<task> tasks = taskservice.createtaskquery()
                //这里有改变
                .taskcandidateuser("张三")
                .list();
        tasks.foreach(system.out::println);
    }
7.候选人组
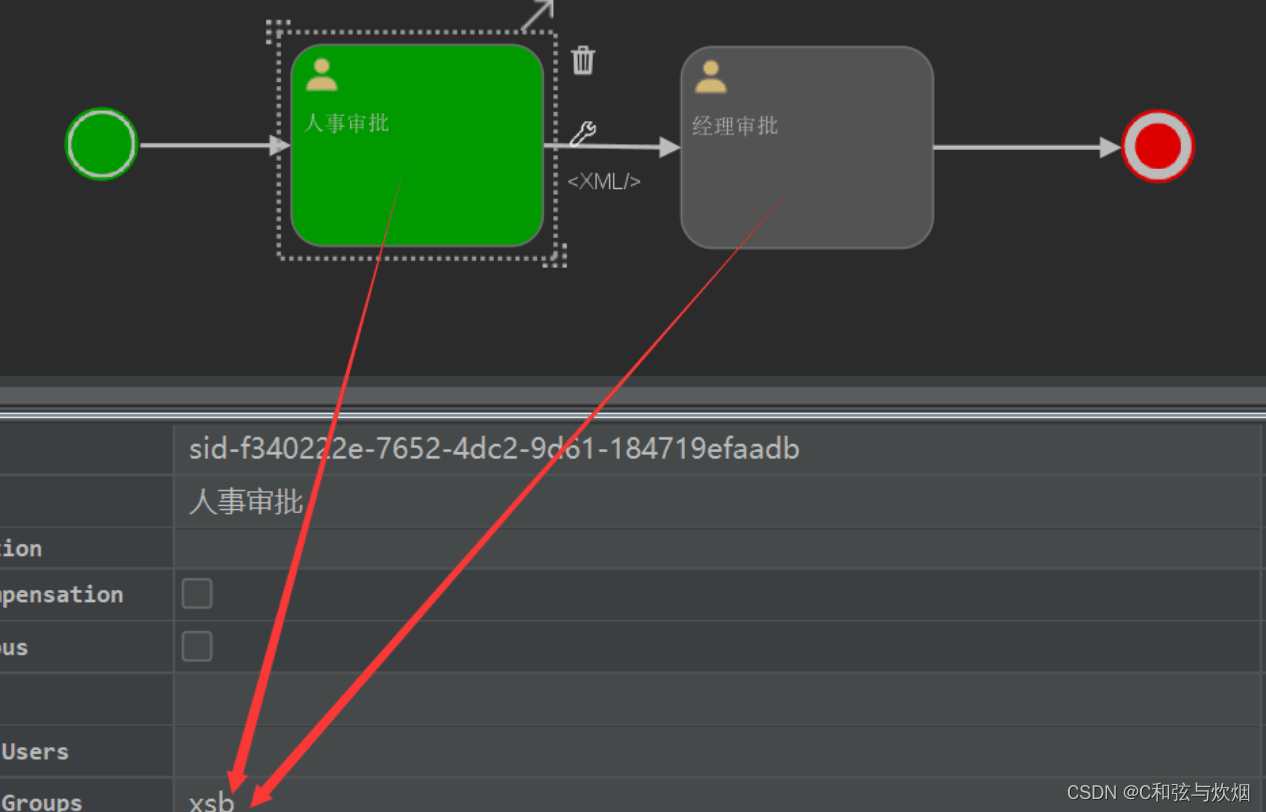
	//先创建用户
	@test
    void createuser(){
        user user = identityservice.newuser("zhangsan");
        user.setemail("zhansgan@qq.com");
        user.setfirstname("zhang");
        user.setlastname("san");
        user.setpassword("123456");
        identityservice.saveuser(user);
    }

/**
     * 用户组
     */
    @test
    void creategroup(){
        group group = identityservice.newgroup("xsb");
        group.setname("销售部");
        group.settype("type1");
        identityservice.savegroup(group);
    }
/**
     * 用户与用户组的关系
     */
    @test
    void createmembership(){
        group group = identityservice.creategroupquery().groupid("xsb").singleresult();
        list<user> users = identityservice.createuserquery().list();
        users.foreach(user -> {identityservice.createmembership(user.getid(), group.getid());});
    }
act_id_group

act_id_membership
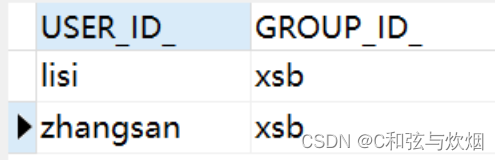
直接部署后启动,act_ru_identitylink中就会出现候选组信息。

 /**
     * 当前登录用户根据候选人组查询任务
     */
    @test
    void findgrouptask(){
        //先查询当前所在的组 如查张三
        group group = identityservice.creategroupquery()
                .groupmember("zhangsan").singleresult();
        system.out.println("当前用户所在组的id为:"+group.getid());
        list<task> tasks = taskservice.createtaskquery().taskcandidategroup(group.getid()).list();
        for (task task : tasks) {
            //拾取任务
            taskservice.claim(task.getid(),"zhangsan");
        }
    }

    /**
     * 任务的审批
     */
    @test
    void compeletetask(){
        map<string,object> variables =new hashmap<>();
        taskservice.complete("ae543ec1-1d5f-11ef-a409-005056c00008");
    }
8.网关
排他网关
并行网关
包容网关
事件网关
排他网关
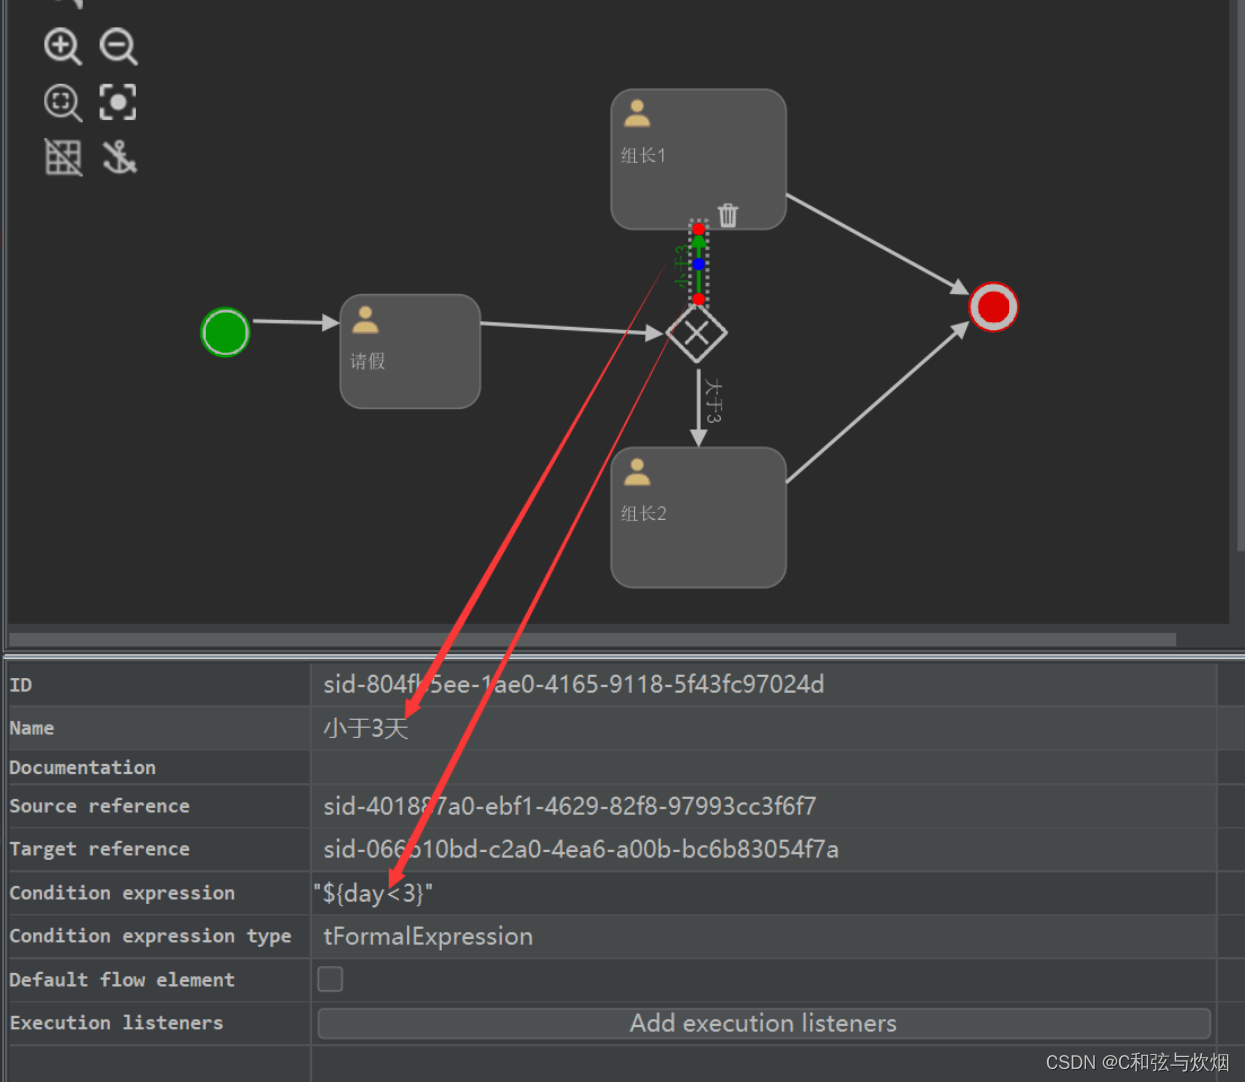
在审批的时候加入day天数就能完成请假步骤,从而转向不同的审批人。
   @test
    void compeletetask(){
        map<string,object> variables =new hashmap<>();
        variables.put("day",3);
        taskservice.complete("fae74a9a-1d6c-11ef-9a09-005056c00008");
    }
注意:条件尽量包含所有情况,否则报错。
并行网关

提交申请之后,task表中将会出现两条审批,分别是zhangsan和lisi。

包含网关
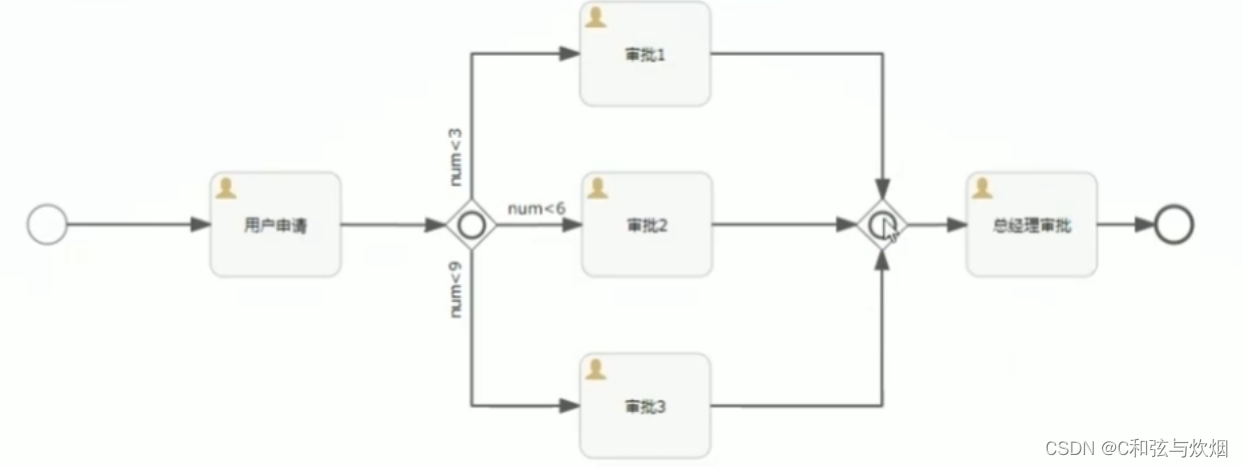
可以看成并行和排他的结合体
如num=2走三条,num=5走两条,num=8走三条
tips
每次重新部署一个id相同的bpmn时,正在执行的流程会被自动删除。
流程定义与流程部署是不一样的,一个流程部署可以对应多个流程定义。流程部署的表是act_re_deployment,流程定义的表是act_re_procdef。可以理解为act_re_procdef是act_re_deployment的从表。
流程定义不需要删除,当你不要这个流程定义时,就把流程部署给删除好了。
删除流程部署,默认级联删除,正在执行的流程实例也会被删除。
与activiti7的区别
1.activiti默认不开启数据库的历史记录,flowable默认开启
2.activiti23张表,flowable79张表。
3.flowable是activiti的继任者,因此flowable包含了activiti的所有功能,并且在原有功能的基础上进行了进一步的改进和优化。
4.支持 cmmn 和 dmn 标准
三、springboot项目中引入flowable
1.配置flowable独立数据源
flowable:
  async-executor-activate: false
  #第一次生成后关闭
  database-schema-update: true
  #保存历史数据级别
  history-level: full
  #解决乱码
  activity-font-name: "宋体"
  annotation-font-name: "宋体"
  label-font-name: "宋体"

#配置flowable数据源
flow:
  username: root
  password: root
  url: jdbc:mysql://localhost:3306/flowable2?servertimezone=asia/shanghai&useunicode=true&characterencoding=utf-8&zerodatetimebehavior=converttonull&usessl=false&allowpublickeyretrieval=true&nullcatalogmeanscurrent=true&rewritebatchedstatements=true
  driver-class-name: com.mysql.cj.jdbc.driver
  maxpoolsize: 30
2.创建配置类
import com.alibaba.druid.pool.druiddatasource;
import lombok.extern.slf4j.slf4j;
import org.flowable.app.spring.springappengineconfiguration;
import org.flowable.spring.boot.engineconfigurationconfigurer;
import org.springframework.beans.factory.annotation.value;
import org.springframework.context.annotation.configuration;
import org.springframework.context.annotation.propertysource;
import javax.sql.datasource;
import java.beans.propertyvetoexception;
/**
* 一共有两个配置类,一个是processengineconfiguration,一个是springappengineconfiguration
* 他们里面都需要重写configure方法来进行配置
* 配置数据源应该在springappengineconfiguration中设定
* 前者是配置processengine的,如自动生成表,设置中文,在yml文件中配置的属性便是在此类中读取
*/
@configuration
@propertysource("classpath:application-dev.yml")
@slf4j
public class flowableconfig implements engineconfigurationconfigurer<springappengineconfiguration> {
//读取配置
@value("${flow.username}")
private string user;
@value("${flow.password}")
string password;
@value("${flow.url}")
string jdbcurl;
@value("${flow.driver-class-name}")
string driverclass;
@value("${flow.maxpoolsize}")
int maxpoolsize;
// @bean(name = "processengine")
// public processengine processengineconfiguration() throws propertyvetoexception {
// processengineconfiguration cfg = new standaloneprocessengineconfiguration();
// cfg.setdatasource(datasource2());
// cfg.setdatabaseschemaupdate(processengineconfiguration.db_schema_update_false);
// cfg.setactivityfontname("宋体");
// cfg.setlabelfontname("宋体");
// cfg.setannotationfontname("宋体");
// cfg.setasyncexecutoractivate(false);
// return cfg.buildprocessengine();
// }
//配置数据源
public datasource datasource2() throws propertyvetoexception {
druiddatasource datasource = new druiddatasource();
datasource.setusername(user);
datasource.setpassword(password);
datasource.seturl(jdbcurl);
datasource.setdriverclassname(driverclass);
datasource.setmaxpoolpreparedstatementperconnectionsize(maxpoolsize);
return datasource;
}
@override
public void configure(springappengineconfiguration engineconfiguration) {
try {
//把数据源设置进来
engineconfiguration.setdatasource(datasource2());
log.info("配置flowable数据源成功");
} catch (propertyvetoexception e) {
throw new runtimeexception(e);
}
}
}注意这里配置的是springappengineconfiguration,而不是processengine,否则将出现报错,或者设置单独的数据源失败。
项目启动成功就可以看到自动创建的79张表了。然后把表的自动更新关闭,否则会影响性能。
到此这篇关于flowable整合springboot实现的示例代码的文章就介绍到这了,更多相关flowable整合springboot内容请搜索代码网以前的文章或继续浏览下面的相关文章希望大家以后多多支持代码网!


发表评论