电脑环境:
语言环境:python 3.8.0
编译器:jupyter notebook
深度学习环境:tensorflow 2.17.0
一、前期工作
1.设置gpu(如果使用的是cpu可以忽略这步)
import tensorflow as tf

gpus = tf.config.list_physical_devices("gpu")

if gpus:
    tf.config.experimental.set_memory_growth(gpus[0], true)  #设置gpu显存用量按需使用
    tf.config.set_visible_devices([gpus[0]],"gpu")

# 打印显卡信息,确认gpu可用
print(gpus)
2、加载数据
data_dir   = "./365-8-data/"
img_height = 224
img_width  = 224
batch_size = 32

train_ds = tf.keras.preprocessing.image_dataset_from_directory(
    data_dir,
    validation_split=0.3,
    subset="training",
    seed=12,
    image_size=(img_height, img_width),
    batch_size=batch_size)
found 3400 files belonging to 2 classes.
using 2380 files for training.
val_ds = tf.keras.preprocessing.image_dataset_from_directory(
    data_dir,
    validation_split=0.3,
    subset="training",
    seed=12,
    image_size=(img_height, img_width),
    batch_size=batch_size)
found 3400 files belonging to 2 classes.
using 1020 files for validation.
由于原始数据集不包含测试集,因此需要创建一个。使用 tf.data.experimental.cardinality 确定验证集中有多少批次的数据,然后将其中的 20% 移至测试集。
val_batches = tf.data.experimental.cardinality(val_ds)
test_ds     = val_ds.take(val_batches // 5)
val_ds      = val_ds.skip(val_batches // 5)

print('number of validation batches: %d' % tf.data.experimental.cardinality(val_ds))
print('number of test batches: %d' % tf.data.experimental.cardinality(test_ds))
number of validation batches: 26
number of test batches: 6
tf.data.experimental.cardinality 函数是一个用于确定tf.data.dataset对象中包含的元素数量的实验性功能。然而,需要注意的是,这个函数并不总是能够返回确切的元素数量,特别是对于无限数据集或包含复杂转换的数据集。
数据一共有猫、狗两类:
class_names = train_ds.class_names
print(class_names)
[‘cat’, ‘dog’]
数据归一化:
autotune = tf.data.autotune

def preprocess_image(image,label):
    return (image/255.0,label)

# 归一化处理
train_ds = train_ds.map(preprocess_image, num_parallel_calls=autotune)
val_ds   = val_ds.map(preprocess_image, num_parallel_calls=autotune)
test_ds  = test_ds.map(preprocess_image, num_parallel_calls=autotune)

train_ds = train_ds.cache().prefetch(buffer_size=autotune)
val_ds   = val_ds.cache().prefetch(buffer_size=autotune)
数据可视化:
plt.figure(figsize=(15, 10))  # 图形的宽为15高为10

for images, labels in train_ds.take(1):
    for i in range(8):

        ax = plt.subplot(5, 8, i + 1)
        plt.imshow(images[i])
        plt.title(class_names[labels[i]])

        plt.axis("off")

二、数据增强
我们可以使用 tf.keras.layers.experimental.preprocessing.randomflip 与tf.keras.layers.experimental.preprocessing.randomrotation 进行数据增强,当然还有其他的增强函数(新版本的tf增强函数调用函数不同):
- tf.keras.layers.experimental.preprocessing.randomflip:水平和垂直随机翻转每个图像。
- tf.keras.layers.experimental.preprocessing.randomrotation:随机旋转每个图像。
- tf.keras.layers.experimental.preprocessing.randomzoom:随机裁剪和重新调整大小来模拟缩放效果。
- tf.keras.layers.experimental.preprocessing.randomcontrast:调整图像的对比度。
- tf.keras.layers.experimental.preprocessing.randombrightness:调整图像的亮度。
data_augmentation = tf.keras.sequential([
  tf.keras.layers.experimental.preprocessing.randomflip("horizontal_and_vertical"),
  tf.keras.layers.experimental.preprocessing.randomrotation(0.2),
])
第一个层表示进行随机的水平和垂直翻转,而第二个层表示按照 0.2 的弧度值进行随机旋转。
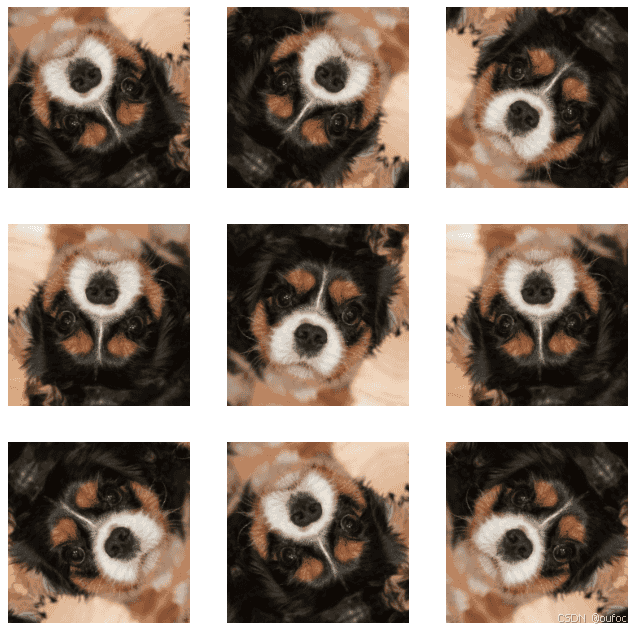
增加一张图片为一个批次:
# add the image to a batch.
image = tf.expand_dims(images[i], 0)
plt.figure(figsize=(8, 8))
for i in range(9):
    augmented_image = data_augmentation(image)
    ax = plt.subplot(3, 3, i + 1)
    plt.imshow(augmented_image[0])
    plt.axis("off")
更多的数据增强方式可以参考:链接: link
三、增强方式
方法一:将其嵌入model中
model = tf.keras.sequential([
  data_augmentation,
  layers.conv2d(16, 3, padding='same', activation='relu'),
  layers.maxpooling2d(),
])
这样做的好处是:
- 数据增强这块的工作可以得到gpu的加速(如果你使用了gpu训练的话)
注意:只有在模型训练时(model.fit)才会进行增强,在模型评估(model.evaluate)以及预测(model.predict)时并不会进行增强操作。
方法二:在dataset数据集中进行数据增强
batch_size = 32
autotune = tf.data.autotune

def prepare(ds):
    ds = ds.map(lambda x, y: (data_augmentation(x, training=true), y), num_parallel_calls=autotune)
    return ds

train_ds = prepare(train_ds)
四、训练模型
model = tf.keras.sequential([
  layers.conv2d(16, 3, padding='same', activation='relu'),
  layers.maxpooling2d(),
  layers.conv2d(32, 3, padding='same', activation='relu'),
  layers.maxpooling2d(),
  layers.conv2d(64, 3, padding='same', activation='relu'),
  layers.maxpooling2d(),
  layers.flatten(),
  layers.dense(128, activation='relu'),
  layers.dense(len(class_names))
])

model.compile(optimizer='adam',
              loss=tf.keras.losses.sparsecategoricalcrossentropy(from_logits=true),
              metrics=['accuracy'])

epochs=20
history = model.fit(
  train_ds,
  validation_data=val_ds,
  epochs=epochs
)
epoch 1/20
75/75 ━━━━━━━━━━━━━━━━━━━━ 399s 5s/step - accuracy: 0.5225 - loss: 293.7218 - val_accuracy: 0.6775 - val_loss: 0.5858
epoch 2/20
75/75 ━━━━━━━━━━━━━━━━━━━━ 73s 376ms/step - accuracy: 0.7183 - loss: 0.5656 - val_accuracy: 0.8080 - val_loss: 0.4210
..............
epoch 20/20
75/75 ━━━━━━━━━━━━━━━━━━━━ 25s 329ms/step - accuracy: 0.9430 - loss: 0.1563 - val_accuracy: 0.9263 - val_loss: 0.2544
loss, acc = model.evaluate(test_ds)
print("accuracy", acc)
6/6 ━━━━━━━━━━━━━━━━━━━━ 1s 100ms/step - accuracy: 0.9310 - loss: 0.1482
accuracy 0.921875
五、自定义增强函数
import random
# 这是大家可以自由发挥的一个地方
def aug_img(image):
    seed = (random.randint(0,9), 0)
    # 随机改变图像对比度
    stateless_random_brightness = tf.image.stateless_random_contrast(image, lower=0.1, upper=1.0, seed=seed)
    return stateless_random_brightness
image = tf.expand_dims(images[3]*255, 0)
print("min and max pixel values:", image.numpy().min(), image.numpy().max())
min and max pixel values: 2.4591687 241.47968
plt.figure(figsize=(8, 8))
for i in range(9):
    augmented_image = aug_img(image)
    ax = plt.subplot(3, 3, i + 1)
    plt.imshow(augmented_image[0].numpy().astype("uint8"))

    plt.axis("off")
将自定义增强函数应用到我们数据上
autotune = tf.data.autotune

import random
# 这是大家可以自由发挥的一个地方
def aug_img(image):
    seed = (random.randint(0,9), 0)
    # 随机改变图像对比度
    stateless_random_brightness = tf.image.stateless_random_contrast(image, lower=0.1, upper=1.0, seed=seed)
    return stateless_random_brightness

def preprocess_image(image, label):
    image = image / 255.0
    image = aug_img(image)
    return (image, label)
# 归一化处理
train_ds = train_ds.map(preprocess_image, num_parallel_calls=autotune)
train_ds = train_ds.cache().prefetch(buffer_size=autotune)
六、总结
本次学习了使用两种方式的数据增强提高模型性能以及自定义数据增强函数。
到此这篇关于tensorflow实现数据增强的示例代码的文章就介绍到这了,更多相关tensorflow 数据增强内容请搜索代码网以前的文章或继续浏览下面的相关文章希望大家以后多多支持代码网!


发表评论