一、准备工作
1.1 导入依赖
因springboot 3.0 + 以上版本只能支持java17 顾使用2.5.0 版本

  <parent>
        <groupid>org.springframework.boot</groupid>
        <artifactid>spring-boot-starter-parent</artifactid>
        <version>2.5.0</version>
       <!-- <version>2.7.18</version>-->
    </parent>
 <dependencies>
        <dependency>
            <groupid>org.springframework.boot</groupid>
            <artifactid>spring-boot-starter-web</artifactid>
        </dependency>
        <dependency>
            <groupid>org.springframework.boot</groupid>
            <artifactid>spring-boot-starter-security</artifactid>
        </dependency>
        <dependency>
            <groupid>org.projectlombok</groupid>
            <artifactid>lombok</artifactid>
        </dependency>
        <dependency>
            <groupid>org.springframework.boot</groupid>
            <artifactid>spring-boot-starter-test</artifactid>
        </dependency>
        <!-- thymeleaf 相关依赖 -->
        <dependency>
            <groupid>org.springframework.boot</groupid>
            <artifactid>spring-boot-starter-thymeleaf</artifactid>
        </dependency>
        <dependency>
            <groupid>org.springframework.boot</groupid>
            <artifactid>spring-boot-devtools</artifactid>
            <scope>runtime</scope>
            <optional>true</optional>
        </dependency>
        <dependency>
            <groupid>org.springframework.boot</groupid>
            <artifactid>spring-boot-starter-logging</artifactid>
        </dependency>
        <dependency>
            <groupid>cn.hutool</groupid>
            <artifactid>hutool-all</artifactid>
            <version>5.8.11</version>
        </dependency>
        <!-- mybatis坐标 -->
        <dependency>
            <groupid>org.mybatis.spring.boot</groupid>
            <artifactid>mybatis-spring-boot-starter</artifactid>
            <version>2.2.2</version>
        </dependency>
        <!-- mysql -->
        <dependency>
            <groupid>mysql</groupid>
            <artifactid>mysql-connector-java</artifactid>
           <!-- <version>8.0.28</version>-->
        </dependency>
        <!--validation依赖-->
        <dependency>
            <groupid>org.springframework.boot</groupid>
            <artifactid>spring-boot-starter-validation</artifactid>
        </dependency>
        <!--redis坐标-->
        <dependency>
            <groupid>org.springframework.boot</groupid>
            <artifactid>spring-boot-starter-data-redis</artifactid>
        </dependency>
        <!--springdoc-openapi-->
        <dependency>
            <groupid>org.springdoc</groupid>
            <artifactid>springdoc-openapi-starter-webmvc-ui</artifactid>
            <version>2.1.0</version>
        </dependency>
        <dependency>
            <groupid>org.springdoc</groupid>
            <artifactid>springdoc-openapi-starter-webmvc-api</artifactid>
            <version>2.1.0</version>
        </dependency>
        <!--fastjson依赖-->
        <dependency>
            <groupid>com.alibaba</groupid>
            <artifactid>fastjson</artifactid>
            <version>1.2.33</version>
        </dependency>
        <!--jwt依赖-->
        <dependency>
            <groupid>io.jsonwebtoken</groupid>
            <artifactid>jjwt</artifactid>
            <version>0.9.0</version>
        </dependency>
    </dependencies>
 <build>
        <plugins>
            <plugin>
                <groupid>org.springframework.boot</groupid>
                <artifactid>spring-boot-maven-plugin</artifactid>
            </plugin>
        </plugins>
    </build>
二、认证
2.1 登录认证流程
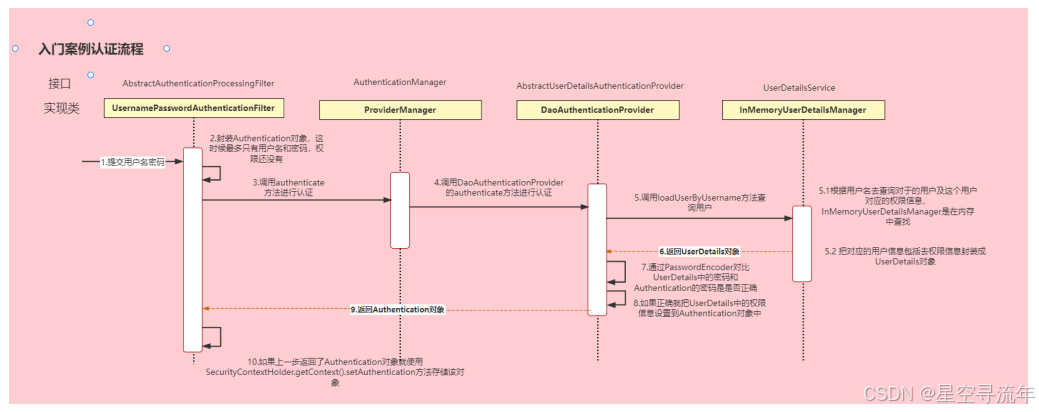
接口解释
authentication接口: 它的实现类,表示当前访问系统的用户,封装了用户相关信息;
authenticationmanager接口:定义了认证authentication的方法;
userdetailsservice接口:加载用户特定数据的核心接口。里面定义了一个根据用户名查询用户信息的 方法;
userdetails接口:提供核心用户信息。通过userdetailsservice根据用户名获取处理的用户信息要封装 成userdetails对象返回。然后将这些信息封装到authentication对象中;
2.3 自定义数据源分析
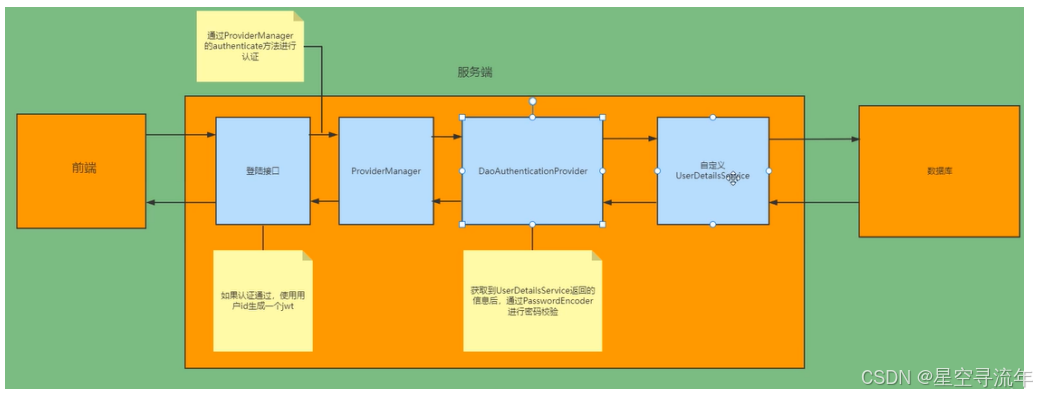
①自定义登录接口 调用providermanager的方法进行认证 如果认证通过生成jwt 把用户信息存入redis中;
②自定义userdetailsservice 在这个实现类中去查询数据库;
2.4 自定义数据源查询代码实现(可实现多数据源模式,db2,mysql)
2.4.1 自定义数据源扫描mapper
package com.fashion.config.datasource;
import com.zaxxer.hikari.hikaridatasource;
import org.apache.ibatis.session.sqlsessionfactory;
import org.mybatis.spring.sqlsessionfactorybean;
import org.mybatis.spring.annotation.mapperscan;
import org.springframework.beans.factory.annotation.autowired;
import org.springframework.context.annotation.bean;
import org.springframework.context.annotation.configuration;
import org.springframework.context.annotation.primary;
import org.springframework.core.io.classpathresource;
import org.springframework.core.io.support.pathmatchingresourcepatternresolver;
import javax.sql.datasource;
/**
 * @author: lq
 * @date 2024/8/17 14:23
 * @description: mysql 配置
 */
@configuration
@mapperscan(basepackages = "com.fashion.mapper.mysql",sqlsessionfactoryref = "mysqlsqlsessionfactory")
public class mysqldatasourceconfig {
    @primary
    @bean
    public datasource mysqldatasource() {
        hikaridatasource datasource = new hikaridatasource();
        datasource.setjdbcurl("jdbc:mysql://localhost:3306/lq");
        datasource.setdriverclassname("com.mysql.cj.jdbc.driver");
        datasource.setusername("root");
        datasource.setpassword("123456");
        return datasource;
    }
    @primary
    @bean
    public sqlsessionfactory mysqlsqlsessionfactory(@autowired datasource mysqldatasource){
        sqlsessionfactorybean sessionfactory = new sqlsessionfactorybean();
        sessionfactory.setdatasource(mysqldatasource);
        sessionfactory.setconfiglocation(new classpathresource("/mybatis/mybatis-config.xml"));
        try {
            // mapper xml 文件位置
            sessionfactory.setmapperlocations(
                    new pathmatchingresourcepatternresolver()
                            .getresources("classpath:mybatis/mapper/mysql/*.xml"));
          //  sessionfactory.setmapperlocations(new classpathresource("/mybatis/mapper/mysql/*.xml"));
            return sessionfactory.getobject();
        } catch (exception e) {
            e.printstacktrace();
        }
        return null;
    }
}
2.4.2 自定义 userdetailsservice
package com.fashion.service;
import com.fashion.domain.loginsessionuserinf;
import com.fashion.domain.mysql.tuserinf;
import com.fashion.exception.customerauthenticationexception;
import com.fashion.mapper.mysql.tuserinfmapper;
import org.springframework.beans.factory.annotation.autowired;
import org.springframework.security.core.userdetails.userdetails;
import org.springframework.security.core.userdetails.userdetailsservice;
import org.springframework.security.core.userdetails.usernamenotfoundexception;
import org.springframework.stereotype.component;
import org.springframework.util.objectutils;
import java.util.arrays;
import java.util.list;
/**
 * @author: lq
 * @date 2024/8/13 21:12
 * @description:
 */
@component
public class userdetailsserviceimpl implements userdetailsservice {
    @autowired
    private tuserinfmapper userinfmapper;
    @override
    public userdetails loaduserbyusername(string loginid) throws usernamenotfoundexception {
        // 根据用户名获取用户信息
        if (objectutils.isempty(loginid)) {
            throw new customerauthenticationexception("用户名不能为空!");
        }
        tuserinf tuserinf = userinfmapper.selectbyloginid(loginid);
        if (objectutils.isempty(tuserinf)) {
            throw new customerauthenticationexception("用户不存在!");
        }
        // 获取权限信息 todo:后期从数据库查询
        list<string> perlist = arrays.aslist("new:query", "news:delete");
        loginsessionuserinf loginsessionuserinf = new loginsessionuserinf(tuserinf, perlist);
        return loginsessionuserinf;
    }
}
2.4.3 自定义 userdetails
package com.fashion.domain;
import com.alibaba.fastjson.annotation.jsonfield;
import com.fashion.domain.mysql.tuserinf;
import com.fasterxml.jackson.annotation.jsonignore;
import lombok.data;
import org.springframework.security.core.grantedauthority;
import org.springframework.security.core.authority.simplegrantedauthority;
import org.springframework.security.core.userdetails.userdetails;
import java.util.collection;
import java.util.list;
import java.util.stream.collectors;
/**
 * @author: lq
 * @date 2024/8/17 15:57
 * @description: 用户登录信息
 */
@data
public class loginsessionuserinf implements userdetails {
    private tuserinf userinf;
    public loginsessionuserinf() {
    }
    @jsonignore
    @jsonfield(serialize=false)
    private list<grantedauthority> grantedauthorities;
    // 权限列表
    private list<string> perlist;
    public loginsessionuserinf(tuserinf userinf, list<string> perlist) {
        this.userinf = userinf;
        this.perlist = perlist;
    }
    @override
    public collection<? extends grantedauthority> getauthorities() {
        if (grantedauthorities != null) {
            return grantedauthorities;
        }
        grantedauthorities = perlist.stream()
                .map(simplegrantedauthority::new)
                .collect(collectors.tolist());
        return grantedauthorities;
    }
    @override
    public string getpassword() {
        return userinf.getloginpwd();
    }
    @override
    public string getusername() {
        return userinf.getloginid();
    }
    //判断账号是否未过期
    @override
    public boolean isaccountnonexpired() {
        return "1".equals(userinf.getstatus());
    }
    //判断账号是否没有锁定
    @override
    public boolean isaccountnonlocked() {
        return true;
    }
    //判断账号是否没有超时
    @override
    public boolean iscredentialsnonexpired() {
        return true;
    }
    //判断账号是否可用
    @override
    public boolean isenabled() {
        return true;
    }
}
2.4.4 创建用户sql
create table t_user_inf(
    id int primary key auto_increment comment '主键id',
    login_id varchar(64) default '' comment '登录账号id',
    login_pwd varchar(128) default '' comment '登录密码',
    user_nm varchar(126) default '' comment '登录账号名称',
    status varchar(2) default '1' comment '状态 1正常',
    phone varchar(11) default '' comment '手机号',
    source_type varchar(2) default '1' comment '登录来源 1 账密  2 githup',
    address varchar(128) default '' comment '家庭住址',
    cre_date datetime default now() comment '创建时间',
    upd_date datetime default now() comment '更新时间',
    upd_usr varchar(64) default '' comment '更新人'
);
2.4.5 其他实体类(用户类)
package com.fashion.domain.mysql;
import java.util.date;
import lombok.data;
@data
public class tuserinf {
    /**
    * 主键id
    */
    private integer id;
    /**
    * 登录账号id
    */
    private string loginid;
    /**
    * 登录密码
    */
    private string loginpwd;
    /**
    * 登录账号名称
    */
    private string usernm;
    /**
    * 状态 1正常
    */
    private string status;
    /**
    * 手机号
    */
    private string phone;
    /**
    * 登录来源 1 账密  2 githup
    */
    private string sourcetype;
    /**
    * 家庭住址
    */
    private string address;
    /**
    * 创建时间
    */
    private date credate;
    /**
    * 更新时间
    */
    private date upddate;
    /**
    * 更新人
    */
    private string updusr;
}
2.4.6 通用返回类
package com.fashion.domain;
import lombok.data;
import java.util.hashmap;
import java.util.map;
/**
 * @author: lq
 * @date 2024/8/17 15:08
 * @description:
 */
@data
public class r {
    private boolean success; //返回的成功或者失败的标识符
    private integer code; //返回的状态码
    private string message; //提示信息
    private map<string, object> data = new hashmap<string, object>(); //数据
    //把构造方法私有
    private r() {}
    //成功的静态方法
    public static r ok(){
        r r=new r();
        r.setsuccess(true);
        r.setcode(resultcode.success);
        r.setmessage("成功");
        return r;
    }
    //失败的静态方法
    public static r error(){
        r r=new r();
        r.setsuccess(false);
        r.setcode(resultcode.error);
        r.setmessage("失败");
        return r;
    }
    //使用下面四个方法,方面以后使用链式编程
// r.ok().success(true)
// r.message("ok).data("item",list)
    public r success(boolean success){
        this.setsuccess(success);
        return this; //当前对象 r.success(true).message("操作成功").code().data()
    }
    public r message(string message){
        this.setmessage(message);
        return this;
    }
    public r code(integer code){
        this.setcode(code);
        return this;
    }
    public r data(string key, object value){
        this.data.put(key, value);
        return this;
    }
    public r data(map<string, object> map){
        this.setdata(map);
        return this;
    }
}
2.5 配置类/工具类
package com.fashion.utils;
import cn.hutool.core.util.idutil;
import io.jsonwebtoken.claims;
import io.jsonwebtoken.jwtbuilder;
import io.jsonwebtoken.jwts;
import io.jsonwebtoken.signaturealgorithm;
import javax.crypto.secretkey;
import javax.crypto.spec.secretkeyspec;
import java.util.base64;
import java.util.date;
/**
 * @author: lq
 * @date 2024/8/17 15:38
 * @description: jwt 工具类
 */
public class jwtutil {
    //有效期为
    public static final long jwt_ttl = 60 * 60 *1000l;// 60 * 60 *1000 一个小时
    //设置秘钥明文(盐)
    public static final string jwt_key = "lqlacd";
    //生成令牌
    public static string getuuid(){
        string token = idutil.fastsimpleuuid();
        return token;
    }
    /**
     * 生成jtw
     * @param subject token中要存放的数据(json格式) 用户数据
     * @param ttlmillis token超时时间
     * @return
     */
    public static string createjwt(string subject, long ttlmillis) {
        jwtbuilder builder = getjwtbuilder(subject, ttlmillis, getuuid());// 设置
        //过期时间
        return builder.compact();
    }
    //生成jwt的业务逻辑代码
    private static jwtbuilder getjwtbuilder(string subject, long ttlmillis,
                                            string uuid) {
        signaturealgorithm signaturealgorithm = signaturealgorithm.hs256;
        secretkey secretkey = generalkey();
        long nowmillis = system.currenttimemillis();//获取到系统当前的时间戳
        date now = new date(nowmillis);
        if(ttlmillis==null){
            ttlmillis=jwtutil.jwt_ttl;
        }
        long expmillis = nowmillis + ttlmillis;
        date expdate = new date(expmillis);
        return jwts.builder()
                .setid(uuid) //唯一的id
                .setsubject(subject) // 主题 可以是json数据
                .setissuer("xx") // 签发者
                .setissuedat(now) // 签发时间
                .signwith(signaturealgorithm, secretkey) //使用hs256对称加密算法签名, 第二个参数为秘钥
                .setexpiration(expdate);
    }
    /**
     * 创建token
     * @param id
     * @param subject
     * @param ttlmillis
    添加依赖
    2.3.5 认证的实现
    1 配置数据库校验登录用户
    从之前的分析我们可以知道,我们可以自定义一个userdetailsservice,让springsecurity使用我们的
    userdetailsservice。我们自己的userdetailsservice可以从数据库中查询用户名和密码。
    我们先创建一个用户表, 建表语句如下:
     * @return
     */
    public static string createjwt(string id, string subject, long ttlmillis) {
        jwtbuilder builder = getjwtbuilder(subject, ttlmillis, id);// 设置过期时间
        return builder.compact();
    }
    /**
     * 生成加密后的秘钥 secretkey
     * @return
     */
    public static secretkey generalkey() {
        byte[] encodedkey = base64.getdecoder().decode(jwtutil.jwt_key);
        secretkey key = new secretkeyspec(encodedkey, 0, encodedkey.length,
                "aes");
        return key;
    }
    /**
     * 解析jwt
     *
     * @param jwt
     * @return
     * @throws exception
     */
    public static claims parsejwt(string jwt) throws exception {
        secretkey secretkey = generalkey();
        return jwts.parser()
                .setsigningkey(secretkey)
                .parseclaimsjws(jwt)
                .getbody();
    }
}
2.5.1 webutild 工具类
package com.fashion.utils;
import cn.hutool.json.jsonutil;
import lombok.extern.slf4j.slf4j;
import javax.servlet.servletoutputstream;
import javax.servlet.http.httpservletresponse;
import java.awt.*;
import java.nio.charset.standardcharsets;
/**
 * @author: lq
 * @date 2024/8/17 16:56
 * @description:
 */
@slf4j
public class webutils {
    /**
     *  写内容到客户端
     * @param response
     * @param obj
     */
    public static void writeresp(httpservletresponse response,object obj) {
      try {
          //设置客户端的响应的内容类型
          response.setcontenttype("application/json;charset=utf-8");
          //获取输出流
          servletoutputstream outputstream = response.getoutputstream();
          //消除循环引用
          string result = jsonutil.tojsonstr(obj);
          serializerfeature.disablecircularreferencedetect);
          outputstream.write(result.getbytes(standardcharsets.utf_8));
          outputstream.flush();
          outputstream.close();
      } catch (exception e) {
          log.error("写出字符流失败",e);
      }
    }
}
2.5.2 redis 工具类配置
package com.fashion.config.datasource;
import com.fasterxml.jackson.annotation.jsonautodetect;
import com.fasterxml.jackson.annotation.jsontypeinfo;
import com.fasterxml.jackson.annotation.propertyaccessor;
import com.fasterxml.jackson.databind.deserializationfeature;
import com.fasterxml.jackson.databind.objectmapper;
import com.fasterxml.jackson.databind.jsontype.impl.laissezfairesubtypevalidator;
import org.springframework.context.annotation.bean;
import org.springframework.context.annotation.configuration;
import org.springframework.data.redis.connection.redisconnectionfactory;
import org.springframework.data.redis.connection.redisstandaloneconfiguration;
import org.springframework.data.redis.connection.lettuce.lettuceconnectionfactory;
import org.springframework.data.redis.core.redistemplate;
import org.springframework.data.redis.serializer.jackson2jsonredisserializer;
import org.springframework.data.redis.serializer.stringredisserializer;
import org.springframework.web.client.resttemplate;
/**
 * @author: lq
 * @date 2024/8/17 15:18
 * @description:
 */
@configuration
public class redisconfig {
    @bean
    public redisconnectionfactory redisconnectionfactory() {
        lettuceconnectionfactory lettuceconnectionfactory =
                new lettuceconnectionfactory(new redisstandaloneconfiguration("127.0.0.1", 6379));
        return lettuceconnectionfactory;
    }
    @bean
    public redistemplate<object, object> redistemplate(redisconnectionfactory redisconnectionfactory) {
        redistemplate<object, object> template = new redistemplate<>();
        template.setconnectionfactory(redisconnectionfactory);
        template.setkeyserializer(new stringredisserializer());
        template.setvalueserializer(new jackson2jsonredisserializer<>(object.class));
        template.sethashkeyserializer(jackson2jsonredisserializer());
        template.sethashvalueserializer(jackson2jsonredisserializer());
        template.afterpropertiesset();
        return template;
    }
    @bean
    public resttemplate resttemplate(){
        return new resttemplate();
    }
    /**
     *  redis 值序列化方式
     * @return
     */
    private jackson2jsonredisserializer<object> jackson2jsonredisserializer() {
        jackson2jsonredisserializer<object> jackson2jsonredisserializer =
                new jackson2jsonredisserializer<>(object.class);
        objectmapper objectmapper = new objectmapper();
        // 自动检测所有类的全部属性
        objectmapper.setvisibility(propertyaccessor.field, jsonautodetect.visibility.any) ;
        // 此项必须配置,否则会报java.lang.classcastexception: java.util.linkedhashmap cannot be cast to xxx
        objectmapper.activatedefaulttyping(laissezfairesubtypevalidator.instance , objectmapper.defaulttyping.non_final, jsontypeinfo.as.property);
        // 此设置默认为true,就是在反序列化遇到未知属性时抛异常,这里设置为false,目的为忽略部分序列化对象存入缓存时误存的其他方法的返回值
        objectmapper.configure(deserializationfeature.fail_on_unknown_properties, false);
        jackson2jsonredisserializer.setobjectmapper(objectmapper);
        return jackson2jsonredisserializer;
    }
}
2.5.3 spring security 配置
httpsecurity参数说明 securityfilterchain : 一个表示安全过滤器链的对象 http.antmatchers(...).permitall() 通过 antmatchers 方法,你可以指定哪些请求路径不 需要进行身份验证。
http.authorizerequests() 可以配置请求的授权规则。 例 如, .anyrequest().authenticated() 表示任何请求都需要经过身份验证。 http.requestmatchers 表示某个请求不需要进行身份校验,permitall 随意访问。 http.httpbasic() 配置基本的 http 身份验证。 http.csrf() 通过 csrf 方法配置 csrf 保护。 http.sessionmanagement() 不会创建会话。这意味着每个请求都是独立的,不依赖于之前的 请求。适用于 restful 风格的应用。
package com.fashion.config;
import com.fashion.filter.imgverifyfilter;
import com.fashion.filter.jwtauthenticationtokenfilter;
import com.fashion.handler.anonymousauthenticationhandler;
import com.fashion.handler.customeraccessdeniedhandler;
import com.fashion.service.userdetailsserviceimpl;
import org.springframework.beans.factory.annotation.autowired;
import org.springframework.context.annotation.bean;
import org.springframework.context.annotation.configuration;
import org.springframework.security.authentication.authenticationmanager;
import org.springframework.security.config.annotation.web.builders.httpsecurity;
import org.springframework.security.config.annotation.web.configuration.websecurityconfigureradapter;
import org.springframework.security.crypto.bcrypt.bcryptpasswordencoder;
import org.springframework.security.crypto.password.passwordencoder;
import org.springframework.security.web.authentication.authenticationfailurehandler;
import org.springframework.security.web.authentication.usernamepasswordauthenticationfilter;
import java.util.arrays;
import java.util.list;
/**
 * @author: lq
 * @date 2024/8/13 21:12
 * @description:
 */
@configuration
public class securityfilterconfig extends websecurityconfigureradapter {
    @autowired
    private userdetailsserviceimpl userdetailsservice;
    @autowired
    private imgverifyfilter imgverifyfilter;
    @autowired
    private authenticationfailurehandler loginfailurehandler;
//    @autowired
//    private loginsuccesshandler loginsuccesshandler;
    @autowired
    private customeraccessdeniedhandler customeraccessdeniedhandler;
    @autowired
    private anonymousauthenticationhandler anonymousauthenticationhandler;
    @autowired
    private jwtauthenticationtokenfilter jwtauthenticationtokenfilter;
    private static list<string> exclude_url_list = arrays.aslist("/static/**","/user/**","/comm/**","/","/favicon.ico");
    /**
     * 登录时需要调用authenticationmanager.authenticate执行一次校验
     *
     */
    @bean
    @override
    protected authenticationmanager authenticationmanager() throws exception {
        return super.authenticationmanager();
    }
    // 入口配置
    @override
    protected void configure(httpsecurity http) throws exception {
         // 关闭crsf
         http.csrf(csrf -> csrf.disable());
         // 放行静态资源,以及登录接口放行
         http.authorizerequests().antmatchers(exclude_url_list.toarray(new string[]{}))
                 .permitall()
                 .anyrequest().authenticated();
         // 设置数据源
         http.userdetailsservice(userdetailsservice);
         // 配置异常过滤器
         //http.formlogin().failurehandler(loginfailurehandler);
        // 其他异常处理
         http.exceptionhandling(config ->
                 {
                     config.accessdeniedhandler(customeraccessdeniedhandler);
                     config.authenticationentrypoint(anonymousauthenticationhandler);
                 }
         );
         // 添加图形验证码过滤器
         http.addfilterbefore(imgverifyfilter, usernamepasswordauthenticationfilter.class);
         // jwt token 校验
         http.addfilterbefore(jwtauthenticationtokenfilter,usernamepasswordauthenticationfilter.class);
    }
    @bean
    public passwordencoder passwordencoder() {
        return new bcryptpasswordencoder();
    }
}
2.5.4 web 配置静态资源放行等信息
package com.fashion.config;
import org.springframework.context.annotation.configuration;
import org.springframework.web.servlet.config.annotation.resourcehandlerregistry;
import org.springframework.web.servlet.config.annotation.viewcontrollerregistry;
import org.springframework.web.servlet.config.annotation.webmvcconfigurer;
/**
 * @author: lq
 * @date 2024/8/17 16:32
 * @description:
 */
@configuration
public class webconfig implements webmvcconfigurer {
    /**
     *  放行静态资源
     * @param registry
     */
    @override
    public void addresourcehandlers(resourcehandlerregistry registry) {
        registry.addresourcehandler("/static/**")
                .addresourcelocations("classpath:/static/");
    }
    /**
     *  配置默认首页地址
     * @param registry
     */
    @override
    public void addviewcontrollers(viewcontrollerregistry registry) {
        registry.addviewcontroller("/").setviewname("index");
    }
//    @override
//    public void addcorsmappings(corsregistry registry) {
//        registry.addmapping("/**")
//                .allowedorigins("*")
//                .allowedmethods("get", "post", "put", "delete", "options")
//                .allowedheaders("*")
//                .allowcredentials(true);
//    }
}
2.5.5 异常类编写
/**
 * @author: lq
 * @date 2024/8/17 20:29
 * @description:
 */
public class customeraccessexception extends accessdeniedexception {
    public customeraccessexception(string msg) {
        super(msg);
    }
}
/**
 * @author: lq
 * @date 2024/8/17 15:35
 * @description: 无权限资源时异常
 */
public class customerauthenticationexception extends authenticationexception {
    public customerauthenticationexception(string msg) {
        super(msg);
    }
}
2.5.6 过滤器(图形验证码过滤器)
package com.fashion.filter;
import com.fashion.constants.comconstants;
import com.fashion.domain.r;
import com.fashion.handler.anonymousauthenticationhandler;
import com.fashion.utils.webutils;
import lombok.extern.slf4j.slf4j;
import org.springframework.beans.factory.annotation.autowired;
import org.springframework.stereotype.component;
import org.springframework.web.filter.onceperrequestfilter;
import javax.servlet.filterchain;
import javax.servlet.servletexception;
import javax.servlet.http.httpservletrequest;
import javax.servlet.http.httpservletresponse;
import java.io.ioexception;
/**
 * @author: lq
 * @date 2024/8/17 19:29
 * @description: 图像验证码过滤器
 */
@component
@slf4j
public class imgverifyfilter extends onceperrequestfilter {
    @autowired
    private httpservletrequest request;
    @autowired
    private anonymousauthenticationhandler anonymousauthenticationhandler;
    @override
    protected void dofilterinternal(httpservletrequest httpservletrequest, httpservletresponse httpservletresponse, filterchain filterchain) throws servletexception, ioexception {
        string requrl = httpservletrequest.getrequesturi();
        log.info("请求url:{}",requrl);
        if (comconstants.login_url.equals(requrl)) {
            // 开始校验图形验证码
            object imgcode = request.getparameter("imagecode");
            object sesscode = request.getsession().getattribute(comconstants.session_image);
            // 判断是否和库里面相等
            log.info("传过来的验证码为:{},session中的为:{}",imgcode,sesscode);
            if (!sesscode.equals(imgcode)) {
                //throw new customerauthenticationexception("图像验证码错误");
                webutils.writeresp(httpservletresponse, r.error().code(400).message("图像验证码失败!"));
                return;
            }
        }
        filterchain.dofilter(httpservletrequest,httpservletresponse);
    }
}
2.5.7 jwt 过滤器
作用:因为禁用了session所以需要将 securitycontextholder.getcontext() 中
package com.fashion.filter;
import cn.hutool.json.jsonutil;
import com.alibaba.fastjson.json;
import com.fashion.constants.comconstants;
import com.fashion.constants.redispreconst;
import com.fashion.domain.jwttoken;
import com.fashion.domain.loginsessionuserinf;
import com.fashion.exception.customerauthenticationexception;
import com.fashion.handler.loginfailurehandler;
import com.fashion.utils.jwtutil;
import io.jsonwebtoken.claims;
import lombok.extern.slf4j.slf4j;
import org.springframework.beans.factory.annotation.autowired;
import org.springframework.data.redis.core.stringredistemplate;
import org.springframework.security.authentication.usernamepasswordauthenticationtoken;
import org.springframework.security.core.authenticationexception;
import org.springframework.security.core.context.securitycontextholder;
import org.springframework.stereotype.component;
import org.springframework.util.objectutils;
import org.springframework.web.filter.onceperrequestfilter;
import javax.servlet.filterchain;
import javax.servlet.servletexception;
import javax.servlet.http.httpservletrequest;
import javax.servlet.http.httpservletresponse;
import java.io.ioexception;
/**
 * @author: lq
 * @date 2024/8/17 22:12
 * @description: jwt 认证
 */
@component
@slf4j
public class jwtauthenticationtokenfilter extends onceperrequestfilter {
    @autowired
    private loginfailurehandler loginfailurehandler;
    @autowired
    private stringredistemplate stringredistemplate;
    @override
    protected void dofilterinternal(httpservletrequest request, httpservletresponse response, filterchain filterchain) throws servletexception, ioexception {
        try {
            //获取当前请求的url地址
            string url = request.getrequesturi();
            //如果当前请求不是登录请求,则需要进行token验证
            if (!url.equals(comconstants.login_url) && !url.startswith("/user/") && !url.startswith("/comm")
                    && !url.equals("/") && !url.startswith("/favicon.ico") && !url.endswith("js") && !url.endswith("map")) {
                this.validatetoken(request);
            }
        } catch (authenticationexception e) {
            log.error("jwt异常");
            loginfailurehandler.onauthenticationfailure(request, response, e);
        }
        //登录请求不需要验证token
        dofilter(request, response, filterchain);
    }
    /**
     *  校验token有效性
     * @param request
     * @throws authenticationexception
     */
    private void validatetoken(httpservletrequest request) throws
            authenticationexception {
        //从头部获取token信息
        string token = request.getheader("token");
        //如果请求头部没有获取到token,则从请求的参数中进行获取
        if (objectutils.isempty(token)) {
            token = request.getparameter("token");
        }
        if (objectutils.isempty(token)) {
            throw new customerauthenticationexception("token不存在");
        }
        //如果存在token,则从token中解析出用户名
        claims claims = null;
        try {
            claims = jwtutil.parsejwt(token);
        } catch (exception e) {
            throw new customerauthenticationexception("token解析失败");
        }
        //获取到主题
        string loginuserstring = claims.getsubject();
        //把字符串转成loginuser对象
        jwttoken jwttoken = json.parseobject(loginuserstring, jwttoken.class);
        // 拿到中间的uuid去库里面得到用户信息
        string usertokenpre = string.format(redispreconst.login_token,jwttoken.gettoken());
        // 将用户信息放到redis中  24小时后过期
        string redisuser = stringredistemplate.opsforvalue().get(usertokenpre);
        if (objectutils.isempty(redisuser)) {
            throw new customerauthenticationexception("用户信息过期,请重新登录!");
        }
        loginsessionuserinf loginuser = jsonutil.tobean(redisuser,loginsessionuserinf.class);
        //创建身份验证对象
        usernamepasswordauthenticationtoken authenticationtoken = new
                usernamepasswordauthenticationtoken(loginuser, null,
                loginuser.getauthorities());
        //设置到spring security上下文
        securitycontextholder.getcontext().setauthentication(authenticationtoken);
    }
}
2.6 自定义登录接口
2.6.1 登录controller 接口
package com.fashion.controller;
import com.fashion.domain.r;
import com.fashion.domain.req.loginuserreq;
import com.fashion.service.userloginservice;
import org.springframework.beans.factory.annotation.autowired;
import org.springframework.web.bind.annotation.requestmapping;
import org.springframework.web.bind.annotation.restcontroller;
/**
 * @author: lq
 * @date 2024/8/17 16:05
 * @description: 用户登录接口
 */
@restcontroller
@requestmapping("user/")
public class userlogincontroller {
    @autowired
    private userloginservice userloginservice;
    /**
     *  用户登录
     * @param req
     * @return
     */
    @requestmapping("login")
    public r userlogin(loginuserreq req) {
        return userloginservice.login(req);
    }
}
2.6.2 userloginservice 用户自定义接口
package com.fashion.service;
import com.fashion.domain.r;
import com.fashion.domain.req.loginuserreq;
/**
 * @author: lq
 * @date 2024/8/17 16:07
 * @description: 用户自定义登录重写 providermanager的方法进行认证 如果认证通过生成jw
 */
public interface userloginservice {
    /**
     *  登录
     * @param userinf
     * @return
     */
   r login(loginuserreq userinf);
}
@service
@slf4j
public class userloginserviceimpl implements userloginservice {
    @autowired
    private authenticationmanager authenticationmanager;
    @autowired
    private stringredistemplate stringredistemplate;
    @override
    public r login(loginuserreq userinf) {
        // 1 封装 authenticationtoken 对象,密码校验等信息
        usernamepasswordauthenticationtoken usernamepasswordauthenticationtoken = new usernamepasswordauthenticationtoken(userinf.getloginid(),userinf.getloginpwd());
        // 2 开始调用进行校验
        authentication authenticate = authenticationmanager.authenticate(usernamepasswordauthenticationtoken);
        //3、如果authenticate为空
        if(objectutils.isempty(authenticate)){
            throw new customerauthenticationexception("登录失败!");
        }
        //放入的用户信息
        loginsessionuserinf loginsessionuserinf = (loginsessionuserinf)authenticate.getprincipal();
        //生成jwt,将用户名+uuid 放进去 这样jwt 就比较小,更好校验,将token 作为key 把loginsesionuser信息放到redis中
        jwttoken jwttoken = new jwttoken();
        jwttoken.setloginid(loginsessionuserinf.getusername());
        jwttoken.settoken(jwtutil.getuuid());
        string loginuserstring = jsonutil.tojsonstr(jwttoken);
        //调用jwt工具类,生成jwt令牌
        string jwtstr = jwtutil.createjwt(jwttoken.gettoken(), loginuserstring, jwtutil.jwt_ttl);
        log.info("jwt token 生成成功:{}",jwtstr);
        string usertokenpre = string.format(redispreconst.login_token,jwttoken.gettoken());
        log.info("用户拼接后的前缀信息:{}",usertokenpre);
        // 将用户信息放到redis中  24小时后过期
        stringredistemplate.opsforvalue().set(usertokenpre, jsonobject.tojsonstring(loginsessionuserinf),24, timeunit.hours);
        // 跳转到页面
        return r.ok().data("token",jwtstr).message("/main/index");
    }
}
2.6.3 代码截图
2.6.4 验证码controller
package com.fashion.controller;
import cn.hutool.captcha.captchautil;
import cn.hutool.captcha.linecaptcha;
import cn.hutool.captcha.generator.randomgenerator;
import com.fashion.constants.comconstants;
import lombok.extern.slf4j.slf4j;
import org.springframework.beans.factory.annotation.autowired;
import org.springframework.stereotype.controller;
import org.springframework.web.bind.annotation.requestmapping;
import javax.servlet.http.httpservletrequest;
import javax.servlet.http.httpservletresponse;
import java.awt.*;
import java.io.ioexception;
/**
 * @author: lq
 * @date 2024/8/17 16:05
 * @description: 通用接口,不用拦截
 */
@controller
@requestmapping("comm/")
@slf4j
public class comcontroller {
    @autowired
    private httpservletrequest request;
    /**
     *  获取图像验证码
     * @param response
     */
    @requestmapping("getverifyimage")
    public void getverifyimage(httpservletresponse response) {
        randomgenerator randomgenerator = new randomgenerator("0123456789", 4);
        //定义图形验证码的长、宽、验证码位数、干扰线数量
        linecaptcha linecaptcha = captchautil.createlinecaptcha(120, 40,4,19);
        linecaptcha.setgenerator(randomgenerator);
        linecaptcha.createcode();
        //设置背景颜色
        linecaptcha.setbackground(new color(249, 251, 220));
        //生成四位验证码
        string code = linecaptcha.getcode();
        log.info("图形验证码生成成功:{}",code);
        request.getsession().setattribute(comconstants.session_image,code);
        response.setcontenttype("image/jpeg");
        response.setheader("pragma", "no-cache");
        response.setheader("cache-control", "no-cache");
        try {
            linecaptcha.write(response.getoutputstream());
        } catch (ioexception e) {
            log.error("图像验证码获取失败:",e);
        }
    }
}
2.6.5 登录首页
package com.fashion.controller;
import lombok.extern.slf4j.slf4j;
import org.springframework.security.core.authentication;
import org.springframework.security.core.context.securitycontextholder;
import org.springframework.stereotype.controller;
import org.springframework.web.bind.annotation.requestmapping;
/**
 * @author: lq
 * @date 2024/8/17 22:06
 * @description: main的主页
 */
@controller
@requestmapping("main/")
@slf4j
public class maincontroller {
    @requestmapping("index")
    public string index() {
        authentication authentication = securitycontextholder.getcontext().getauthentication();
        object principal = authentication.getprincipal();
        log.info("我来首页了,用户信息:{}",principal);
        return "main";
    }
}
2.7 前端页面
2.7.1 前端效果

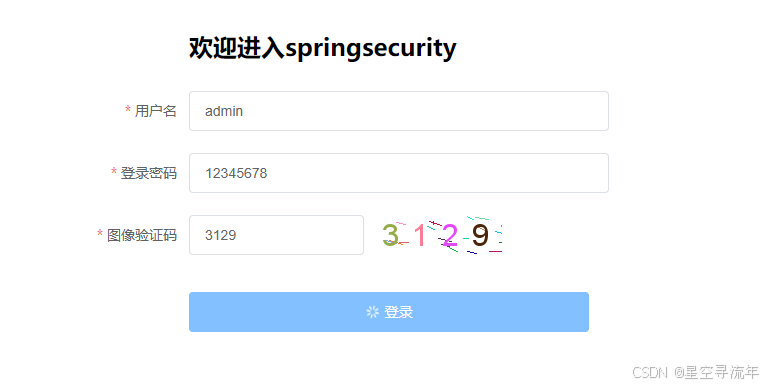
2.7.2 前端代码
<!doctype html>
<html lang="en" xmlns:th="http://www.thymeleaf.org">
<head>
    <meta charset="utf-8">
    <title>登录页</title>
    <!-- 引入样式 -->
    <link rel="stylesheet" href="https://unpkg.com/element-ui/lib/theme-chalk/index.css" rel="external nofollow"  rel="external nofollow" >
    <style type="text/css">
        #app{width: 600px;margin: 28px auto 10px }
        img{cursor: pointer;}
    </style>
</head>
<body>
   <div id="app">
       <el-container>
           <el-header>
               <h2 style="margin-left: 140px;">欢迎进入springsecurity</h2>
           </el-header>
           <el-main>
               <el-form ref="form" :model="form" label-width="140px" :rules="rules">
                   <el-form-item label="用户名" prop="loginid">
                       <el-input v-model="form.loginid" ></el-input>
                   </el-form-item>
                   <el-form-item label="登录密码" prop="loginpwd">
                       <el-input v-model="form.loginpwd"></el-input>
                   </el-form-item>
                   <el-form-item label="图像验证码" prop="imagecode">
                       <el-col :span="10">
                           <el-input v-model="form.imagecode"></el-input>
                       </el-col>
                       <!--<el-col class="line" :span="4"></el-col>-->
                       <el-col :span="5" :offset="1">
                           <img :src="form.imagecodeurl" @click="getverifycode">
                       </el-col>
                  </el-form-item>
                   <!--  <el-form-item label="即时配送">
                        <el-switch v-model="form.delivery"></el-switch>
                    </el-form-item>-->
                   <el-form-item>
                       <el-button type="primary" :loading="status.loading" @click="onsubmit('form')" style="width: 400px;">登录</el-button>
                      <!-- <el-button>取消</el-button>-->
                   </el-form-item>
               </el-form>
           </el-main>
          <!-- <el-footer>footer</el-footer>-->
       </el-container>
   </div>
<script type="text/javascript" th:src="@{/static/js/axios.js}"></script>
<script type="text/javascript" th:src="@{/static/js/vue2.js }"></script>
<!-- 引入组件库 -->
<script src="https://unpkg.com/element-ui/lib/index.js"></script>
<script type="text/javascript">
    var app = new vue({
        el:"#app",
        data:{
            form: {
                loginid: 'admin',
                loginpwd: '12345678',
                imagecode: '1111',
                imagecodeurl: '/comm/getverifyimage'
            }
            ,status: {
                "loading": false
            }
            ,
            rules: {
                loginid: [
                    { required: true, message: '请填写登录账号', trigger: 'blur' },
                    { min: 3, max: 15, message: '长度在 3 到 15 个字符', trigger: 'blur' }
                ],
                loginpwd: [
                    { required: true, message: '请填写登录密码', trigger: 'blur' },
                    { min: 3, max: 15, message: '长度在 3 到 15 个字符', trigger: 'blur' }
                ],
                imagecode: [
                    { required: true, message: '请填写图像验证码', trigger: 'blur' },
                    { min: 4, max: 4, message: '长度在4个', trigger: 'blur' }
                ],
            }
        }
        ,methods:{
            onsubmit:function(formname) {
                let that = this;
                that.status.loading = true;
                this.$refs[formname].validate((valid) => {
                    if (valid) {
                        let fordata =  json.stringify(that.form);
                        let formdata = new formdata();
                        formdata.append('loginid', that.form.loginid);
                        formdata.append('loginpwd', that.form.loginpwd);
                        formdata.append('imagecode', that.form.imagecode);
                        //console.log(fordata);
                        axios.post("/user/login",
                            formdata
                        )
                            .then(function (response) {
                                let resdata = response.data;
                                console.log(resdata);
                                that.status.loading = false;
                                if (resdata.code != '0000') {
                                    that.$message.error(resdata.message);
                                    // 刷新验证码
                                    that.getverifycode();
                                } else {
                                    that.$message({
                                        showclose: true,
                                        message: '登录成功,稍后进行跳转',
                                        type: 'success'
                                    });
                                    let url = resdata.message + "?token=" + resdata.data.token
                                    window.location.href = url;
                                }
                            })
                    } else {
                        that.$message.error('请完整填写信息');
                        return false;
                    }
                });
            },
            resetform(formname) {
                this.$refs[formname].resetfields();
            }
            ,getverifycode: function () {
                console.log("getverifycode")
                this.form.imagecodeurl = '/comm/getverifyimage?v='+new date();
            }
        }
    });
</script>
</body>
</html>
2.7.3 登录成功页面
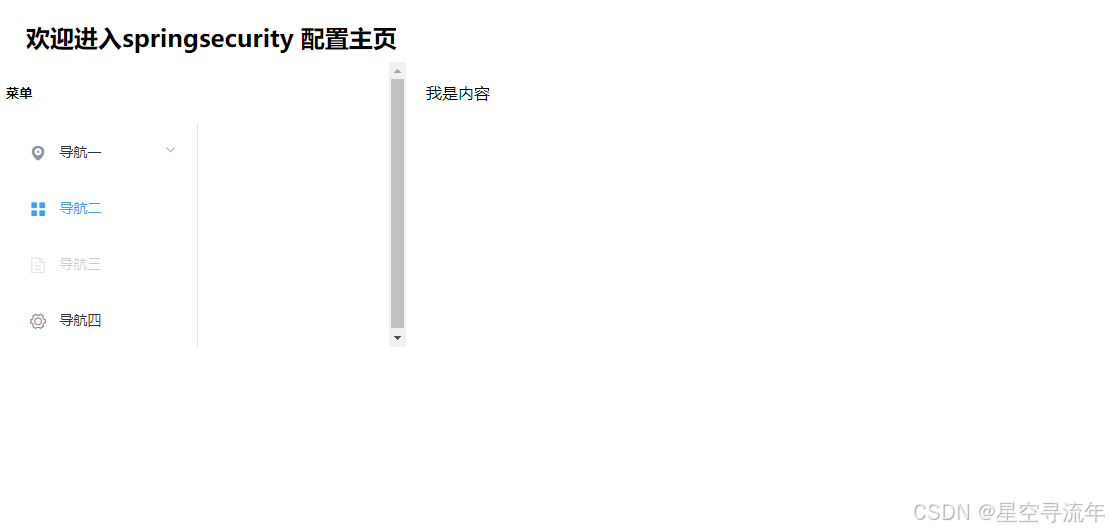
2.7.4 htm 代码
<!doctype html>
<html lang="en" xmlns:th="http://www.thymeleaf.org">
<head>
    <meta charset="utf-8">
    <title>主页菜单</title>
    <!-- 引入样式 -->
    <link rel="stylesheet" href="https://unpkg.com/element-ui/lib/theme-chalk/index.css" rel="external nofollow"  rel="external nofollow" >
    <style type="text/css">
    </style>
</head>
<body>
   <div id="app">
       <el-container>
           <el-header>
               <h2 >欢迎进入springsecurity 配置主页</h2>
           </el-header>
           <el-container>
               <el-aside width="400px">
                   <el-row class="tac">
                       <el-col :span="12">
                           <h5>菜单</h5>
                           <el-menu
                                   default-active="2"
                                   class="el-menu-vertical-demo"
                                   @open="handleopen"
                                   @close="handleclose">
                               <el-submenu index="1">
                                   <template slot="title">
                                       <i class="el-icon-location"></i>
                                       <span>导航一</span>
                                   </template>
                                   <el-menu-item-group>
                                       <!-- <template slot="title">分组一</template>-->
                                       <el-menu-item index="1-1">选项1</el-menu-item>
                                       <el-menu-item index="1-2">选项2</el-menu-item>
                                   </el-menu-item-group>
                               </el-submenu>
                               <el-menu-item index="2">
                                   <i class="el-icon-menu"></i>
                                   <span slot="title">导航二</span>
                               </el-menu-item>
                               <el-menu-item index="3" disabled>
                                   <i class="el-icon-document"></i>
                                   <span slot="title">导航三</span>
                               </el-menu-item>
                               <el-menu-item index="4">
                                   <i class="el-icon-setting"></i>
                                   <span slot="title">导航四</span>
                               </el-menu-item>
                           </el-menu>
                       </el-col>
                   </el-row>
               </el-aside>
               <el-main>我是内容</el-main>
           </el-container>
          <!-- <el-footer>footer</el-footer>-->
       </el-container>
   </div>
<script type="text/javascript" th:src="@{/static/js/axios.js}"></script>
<script type="text/javascript" th:src="@{/static/js/vue2.js }"></script>
<!-- 引入组件库 -->
<script src="https://unpkg.com/element-ui/lib/index.js"></script>
<script type="text/javascript">
    var app = new vue({
        el:"#app",
        data:{
        }
        ,methods:{
            handleopen(key, keypath) {
                console.log(key, keypath);
            },
            handleclose(key, keypath) {
                console.log(key, keypath);
            }
        }
    });
</script>
</body>
</html>
到此这篇关于springsecurity 登录认证一(ajax)的文章就介绍到这了,更多相关springsecurity 登录认证内容请搜索代码网以前的文章或继续浏览下面的相关文章希望大家以后多多支持代码网!


发表评论