opencv鼠标事件函数setmousecallback()详解
1、鼠标事件函数:
(1)鼠标事件函数原型:setmousecallback(),此函数会在调用之后不断查询回调函数onmouse(),直到窗口销毁
  void setmousecallback(
	const string& winname,
	mousecallback onmouse,
	void* userdata = 0
)

参数解释:
 winname:窗口名称;
 onmouse:回调函数;
 userdata:传递给回调函数用户自定义的外部数据,userdata是一个 void 类型的指针;
(2)回调函数onmouse(),可随意命名,但是要与 setmousecallback()函数里的回调函数名称一致
void onmouse(
int event,
int x,
int y,
int flags,
void *userdata
)
参数解释:
event:表示鼠标事件类型的常量(
#define cv_event_mousemove 0
#define cv_event_lbuttondown 1
#define cv_event_rbuttondown 2
#define cv_event_mbuttondown 3
#define cv_event_lbuttonup 4
#define cv_event_rbuttonup 5
#define cv_event_mbuttonup 6
#define cv_event_lbuttondblclk 7
#define cv_event_rbuttondblclk 8
#define cv_event_mbuttondblclk 9
);
x和y:鼠标指针在图像坐标系的坐标;
flags:鼠标事件标志的常量;
userdata:回调函数接收,用户自定义的外部数据,userdata是一个 void 类型的指针;
2、代码示例:
(1)main.cpp
#include <opencv2\opencv.hpp>
#include <iostream>
#include <demo.h>
using namespace cv;
using namespace std;
int main() {
mat src = cv::imread("c:\\cpp\\image\\suzy4.jpg");
if (src.empty()) {
printf("could not load image..../n");
return -1;
}
demo demo;
demo.mouseevent(src);
waitkey();
destroyallwindows();
return 0;
}
(2)头文件demo.h
#include <opencv2/opencv.hpp>

using namespace cv;

class demo
{
public:
	void mouseevent(mat &image);
private:

};
(3)demo.cpp
#include <demo.h>
using namespace std;
point sp(-1, -1);
point ep(-1, -1);
mat temp;
static void onmouse(int event, int x, int y, int flags, void *userdata) {
mat image = *((mat*)userdata);
if (event == event_lbuttondown) {
sp.x = x;
sp.y = y;
std::cout << "start point:" << sp << std::endl;
}
else if (event == event_lbuttonup) {
ep.x = x;
ep.y = y;
int dx = ep.x - sp.x;
int dy = ep.y - sp.y;
if (dx > 0 && dy > 0) {
rect box(sp.x, sp.y, dx, dy);
temp.copyto(image);
imshow("roi区域", image(box));
rectangle(image, box, scalar(0, 0, 255), 2, 8, 0);
imshow("鼠标绘制", image);
sp.x = -1;
sp.y = -1;
}
}
else if (event == event_mousemove) {
if (sp.x > 0 && sp.y > 0) {
ep.x = x;
ep.y = y;
int dx = ep.x - sp.x;
int dy = ep.y - sp.y;
if (dx > 0 && dy > 0) {
rect box(sp.x, sp.y, dx, dy);
temp.copyto(image);
rectangle(image, box, scalar(0, 0, 255), 2, 8, 0);
imshow("鼠标绘制", image);
}
}
}
}
void demo::mouseevent(mat &image) {
namedwindow("鼠标事件", window_autosize);
setmousecallback("鼠标绘制", onmouse, (void*)(&image));
imshow("鼠标绘制", image);
temp = image.clone();
}
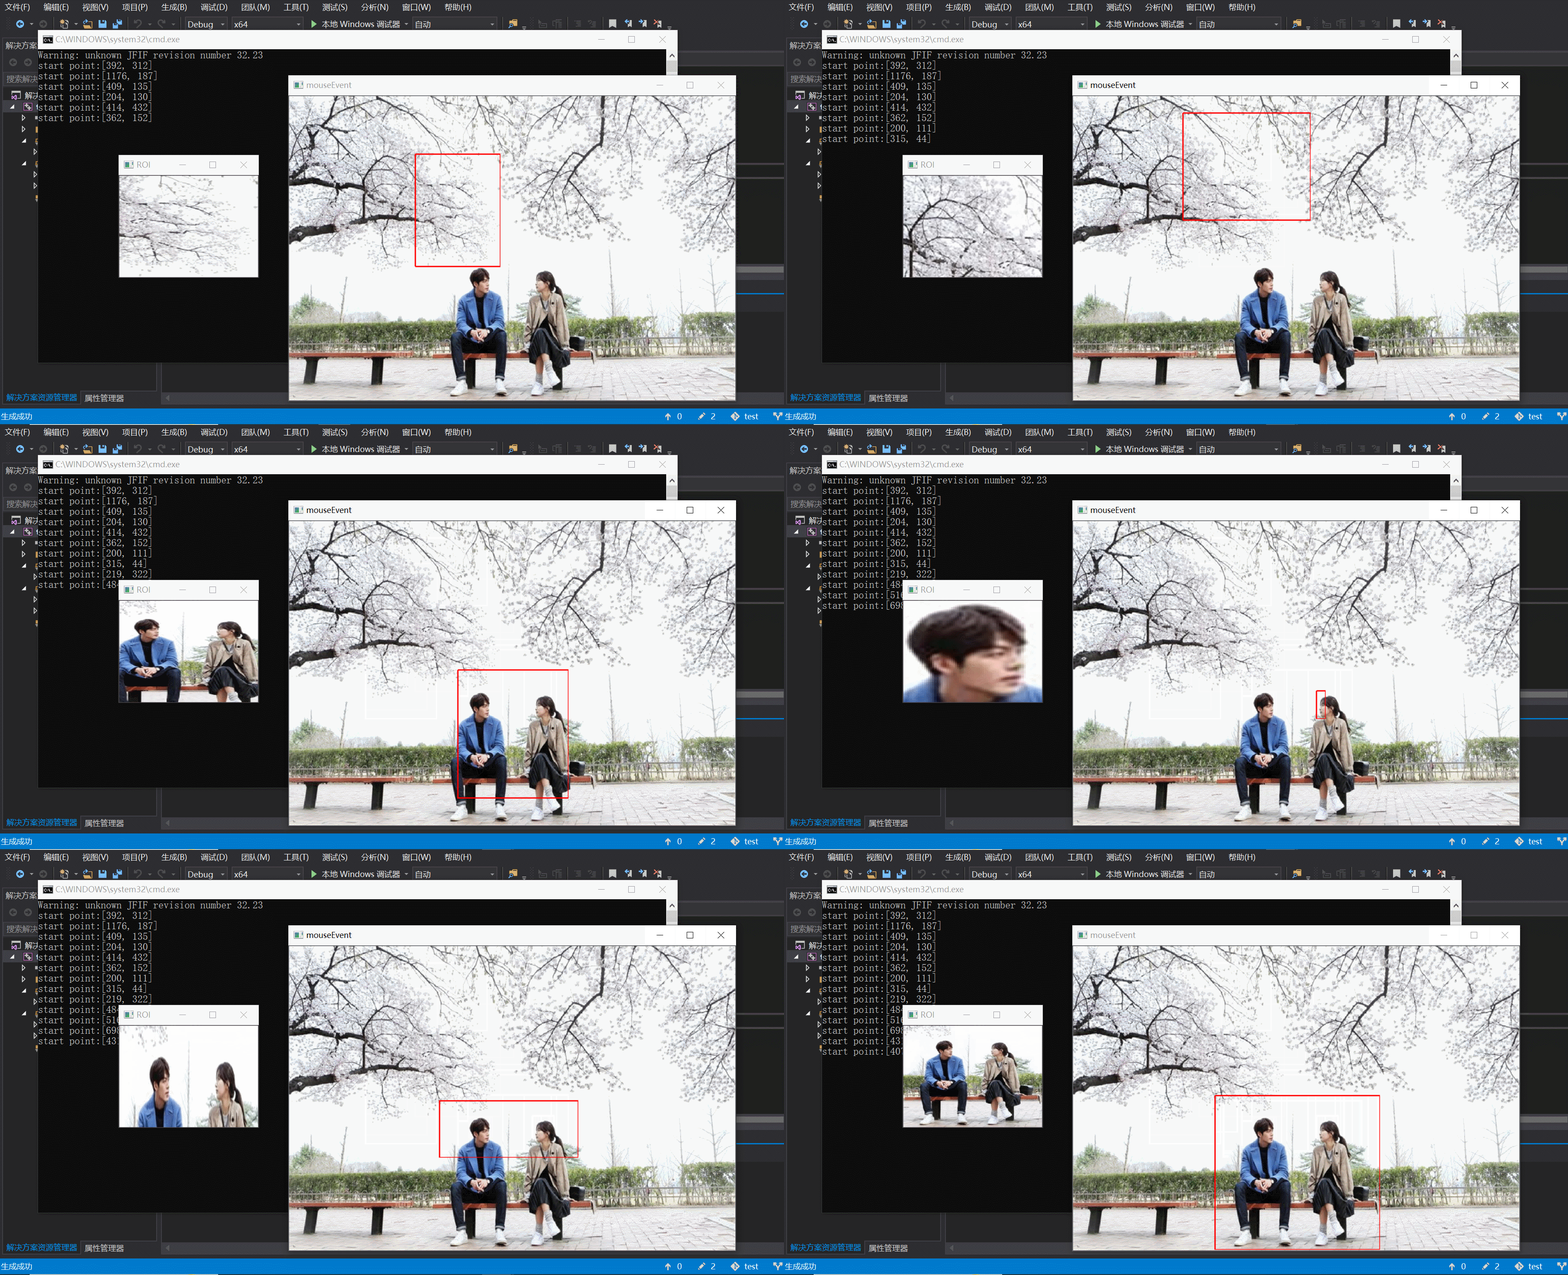
(4)效果演示

版权声明:本文内容由互联网用户贡献,该文观点仅代表作者本人。本站仅提供信息存储服务,不拥有所有权,不承担相关法律责任。
如发现本站有涉嫌抄袭侵权/违法违规的内容, 请发送邮件至 2386932994@qq.com 举报,一经查实将立刻删除。


发表评论