1.修改pages.json文件中tabbar内容: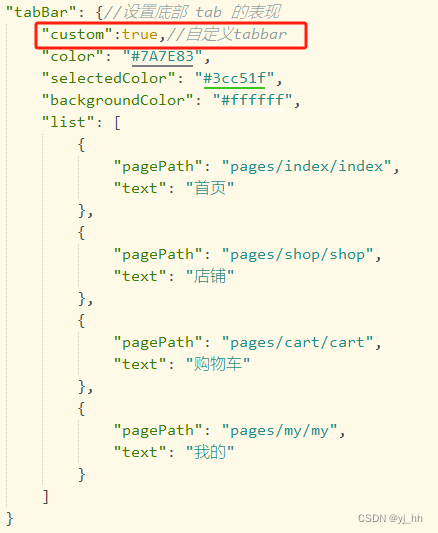
只需要添加"custom":true,//自定义tabbar即可
2.创建组件tabbar
<template>
	<view class="tabbar">
		<view v-for="(item, index) in tabbarlist" :key="index" class="tabbar-item" @click="switchtab(index)">
			<text :class="{active: index === currentindex}">{{item.text}}</text>
		</view>
	</view>
</template>

<script>
export default {
	props: {
		currentindex: number
	},
	data(){
		return{
			tabbarlist: [
				{ text: '首页', icon: '', activeicon: '' },
				{ text: '店铺', icon: '', activeicon: '' },
				{ text: '购物车', icon: '', activeicon: '' },
				{ text: '我的', icon: '', activeicon: '' }
			],
		}
	},
	methods: {
		switchtab(index) {
		  this.$emit('switchtab', index);
		}
	}
}
</script>

<style scoped>
	.tabbar {
		display: flex;
		position: fixed;
		bottom: 0;
		left: 0;
		right: 0;
		background-color: #fff;
		height: 80px;
		border-top: 1px solid #999;
	}
	.tabbar-item {
		flex: 1;
		display: flex;
		justify-content: center;
		align-items: center;
		position: relative;
	}
	.tabbar-item text {
		padding: 5px;
		font-size: 14px;
		color: #333;
	}
	.tabbar-item text.active {
		color: #09bb07;
	}
</style>
3.引用组件
在首页引用组件
<template>
	<view class="content">
		<tabbar  :currentindex="currentindex" @switchtab="switchtab"></tabbar>
	</view>
</template>

<script>
	import tabbar from '@/components/tabbar/tabbar.vue'
	export default {
		components:{
			tabbar
		},
		data() {
			return {
				currentindex: 0
			}
		},
		created() {},
		onload() {},
		methods: {
			switchtab(index) {
				this.currentindex = index;// 根据index切换对应的页面
			}
		}
	}
</script>

<style>

</style>


发表评论