简介
之前使用@schedule一直没有遇到什么问题,那种拿来就用的感觉还挺好,最近使用@schedule遇到一点问题,才仔细的研究了一下@schedule的一些细节和原理问题。
这篇文章就将分享一下,使用@schedule一些可能被忽略的问题。
注意事项
@schedule默认线程池大小
我相信@schedule默认线程池大小的问题肯定是被很多拿来就用的朋友忽略的问题,默认情况下@schedule使用线程池的大小为1。
一般情况下没有什么问题,但是如果有多个定时任务,每个定时任务执行时间可能不短的情况下,那么有的定时任务可能一直没有机会执行。
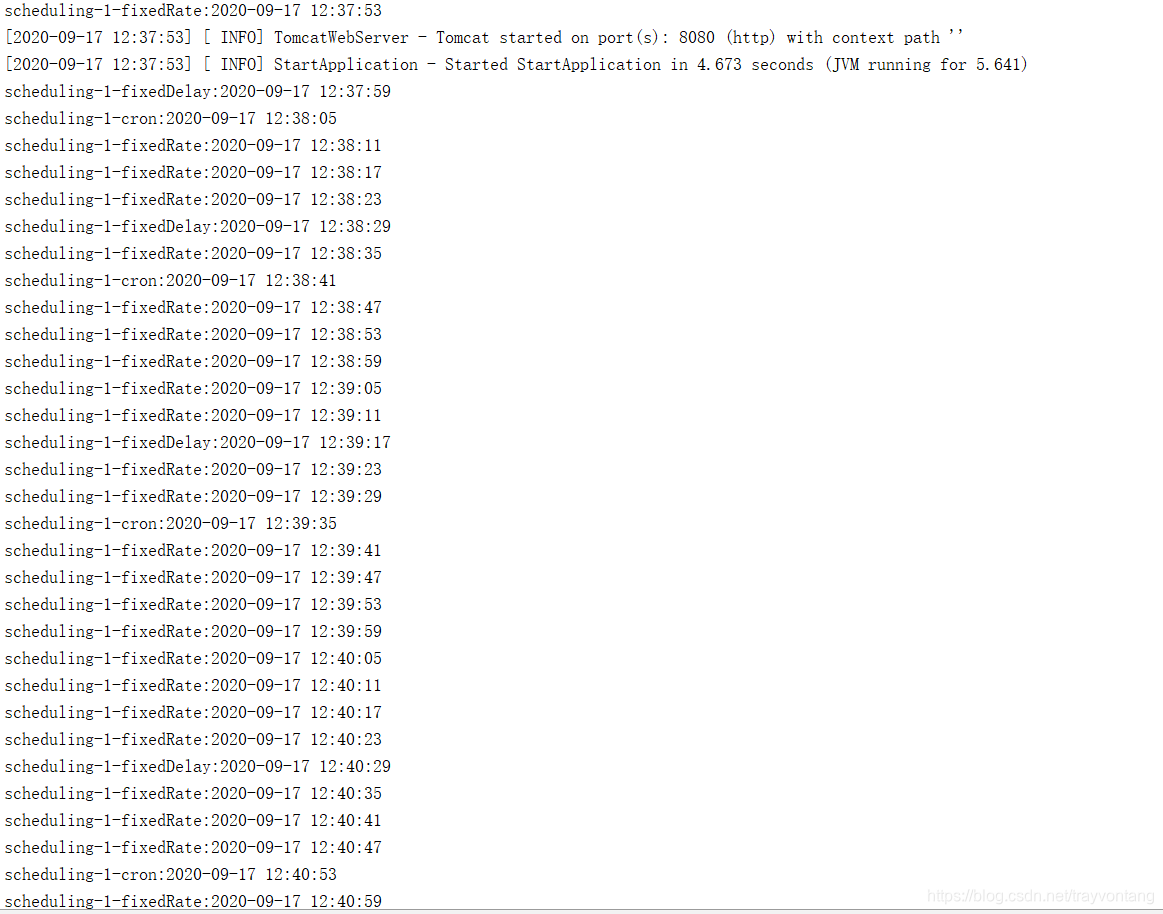
有兴趣的朋友,可以试一下:
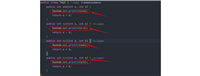
@component
public class brigetask {

    private static final datetimeformatter formatter = datetimeformatter.ofpattern("yyyy-mm-dd hh:mm:ss");

    @scheduled(cron = "*/5 * * * * ?")
    private void cron() throws interruptedexception {
        system.out.println(thread.currentthread().getname() + "-cron:" + localdatetime.now().format(formatter));
        timeunit.seconds.sleep(6);
    }

    @scheduled(fixeddelay = 5000)
    private void fixeddelay() throws interruptedexception {
        system.out.println(thread.currentthread().getname() + "-fixeddelay:" + localdatetime.now().format(formatter));
        timeunit.seconds.sleep(6);
    }

    @scheduled(fixedrate = 5000)
    private void fixedrate() throws interruptedexception {
        system.out.println(thread.currentthread().getname() + "-fixedrate:" + localdatetime.now().format(formatter));
        timeunit.seconds.sleep(6);
    }
}
上面的任务中,fixeddelay与cron,可能很久都不会被执行。
要解决上面的问题,可以把执行任务的线程池设置大一点,怎样设置通过实现schedulingconfigurer接口,在configuretasks方法中配置,这种方式参见后面的代码,这里可以直接注入一个taskscheduler来解决问题。
@bean
public taskscheduler taskscheduler() {
    threadpooltaskscheduler taskscheduler = new threadpooltaskscheduler();
    taskscheduler.setpoolsize(5);
    return taskscheduler;
}
当然也可以使用scheduledexecutorservice:
@bean
public scheduledexecutorservice scheduledexecutorservice() {
    return executors.newscheduledthreadpool(10);
}
为啥这样有效,请参考后面@schedule原理。
固定延迟与固定速率
@schedule的三种方式cron、fixeddelay、fixedrate不管线程够不够都会阻塞到上一次执行完成,才会执行下一次。
如果任务方法执行时间非常短,上面三种方式其实基本没有太多的区别。
如果,任务方法执行时间比较长,大于了设置的执行周期,那么就有很大的区别。例如,假设执行任务的线程足够,执行周期是5s,任务方法会执行6s。
- cron的执行方式是,任务方法执行完,遇到下一次匹配的时间再次执行,基本就会10s执行一次,因为执行任务方法的时间区间会错过一次匹配。
- fixeddelay的执行方式是,方法执行了6s,然后会再等5s再执行下一次,在上面的条件下,基本就是每11s执行一次。
- fixedrate的执行方式就变成了每隔6s执行一次,因为按固定区间执行它没5s就应该执行一次,但是任务方法执行了6s,没办法,只好6s执行一次。
上面的结论都可以通过,最上面的示例验证,有兴趣的朋友可以调整一下休眠时间测试一下。
springboot @schedule原理
在springboot中,我们使用@enablescheduling来启用@schedule。
@target(elementtype.type)
@retention(retentionpolicy.runtime)
@import(schedulingconfiguration.class)
@documented
public @interface enablescheduling {

}
enablescheduling注解没什么特殊,需要注意import了schedulingconfiguration。
schedulingconfiguration一看名字就知道是一个配置类,肯定是为了添加相应的依赖类。
@configuration
@role(beandefinition.role_infrastructure)
public class schedulingconfiguration {

	@bean(name = taskmanagementconfigutils.scheduled_annotation_processor_bean_name)
	@role(beandefinition.role_infrastructure)
	public scheduledannotationbeanpostprocessor scheduledannotationprocessor() {
		return new scheduledannotationbeanpostprocessor();
	}
}
我们可以看到在schedulingconfiguration创建了一个scheduledannotationbeanpostprocessor。
看样子springboot定时任务的核心就是scheduledannotationbeanpostprocessor类了,下面我们来看一看scheduledannotationbeanpostprocessor类。
scheduledannotationbeanpostprocessor
public class scheduledannotationbeanpostprocessor
		implements scheduledtaskholder, mergedbeandefinitionpostprocessor, destructionawarebeanpostprocessor,
		ordered, embeddedvalueresolveraware, beannameaware, beanfactoryaware, applicationcontextaware,
		smartinitializingsingleton, applicationlistener<contextrefreshedevent>, disposablebean {
}
scheduledannotationbeanpostprocessor实现了很多接口,这里重点关注2个,applicationlistener和destructionawarebeanpostprocessor。
destructionawarebeanpostprocessor封装任务
destructionawarebeanpostprocessor继承了beanpostprocessor。
beanpostprocessor相信大家已经非常熟悉了,就是在bean创建执行setter之后,在自定义的afterpropertiesset和init-method前后提供拦截点,大致执行的先后顺序是:
bean实例化 -> setter -> beanpostprocessor#postprocessbeforeinitialization ->
-> initializingbean#afterpropertiesset -> init-method -> beanpostprocessor#postprocessafterinitialization
我们看一下scheduledannotationbeanpostprocessor的postprocessafterinitialization方法:
@override
public object postprocessafterinitialization(object bean, string beanname) {
    if (bean instanceof aopinfrastructurebean || bean instanceof taskscheduler ||
            bean instanceof scheduledexecutorservice) {
        // ignore aop infrastructure such as scoped proxies.
        return bean;
    }

    class<?> targetclass = aopproxyutils.ultimatetargetclass(bean);
    if (!this.nonannotatedclasses.contains(targetclass) &&
            annotationutils.iscandidateclass(targetclass, arrays.aslist(scheduled.class, schedules.class))) {
        map<method, set<scheduled>> annotatedmethods = methodintrospector.selectmethods(targetclass,
                (methodintrospector.metadatalookup<set<scheduled>>) method -> {
                    set<scheduled> scheduledmethods = annotatedelementutils.getmergedrepeatableannotations(
                            method, scheduled.class, schedules.class);
                    return (!scheduledmethods.isempty() ? scheduledmethods : null);
                });
        if (annotatedmethods.isempty()) {
            this.nonannotatedclasses.add(targetclass);
            if (logger.istraceenabled()) {
                logger.trace("no @scheduled annotations found on bean class: " + targetclass);
            }
        }
        else {
            // non-empty set of methods
            annotatedmethods.foreach((method, scheduledmethods) ->
                    scheduledmethods.foreach(scheduled -> processscheduled(scheduled, method, bean)));
            if (logger.istraceenabled()) {
                logger.trace(annotatedmethods.size() + " @scheduled methods processed on bean '" + beanname +
                        "': " + annotatedmethods);
            }
        }
    }
    return bean;
}
简单说一下流程:
找到所有的schedule方法,把它封装为scheduledmethodrunnable类(scheduledmethodrunnable类实现了runnable接口),并把其做为一个任务注册到scheduledtaskregistrar中。
如果对具体的逻辑感兴趣,可以从postprocessafterinitialization方法顺着processscheduled方法一次debug。
applicationlistener执行任务
前面我们介绍通过beanpostprocessor解析出了所有的任务,接下来要做的事情就是提交任务了。
@override
public void onapplicationevent(contextrefreshedevent event) {
    if (event.getapplicationcontext() == this.applicationcontext) {
        // running in an applicationcontext -> register tasks this late...
        // giving other contextrefreshedevent listeners a chance to perform
        // their work at the same time (e.g. spring batch's job registration).
        finishregistration();
    }
}
scheduledannotationbeanpostprocessor监听的事件是contextrefreshedevent,就是在容器初始化,或者刷新的时候被调用。
监听到contextrefreshedevent事件之后,值调用了finishregistration方法,这个方法的基本流程如下:
- 1.找到容器中的schedulingconfigurer,并调用它的configuretasks,schedulingconfigurer的作用主要就是配置scheduledtaskregistrar类,例如线程池等参数,例如:
import org.springframework.context.annotation.configuration;
import org.springframework.scheduling.annotation.schedulingconfigurer;
import org.springframework.scheduling.config.scheduledtaskregistrar;

import java.util.concurrent.executors;

@configuration
public class myscheduleconfig implements schedulingconfigurer {

    @override
    public void configuretasks(scheduledtaskregistrar taskregistrar) {
        taskregistrar.setscheduler(executors.newscheduledthreadpool(10));
    }
}- 2.调用scheduledtaskregistrar的afterpropertiesset方法执行任务,如果对具体的逻辑感兴趣,可以阅读scheduledtaskregistrar的scheduletasks方法。
关于为啥直接在容器中注入一个taskscheduler、scheduledexecutorservice也可以有效,也可以在finishregistration方法中找到答案。
总结
以上为个人经验,希望能给大家一个参考,也希望大家多多支持代码网。


发表评论