前言
前面总结了一对一,多对一和一对多的多表查询,今天总结一下多对多的mybatis多表查询。同样有xml方式和注解方式,步骤和前两种查询差不多,最主要的区别就在表和sql语句上了。
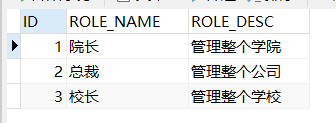
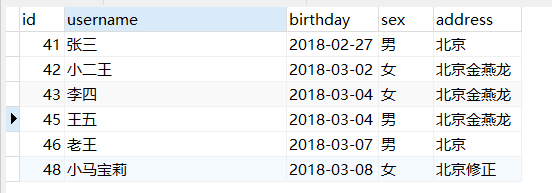
数据库表及关系
这里采用用户和角色的例子
一个用户可以有多个角色
一个角色可以赋予多个用户
在进行多表查询时,我们需要一张中间表,中间表中包含各自的主键,在中间表中是外键。

多对多查询(xml方式)
这次我们首先清理一下思路,我们先在数据库里把我们需要的数据查出来再写代码。
我们查询用户时要同时查出其对应的角色,借助中间表,根据uid查询rid,再根据rid查询角色表,中间表的数据我们不需要,所以不显示。
这里我们可以用左外连接来进行多表的查询,查询所有用户,用户有角色信息就连接到该用户后面,没有则为空。
select u.*,r.id as rid,r.role_name,r.role_desc from user u
        left outer join user_role ur on u.id=ur.uid
        left outer join role r on ur.rid = r.id

当我们查询角色想要得到相应的用户时道理是一样的,sql语句也只要换一下连接顺序。
select u.*,r.id as rid,r.role_name,r.role_desc from role r
        left outer join user_role ur on r.id=ur.rid
        left outer join user u on ur.uid = u.id

查询出来结果后剩下的内容就很简单。
在user和role里加入多对多实体映射
public class role implements serializable {
    private string roleid;
    private string rolename;
    private string roledesc;
    //多对多映射关系,一个角色有多个用户
    private list<user> users;

    public list<user> getusers() {
        return users;
    }

    public void setusers(list<user> users) {
        this.users = users;
    }

    public string getroleid() {
        return roleid;
    }

    public void setroleid(string roleid) {
        this.roleid = roleid;
    }

    public string getrolename() {
        return rolename;
    }

    public void setrolename(string rolename) {
        this.rolename = rolename;
    }

    public string getroledesc() {
        return roledesc;
    }

    public void setroledesc(string roledesc) {
        this.roledesc = roledesc;
    }

    @override
    public string tostring() {
        return "role{" +
                "roleid='" + roleid + '\'' +
                ", rolename='" + rolename + '\'' +
                ", roledesc='" + roledesc + '\'' +
                '}';
    }
}
public class user implements serializable{
    private integer id;
    private string username;
    private string address;
    private string sex;
    private date birthday;
    //多对多映射关系,一个用户具备多个角色
    private list<role> roles;

    public list<role> getroles() {
        return roles;
    }

    public void setroles(list<role> roles) {
        this.roles = roles;
    }

    @override
    public string tostring() {
        return "user{" +
                "id=" + id +
                ", username='" + username + '\'' +
                ", address='" + address + '\'' +
                ", sex='" + sex + '\'' +
                ", birthday=" + birthday +
                '}';
    }

    public integer getid() {
        return id;
    }

    public void setid(integer id) {
        this.id = id;
    }

    public string getusername() {
        return username;
    }

    public void setusername(string username) {
        this.username = username;
    }

    public string getaddress() {
        return address;
    }

    public void setaddress(string address) {
        this.address = address;
    }

    public string getsex() {
        return sex;
    }

    public void setsex(string sex) {
        this.sex = sex;
    }

    public date getbirthday() {
        return birthday;
    }

    public void setbirthday(date birthday) {
        this.birthday = birthday;
    }
}
然后配置xml,配置映射封装和sql语句
<!--定义resultmap-->
    <resultmap id="userwithrole" type="user">
        <id property="id" column="id"></id>
        <result property="username" column="username"></result>
        <result property="address" column="address"></result>
        <result property="sex" column="sex"></result>
        <result property="birthday" column="birthday"></result>
        <!--配置角色映射-->
        <collection property="roles" oftype="role">
            <id property="roleid" column="rid"></id>
            <result property="rolename" column="role_name"></result>
            <result property="roledesc" column="role_desc"></result>
        </collection>
    </resultmap>
    <!--查询所有用户信息-->
    <select id="findall" resultmap="userwithrole">
        select u.*,r.id as rid,r.role_name,r.role_desc from user u
        left outer join user_role ur on u.id=ur.uid
        left outer join role r on ur.rid = r.id
    </select>
<resultmap id="roleusermap" type="role">
        <id property="roleid" column="rid"></id>
        <result property="rolename" column="role_name"></result>
        <result property="roledesc" column="role_desc"></result>
        <collection property="users" oftype="user">
            <id property="id" column="id"></id>
            <result property="username" column="username"></result>
            <result property="address" column="address"></result>
            <result property="sex" column="sex"></result>
            <result property="birthday" column="birthday"></result>
        </collection>
    </resultmap>
    <!--查询所有角色信息-->
    <select id="findall" resultmap="roleusermap">
        select u.*,r.id as rid,r.role_name,r.role_desc from role r
        left outer join user_role ur on r.id=ur.rid
        left outer join user u on ur.uid = u.id
    </select>
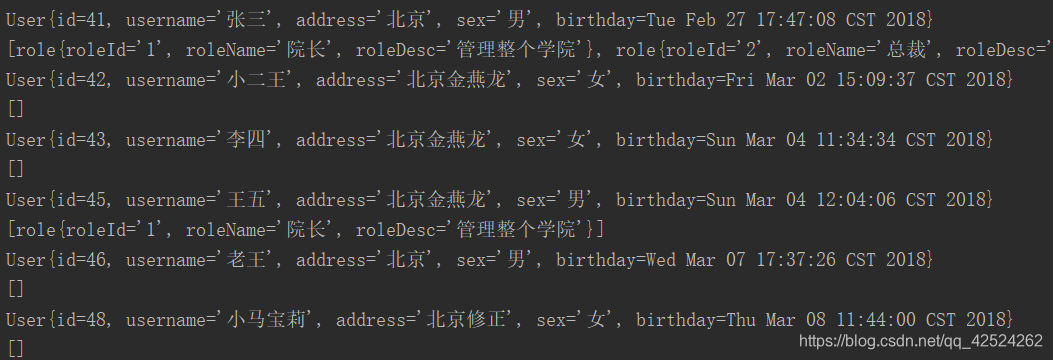
测试结果

注解方式
思路是一样的,但我们使用注解时,不能像xml方式一样只使用一条sql语句完成直接封装,所以这里要按上面说的思路完成分步查询。
public interface iuserdao {
    /**
     * 查询所有操作,并携带账户信息
     * @return
     */
    @select("select * from user")
    @results(id = "userrolemap",value = {
            //id表示主键
            @result(id = true,column = "id",property = "id"),
            @result(column = "username",property = "username"),
            @result(column = "address",property = "address"),
            @result(column = "sex",property = "sex"),
            @result(column = "birthday",property = "birthday"),
            @result(property = "roles",column = "id",many = @many(select = "com.itcc.dao.iroledao.findbyuid",fetchtype = fetchtype.lazy))
    })
    list<user> findall();


    /**
     * 根据id查询一个用户
     * @param rid
     */
    @select("select * from user where id in(select uid from user_role where rid = #{rid})")
    @results({
            @result(id = true,column = "id",property = "id"),
            @result(column = "username",property = "username"),
            @result(column = "address",property = "address"),
            @result(column = "sex",property = "sex"),
            @result(column = "birthday",property = "birthday")
    })
    list<user> findbyrid(integer rid);


}
public interface iroledao {
    /**
     * 查询所有角色信息
     * @return
     */
    @select("select * from role")
    @results({
            @result(id = true,column = "id",property = "roleid"),
            @result(column = "role_name",property = "rolename"),
            @result(column = "role_desc",property = "roledesc"),
            @result(property = "users",column = "id",many = @many(select = "com.itcc.dao.iuserdao.findbyrid",fetchtype = fetchtype.lazy))
    })
    list<role> findall();

    @select("select * from role where id in(select rid from user_role where uid = #{uid})")
    @results({
            @result(id = true,column = "id",property = "roleid"),
            @result(column = "role_name",property = "rolename"),
            @result(column = "role_desc",property = "roledesc")
    })
    list<role> findbyuid(string uid);
}
最终的测试结果和上面一样。
到此这篇关于mybatis多对多查询的实现(xml方式和注解方式)的文章就介绍到这了,更多相关mybatis多对多查询内容请搜索代码网以前的文章或继续浏览下面的相关文章希望大家以后多多支持代码网!


发表评论