前言
学习参考:老孟 flutter动画
基本上开发时使用的组件都有其动画,关于动画方面的知识,一般情况很少会用到。因此这里只学习关于动画的基本知识。
animationcontroller
flutter中的animationcontroller是一个用于控制动画的类。它可以控制动画的开始、停止、反转、重置等操作,并且可以设置动画的持续时间、曲线等属性。
animationcontroller 通常在 initstate 方法中初始化,在dispose中释放动画
使用animationcontroller需要先创建一个实例,然后设置动画的持续时间、曲线等属性,最后通过调用forward()方法来启动动画。在动画运行过程中,可以通过调用reverse()方法来反转动画,通过调用stop()方法来停止动画,通过调用reset()方法来重置动画。
animationcontroller还可以添加监听器,用于监听动画的状态变化。例如,可以通过添加addlistener()方法来监听动画的值变化,从而更新ui界面。通过添加addstatuslistener来监听动画的状态
// 单个 animationcontroller 的时候使用 singletickerproviderstatemixin,多个 animationcontroller 使用 tickerproviderstatemixin。
class _ychomebodystate extends state<ychomebody>
with singletickerproviderstatemixin {
double size = 100;
// 定义动画控制器对象
late animationcontroller _controller;
// animationcontroller 通常在 initstate 方法中初始化
void initstate() {
// todo: implement initstate
super.initstate();
// vsync 用于防止屏幕外动画消耗不必要的资源
_controller = animationcontroller(
vsync: this,
duration: const duration(seconds: 2),
);
// 监听动画帧的变化,在每一帧中调用setstate来更新ui,animationcontroller 的值默认是 0 到 1
_controller.addlistener(() {
setstate(() {
// 使size从100到200
size = 100 + 100 * _controller.value;
});
});
// 监听动画的状态,当动画正序完成后反向执行动画
_controller.addstatuslistener((status) {
// 动画状态status的值有:dismissed(动画停止在开始处)、forward(正向运行)、reverse(反向运行)、completed(动画停止在结束处)
if (status == animationstatus.completed) {
_controller.reverse();
} else if (status == animationstatus.dismissed) {
_controller.forward();
}
});
}
void dispose() {
super.dispose();
//释放动画
_controller.dispose();
}
widget build(buildcontext context) {
return center(
//创建一个手势识别器
child: gesturedetector(
ontap: () {
// 启动动画
_controller.forward();
},
child: container(
width: size,
height: size,
color: colors.blue,
alignment: alignment.center, // 设置文字居中
child: const text("点击变大"),
),
));
}
}

tween
flutter中的tween是用于在动画中定义起始值和结束值之间的插值计算的类。它可以将一个范围内的值映射到另一个范围内的值,从而实现动画效果
上面的案例可以修改为
class _ychomebodystate extends state<ychomebody>
with singletickerproviderstatemixin {
double size = 100;
// 定义动画控制器对象
late animationcontroller _controller;
// 定义一个动画对象
late animation _animation;
// animationcontroller 通常在 initstate 方法中初始化
void initstate() {
// todo: implement initstate
super.initstate();
// vsync 用于防止屏幕外动画消耗不必要的资源
_controller = animationcontroller(
vsync: this,
duration: const duration(seconds: 2),
);
final tween tween = tween(begin: 100.0, end: 200.0);
_animation = tween.animate(_controller);
_animation.addlistener(() {
setstate(() {
size = _animation.value;
});
});
}
void dispose() {
super.dispose();
//释放动画
_controller.dispose();
}
widget build(buildcontext context) {
return center(
//创建一个手势识别器
child: gesturedetector(
ontap: () {
// 启动动画
_controller.forward();
},
child: container(
width: size,
height: size,
color: colors.blue,
alignment: alignment.center, // 设置文字居中
child: const text("点击变大"),
),
));
}
}
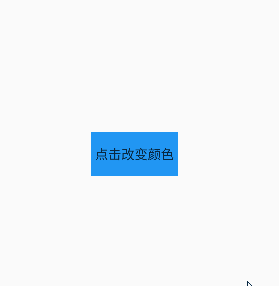
同理也可以改变颜色
class _ychomebodystate extends state<ychomebody>
with singletickerproviderstatemixin {
color _color = colors.blue;
// 定义动画控制器对象
late animationcontroller _controller;
// 定义一个动画对象
late animation _animation;
// animationcontroller 通常在 initstate 方法中初始化
void initstate() {
// todo: implement initstate
super.initstate();
// vsync 用于防止屏幕外动画消耗不必要的资源
_controller = animationcontroller(
vsync: this,
duration: const duration(seconds: 2),
);
final tween tween = colortween(begin: colors.blue, end: colors.red);
_animation = tween.animate(_controller);
_animation.addlistener(() {
setstate(() {
_color = _animation.value;
});
});
}
void dispose() {
super.dispose();
//释放动画
_controller.dispose();
}
widget build(buildcontext context) {
return center(
//创建一个手势识别器
child: gesturedetector(
ontap: () {
// 启动动画
_controller.forward();
},
child: container(
width: 100,
height: 100,
color: _color,
alignment: alignment.center, // 设置文字居中
child: const text("点击改变颜色"),
),
));
}
}

curve
动画中还有一个重要的概念就是 curve,即动画执行曲线。使动画的效果能够以匀速、加速、减速、抛物线等各种速率变化。
// 使用了 chain 方法将 colortween 和 curvetween 组合起来
  final animatable<color?> tween =
      colortween(begin: colors.blue, end: colors.red)
          .chain(curvetween(curve: curves.easeinout));
  _animation = tween.animate(_controller);
  _animation.addlistener(() {
    setstate(() {
      _color = _animation.value;
    });
  });
动画组件
flutter 系统提供了20多个动画组件,这些组件都是基于动画的核心知识实现的。动画组件分为两大类:
- 隐式动画组件:只需提供给组件动画开始、结束值,组件创建 animationcontroller、curve、tween,执行动画,释放animationcontroller
- 显式动画组件:需要设置 animationcontroller,控制动画的执行,使用显式动画可以完成任何隐式动画的效果,甚至功能更丰富一些,不过你需要管理该动画的 animationcontroller 生命周期
- 显示动画组件和隐式动画组件中各有一个万能的组件,它们是 animatedbuilder 和 tweenanimationbuilder,当系统中不存在我们想要的动画组件时,可以使用这两个组件
隐式动画组件的使用
class _ychomebodystate extends state<ychomebody>
with singletickerproviderstatemixin {
double _opacity = 1.0;
widget build(buildcontext context) {
return center(
//创建一个手势识别器
child: gesturedetector(
ontap: () {
setstate(() {
_opacity = 0;
});
},
child: animatedopacity(
opacity: _opacity,
duration: const duration(seconds: 1),
child: container(
width: 100,
height: 100,
color: colors.blue,
alignment: alignment.center, // 设置文字居中
child: const text("点击改变颜色"),
),
)));
}
}

**tweenanimationbuilder **
tweenanimationbuilder 是 flutter 中的一个动画构建器,可以用于创建一个在两个值之间进行动画的动画组件。使用 tweenanimationbuilder 需要指定两个值之间的插值器(tween),以及动画的持续时间和动画结束后的回调函数。
class _ychomebodystate extends state<ychomebody>
with singletickerproviderstatemixin {
// 一开始不能定义null,否则运行会报错
late colortween _tween = colortween(begin: colors.blue, end: colors.blue);
widget build(buildcontext context) {
return center(
//创建一个手势识别器
child: gesturedetector(
ontap: () {
setstate(() {
_tween = colortween(begin: colors.blue, end: colors.red);
});
},
child: tweenanimationbuilder(
duration: const duration(seconds: 1),
tween: _tween,
builder: (buildcontext context, color? value, widget? child) {
return container(
width: 100,
height: 100,
color: value,
alignment: alignment.center, // 设置文字居中
child: const text("点击改变颜色"),
);
},
)));
}
}
class _ychomebodystate extends state<ychomebody>
with singletickerproviderstatemixin {
// 动画控制器
late animationcontroller _controller;
// 颜色动画
late animation _coloranimation;
// 大小动画
late animation _sizeanimation;
void initstate() {
_controller =
animationcontroller(vsync: this, duration: const duration(seconds: 2));
// 使用animationcontroller的drive方法将一个tween对象与animationcontroller关联起来
_coloranimation =
_controller.drive(colortween(begin: colors.blue, end: colors.red));
// 使用animationcontroller的drive方法将一个tween对象与animationcontroller关联起来
_sizeanimation = _controller
.drive(sizetween(begin: const size(100, 50), end: const size(50, 100)));
super.initstate();
}
void dispose() {
_controller.dispose();
super.dispose();
}
widget build(buildcontext context) {
return center(
//创建一个手势识别器
child: gesturedetector(
ontap: () {
setstate(() {
// 开始动画
_controller.forward();
});
},
child: animatedbuilder(
animation: _controller,
builder: (context, widget) {
return container(
width: _sizeanimation.value.width,
height: _sizeanimation.value.height,
color: _coloranimation.value,
alignment: alignment.center, // 设置文字居中
child: const text("点击改变颜色"),
);
})));
}
}
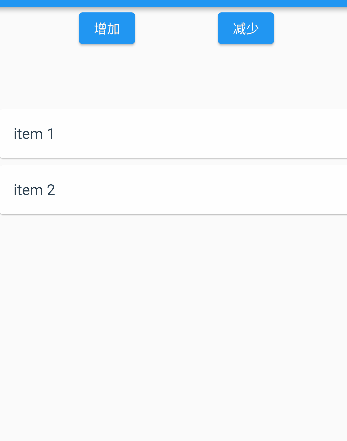
列表动画
animatedlist提供了一种简单的方式使列表数据发生变化时加入过渡动画
animatedlist主要属性如下表。
| 属性 | 说明 |
|---|---|
| itembuilder | 一个函数,列表的每一个索引会调用,这个函数有一个animation参数,可以设置成任何一个动画 |
| initialitemcount | item的个数 |
| scrolldirection | 滚动方向,默认垂直 |
| controller | scroll控制器 |
列表数据的插入和删除有进出场动画需要调用animatedliststate指定的方法,只删除原数据并调用setstate方法是没有动画效果的
class _ychomebodystate extends state<ychomebody>
with singletickerproviderstatemixin {
// 定义一个全局的key来管理animatedliststate对象,并将其传递给animatedlist构造函数
final globalkey<animatedliststate> _listkey = globalkey<animatedliststate>();
// 定义列表
final list<string> _itemlist = ["item 1", "item 2", "item 3"];
// 新增
void additem() {
_itemlist.add('item ${_itemlist.length + 1}');
_listkey.currentstate?.insertitem(_itemlist.length - 1);
}
// 删除
void removeitem() {
// 删除操作要注意,要先删除列表中的数据在删除animatedliststate的状态
// 并且关于index下标的操作,要放在删除操作之前,不然会导致删除时下标错误报错
int index = _itemlist.length - 1;
string title = _itemlist[index];
_itemlist.removeat(index);
_listkey.currentstate?.removeitem(
index,
(context, animation) => slidetransition(
position: animation.drive(curvetween(curve: curves.easein)).drive(
tween<offset>(begin: const offset(1, 1), end: const offset(0, 1))),
child: card(
child: listtile(
title: text(title),
),
),
),
);
}
widget build(buildcontext context) {
return column(
children: [
row(
mainaxisalignment: mainaxisalignment.spaceevenly,
children: [
elevatedbutton(onpressed: additem, child: const text('增加')),
elevatedbutton(onpressed: removeitem, child: const text('减少')),
],
),
// animatedlist需要有高度
expanded(
child: animatedlist(
key: _listkey,
initialitemcount: _itemlist.length, // item的个数
itembuilder: (context, index, animation) {
// 为每一个item设置动画,将曲线动画和平移动画结合在一起
return slidetransition(
// 动画对象,用于控制子组件的平移动画
position: animation
.drive(curvetween(curve: curves.easein))
.drive(tween<offset>(
begin: const offset(1, 1),
end: const offset(0, 1))),
child: card(
child: listtile(
title: text(_itemlist[index]),
),
),
);
}))
],
);
}
}
这个东西挺难搞的,出了不少问题。删除时一点要注意:
- 删除操作要注意,要先删除列表中的数据在删除animatedliststate的状态
- 并且关于index下标的操作,要放在删除操作之前,不然会导致删除时下标错误报错
关于新增时简单,删除时复杂我查到的解释是:
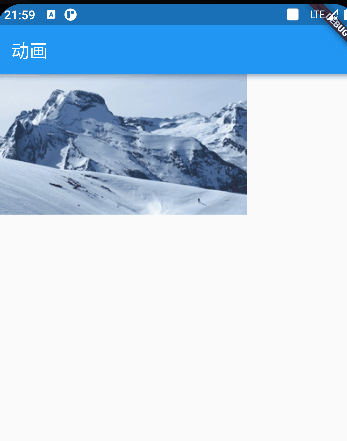
hero
hero用于在两个页面之间实现平滑的过渡效果。它可以将一个widget从一个页面转换到另一个页面,同时保持其外观和位置不
变。
hero动画通常用于在两个页面之间传递图像或其他媒体内容时,可以使用户感觉到这些内容在两个页面之间平滑地移动。
class _ychomebodystate extends state<ychomebody> {
widget build(buildcontext context) {
return scaffold(
body: gesturedetector(
ontap: () {
navigator.push(
context,
materialpageroute(builder: (context) => const secondpage()),
);
},
child: hero(
tag: 'imagehero',
child: image.network(
'https://scpic3.chinaz.net/files/default/imgs/2023-06-07/f84b7dd1b1e82805_s_w285.jpg'),
),
),
);
}
}
class secondpage extends statelesswidget {
const secondpage({key? key}) : super(key: key);
widget build(buildcontext context) {
return scaffold(
body: gesturedetector(
ontap: () {
navigator.pop(context);
},
child: hero(
tag: 'imagehero',
child: image.network(
'https://scpic3.chinaz.net/files/default/imgs/2023-06-07/f84b7dd1b1e82805_s_w285.jpg'),
),
),
);
}
}


发表评论