需求
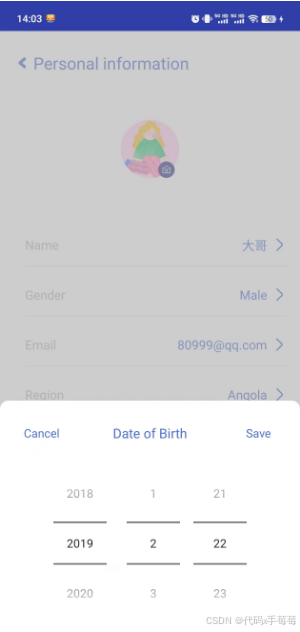
如下图所示, 底部弹出日历组件
原生插件使用的有一个好处是可以根据你的系统语言切换插件内的语言, 刚好我们这个app面向的国外用户, 而产品对日历组件的日期显示有特别要求, 因此这无疑减少了我们切换语言的开发工作量

代码
1. custom_bottom_datepicker.xml
<relativelayout xmlns:android="http://schemas.android.com/apk/res/android"
    xmlns:tools="http://schemas.android.com/tools"
    android:layout_width="match_parent"
    android:layout_height="wrap_content"
    android:background="#98adabab">
    <relativelayout
        android:id="@+id/dialog_bottom"
        android:layout_width="match_parent"
        android:layout_height="320dp"
        android:layout_alignparentbottom="true"
        android:layout_centerhorizontal="true"
        android:background="@drawable/rounded_button_white"
        android:padding="20dp">
        <linearlayout
            android:layout_width="match_parent"
            android:layout_height="match_parent"
            android:layout_marginbottom="40dp">
            <textview
                android:id="@+id/cancel"
                android:layout_width="0dp"
                android:layout_weight="1.5"
                android:layout_height="38dp"
                android:layout_gravity="center_horizontal"
                android:text="cancel"
                android:textallcaps="false"
                android:textcolor="@color/colorprimary"
                android:textsize="14sp"
                android:gravity="center"
                />
            <textview
                android:id="@+id/title"
                android:layout_width="0dp"
                android:layout_weight="5"
                android:layout_height="38dp"
                android:layout_gravity="center_horizontal"
                android:text="date of birth"
                android:textallcaps="false"
                android:textcolor="@color/colorprimary"
                android:textsize="16sp"
                android:gravity="center"
                />
            <textview
                android:id="@+id/save"
                android:layout_width="0dp"
                android:layout_weight="1.5"
                android:layout_height="38dp"
                android:layout_gravity="center_horizontal"
                android:layout_margintop="139dp"
                android:text="save"
                android:textallcaps="false"
                android:gravity="center"
                android:textcolor="@color/colorprimary"
                android:textsize="14sp" />
        </linearlayout>
        <linearlayout
            android:layout_width="match_parent"
            android:layout_height="wrap_content"
            android:layout_margintop="40dp"
            android:gravity="center_horizontal"
            android:orientation="vertical">
            <linearlayout xmlns:android="http://schemas.android.com/apk/res/android"
                android:layout_width="match_parent"
                android:layout_height="match_parent"
                android:orientation="vertical"
                android:padding="5dp">
				// 这个是最关键的
                <datepicker
                    android:id="@+id/dp_date"
                    android:layout_width="match_parent"
                    android:layout_height="wrap_content"
                    android:calendarviewshown="false"
                    android:datepickermode="spinner"
                    />
            </linearlayout>
        </linearlayout>
    </relativelayout>
</relativelayout>
2. activity.kt
import java.util.date
/**
 * 个人信息页
 */
class personnalinfoactivity : appcompatactivity() {
    private var year: string? = null
    private var month: string? = null
    private var day: string? = null
    @requiresapi(build.version_codes.n)
    override fun oncreate(savedinstancestate: bundle?) {
        super.oncreate(savedinstancestate)
        setcontentview(r.layout.activity_personal_info)
        birthday.setonclicklistener {
            choosebirthfun()
        }
    }
    private fun choosebirthfun() = run {
        val userinfo = sharedprefs.loaduserfrompreferences(this@personnalinfoactivity)
        val view = layoutinflater.inflate(r.layout.custom_bottom_datepicker, null)
        val popupwindow = popupwindow(
            view,
            viewgroup.layoutparams.match_parent,
            viewgroup.layoutparams.match_parent,
            true
        )
        // 设置popupwindow是否能响应外部点击事件
        popupwindow.isoutsidetouchable = true
        // 设置popupwindow是否能响应点击事件
        popupwindow.istouchable = true
        // 设置popupwindow弹出窗体的背景
        popupwindow.setbackgrounddrawable(
            colordrawable(
                contextcompat.getcolor(
                    this,
                    android.r.color.transparent
                )
            )
        )
        // 设置popupwindow从底部弹出
        popupwindow.showatlocation(view, gravity.bottom, 0, 0)
        val save = view.findviewbyid<textview>(r.id.save)
        val cancel = view.findviewbyid<textview>(r.id.cancel)
        val dpdate = view.findviewbyid<datepicker>(r.id.dp_date);
        // 设置默认日期
        if (userinfo != null) {
            if (userinfo.birthday == "") {
                dpdate.init(1970, 0, 1, null);
            } else {
                year?.let {
                    (month)?.let { it1 ->
                        day?.let { it2 ->
                            dpdate.init(
                                it.toint(),
                                (it1.toint()) - 1,
                                it2.toint(),
                                null
                            )
                        }
                    }
                };
            }
        }
        save.setonclicklistener {
            if (popupwindow.isshowing) {
                year = dpdate.getyear().tostring()
                month = ((dpdate.getmonth() + 1).tostring())
                day = dpdate.getdayofmonth().tostring()
                val birthstr = "${year}-${month}-${day}"
                // 此处可以处理选择好的日期
                popupwindow.dismiss()
            }
        }
        cancel.setonclicklistener {
            if (popupwindow.isshowing) {
                popupwindow.dismiss()
            }
        }
    }
}
完成~
到此这篇关于android kotlin 实现底部弹框日历组件的文章就介绍到这了,更多相关android kotlin底部弹框内容请搜索代码网以前的文章或继续浏览下面的相关文章希望大家以后多多支持代码网!


发表评论