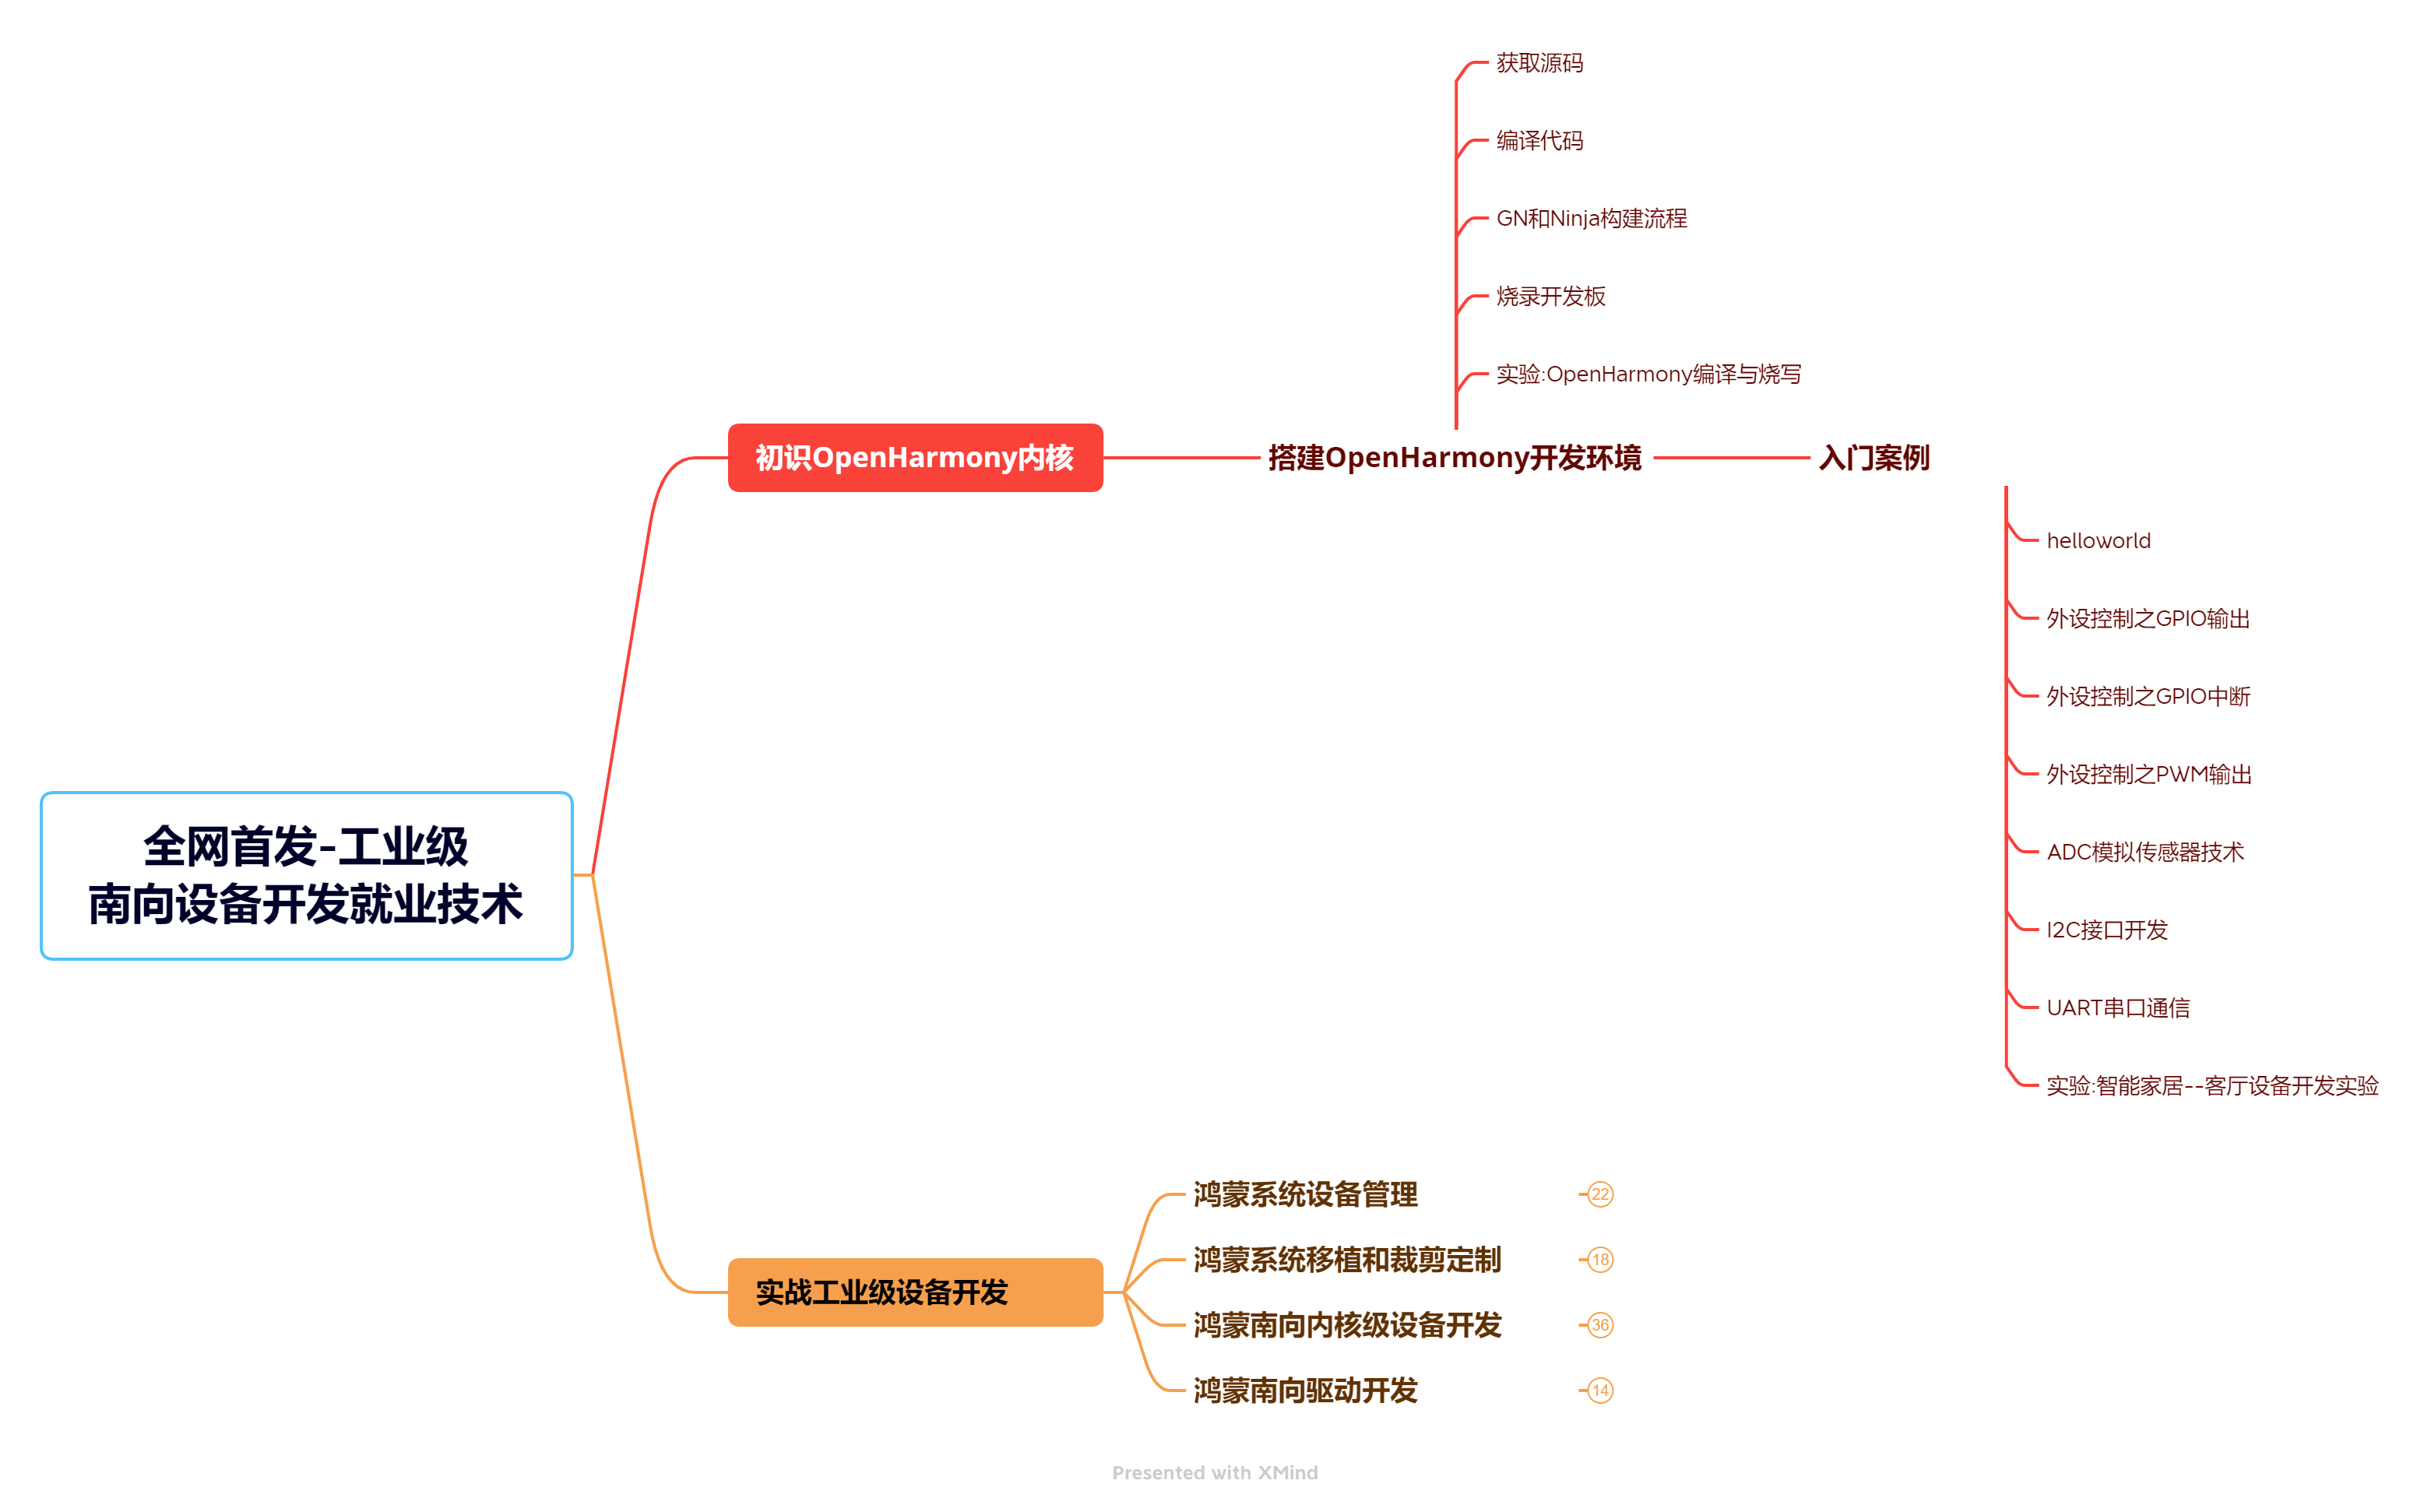
概述
自动化测试框架arkxtest,作为工具集的重要组成部分,支持js/ts语言的单元测试框架(jsunit)及ui测试框架(uitest)。
jsunit提供单元测试用例执行能力,提供用例编写基础接口,生成对应报告,用于测试系统或应用接口。
uitest通过简洁易用的api提供查找和操作界面控件能力,支持用户开发基于界面操作的自动化测试脚本。本指南介绍了测试框架的主要功能、实现原理、环境准备,以及测试脚本编写和执行等内容。
实现原理
测试框架分为单元测试框架和ui测试框架。
单元测试框架是测试框架的基础底座,提供了最基本的用例识别、调度、执行及结果汇总的能力。
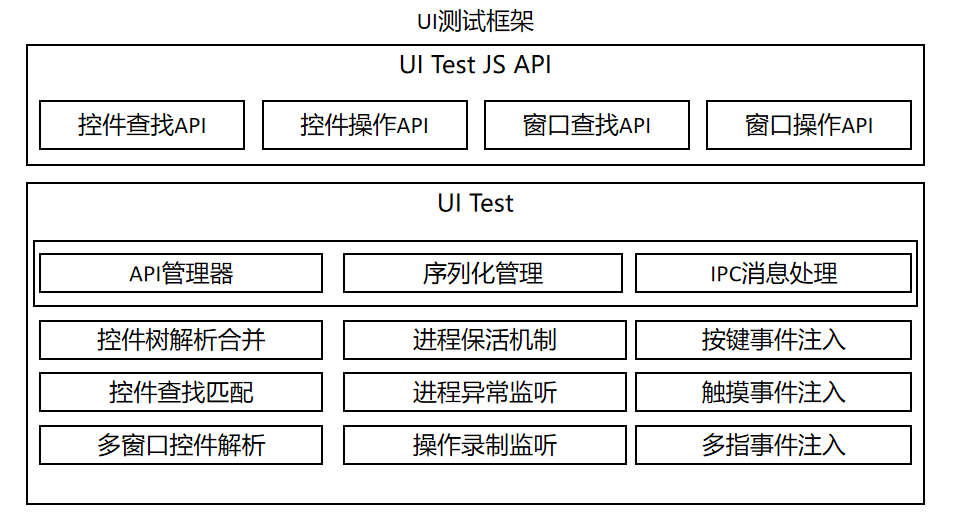
ui测试框架主要对外提供了uitest api供开发人员在对应测试场景调用,而其脚本的运行基础仍是单元测试框架。
单元测试框架
图1.单元测试框架主要功能
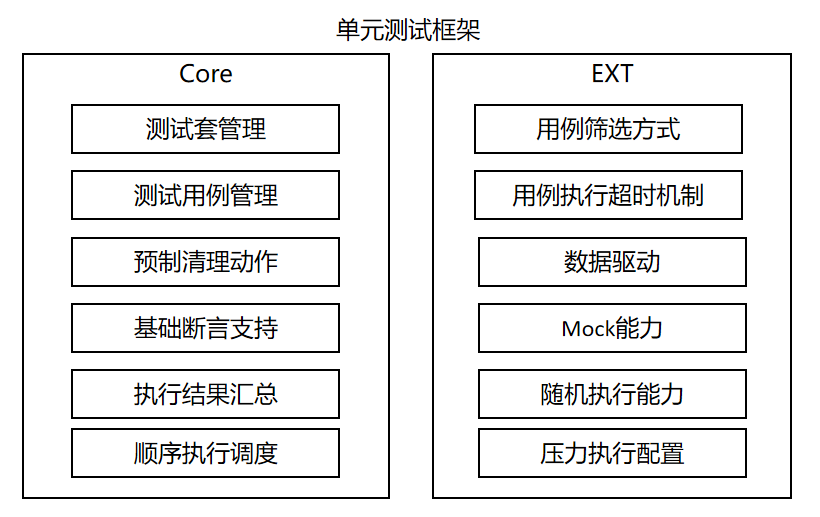
图2.脚本基础流程运行图

ui测试框架
图3.ui测试框架主要功能
约束与限制
- ui测试框架的能力在openharmony 3.1 release版本之后方可使用,历史版本不支持使用。
环境准备
环境要求
自动化脚本的编写主要基于deveco studio,并建议使用3.0之后的版本进行脚本编写。
脚本执行需要pc连接硬件设备,如开发板等。
搭建环境
deveco studio可参考其官网介绍进行下载,并进行相关的配置动作。
新建和编写测试脚本
新建测试脚本
1.在deveco studio中新建应用开发工程,其中ohos目录即为测试脚本所在的目录。
2.在工程目录下打开待测试模块下的ets文件,将光标置于代码中任意位置,单击右键 > show context actions > create ohos test或快捷键alt+enter > create ohos test创建测试类。
编写单元测试脚本
本章节主要描述单元测试框架支持能力,以及能力的使用方法, 具体请参考单元测试框架功能特性。
在单元测试框架,测试脚本需要包含如下基本元素:
1、依赖导包,以便使用依赖的测试接口。
2、测试代码编写,主要编写测试代码的相关逻辑,如接口调用等。
3、断言接口调用,设置测试代码中的检查点,如无检查点,则不可认为一个完整的测试脚本。
如下示例代码实现的场景是:启动测试页面,检查设备当前显示的页面是否为预期页面。
import { describe, it, expect } from '@ohos/hypium';
import abilitydelegatorregistry from '@ohos.app.ability.abilitydelegatorregistry';
import uiability from '@ohos.app.ability.uiability';
import want from '@ohos.app.ability.want';

const delegator = abilitydelegatorregistry.getabilitydelegator()
const bundlename = abilitydelegatorregistry.getarguments().bundlename;
function sleep(time: number) {
  return new promise<void>((resolve: function) => settimeout(resolve, time));
}
export default function abilitytest() {
  describe('actsabilitytest', () =>{
    it('testuiexample',0, async (done: function) => {
      console.info("uitest: testuiexample begin");
      //start tested ability
      const want: want = {
        bundlename: bundlename,
        abilityname: 'entryability'
      }
      await delegator.startability(want);
      await sleep(1000);
      //check top display ability
      await delegator.getcurrenttopability().then((ability: uiability)=>{
        console.info("get top ability");
        expect(ability.context.abilityinfo.name).assertequal('entryability');
      })
      done();
    })
  })
}
编写ui测试脚本
本章节主要介绍ui测试框架支持能力,以及对应能力api的使用方法。
ui测试基于单元测试,ui测试脚本在单元测试脚本上增加了对uitest接口,具体请参考api文档。
如下的示例代码是在上面的单元测试脚本基础上增量编写,实现的是在启动的应用页面上进行点击操作,然后检测当前页面变化是否为预期变化。
1.增加依赖导包。
import { driver, on } from '@ohos.uitest'
2.编写index.ets页面代码。
@entry
@component
struct index {
  @state message: string = 'hello world'

  build() {
    row() {
      column() {
        text(this.message)
          .fontsize(50)
          .fontweight(fontweight.bold)
        text("next")
          .fontsize(50)
          .margin({top:20})
          .fontweight(fontweight.bold)
        text("after click")
          .fontsize(50)
          .margin({top:20})
          .fontweight(fontweight.bold)
      }
      .width('100%')
    }
    .height('100%')
  }
}
3.编写具体测试代码。
import { describe, it, expect } from '@ohos/hypium';
import abilitydelegatorregistry from '@ohos.app.ability.abilitydelegatorregistry';
import { driver, on } from '@ohos.uitest'
import want from '@ohos.app.ability.want';
import uiability from '@ohos.app.ability.uiability';

const delegator: abilitydelegatorregistry.abilitydelegator = abilitydelegatorregistry.getabilitydelegator()
const bundlename = abilitydelegatorregistry.getarguments().bundlename;
function sleep(time: number) {
  return new promise<void>((resolve: function) => settimeout(resolve, time));
}
export default function abilitytest() {
  describe('actsabilitytest', () => {
    it('testuiexample',0, async (done: function) => {
      console.info("uitest: testuiexample begin");
      //start tested ability
      const want: want = {
        bundlename: bundlename,
        abilityname: 'entryability'
      }
      await delegator.startability(want);
      await sleep(1000);
      //check top display ability
      await delegator.getcurrenttopability().then((ability: uiability)=>{
        console.info("get top ability");
        expect(ability.context.abilityinfo.name).assertequal('entryability');
      })
      //ui test code
      //init driver
      let driver = driver.create();
      await driver.delayms(1000);
      //find button on text 'next'
      let button = await driver.findcomponent(on.text('next'));
      //click button
      await button.click();
      await driver.delayms(1000);
      //check text
      await driver.assertcomponentexist(on.text('after click'));
      await driver.pressback();
      done();
    })
  })
}
执行测试脚本
deveco studio执行
通过点击按钮执行,当前支持以下执行方式:
1、测试包级别执行,即执行测试包内的全部用例。
2、测试套级别执行,即执行describe方法中定义的全部测试用例。
3、测试方法级别执行,即执行指定it方法也就是单条测试用例。

查看测试结果
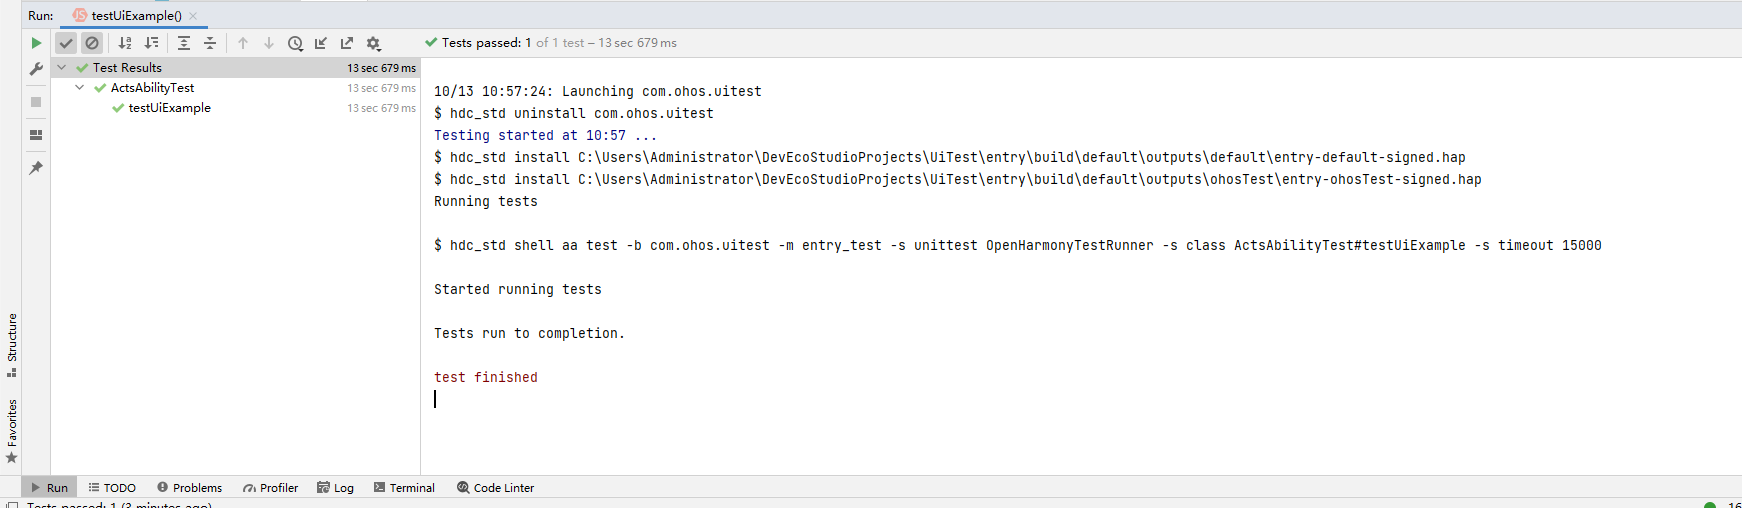
测试执行完毕后可直接在deveco studio中查看测试结果,如下图示例所示:
查看测试用例覆盖率
执行完测试用例后可以查看测试用例覆盖率。
cmd执行
将应用测试包安装到测试设备上,在cmd窗口中执行aa命令,完成对用例测试。
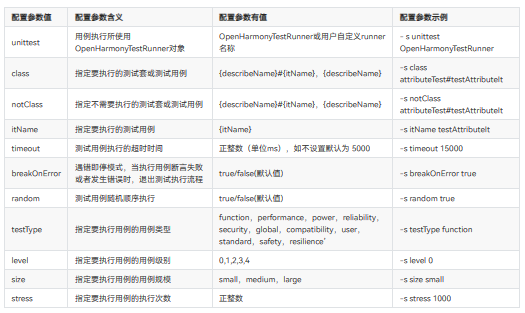
aa test命令执行配置参数
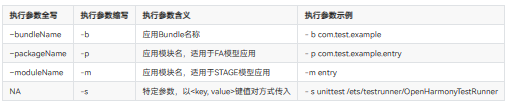
框架当前支持多种用例执行方式,通过上表中的-s参数后的配置键值对参数传入触发,如下表所示。
cmd窗口执行test命令
- 打开cmd窗口
- 执行 aa test 命令
示例代码1:执行所有测试用例。
hdc shell aa test -b xxx -p xxx -s unittest openharmonytestrunner
示例代码2:执行指定的describe测试套用例,指定多个需用逗号隔开。
hdc shell aa test -b xxx -p xxx -s unittest openharmonytestrunner -s class s1,s2
示例代码3:执行指定测试套中指定的用例,指定多个需用逗号隔开。
hdc shell aa test -b xxx -p xxx -s unittest openharmonytestrunner -s class teststop#stop_1,teststop1#stop_0
示例代码4:执行指定除配置以外的所有的用例,设置不执行多个测试套需用逗号隔开。
hdc shell aa test -b xxx -p xxx -s unittest openharmonytestrunner -s notclass teststop
示例代码5:执行指定it名称的所有用例,指定多个需用逗号隔开。
hdc shell aa test -b xxx -p xxx -s unittest openharmonytestrunner -s itname stop_0
示例代码6:用例执行超时时长配置。
hdc shell aa test -b xxx -p xxx -s unittest openharmonytestrunner -s timeout 15000
示例代码7:用例以breakonerror模式执行用例。
hdc shell aa test -b xxx -p xxx -s unittest openharmonytestrunner -s breakonerror true
示例代码8:执行测试类型匹配的测试用例。
hdc shell aa test -b xxx -p xxx -s unittest openharmonytestrunner -s testtype function
示例代码9:执行测试级别匹配的测试用例。
hdc shell aa test -b xxx -p xxx -s unittest openharmonytestrunner -s level 0
示例代码10:执行测试规模匹配的测试用例。
hdc shell aa test -b xxx -p xxx -s unittest openharmonytestrunner -s size small
示例代码11:执行测试用例指定次数。
hdc shell aa test -b xxx -p xxx -s unittest openharmonytestrunner -s stress 1000
查看测试结果
- cmd模式执行过程,会打印如下相关日志信息。
ohos_report_status: class=teststop
ohos_report_status: current=1
ohos_report_status: id=js
ohos_report_status: numtests=447
ohos_report_status: stream=
ohos_report_status: test=stop_0
ohos_report_status_code: 1

ohos_report_status: class=teststop
ohos_report_status: current=1
ohos_report_status: id=js
ohos_report_status: numtests=447
ohos_report_status: stream=
ohos_report_status: test=stop_0
ohos_report_status_code: 0
ohos_report_status: consuming=4
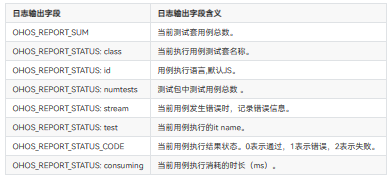
- cmd执行完成后,会打印如下相关日志信息。
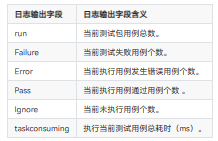
ohos_report_result: stream=tests run: 447, failure: 0, error: 1, pass: 201, ignore: 245
ohos_report_code: 0

ohos_report_result: breakonerror model, stopping whole test suite if one specific test case failed or error
ohos_report_status: taskconsuming=16029
录制用户操作
使用录制功能
hdc shell uitest uirecord record
查看录制数据
支持两种方式查看数据。
命令读取并打印录制数据
hdc shell uitest uirecord read
命令导出 record.csv文件查看录制数据
hdc file recv /data/local/tmp/layout/record.csv d:\tool # d:\tool 为本地存储路径,用户可自定义
- record 数据字段含义请参考如下示例数据。
{
	"ability": "com.ohos.launcher.mainability", // 前台应用界面
	"bundle": "com.ohos.launcher", // 操作应用
	"center_x": "", // 模拟捏合中心x, pinch事件
	"center_y": "", // 模拟捏合中心y, pinch事件
	"event_type": "pointer", //
	"length": "0", // 总体步长
	"op_type": "click", //事件类型,当前支持点击、双击、长按、拖拽、捏合、滑动、抛滑动作录制
	"velo": "0.000000", // 离手速度
	"direction.x": "0.000000",// 总体移动x方向
	"direction.y": "0.000000", // 总体移动y方向
	"duration": 33885000.0, // 手势操作持续时间
	"fingerlist": [{
		"length": "0", // 总体步长
		"max_vel": "40000", // 最大速度
		"velo": "0.000000", // 离手速度
		"w1_bounds": "{"bottom":361,"left":37,"right":118,"top":280}", // 起点控件bounds
		"w1_hier": "root,3,0,0,0,0,0,0,0,0,5,0,0,0,0,0,0,0", // 起点控件hierarchy
		"w1_id": "", // 起点控件id
		"w1_text": "", // 起点控件text
		"w1_type": "image", // 起点控件类型
		"w2_bounds": "{"bottom":361,"left":37,"right":118,"top":280}", // 终点控件bounds
		"w2_hier": "root,3,0,0,0,0,0,0,0,0,5,0,0,0,0,0,0,0", // 终点控件hierarchy
		"w2_id": "", // 终点控件id
		"w2_text": "", // 终点控件text
		"w2_type": "image", // 终点控件类型
		"x2_posi": "47", // 终点x
		"x_posi": "47", // 起点x
		"y2_posi": "301", // 终点y
		"y_posi": "301", // 起点y
		"direction.x": "0.000000", // x方向移动量
		"direction.y": "0.000000" // y方向移动量
	}],
	"fingernumber": "1" //手指数量
}
shell命令方式注入ui模拟操作
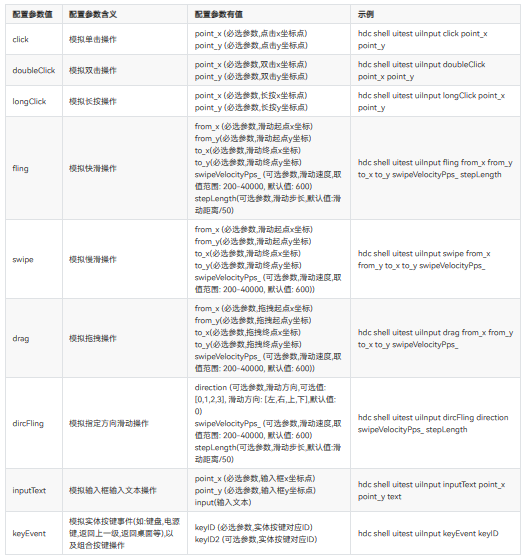
示例代码1:执行点击事件。
hdc shell uitest uiinput click 100 100
示例代码2:执行双击事件。
hdc shell uitest uiinput doubleclick 100 100
示例代码3:执行长按事件。
hdc shell uitest uiinput longclick 100 100
示例代码4:执行快滑操作。
hdc shell uitest uiinput fling 10 10 200 200 500
示例代码5:执行慢滑操作。
hdc shell uitest uiinput swipe 10 10 200 200 500
示例代码6:执行拖拽操作。
hdc shell uitest uiinput drag 10 10 100 100 500
示例代码7:执行向左滑动操作。
hdc shell uitest uiinput dircfling 0 500
示例代码8:执行向右滑动操作。
hdc shell uitest uiinput dircfling 1 600
示例代码9:执行向上滑动操作。
hdc shell uitest uiinput dircfling 2
示例代码10:执行向下滑动操作。
hdc shell uitest uiinput dircfling 3
示例代码11:执行输入框输入操作。
hdc shell uitest uiinput inputtext 100 100 hello
示例代码12:执行返回主页操作。
hdc shell uitest uiinput keyevent home
示例代码13:执行返回上一步操作。
hdc shell uitest uiinput keyevent back
示例代码14:执行组合键粘贴操作。
hdc shell uitest uiinput keyevent 2072 2038
如果大家还没有掌握鸿蒙,现在想要在最短的时间里吃透它,我这边特意整理了《鸿蒙语法arkts、typescript、arkui、教学视频》以及《鸿蒙生态应用开发白皮书v2.0pdf》《鸿蒙开发学习手册》(共计890页)鸿蒙开发资料等…希望对大家有所帮助:https://docs.qq.com/doc/dzvvbylhurkzqzlb3
鸿蒙语法arkts、typescript、arkui等…视频教程:https://docs.qq.com/doc/dzvvbylhurkzqzlb3

openharmony app开发教程步骤:https://docs.qq.com/doc/dzvvbylhurkzqzlb3
鸿蒙生态应用开发白皮书v2.0pdf:https://docs.qq.com/doc/dzvvkrgrud3phsnfg
南北双向高工技能基础:https://docs.qq.com/doc/dzvvbylhurkzqzlb3
应用开发中高级就业技术:https://docs.qq.com/doc/dzvvbylhurkzqzlb3
全网首发-工业级 南向设备开发就业技术:https://docs.qq.com/doc/dzvvbylhurkzqzlb3
《鸿蒙开发学习手册》:
如何快速入门:https://docs.qq.com/doc/dzvvbylhurkzqzlb3
1.基本概念
2.构建第一个arkts应用
3.……
开发基础知识:https://docs.qq.com/doc/dzvvbylhurkzqzlb3
1.应用基础知识
2.配置文件
3.应用数据管理
4.应用安全管理
5.应用隐私保护
6.三方应用调用管控机制
7.资源分类与访问
8.学习arkts语言
9.……

基于arkts 开发:https://docs.qq.com/doc/dzvvbylhurkzqzlb3
1.ability开发
2.ui开发
3.公共事件与通知
4.窗口管理
5.媒体
6.安全
7.网络与链接
8.电话服务
9.数据管理
10.后台任务(background task)管理
11.设备管理
12.设备使用信息统计
13.dfx
14.国际化开发
15.折叠屏系列
16.……


发表评论