单点登录(sso)是一种身份验证过程,允许用户通过一次登录访问多个系统。本文将深入解析单点登录的原理,并详细介绍如何在spring cloud环境中实现单点登录。通过具体的架构图和代码示例,我们将展示sso的工作机制和优势,帮助开发者更好地理解和应用这一技术。

一、单点登录简介
1、单点登录介绍
单点登录(single sign-on,简称sso)是一种认证机制,允许用户通过一次身份验证后,访问多个相互信任的应用系统。它简化了用户的操作,提高了用户体验,同时也降低了管理多个认证系统的复杂性。在现代分布式系统和微服务架构中,sso尤为重要,因为它可以减少重复的登录操作,统一用户认证入口,提高系统的安全性和可管理性。
2、单点登录原理
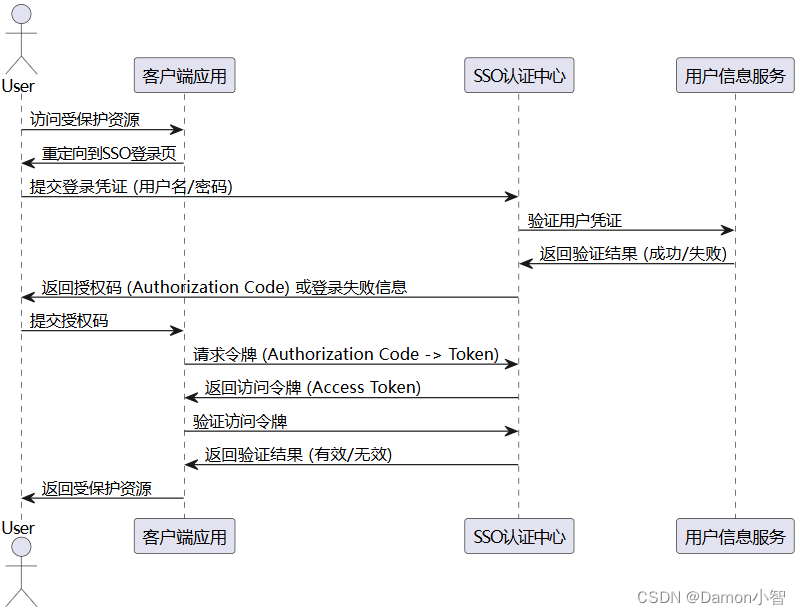
sso的基本原理是通过共享认证状态来实现对多个系统的访问。其核心步骤包括:
- 用户认证:用户在sso认证中心进行登录,认证中心验证用户身份后生成一个token。
- token共享:用户访问其他受信任的应用系统时,携带这个token。应用系统通过验证token来确认用户身份。
- 会话管理:sso系统管理用户会话状态,确保用户在有效期内不需要重复登录。
3、单点登录架构图
二、单点登录实现
在spring cloud环境中实现单点登录需要考虑以下几个步骤:
| 步骤 | 描述 |
|---|---|
| 1. 建立认证中心 | 创建一个专门的认证服务,负责用户登录和token生成。可以使用spring security和oauth2来实现这一功能。 |
| 2. 配置网关服务 | 通过spring cloud gateway或zuul来实现请求路由和token验证。 |
| 3. 应用服务集成 | 将各个应用服务与认证中心集成,确保每个请求都经过token验证。 |
1. 建立认证中心
认证中心负责用户认证和token生成。可以使用spring security和oauth2来实现认证中心。
oauth2 协议介绍:
oauth2 协议是一种授权框架,允许第三方应用在用户授权下,访问用户的资源而无需共享用户的凭据,常用于社交媒体登录等场景。
oauth2 协议一共支持四种不同的授权模式:
- 授权码模式:大多数第三方平台登录功能都采用这种模式,因其具有较高的安全性。
- 简化模式:简化模式不需要第三方服务器(客户端)的参与,直接在浏览器中向授权服务器申请令牌(token)。如果网站是纯静态页面,可以采用这种方式。
- 密码模式:密码模式要求用户将用户名和密码直接提供给客户端,客户端再使用这些信息向授权服务器申请令牌(token)。这种模式需要用户对客户端有高度的信任,例如客户端应用和服务器提供商是同一家公司。
- 客户端模式:客户端模式是指客户端以自己的名义而非用户的名义向授权服务器申请授权。严格来说,客户端模式并不属于oauth协议的典型解决方案,但在某些移动端授权服务器上使用这种模式对开发者来说非常方便。
最常用的是授权码模式,也是我们这里使用的模式。
oauth2 授权码模式示意图:
为了更清晰地展示授权码模式的每个环节,我们可以使用mermaid将流程分为几个部分。以下是分成四张图分别介绍每个环节的示例代码:
- step 1: 用户请求资源并重定向到授权服务器
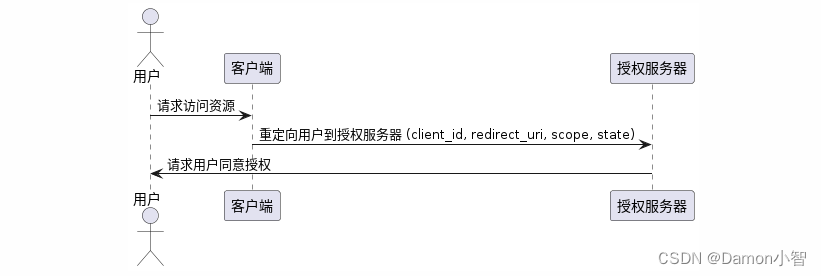
- step 2: 用户同意授权并获取授权码

- step 3: 客户端交换授权码获取访问令牌

- step 4: 客户端使用访问令牌访问资源服务器

① 添加oauth2依赖
给项目添加oauth2依赖项:
<dependency>
    <groupid>org.springframework.boot</groupid>
    <artifactid>spring-boot-starter-oauth2-client</artifactid>
</dependency>
<dependency>
    <groupid>org.springframework.boot</groupid>
    <artifactid>spring-boot-starter-oauth2-resource-server</artifactid>
</dependency>
<dependency>
    <groupid>org.springframework.security</groupid>
    <artifactid>spring-security-oauth2-jose</artifactid>
</dependency>
② 配置oauth2认证服务器
创建并配置oauth2认证服务器:
@configuration
@enableauthorizationserver
public class authorizationserverconfig extends authorizationserverconfigureradapter {

    @autowired
    private authenticationmanager authenticationmanager;

    @override
    public void configure(clientdetailsserviceconfigurer clients) throws exception {
        clients.inmemory()
                .withclient("client-id")
                .secret("{noop}client-secret")
                .authorizedgranttypes("authorization_code", "refresh_token", "password")
                .scopes("read", "write")
                .redirecturis("http://localhost:8081/login/oauth2/code/custom");
    }

    @override
    public void configure(authorizationserverendpointsconfigurer endpoints) throws exception {
        endpoints.authenticationmanager(authenticationmanager)
                 .tokenstore(new inmemorytokenstore());
    }
}
③ 配置spring security
创建并配置spring security:
@configuration
@enablewebsecurity
public class securityconfig extends websecurityconfigureradapter {

    @override
    protected void configure(authenticationmanagerbuilder auth) throws exception {
        auth.inmemoryauthentication()
            .withuser("user")
            .password("{noop}password")
            .roles("user");
    }

    @override
    protected void configure(httpsecurity http) throws exception {
        http.authorizerequests()
            .anyrequest().authenticated()
            .and()
            .formlogin().permitall();
    }

    @bean
    @override
    public authenticationmanager authenticationmanagerbean() throws exception {
        return super.authenticationmanagerbean();
    }
}
2. 配置网关服务
网关服务负责路由请求和验证token。我们使用spring cloud gateway来实现。
① 添加网关服务依赖
给项目添加网关服务依赖项:
<dependency>
    <groupid>org.springframework.cloud</groupid>
    <artifactid>spring-cloud-starter-gateway</artifactid>
</dependency>
<dependency>
    <groupid>org.springframework.boot</groupid>
    <artifactid>spring-boot-starter-oauth2-client</artifactid>
</dependency>
② 增加gateway配置
在application.yml中添加gateway配置:
spring:
  cloud:
    gateway:
      routes:
        - id: user-service
          uri: lb://user-service
          predicates:
            - path=/user/**
          filters:
            - tokenrelay
  security:
    oauth2:
      client:
        provider:
          custom:
            authorization-uri: http://localhost:8080/oauth/authorize
            token-uri: http://localhost:8080/oauth/token
            user-info-uri: http://localhost:8080/userinfo
            jwk-set-uri: http://localhost:8080/.well-known/jwks.json
        registration:
          custom:
            client-id: client-id
            client-secret: client-secret
            authorization-grant-type: authorization_code
            redirect-uri: "{baseurl}/login/oauth2/code/{registrationid}"
            scope: read,write
3. 应用服务集成
每个微服务都需要配置为资源服务器,以确保每个请求都经过token验证。
① 给每个服务添加依赖
给每个服务添加oauth2资源服务器依赖项:
<dependency>
    <groupid>org.springframework.boot</groupid>
    <artifactid>spring-boot-starter-oauth2-resource-server</artifactid>
</dependency>
② 给每个服务添加配置
在application.yml中添加oauth2资源服务器配置:
spring:
  security:
    oauth2:
      resourceserver:
        jwt:
          issuer-uri: http://localhost:8080/
③ 配置安全策略
创建并配置spring security以确保所有请求都经过token验证:
@configuration
@enablewebsecurity
public class resourceserverconfig extends websecurityconfigureradapter {

    @override
    protected void configure(httpsecurity http) throws exception {
        http.authorizerequests()
            .antmatchers("/public/**").permitall()
            .anyrequest().authenticated()
            .and()
            .oauth2resourceserver().jwt();
    }
}
4、编写单点登录接口
在实现单点登录的过程中,涉及到客户端应用向认证中心请求认证并获取token,然后将token传递给各个微服务以进行资源访问。以下是单点登录调用代码的详细步骤,包括获取授权码、请求访问令牌以及使用令牌访问受保护资源的示例代码。
① 获取授权码
首先,客户端应用需要引导用户到sso认证中心进行登录,并获取授权码。
可以通过浏览器重定向实现:
@getmapping("/login")
public void login(httpservletresponse response) throws ioexception {
    string authorizationuri = "http://localhost:8080/oauth/authorize";
    string clientid = "client-id";
    string redirecturi = "http://localhost:8081/callback";
    string responsetype = "code";
    string scope = "read write";

    string authurl = authorizationuri + "?response_type=" + responsetype
            + "&client_id=" + clientid
            + "&redirect_uri=" + urlencoder.encode(redirecturi, "utf-8")
            + "&scope=" + urlencoder.encode(scope, "utf-8");

    response.sendredirect(authurl);
}
② 获取访问令牌
用户在认证中心成功登录后,认证中心会重定向回客户端应用,并附带授权码。
客户端应用需要使用这个授权码来请求访问令牌:
@getmapping("/callback")
public string callback(@requestparam("code") string code, model model) {
    string tokenuri = "http://localhost:8080/oauth/token";
    string clientid = "client-id";
    string clientsecret = "client-secret";
    string redirecturi = "http://localhost:8081/callback";

    resttemplate resttemplate = new resttemplate();

    httpheaders headers = new httpheaders();
    headers.setcontenttype(mediatype.application_form_urlencoded);
    headers.setbasicauth(clientid, clientsecret);

    multivaluemap<string, string> params = new linkedmultivaluemap<>();
    params.add("grant_type", "authorization_code");
    params.add("code", code);
    params.add("redirect_uri", redirecturi);

    httpentity<multivaluemap<string, string>> request = new httpentity<>(params, headers);

    responseentity<map> response = resttemplate.exchange(tokenuri, httpmethod.post, request, map.class);

    map<string, object> responsebody = response.getbody();
    string accesstoken = (string) responsebody.get("access_token");

    model.addattribute("accesstoken", accesstoken);

    return "home";
}
③ 使用访问令牌访问受保护资源
获取访问令牌后,客户端应用可以使用这个令牌来访问受保护的资源。
以下是如何使用resttemplate访问受保护资源的示例代码:
@getmapping("/resource")
public string getresource(@requestparam("accesstoken") string accesstoken, model model) {
    string resourceuri = "http://localhost:8082/resource";

    resttemplate resttemplate = new resttemplate();

    httpheaders headers = new httpheaders();
    headers.setbearerauth(accesstoken);

    httpentity<string> request = new httpentity<>(headers);

    responseentity<string> response = resttemplate.exchange(resourceuri, httpmethod.get, request, string.class);

    string resource = response.getbody();

    model.addattribute("resource", resource);

    return "resource";
}
5、示例项目结构
示例项目结构如下:
/sso-auth-server
  ├── src/main/java/com/example/auth
  │   ├── authorizationserverconfig.java
  │   ├── securityconfig.java
  │   └── application.java
  └── src/main/resources
      └── application.yml

/sso-gateway
  ├── src/main/java/com/example/gateway
  │   └── application.java
  └── src/main/resources
      └── application.yml

/sso-user-service
  ├── src/main/java/com/example/user
  │   ├── resourceserverconfig.java
  │   └── application.java
  └── src/main/resources
      └── application.yml

/sso-client
  ├── src/main/java/com/example/client
  │   ├── ssocontroller.java
  │   └── application.java
  └── src/main/resources
      └── application.yml
这个结构包括四个主要部分:
- 认证服务器 (sso-auth-server):负责用户认证和token生成。
- 网关服务 (sso-gateway):负责路由请求和token验证。
- 用户服务 (sso-user-service):作为资源服务器,提供受保护的资源。
- 客户端应用 (sso-client):负责引导用户登录、获取token并访问受保护资源。
三、单点登录总结
1、单点登录的优势
| 优势 | 描述 |
|---|---|
| 用户体验提升 | 用户只需一次登录即可访问所有系统,避免了重复登录的繁琐操作。 |
| 安全性增强 | 统一的认证入口和集中式管理可以提高系统的安全性,减少各个系统独立管理认证信息的风险。 |
| 管理简化 | 集中管理用户身份信息和认证逻辑,简化了系统的维护和管理工作。 |
| 提高生产力 | 减少了用户在不同系统之间切换的时间,进而提升了整体工作效率。 |
| 降低开发成本 | 开发者只需实现一次认证和授权逻辑,可以节省开发和维护多个认证系统的成本。 |
| 统一用户管理 | 用户数据和权限集中存储和管理,使得用户信息更新和权限变更更加便捷高效。 |
| 改善审计和合规性 | 集中的认证和授权机制有助于监控用户行为,满足法规和审计的要求。 |
| 便于集成扩展 | 可以方便地集成新的应用系统,无需为每个新系统单独配置登录和认证流程。 |
2、单点登录总结
单点登录(single sign-on, sso)在现代分布式系统中扮演着重要角色,它不仅提高了用户体验,还增强了系统的安全性。通过spring cloud实现sso,可以充分利用spring的生态系统和强大的功能,实现高效的身份认证和授权管理。
在实际应用中,开发者应根据具体需求和系统架构选择合适的实现方案,并不断优化以提高系统性能和安全性。以下是一些关键点:
- 技术选型:选择适合业务需求的sso实现方式,如基于oauth2、jwt或cas等。
- 安全策略:确保数据传输和存储的安全,采用加密技术保护用户信息,防范攻击。
- 性能优化:通过负载均衡、缓存和异步处理等技术提升系统的响应速度和稳定性。
- 用户管理:集中管理用户身份信息,确保用户数据的一致性和准确性。
- 日志和监控:实施全面的日志记录和监控机制,及时发现和处理潜在问题,确保系统的正常运行。
- 容错机制:设计健壮的容错机制,确保系统在出现故障时能够快速恢复。
通过以上措施,可以有效提升单点登录系统的整体表现,满足企业的业务需求和安全要求。


发表评论