一、springboot中进行 " 文件上传" :
开发wb应用时,文件上传是很常见的一个需求,浏览器 通过 表单形式 将 文件 以 流的形式传递 给 服务器,服务器再对上传的数据解析处理。下面将通过一个案例讲解使用 springboot 实现 文件上传,具体步骤 如下 :
1.编写 “文件上传” 的 “表单页面”
在项目的 templates模板引擎文件夹下创建一个用来上传文件的upload.html模板页面 :
upload.html :
<!doctype html>
<html lang="en" xmlns:th="http://www.thymeleaf.org">
<head>
<meta charset="utf-8">
<meta http-equiv="content-type" content="text/html; charset=utf-8">
<title>动态添加文件上传列表</title>
<link th:href="@{/login/css/bootstrap.min.css}" rel="external nofollow" rel="stylesheet">
<script th:src="@{/login/js/jquery-3.7.1.min.js}"></script>
</head>
<body>
<div th:if="${uploadstatus}" style="color: red" th:text="${uploadstatus}">
上传成功</div>
<form th:action="@{/uploadfile}" method="post" enctype="multipart/form-data">
上传文件:
<input type="button" value="添加文件" onclick="add()"/>
<div id="file" style="margin-top: 10px;" th:value="文件上传区域"> </div>
<input id="submit" type="submit" value="上传"
style="display: none;margin-top: 10px;"/>
</form>
<script type="text/javascript">
function add(){
var innerdiv = "<div>";
innerdiv += "<input type='file' name='fileupload' required='required'>" +
"<input type='button' value='删除' οnclick='remove(this)'>";
innerdiv +="</div>";
$("#file").append(innerdiv);
$("#submit").css("display","block");
}
function remove(obj) {
$(obj).parent().remove();
if($("#file div").length ==0){
$("#submit").css("display","none");
}
}
</script>
</body>
</html>2.在全局配置文件中添加文件上传的相关配置
在 全局配置文件 : application.properties中添加文件上传的相关设置,配置如下 :
application.properties :
spring.application.name=chapter_12
#thymeleaf的页面缓存设置(默认为true),开发中为方便调试应设置为false,上线稳定后应保持默认true
spring.thymeleaf.cache=false
##配置国际化文件基础名
#spring.messages.basename=i18n.login
#单个文件上传大小限制(默认为1mb)
spring.servlet.multipart.max-file-size=10mb
#总文件上传大小限制
spring.servlet.multipart.max-request-size=50mb
在 application.properties 全局配置文件中,对文件 上传过程中的上传大小进行了设置。
3.进行文件上传处理,实现 “文件上传” 功能
filecontroller.java :
package com.myh.chapter_12.controller;
import org.springframework.boot.banner;
import org.springframework.stereotype.controller;
import org.springframework.ui.model;
import org.springframework.web.bind.annotation.getmapping;
import org.springframework.web.bind.annotation.postmapping;
import org.springframework.web.multipart.multipartfile;
import java.io.file;
import java.io.ioexception;
import java.util.uuid;
/**
* 文件管理控制类
*/
@controller //加入到ioc容器中
public class filecontroller { //关于file的controller类
@getmapping("/toupload")
public string toupload(){
return "upload";
}
@postmapping("/uploadfile")
public string uploadfile(multipartfile[] fileupload, model model) {
//默认文件上传成功,并返回状态信息
model.addattribute("uploadstatus", "上传成功!");
for (multipartfile file : fileupload) {
//获取文件名以及后缀名 (获取原始文件名)
string filename = file.getoriginalfilename();
//使用uuid + 原始文件名 来生成一个新的文件名
filename = uuid.randomuuid()+"_"+filename;
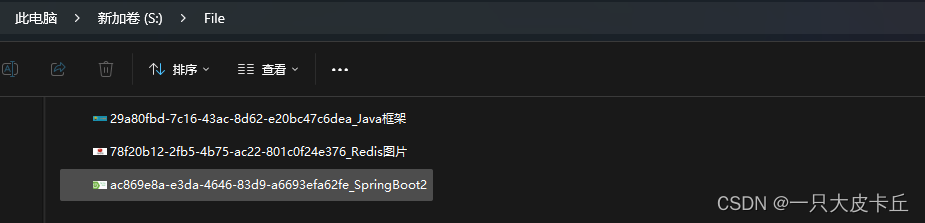
//指定文件上传的本地存储目录,不存在则提前创建
string dirpath = "s:\\file\\";
file filepath = new file(dirpath);
if(!filepath.exists()){filepath.mkdirs();}//创建该目录
try {
//执行“文件上传”的方法
file.transferto(new file(dirpath+filename));
}
catch (exception e) {e.printstacktrace();
//上传失败,返回失败信息
model.addattribute("uploadstatus","上传失败: "+e.getmessage());}
}
//携带状态信息回调到文件上传页面
return "upload";
}
}4.效果测试
启动项目,在浏览器访问 http://localhost:8080/toupload ,效果如下图所示 :

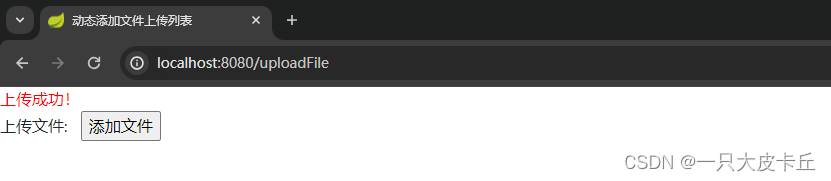
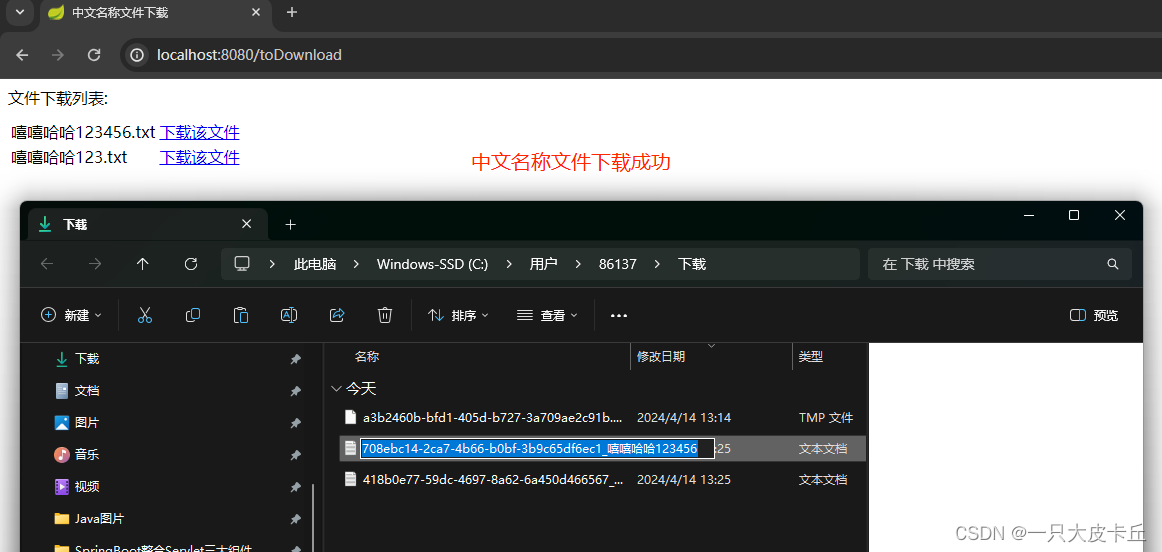
通过以上图片可以看出,springboot 中进行 “文件上传”成功 。
二、springboot中进行 “文件下载” :
下载文件能够通过io流实现,所以 多数框架并没有对文件下载进行封装处理。文件下载时涉及不同浏览器的解析处理,可能会出现 中文乱码 的情况。
接下来将针对 下载英文名文件 和 中文名文件 进行讲解。
“英文名称” 文件下载 : 1.添加文件下载工具依赖
在 pom.xml文件中引入文件下载的一个工具依赖 :
<!--  文件下载的工具依赖  -->
<dependency>
    <groupid>commons-io</groupid>
    <artifactid>commons-io</artifactid>
    <version>2.6</version>
</dependency>
2.定制文件下载页面
download.html :
<!doctype html>
<html lang="en" xmlns:th="http://www.thymeleaf.org">
<head>
    <meta charset="utf-8">
    <title>"英文名称"文件下载</title></head><body>
<div style="margin-bottom: 10px">文件下载列表:</div>
<table>
    <tr>
        <td>嘻嘻哈哈123.txt</td>
        <td><a th:href="@{/download(filename='5afa8ee7-6cbf-4632-9965-4df31aad4558_嘻嘻哈哈123456.txt')}" rel="external nofollow" >下载该文件</a></td>
    </tr>
    <tr>
        <td>嘻嘻哈哈123456.txt</td>
        <td><a th:href="@{/download(filename='c53a27b1-b42e-41a4-b283-86ac43034203_嘻嘻哈哈123.txt')}" rel="external nofollow" >下载该文件</a></td>
    </tr>
</table>
</body>
</html>上面代码中通过列表展示了要下载的两个 文件名及其下载链接。需要注意的是,在文件下载之前,需要保证在文件下载目录(本示例中的“s:\file”目录)中存在对应的文件,可以自行存放,只要 保持文件名统一 即可。
3.编写文件下载处理方法
filecontroller.java :
package com.myh.chapter_12.controller;
import jakarta.servlet.http.httpservletrequest;
import org.apache.commons.io.fileutils;
import org.springframework.boot.banner;
import org.springframework.http.httpheaders;
import org.springframework.http.httpstatus;
import org.springframework.http.mediatype;
import org.springframework.http.responseentity;
import org.springframework.stereotype.controller;
import org.springframework.ui.model;
import org.springframework.web.bind.annotation.getmapping;
import org.springframework.web.bind.annotation.postmapping;
import org.springframework.web.multipart.multipartfile;
import java.io.file;
import java.io.ioexception;
import java.net.urlencoder;
import java.util.uuid;
/**
 * 文件管理控制类
 */
@controller //加入到ioc容器中
public class filecontroller { //关于file的controller类
    @getmapping("/todownload")
    public string todownload(){
        return "download";
    }
    /**
     *  英文名称文件下载
     */
    @getmapping("/download")
    public responseentity<byte[]> filedownload(string filename){
        //指定要下载的文件根路径
        string dirpath = "s:\\file\\";
        //创建该文件对象
        file file = new file(dirpath + file.separator + filename);
        //设置响应头
        httpheaders headers = new httpheaders();
        //通知浏览器以下载方式打开
        headers.setcontentdispositionformdata("attachment",filename);
        //定义以流的形式下载返回文件数据
        headers.setcontenttype(mediatype.application_octet_stream);
        try {return new responseentity<>(fileutils.readfiletobytearray(file),
                headers, httpstatus.ok);}
        catch (exception e) {e.printstacktrace();
            return new responseentity<byte[]>(e.getmessage().getbytes(),
                    httpstatus.expectation_failed);
        }
    }
}
4.效果测试
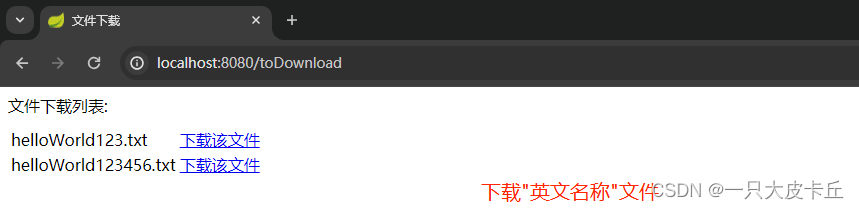
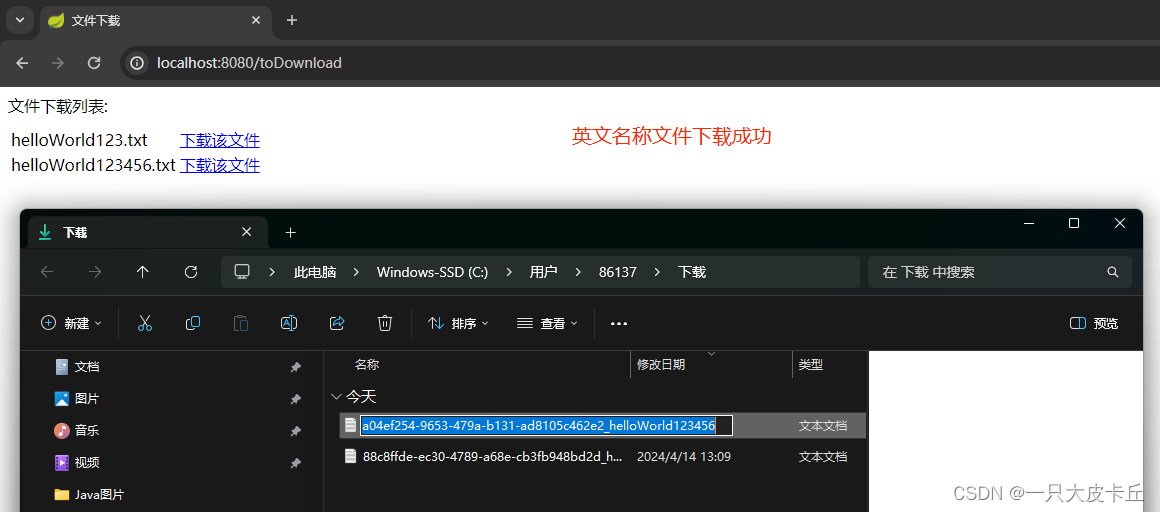
启动项目,在浏览器访问 http://localhost:8080/todownload ,效果如下图所示 :
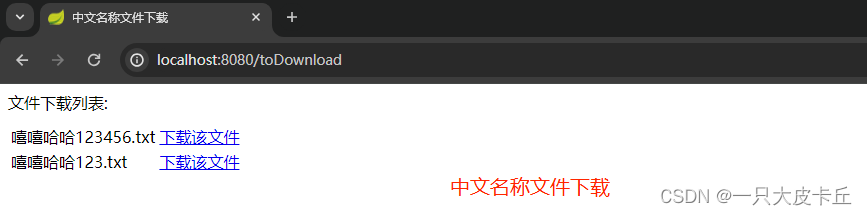
“中文名称” 文件下载 : 1.添加文件下载工具依赖
在 pom.xml文件中引入文件下载的一个工具依赖 :
<!--  文件下载的工具依赖  -->
<dependency>
    <groupid>commons-io</groupid>
    <artifactid>commons-io</artifactid>
    <version>2.6</version>
</dependency>
2.定制文件下载页面
download.html :
<!doctype html>
<html lang="en" xmlns:th="http://www.thymeleaf.org">
<head>
    <meta charset="utf-8">
    <title>中文名称文件下载</title></head><body>
<div style="margin-bottom: 10px">文件下载列表:</div>
<table>
    <tr>
        <td>嘻嘻哈哈123456.txt</td>
        <td><a th:href="@{/download(filename='708ebc14-2ca7-4b66-b0bf-3b9c65df6ec1_嘻嘻哈哈123456.txt')}" rel="external nofollow" >下载该文件</a></td>
    </tr>
    <tr>
        <td>嘻嘻哈哈123.txt</td>
        <td><a th:href="@{/download(filename='418b0e77-59dc-4697-8a62-6a450d466567_嘻嘻哈哈123.txt')}" rel="external nofollow" >下载该文件</a></td>
    </tr>
</table>
</body>
</html>上面代码中通过列表展示了要下载的两个 文件名及其下载链接。需要注意的是,在文件下载之前,需要保证在文件下载目录(本示例中的“s:\file”目录)中存在对应的文件,可以自行存放,只要 保持文件名统一 即可。
3.编写文件下载处理方法
filecontroller.java :
package com.myh.chapter_12.controller;
import jakarta.servlet.http.httpservletrequest;
import org.apache.commons.io.fileutils;
import org.springframework.boot.banner;
import org.springframework.http.httpheaders;
import org.springframework.http.httpstatus;
import org.springframework.http.mediatype;
import org.springframework.http.responseentity;
import org.springframework.stereotype.controller;
import org.springframework.ui.model;
import org.springframework.web.bind.annotation.getmapping;
import org.springframework.web.bind.annotation.postmapping;
import org.springframework.web.multipart.multipartfile;
import java.io.file;
import java.io.ioexception;
import java.net.urlencoder;
import java.util.uuid;
/**
* 文件管理控制类
*/
@controller //加入到ioc容器中
public class filecontroller { //关于file的controller类
@getmapping("/todownload")
public string todownload(){
return "download";
}
/**
* "中文名称"文件下载
*/
@getmapping("/download")
public responseentity<byte[]> filedownload(httpservletrequest request,string filename) throws exception{
//指定下载的文件根路径
string dirpath = "s:\\file\\";
//创建该文件对象
file file = new file(dirpath + file.separator + filename);
//设置响应头
httpheaders headers = new httpheaders();
//通知浏览器以下载方式打开(下载前对文件名进行转码)
filename=getfilename(request,filename);
headers.setcontentdispositionformdata("attachment",filename);
//定义以流的形式下载返回文件数据
headers.setcontenttype(mediatype.application_octet_stream);
try {return new responseentity<>(fileutils.readfiletobytearray(file),
headers, httpstatus.ok);} catch (exception e) {e.printstacktrace();
return new responseentity<byte[]>(e.getmessage().getbytes(),
httpstatus.expectation_failed);
}
}
//根据浏览器的不同进行编码设置,返回编码后的文件名
private string getfilename(httpservletrequest request,string filename)
throws exception {
//ie不同版本user-agent中出现的关键词
string[] iebrowserkeywords = {"msie", "trident", "edge"};
//获取请求头代理信息
string useragent = request.getheader("user-agent");
for (string keyword : iebrowserkeywords) {
if (useragent.contains(keyword)) {
//ie内核浏览器,统一为utf-8编码显示,并对转换的+进行更正
return urlencoder.encode(filename, "utf-8").replace("+"," ");
}}
//火狐等其他浏览器统一为iso-8859-1编码显示
return new string(filename.getbytes("utf-8"), "iso-8859-1");
}
}4.效果测试
启动项目,在浏览器访问 http://localhost:8080/todownload ,效果如下图所示 :
到此这篇关于spring boot中进行 “文件上传” 和 “文件下载”的文章就介绍到这了,更多相关spring boot文件上传和 文件下载内容请搜索代码网以前的文章或继续浏览下面的相关文章希望大家以后多多支持代码网!

发表评论