首先导入mysql的jar包,这里连接的是8版本的。

这里之前到如果mysql的jar包了
![]()
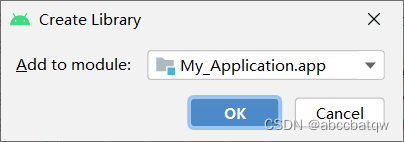
首先跳到project模式: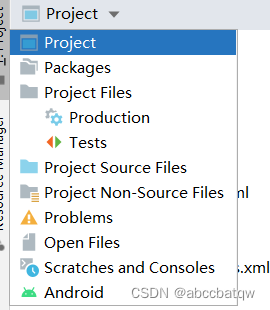
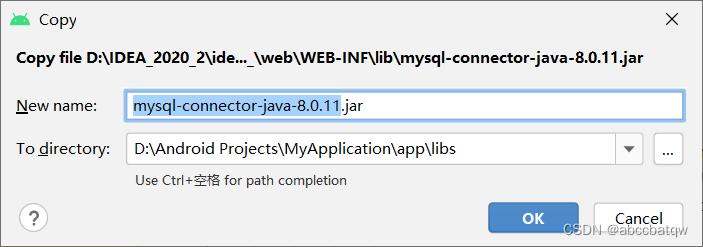
直接复制粘贴到这里:
这里之前到如果了。想删掉重新导入一次,但是报错,什么ioexception。这里将project structure中的moudle中的app中的引入的该jar包的依赖删除掉,然后重启as,再删除就可以了。好吧,这也不是重点。
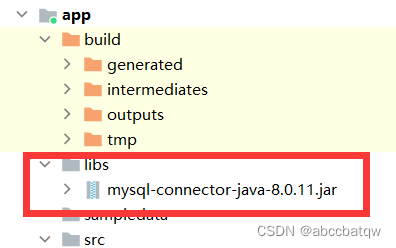
好,这里重新导入一边,复制jar包,粘贴到libs
点击ok后:

这里还没有引入依赖,接下来引入依赖。
有两种方法:
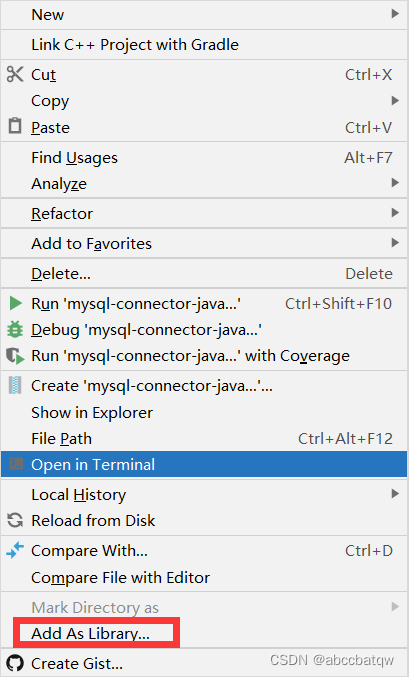
(1)右键jar包
 、
、
点击这个。之后出现:
点击ok,就可以直接在app的build.gradle中创建dependency。
(2)这个比较麻烦
首先进入project structure
快捷键ctrl+alt+shift+s.进入这个界面:
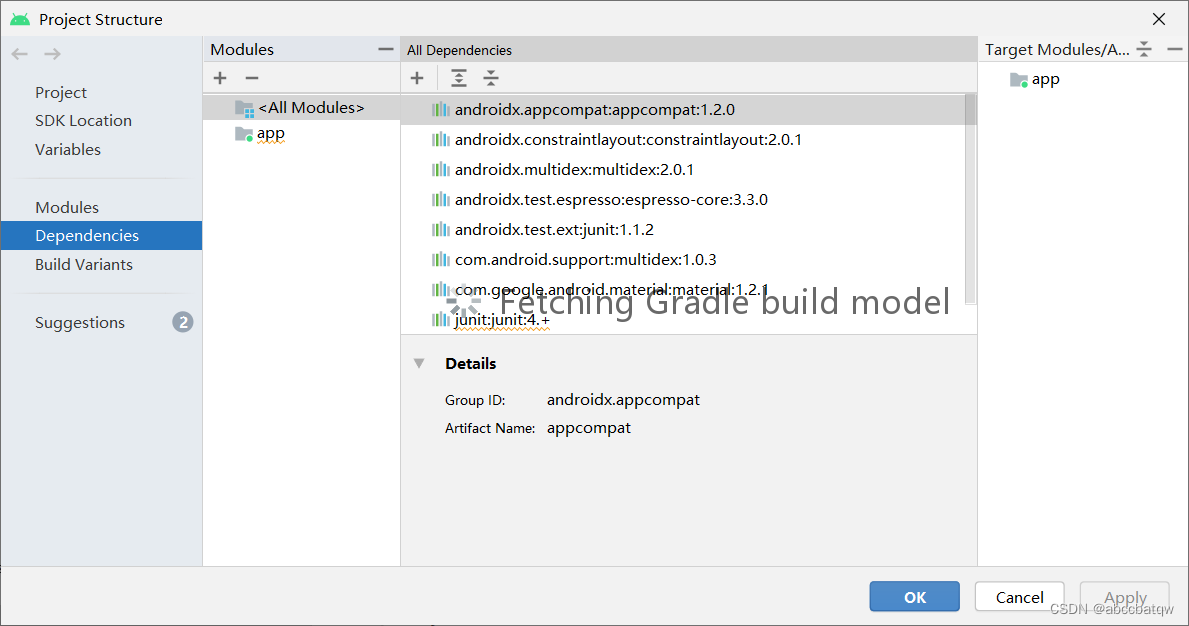
依次点击:

点击第二个jar dependency

出现这个界面:

输入如下路径,这里是相对app文件夹的相对路径:
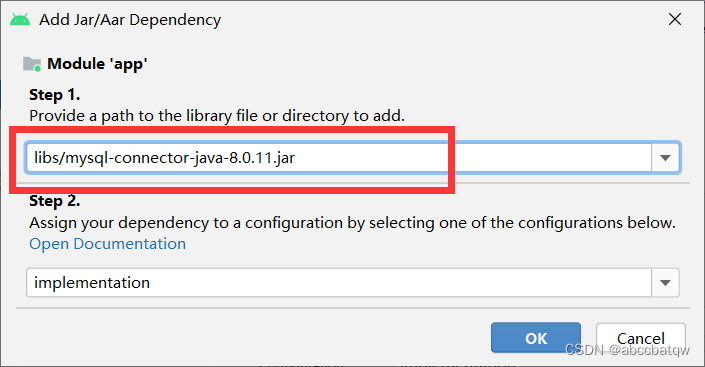
添加进来了:点击ok
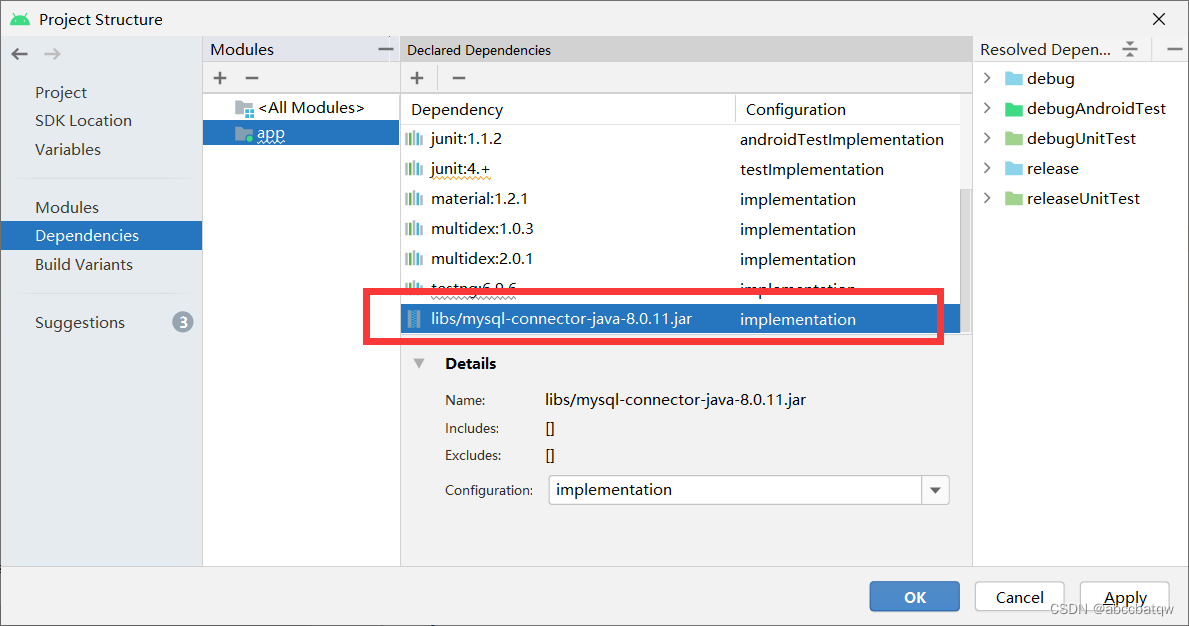
前面 出现‘>' ,引入成功。

app的build.gradle中也会自动引入依赖。
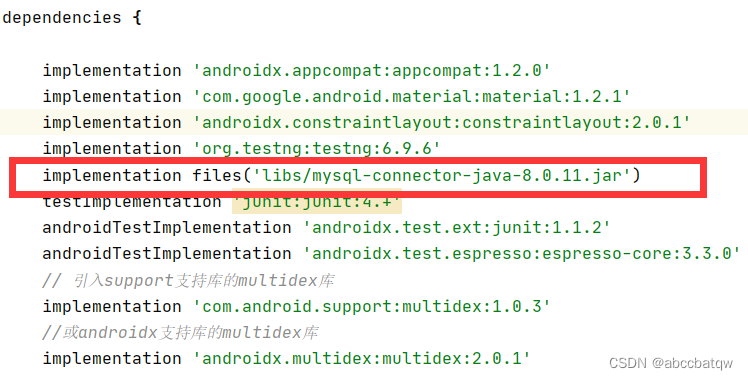
到这里mysql的jar包就导入完成了。、
之后再程序中可以通过:
class.forname("com.mysql.cj.jdbc.driver");来引入。
接下来就可以建立数据库连接了。
这里写了一个工具类,将连接mysql的过程封装起来,直接再main函数中调用即可。这里main函数好像可以不new对象就调用对象中的static方法。
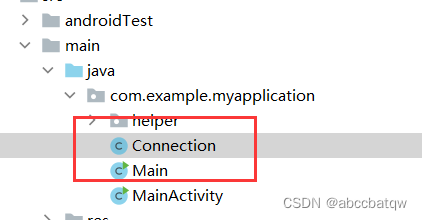
用到的就这两个,其中connection是工具类,main调用工具类。
connection的代码如下:
package com.example.myapplication;
import android.util.log;
import java.sql.drivermanager;
import java.sql.sqlexception;
public class connection {
public static void mymysql(){
final thread thread =new thread(new runnable() {
@override
public void run() {
while (!thread.interrupted()) {
try {
thread.sleep(100); // 每隔0.1秒尝试连接
} catch (interruptedexception e) {
// log.e(tag, e.tostring());
system.out.println(e.tostring());
}
// 1.加载jdbc驱动
try {
class.forname("com.mysql.cj.jdbc.driver");
// log.v(tag, "加载jdbc驱动成功");
system.out.println("加载jdbc驱动成功");
} catch (classnotfoundexception e) {
// log.e(tag, "加载jdbc驱动失败");
system.out.println("加载jdbc驱动失败");
return;
}
// 2.设置好ip/端口/数据库名/用户名/密码等必要的连接信息
string ip = "";
int port = 3306;
string dbname = "";
string url = "jdbc:mysql://" + ip + ":" + port
+ "/" + dbname+"?useunicode=true&characterencoding=utf-8&usessl=false";
// useunicode=true&characterencodeing=utf-8&usessl=false&servertimezone=gmt&allowpublickeyretrieval=true"
// 构建连接mysql的字符串
string user = "root";
string password = "wqt200126";
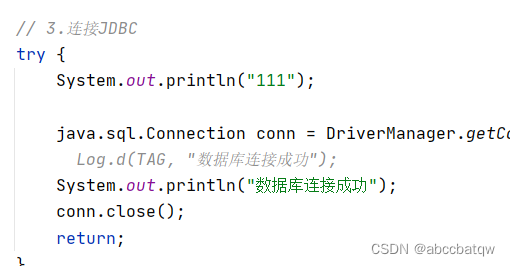
// 3.连接jdbc
try {
system.out.println("111");
java.sql.connection conn = drivermanager.getconnection(url, user, password);
// log.d(tag, "数据库连接成功");
system.out.println("数据库连接成功");
conn.close();
return;
}
catch (sqlexception e) {
// log.e(tag, e.getmessage());
system.out.println('h'+e.getmessage());
}
}
}
});
thread.start();
}
}其中数据库配置的代码是这些:
string ip = "";
int port = 3306;
string dbname = "";
string url = "jdbc:mysql://" + ip + ":" + port
+ "/" + dbname+"?useunicode=true&characterencoding=utf-8&usessl=false";
// useunicode=true&characterencodeing=utf-8&usessl=false&servertimezone=gmt&allowpublickeyretrieval=true"
其中,dbname就是连接的数据库名称,如果是连接本机,ip地址就是127.0.0.1。
还需要加上用户名和密码:
string user = "root";
string password = "";
设置好后就通过:
java.sql.connection conn = drivermanager.getconnection(url, user, password);来连接。
这里as中好像不允许耗时程序再主线程中,意思是连接mysql是个耗时程序,所以需要另外开辟一个线程来连接mysql。所以这里new了一个thread。
然后工具类写好了,接下来再main函数中引入。
main函数代码如下:
package com.example.myapplication;
import androidx.appcompat.app.appcompatactivity;
import android.os.bundle;
import android.util.log;
//import java.sql.connection;
import java.sql.drivermanager;
import java.sql.sqlexception;
import com.example.myapplication.connection;
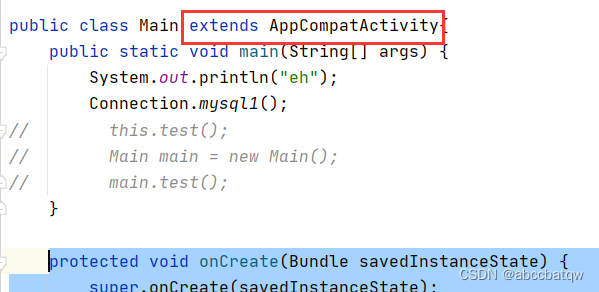
public class main {
public static void main(string[] args) {
system.out.println("eh");
connection.mysql1();
}
}接下来运行main函数。再运行前,要调整这里:

然后运行:
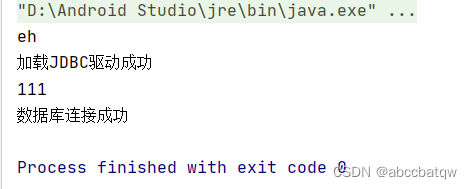
运行结果:
hthe server time zone value 'öð¹ú±ê׼걼ä' is unrecognized or represents more than one time zone. you must configure either the server or jdbc driver (via the servertimezone configuration property) to use a more specifc time zone value if you want to utilize time zone support.
加载jdbc驱动成功
111
hthe server time zone value 'öð¹ú±ê׼걼ä' is unrecognized or represents more than one time zone. you must configure either the server or jdbc driver (via the servertimezone configuration property) to use a more specifc time zone value if you want to utilize time zone support.
加载jdbc驱动成功
111
hthe server time zone value 'öð¹ú±ê׼걼ä' is unrecognized or represents more than one time zone. you must configure either the server or jdbc driver (via the servertimezone configuration property) to use a more specifc time zone value if you want to utilize time zone support.
加载jdbc驱动成功
111
就一直打印这几句话。
这里的“数据库连接成功"没有打印。
仔细看有这句话:
hthe server time zone value 'öð¹ú±ê׼걼ä' is unrecognized or represents more than one time zone. you must configure either the server or jdbc driver (via the servertimezone configuration property) to use a more specifc time zone value if you want to utilize time zone support.好像要加什么时间域。
改了url
原来的url是:
string url = "jdbc:mysql://" + ip + ":" + port
                            + "/" + dbname+"?useunicode=true&characterencoding=utf-8&usessl=false";
改为:
string url = "jdbc:mysql://" + ip + ":" + port
+ "/" + dbname+"? useunicode=true&characterencodeing=utf-8&usessl=false&servertimezone=gmt&allowpublickeyretrieval=true";
再连接:
成功了。
这里尝试一下不用开辟线程的方法,因为这里没有在app上运行:
代码:
工具类中加入:
public static void mysql1(){
string success = "111";
system.out.println(success);
// while (this.success_con!="111") {
while (success=="111"){
// 1.加载jdbc驱动
try {
class.forname("com.mysql.cj.jdbc.driver");
// log.v(tag, "加载jdbc驱动成功");
system.out.println("加载jdbc驱动成功");
} catch (classnotfoundexception e) {
// log.e(tag, "加载jdbc驱动失败");
system.out.println("加载jdbc驱动失败");
return;
}
// 2.设置好ip/端口/数据库名/用户名/密码等必要的连接信息
string ip = "127.0.0.1";
int port = 3306;
string dbname = "mm";
string url = "jdbc:mysql://" + ip + ":" + port
+ "/" + dbname+"?useunicode=true&characterencoding=utf-8&usessl=false";
// useunicode=true&characterencodeing=utf-8&usessl=false&servertimezone=gmt&allowpublickeyretrieval=true"
// 构建连接mysql的字符串
string user = "root";
string password = "wqt200126";
// 3.连接jdbc
try {
system.out.println("111");
java.sql.connection conn = drivermanager.getconnection(url, user, password);
// log.d(tag, "数据库连接成功");
system.out.println("数据库连接成功");
success = "sss";
conn.close();
return;
}
catch (sqlexception e) {
// log.e(tag, e.getmessage());
system.out.println('h'+e.getmessage());
}
}
}
main函数中:
public class main {
    public static void main(string[] args) {
        system.out.println("eh");
        connection.mysql1();
//        this.test();
//        main main = new main();
//        main.test();
    }
}
结果:

也可以连接。
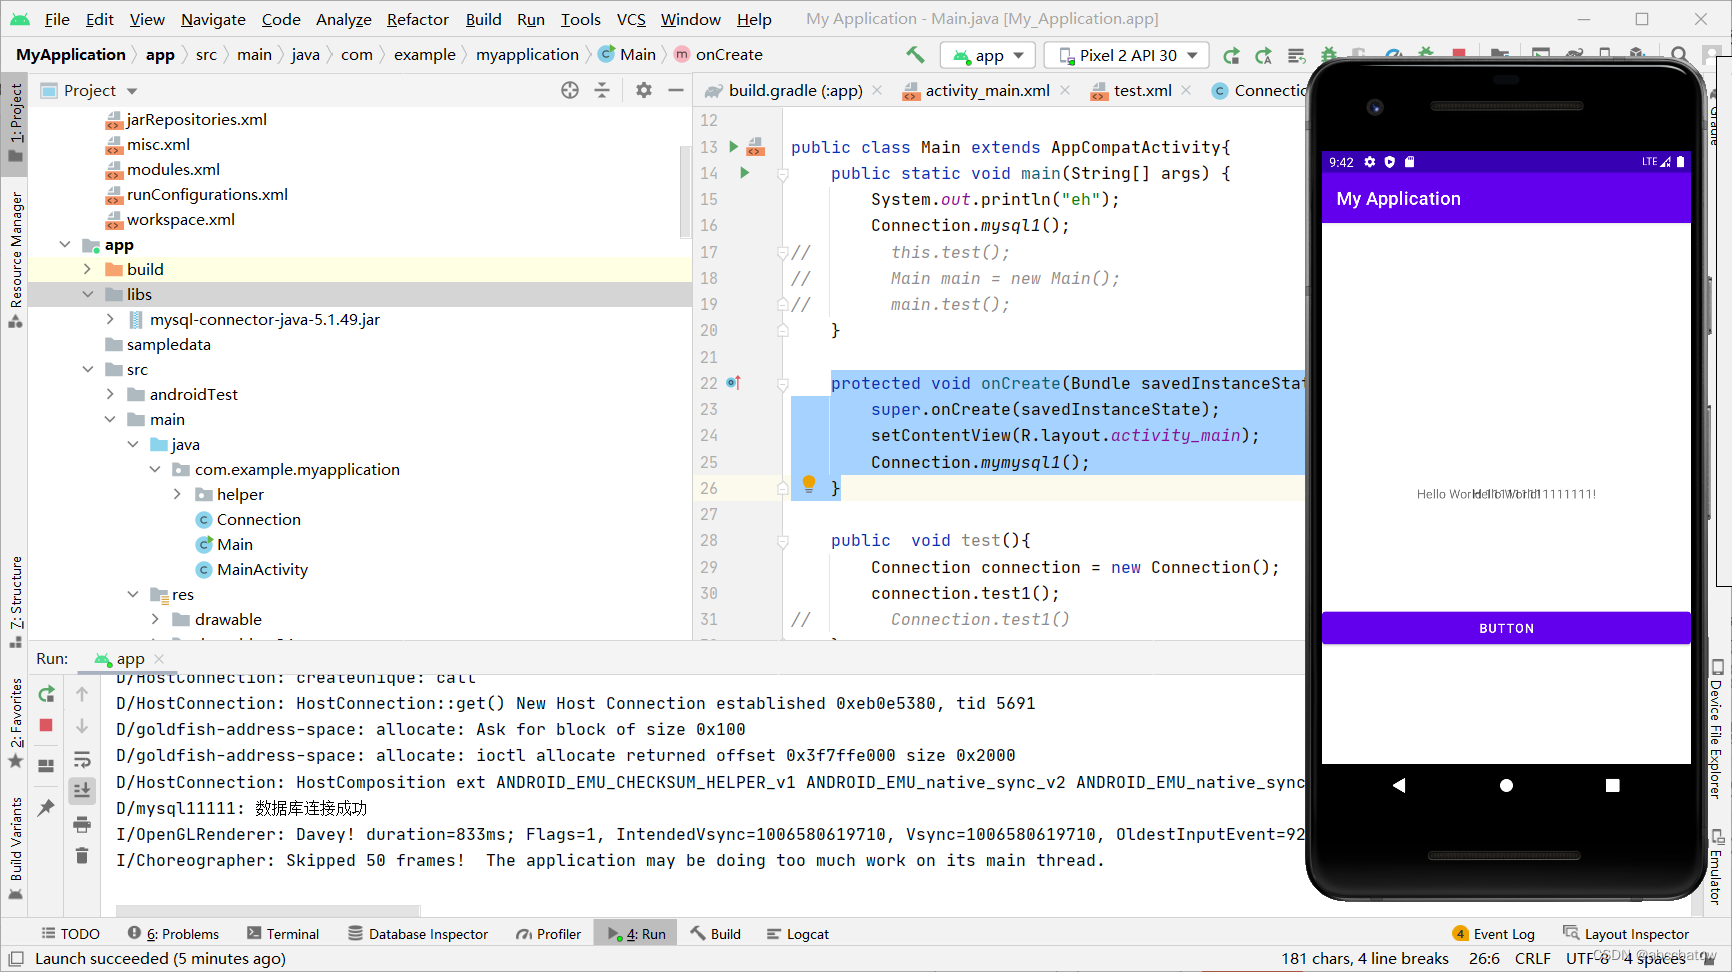
接下来试一下在app中运行。
这里需要注意的是,在app中运行要开辟线程。不在app中运行,也就是不在oncreate,onclick中打印信息,不能用log()。
之前的代码中,我都是将log注释掉了,用的sout。
首先在main函数中添加oncreate方法。
protected void oncreate(bundle savedinstancestate) {
        super.oncreate(savedinstancestate);
        setcontentview(r.layout.activity_main);
        connection.mymysql1();
    }
需要注意的是:

运行前要sync:同步一下。
![]()
同步完成:

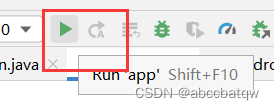
点击这个运行:
运行会报错:
cannot fit requested classes in a single dex file (# methods: 81010 > 65536)好像是容量超过限制。
参考这篇:解决“cannot fit requested classes in a single dex file”的问题-csdn博客
然后sync,build,run
成功。
然后尝试在手机上运行。
在main中加入代码:
protected void oncreate(bundle savedinstancestate) {
        super.oncreate(savedinstancestate);
        setcontentview(r.layout.activity_main);
        connection.mymysql1();
    }
运行成功。
需要注意,这里mysql的jar包要换位5.*,不然在手机上运行会报错。
参考这篇:安卓连接云mysql时报错:java.lang.noclassdeffounderror: failed resolution of: ljava/sql/sqltype-csdn博客
同时更改
class.forname("com.mysql.jdbc.driver");
libs中之前的8.*的jar包要删掉,不然会报错。


发表评论