1. opencv概述
opencv是一个开源的计算机视觉库,它提供了一系列丰富的图像处理和计算机视觉算法,包括图像读取、显示、滤波、特征检测、目标跟踪等功能。
2. 安装opencv
2.1 下载opencv
opencv下载:https://opencv.org/releases/
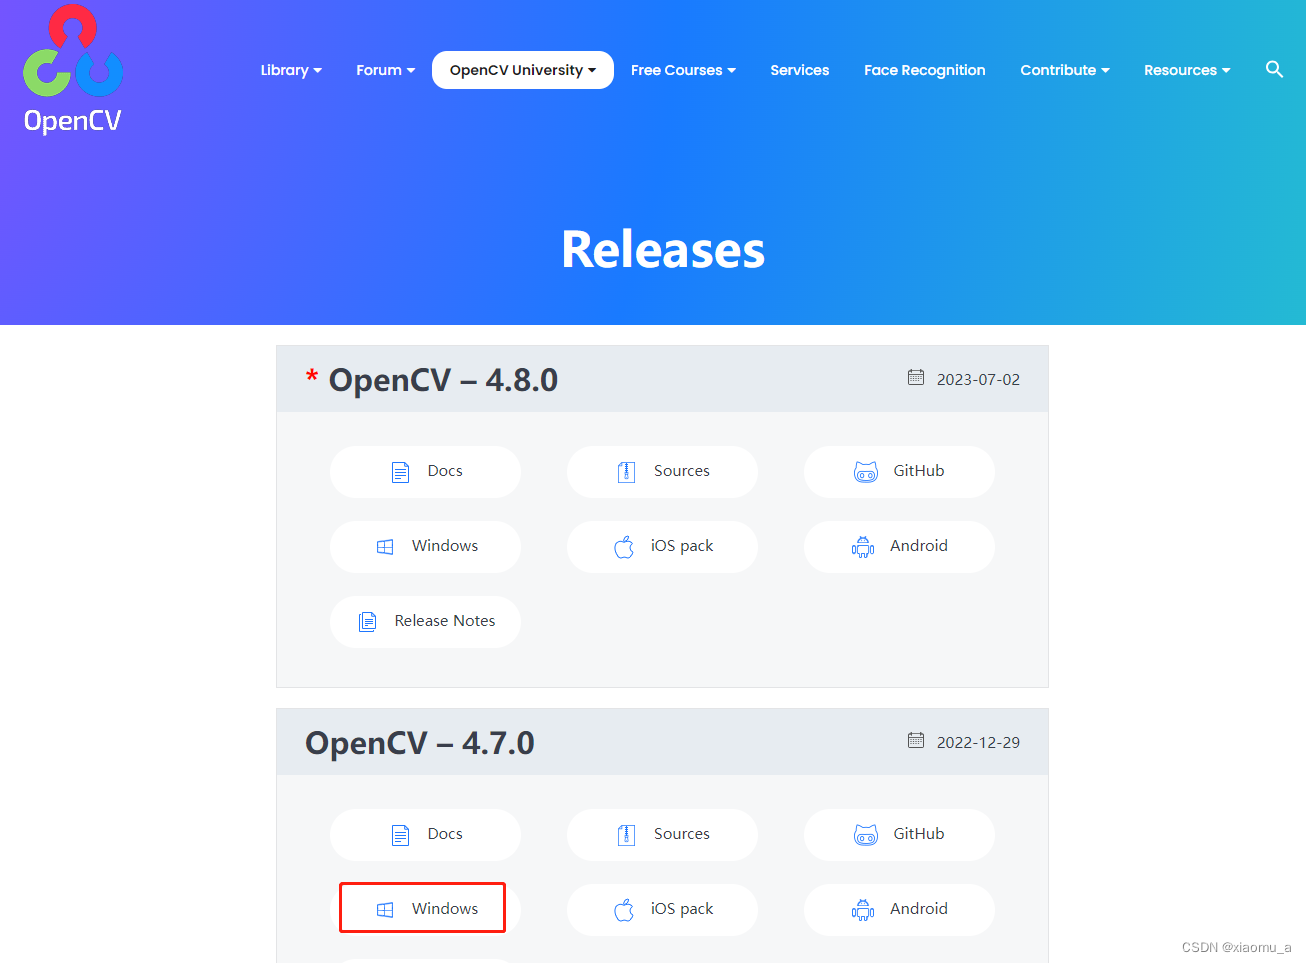
这里我们使用4.7.0版本,下载到本地后,双击进行安装即可。
进入到opencv的安装目录:
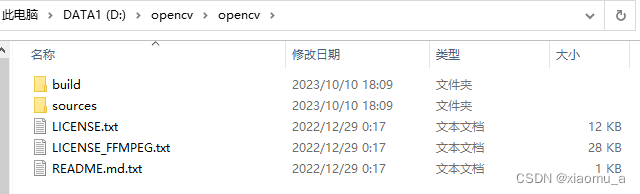
build :基于window构建

sources:开源,提供源码
进入到build\java 目录

2.2 准备文件
# 1. 特征分类器:windows 和 linux 中的配置文件都一样,随便用哪个都行
haarcascade_frontalface_alt.xml
# windows 路径 : opencv\build\etc\haarcascades
# linux 路径 : /usr/local/share/opencv4/haarcascades
# 2. jar 包 - 也可以直接使用 javacv 中的 opencv 包
opencv-470.jar
# windows 路径 : {opencv安装目录}\opencv\build\java
# linux 路径 : /usr/local/share/java/opencv4
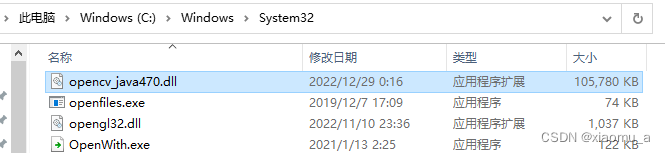
# 3. 动态库
opencv_java470.dll (windows系统使用此文件)
# windows 路径 : {opencv安装目录}\opencv\build\java\{x64}/{x86} 跟据系统选择
libopencv_java470.so (linux系统使用此文件)
# linux 路径 : /usr/local/share/java/opencv4
3. 代码实现
3.1 pom.xml添加依赖
<!-- 版本的依赖与下载的opencv版本一致-->
<dependency>
            <groupid>org.bytedeco</groupid>
            <artifactid>opencv</artifactid>
            <version>4.7.0-1.5.9</version>
        </dependency>
或:
        <dependency>
            <groupid>org.bytedeco</groupid>
            <artifactid>javacv-platform</artifactid>
            <version>1.5.9</version>
        </dependency>
或:
<dependency>
            <groupid>org.openpnp</groupid>
            <artifactid>opencv</artifactid>
            <version>4.7.0-0</version>
        </dependency>
以上三个依赖任选其一即可,项目打包后观察一下使用哪个依赖打包后的jar文件更小
实验证明:
javacv-platform依赖的jar最大,达到929.64m
org.openpnp.opencv依赖最小,几乎为0m
org.bytedeco.opencv依赖居中,大小为2m
3.2 编写代码
package com.testpro.test.opencv;

import org.opencv.core.*;
import org.opencv.imgcodecs.imgcodecs;
import org.opencv.imgproc.imgproc;
import org.opencv.objdetect.cascadeclassifier;

import java.util.arrays;

public class facecompare {

    // 初始化人脸探测器
    static cascadeclassifier facedetector;

    private static final string path_prefix = "c:\\users\\dev\\desktop\\";

	static int i = 0;

    static {
        // 判断系统
        string os = system.getproperty("os.name");

        // 加载动态库
        if (os != null && os.tolowercase().startswith("windows")) {
            // windows操作系统
            // todo windows 系统部署加载 .dll 文件 - 路径跟据自己存放位置更改【这里需要使用绝对路径】
            system.load("d:\\opencv\\opencv\\build\\java\\x64\\opencv_java470.dll");
        } else if (os != null && os.tolowercase().startswith("linux")) {
            // linux操作系统
            // todo linux 服务器部署加载 .so 文件 - 路径跟据自己存放位置更改【是否需要绝对路径有待验证,目前只在windows 系统实践过】
            system.load("/opt/face/libopencv_java440.so");
        }

        // 引入 特征分类器配置 文件:haarcascade_frontalface_alt.xml 文件路径
        // 此文件在opencv的安装目录build\etc\haarcascades下可以找到
        string property = "d:\\opencv\\opencv\\build\\etc\\haarcascades\\haarcascade_frontalface_alt.xml";
        system.out.println(property);
        facedetector = new cascadeclassifier(property);
    }

    public static void main(string[] args) {
        // 图片路径不能包含中文
        string str1 = path_prefix + "3-1.jpg";
        string str2 = path_prefix + "3-2.jpg";
        long start = system.currenttimemillis();
        double comparehist = compare_image(str1, str2);
        system.out.println("time:" + (system.currenttimemillis() - start));
        system.out.println(comparehist);
        if (comparehist > 0.6) {
            system.out.println("人脸匹配");
        } else {
            system.out.println("人脸不匹配");
        }
    }

    // 灰度化人脸
    public static mat conv_mat(string img) {
        mat image0 = imgcodecs.imread(img);
        mat image1 = new mat();
        // 灰度化
        imgproc.cvtcolor(image0, image1, imgproc.color_bgr2gray);
        // 探测人脸
        matofrect facedetections = new matofrect();
        facedetector.detectmultiscale(image1, facedetections);
        // rect中人脸图片的范围
        for (rect rect : facedetections.toarray()) {
            mat face = new mat(image1, rect);
            return face;
        }
        return null;
    }

    // 比较图片
    public static double compare_image(string img_1, string img_2) {
        mat mat_1 = conv_mat(img_1);
        mat mat_2 = conv_mat(img_2);
        mat hist_1 = new mat();
        mat hist_2 = new mat();
        //颜色范围
        matoffloat ranges = new matoffloat(0f, 256f);
        //直方图大小, 越大匹配越精确 (越慢)
        matofint histsize = new matofint(10000000);
        imgproc.calchist(arrays.aslist(mat_1), new matofint(0), new mat(), hist_1, histsize, ranges);
        imgproc.calchist(arrays.aslist(mat_2), new matofint(0), new mat(), hist_2, histsize, ranges);
        // correl 相关系数
        double res = imgproc.comparehist(hist_1, hist_2, imgproc.cv_comp_correl);
        return res;
    }


}
上述代码加载.dll文件也可使用以下方式:
// 使用此方法需将d:\opencv\opencv\build\java\x64\opencv_java470.dll文件复制到c:\windows\system32目录下
system.loadlibrary(core.native_library_name);
如下:
4. 效果

5. 附:完整代码
包括:
从摄像头实时人脸识别,识别成功保存图片到本地
从本地视频文件中识别人脸
本地图片人脸识别,识别成功并保存人脸图片到本地
package com.testpro.test.opencv;

import org.opencv.core.*;
import org.opencv.highgui.highgui;
import org.opencv.imgcodecs.imgcodecs;
import org.opencv.imgproc.imgproc;
import org.opencv.objdetect.cascadeclassifier;
import org.opencv.videoio.videocapture;
import org.opencv.videoio.videowriter;
import org.opencv.videoio.videoio;

import java.util.arrays;

/**
 * opencv 图片人脸识别、实时摄像头人脸识别、视频文件人脸识别
 */
public class facevideo {

    // 初始化人脸探测器
    static cascadeclassifier facedetector;

    static int i = 0;

    static {
        // 判断系统
        string os = system.getproperty("os.name");

        // 加载动态库
        if (os != null && os.tolowercase().startswith("windows")) {
            // windows操作系统
            // todo windows 系统部署加载 .dll 文件 - 路径跟据自己存放位置更改
            system.load("d:\\opencv\\opencv\\build\\java\\x64\\opencv_java470.dll");
//            classloader.getsystemresource("dlls/opencv_java470.dll");
        } else if (os != null && os.tolowercase().startswith("linux")) {
            // linux操作系统
            // todo linux 服务器部署加载 .so 文件 - 路径跟据自己存放位置更改
            system.load("/opt/face/libopencv_java440.so");
        }

        // 引入 特征分类器配置 文件:haarcascade_frontalface_alt.xml 文件路径
        string property = "d:\\opencv\\opencv\\build\\etc\\haarcascades\\haarcascade_frontalface_alt.xml";
        system.out.println(property);
        facedetector = new cascadeclassifier(property);
    }

    private static final string path_prefix = "c:\\users\\dev\\desktop\\";

    public static void main(string[] args) {
        // 1- 从摄像头实时人脸识别,识别成功保存图片到本地
//        getvideofromcamera();

        // 2- 从本地视频文件中识别人脸
//        getvideofromfile();

        // 3- 本地图片人脸识别,识别成功并保存人脸图片到本地
//        face("5-1.jpg");

        // 4- 比对本地2张图的人脸相似度 (越接近1越相似)
        double comparehist = compare_image(path_prefix + "5-1.jpg", path_prefix + "6-1.jpg");
        system.out.println(comparehist);
        if (comparehist > 0.72) {

            system.out.println("人脸匹配");
        } else {

            system.out.println("人脸不匹配");
        }
    }


    /**
     * opencv-4.7.0 从摄像头实时读取
     */
    public static void getvideofromcamera() {
        //1 如果要从摄像头获取视频 则要在 videocapture 的构造方法写 0
        videocapture capture = new videocapture(0);
        mat video = new mat();
        int index = 0;
        if (capture.isopened()) {

            while (i < 3) {
                // 匹配成功3次退出
                capture.read(video);
                highgui.imshow("实时人脸识别", getface(video));
                index = highgui.waitkey(100);
                if (index == 27) {

                    capture.release();
                    break;
                }
            }
        } else {

            system.out.println("摄像头未开启");
        }
        try {

            capture.release();
            thread.sleep(1000);
            system.exit(0);
        } catch (interruptedexception e) {

            e.printstacktrace();
        }
        return;
    }

    /**
     * opencv-4.7.0 从视频文件中读取
     */
    public static void getvideofromfile() {

        videocapture capture = new videocapture();
        capture.open(path_prefix + "yimi.mp4");//1 读取视频文件的路径

        if (!capture.isopened()) {

            system.out.println("读取视频文件失败!");
            return;
        }
        mat video = new mat();
        int index = 0;
        while (capture.isopened()) {

            capture.read(video);//2 视频文件的视频写入 mat video 中
            highgui.imshow("本地视频识别人脸", getface(video));//3 显示图像
            index = highgui.waitkey(100);//4 获取键盘输入
            if (index == 27) {
                //5 如果是 esc 则退出
                capture.release();
                return;
            }
        }
    }

    /**
     * opencv-4.7.0 人脸识别
     *
     * @param image 待处理mat图片(视频中的某一帧)
     * @return 处理后的图片
     */
    public static mat getface(mat image) {
        // 1 读取opencv自带的人脸识别特征xml文件(facedetector)
//        cascadeclassifier facebook = new cascadeclassifier("d:\\sofeware\\opencv\\sources\\data\\haarcascades\\haarcascade_frontalface_alt.xml");
        // 2 特征匹配类
        matofrect face = new matofrect();
        // 3 特征匹配
        facedetector.detectmultiscale(image, face);
        rect[] rects = face.toarray();
        system.out.println("匹配到 " + rects.length + " 个人脸");
        if (rects != null && rects.length >= 1) {

            // 4 为每张识别到的人脸画一个圈
            for (int i = 0; i < rects.length; i++) {

                imgproc.rectangle(image, new point(rects[i].x, rects[i].y), new point(rects[i].x + rects[i].width, rects[i].y + rects[i].height), new scalar(0, 255, 0));
                imgproc.puttext(image, "human", new point(rects[i].x, rects[i].y), imgproc.font_hershey_script_simplex, 1.0, new scalar(0, 255, 0), 1, imgproc.line_aa, false);
                //mat dst=image.clone();
                //imgproc.resize(image, image, new size(300,300));
            }
            i++;
            if (i == 3) {
                // 获取匹配成功第10次的照片
                imgcodecs.imwrite(path_prefix + "face.png", image);
            }
        }
        return image;
    }


    /**
     * opencv-4.7.0 图片人脸识别
     */
    public static void face(string filename) {
        // 1 读取opencv自带的人脸识别特征xml文件
        // opencv 图像识别库一般位于 opencv\sources\data 下面
//        cascadeclassifier facebook=new cascadeclassifier("d:\\sofeware\\opencv\\sources\\data\\haarcascades\\haarcascade_frontalface_alt.xml");
        // 2 读取测试图片
        string imgpath = path_prefix + filename;
        mat image = imgcodecs.imread(imgpath);
        if (image.empty()) {

            system.out.println("image 内容不存在!");
            return;
        }
        // 3 特征匹配
        matofrect face = new matofrect();
        facedetector.detectmultiscale(image, face);
        // 4 匹配 rect 矩阵 数组
        rect[] rects = face.toarray();
        system.out.println("匹配到 " + rects.length + " 个人脸");
        // 5 为每张识别到的人脸画一个圈
        int i = 1;
        for (rect rect : face.toarray()) {

            imgproc.rectangle(image, new point(rect.x, rect.y), new point(rect.x + rect.width, rect.y + rect.height),
                    new scalar(0, 255, 0), 3);
            imagecut(imgpath, path_prefix + i + ".jpg", rect.x, rect.y, rect.width, rect.height);// 进行图片裁剪
            i++;
        }
        // 6 展示图片
        highgui.imshow("人脸识别", image);
        highgui.waitkey(0);
    }

    /**
     * 裁剪人脸
     *
     * @param imagepath
     * @param outfile
     * @param posx
     * @param posy
     * @param width
     * @param height
     */
    public static void imagecut(string imagepath, string outfile, int posx, int posy, int width, int height) {
        // 原始图像
        mat image = imgcodecs.imread(imagepath);
        // 截取的区域:参数,坐标x,坐标y,截图宽度,截图长度
        rect rect = new rect(posx, posy, width, height);
        // 两句效果一样
        mat sub = image.submat(rect); // mat sub = new mat(image, rect);
        mat mat = new mat();
        size size = new size(width, height);
        imgproc.resize(sub, mat, size);// 将人脸进行截图并保存
        imgcodecs.imwrite(outfile, mat);
        system.out.println(string.format("图片裁切成功,裁切后图片文件为: %s", outfile));
    }

    /**
     * 人脸比对
     *
     * @param img_1
     * @param img_2
     * @return
     */
    public static double compare_image(string img_1, string img_2) {

        mat mat_1 = conv_mat(img_1);
        mat mat_2 = conv_mat(img_2);
        mat hist_1 = new mat();
        mat hist_2 = new mat();

        //颜色范围
        matoffloat ranges = new matoffloat(0f, 256f);
        //直方图大小, 越大匹配越精确 (越慢)
        matofint histsize = new matofint(1000);

        imgproc.calchist(arrays.aslist(mat_1), new matofint(0), new mat(), hist_1, histsize, ranges);
        imgproc.calchist(arrays.aslist(mat_2), new matofint(0), new mat(), hist_2, histsize, ranges);

        // correl 相关系数
        double res = imgproc.comparehist(hist_1, hist_2, imgproc.cv_comp_correl);
        return res;
    }

    /**
     * 灰度化人脸
     *
     * @param img
     * @return
     */
    public static mat conv_mat(string img) {

        mat image0 = imgcodecs.imread(img);

        mat image1 = new mat();
        // 灰度化
        imgproc.cvtcolor(image0, image1, imgproc.color_bgr2gray);
        // 探测人脸
        matofrect facedetections = new matofrect();
        facedetector.detectmultiscale(image1, facedetections);
        // rect中人脸图片的范围
        for (rect rect : facedetections.toarray()) {

            mat face = new mat(image1, rect);
            return face;
        }
        return null;
    }

    /**
     * opencv-4.7.0 将摄像头拍摄的视频写入本地
     */
    public static void writevideo() {

        //1 如果要从摄像头获取视频 则要在 videocapture 的构造方法写 0
        videocapture capture = new videocapture(0);
        mat video = new mat();
        int index = 0;
        size size = new size(capture.get(videoio.cap_prop_frame_width), capture.get(videoio.cap_prop_frame_height));
        videowriter writer = new videowriter("d:/a.mp4", videowriter.fourcc('d', 'i', 'v', 'x'), 15.0, size, true);
        while (capture.isopened()) {

            capture.read(video);//2 将摄像头的视频写入 mat video 中
            writer.write(video);
            highgui.imshow("像头获取视频", video);//3 显示图像
            index = highgui.waitkey(100);//4 获取键盘输入
            if (index == 27) {
                //5 如果是 esc 则退出
                capture.release();
                writer.release();
                return;
            }
        }
    }

}
![aidl文件生成Java、C++[android]、C++[ndk]、Rust接口](/images/newimg/nimg1.png)


发表评论