文章目录
- 简介
- 安装和部署
- 1. 安装rabbitmq
- 2.创建virtual-host
- 3. 添加依赖
- 4.修改配置文件
- workqueues模型
- 1.编写消息发送测试类
- 2.编写消息接收(监听)类
- 3. 实现能者多劳
- 交换机
- fanout交换机
- 1.消息发送
- 2.消息监听
- direct交换机
- 1.消息发送
- 2.消息接收
- topic交换机
- 1.消息发送
- 2.消息接收
- 声明队列和交换机
- 声明队列
- 声明交换机
- 绑定队列和交换机
- 1.fanout示例
- 2. direct示例
- 3.基于注解的方式声明队列和交换机
- 消息转换器
- 总结
简介
rabbitmq是一个开源的消息代理软件,它实现了高级消息队列协议(amqp)。rabbitmq支持多种消息传递协议,具有高可靠性、高可用性和高性能等特点。它允许应用程序通过消息队列进行异步通信,从而实现解耦和负载均衡。rabbitmq的核心概念包括交换机(exchange)、队列(queue)和绑定(binding),它们共同构成了消息的路由和传递机制。
rabbitmq的架构如图:

其中包含几个概念:
publisher:生产者,也就是发送消息的一方consumer:消费者,也就是消费消息的一方queue:队列,存储消息。生产者投递的消息会暂存在消息队列中,等待消费者处理exchange:交换机,负责消息路由。生产者发送的消息由交换机决定投递到哪个队列。virtual host:虚拟主机,起到数据隔离的作用。每个虚拟主机相互独立,有各自的exchange、queue
安装和部署
这里以centos7为例:
1. 安装rabbitmq
docker run \
 -e rabbitmq_default_user=shijun \
 -e rabbitmq_default_pass=123321 \
 -v mq-plugins:/plugins \
 --name mq \
 --hostname mq \
 -p 15672:15672 \
 -p 5672:5672 \
 --network hm-net\
 -d \
 rabbitmq:3.8-management
安装完成后访问:http://虚拟机ip地址:15672
输入刚才的账号密码:shijun 123321,就能进入控制台界面。

2.创建virtual-host
按顺序点击,填入“name”和“descrption”,然后点击“add virtual host”按钮:

然后在右上角切换到创建的virtual-host:

3. 添加依赖
        <dependency>
            <groupid>org.projectlombok</groupid>
            <artifactid>lombok</artifactid>
        </dependency>
        <!--amqp依赖,包含rabbitmq-->
        <dependency>
            <groupid>org.springframework.boot</groupid>
            <artifactid>spring-boot-starter-amqp</artifactid>
        </dependency>
        <!--单元测试-->
        <dependency>
            <groupid>org.springframework.boot</groupid>
            <artifactid>spring-boot-starter-test</artifactid>
        </dependency>
4.修改配置文件
logging:
  pattern:
    dateformat: mm-dd hh:mm:ss:sss
spring:
  rabbitmq:
    host: 192.168.56.101 # 你的虚拟机ip
    port: 5672 # 端口
    virtual-host: /mq-demo # 虚拟主机
    username: shijun # 用户名
    password: 123321 # 密码
workqueues模型

在控制台创建一个work.queue队列:

1.编写消息发送测试类
import static org.junit.jupiter.api.assertions.*;
@springboottest
class springamqptest {

    @autowired
    private rabbittemplate rabbittemplate;

    @test
    public void testworkqueue() throws interruptedexception {
        // 队列名称
        string queuename = "work.queue";
        // 消息
        string message = "hello, message_";
        for (int i = 0; i < 50; i++) {
            // 发送消息,每20毫秒发送一次,相当于每秒发送50条消息
            rabbittemplate.convertandsend(queuename, message + i);
            thread.sleep(20);
        }
    }
}
2.编写消息接收(监听)类
@component
public class springrabbitlistener {

    /**
     * 监听名为"work.queue"的rabbitmq队列,接收并处理来自队列的消息。
     * 通过延迟执行模拟消息处理时间
     *
     * @param msg 从队列中接收到的消息内容,以字符串形式提供
     * @throws interruptedexception 如果线程在睡眠期间被中断,则抛出此异常
     */
    @rabbitlistener(queues = "work.queue")
    public void listenworkqueue1(string msg) throws interruptedexception {
        // 输出接收到消息的时间,以便跟踪消息处理的时间点
        system.out.println("消费者1接收到消息:【" + msg + "】" + localtime.now());
        // 模拟消息处理时间,让线程睡眠20毫秒
        thread.sleep(20);
    }


    @rabbitlistener(queues = "work.queue")
    public void listenworkqueue2(string msg) throws interruptedexception {
        system.err.println("消费者2........接收到消息:【" + msg + "】" + localtime.now());
        thread.sleep(200);
    }
}
运行后查看结果:

3. 实现能者多劳
修改配置文件:
spring:
  rabbitmq:
    listener:
      simple:
        prefetch: 1 # 每次只能获取一条消息,处理完成才能获取下一个消息
再次运行,查看结果:

交换机
交换机有不同的类型,常见的有以下几种:
- fanout exchange(扇出交换机):将消息广播到所有绑定的队列,不考虑路由键。
- direct exchange(直连交换机):根据消息的路由键精确匹配队列。
- topic exchange(主题交换机):根据路由键的模式匹配队列。
- headers exchange(头交换机):根据消息的头部信息匹配队列。
fanout交换机

- 可以有多个队列
- 每个队列都要绑定到exchange(交换机)
- 生产者发送的消息,只能发送到交换机
- 交换机把消息发送给绑定过的所有队列
- 订阅队列的消费者都能拿到消息
-
创建fanout交换机

-
创建两个队列
fanout.queue1、fanout.queue2:
-
点击刚刚创建的交换机,进入:

-
将刚才创建的两个队列绑定到交换机,

1.消息发送
在springamqptest类中添加测试方法:
@test
public void testfanoutexchange() {
    // 交换机名称
    string exchangename = "demo.fanout";
    // 消息
    string message = "hello, everyone!";
    rabbittemplate.convertandsend(exchangename, "", message);
}
2.消息监听
在springrabbitlistener中添加两个方法:
@rabbitlistener(queues = "fanout.queue1")
public void listenfanoutqueue1(string msg) {
    system.out.println("消费者1接收到fanout消息:【" + msg + "】");
}

@rabbitlistener(queues = "fanout.queue2")
public void listenfanoutqueue2(string msg) {
    system.out.println("消费者2接收到fanout消息:【" + msg + "】");
}
运行代码,查看结果:

交换机的作用是什么?
- 接收publisher发送的消息
- 将消息按照规则路由到与之绑定的队列
- 不能缓存消息,路由失败,消息丢失
- fanoutexchange的会将消息路由到每个绑定的队列
direct交换机

在direct模型下:
- 队列与交换机的绑定,不能是任意绑定了,而是要指定一个
routingkey(路由key) - 消息的发送方在 向 exchange发送消息时,也必须指定消息的
routingkey。 - exchange不再把消息交给每一个绑定的队列,而是根据消息的
routing key进行判断,只有队列的routingkey与消息的routing key完全一致,才会接收到消息
-
创建
direct.queue1和direct.queue2两个队列,之后创建一个direct类型的交换机:
-
绑定队列到交换机,最终结果如图所示:

1.消息发送
在springamqptest类中添加测试方法:
@test
public void testsenddirectexchange1() {
    // 交换机名称
    string exchangename = "demo.direct";
    // 消息
    string message = "红色警报!日本乱排核废水,导致海洋生物变异,惊现哥斯拉!";
    // 发送消息
    rabbittemplate.convertandsend(exchangename, "red", message);
}

@test
public void testsenddirectexchange2() {
    // 交换机名称
    string exchangename = "demo.direct";
    // 消息
    string message = "最新报道,哥斯拉是居民自治巨型气球,虚惊一场!";
    // 发送消息
    rabbittemplate.convertandsend(exchangename, "blue", message);
}
2.消息接收
在springrabbitlistener中添加方法:
@rabbitlistener(queues = "direct.queue1")
public void listendirectqueue1(string msg) {
    system.out.println("消费者1接收到direct.queue1的消息:【" + msg + "】");
}

@rabbitlistener(queues = "direct.queue2")
public void listendirectqueue2(string msg) {
    system.out.println("消费者2接收到direct.queue2的消息:【" + msg + "】");
}
运行测试类中的testsenddirectexchange1,查看结果:

运行测试类中的testsenddirectexchange2,查看结果:

topic交换机
-
通配符
:在绑定键中,可以使用两个特殊字符来实现模式匹配:
*:匹配一个单词。#:匹配零个或多个单词。
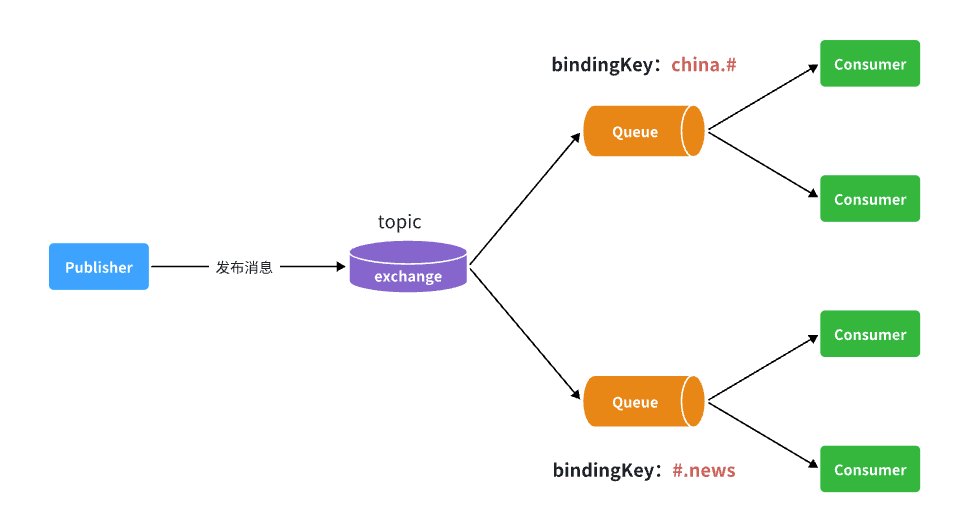
如图所示,假如此时publisher发送的消息使用的routingkey共有四种:
china.news代表有中国的新闻消息;china.weather代表中国的天气消息;japan.news则代表日本新闻japan.weather代表日本的天气消息;
解释:
topic.queue1:绑定的是china.#,凡是以china.开头的routing key都会被匹配到,包括:china.newschina.weather
topic.queue2:绑定的是#.news,凡是以.news结尾的routing key都会被匹配。包括:china.newsjapan.news
按照之前的流程创建topic交换机和队列并进行绑定,最终结果如下:
1.消息发送
在springamqptest类中添加测试方法:
@test
public void testsendtopicexchange1() {
    // 交换机名称
    string exchangename = "demo.topic";
    // 消息
    string message = "喜报!孙悟空大战哥斯拉,胜!";
    // 发送消息
    rabbittemplate.convertandsend(exchangename, "china.news", message);
}

@test
public void testsendtopicexchange1() {
    // 交换机名称
    string exchangename = "demo.topic";
    // 消息
    string message = "喜报!孙悟空大战哥斯拉,胜!";
    // 发送消息
    rabbittemplate.convertandsend(exchangename, "china.weather", message);
}
2.消息接收
在springrabbitlistener中添加方法:
@rabbitlistener(queues = "topic.queue1")
public void listentopicqueue1(string msg){
    system.out.println("消费者1接收到topic.queue1的消息:【" + msg + "】");
}

@rabbitlistener(queues = "topic.queue2")
public void listentopicqueue2(string msg){
    system.out.println("消费者2接收到topic.queue2的消息:【" + msg + "】");
}
运行测试类中的testsendtopicexchange1后观察结果:

运行测试类中的testsendtopicexchange2后观察结果:

声明队列和交换机
声明队列
队列是rabbitmq中用于存储消息的组件。spring amqp通过queue类来声明队列。队列有以下几个重要属性:
- name:队列名称。
- durable:是否持久化。持久化队列在rabbitmq重启后仍然存在,信息持久到磁盘。
- exclusive:是否排他。排他队列只能被创建它的连接使用,并且在连接断开时自动删除。
- autodelete:是否自动删除。当最后一个消费者断开连接后,自动删除队列。
比如:
import org.springframework.amqp.core.queue;
import org.springframework.context.annotation.bean;
import org.springframework.context.annotation.configuration;

@configuration
public class rabbitmqqueueconfig {

    @bean
    public queue myqueue() {
        return new queue("simple.queue");
    }
}
声明交换机
使用exchangebuilder声明交换机,exchangebuilder类提供了多种方法来配置交换机的属性。以下是一些常用的方法:
- durable():声明持久化交换机。
- autodelete():声明自动删除交换机。
- withargument():添加交换机的自定义参数。
import org.springframework.amqp.core.directexchange;
import org.springframework.amqp.core.exchangebuilder;
import org.springframework.amqp.core.fanoutexchange;
import org.springframework.amqp.core.topicexchange;
import org.springframework.amqp.core.headersexchange;
import org.springframework.context.annotation.bean;
import org.springframework.context.annotation.configuration;

@configuration
public class rabbitmqexchangeconfig {

    @bean
    public directexchange directexchange() {
        return exchangebuilder.directexchange("direct.exchange").durable(true).build();
    }

    @bean
    public fanoutexchange fanoutexchange() {
        return exchangebuilder.fanoutexchange("fanout.exchange").durable(true).build();
    }

    @bean
    public topicexchange topicexchange() {
        return exchangebuilder.topicexchange("topic.exchange").durable(true).build();
    }

}
绑定队列和交换机
bindingbuilder类提供了一些静态方法来创建绑定关系。常用的方法包括:
- bind():绑定队列到交换机。
- to():指定交换机。
- with():指定路由键(用于直连交换机和主题交换机)。
- where():指定头部信息(用于头交换机)。
1.fanout示例
import org.springframework.amqp.core.binding;
import org.springframework.amqp.core.bindingbuilder;
import org.springframework.amqp.core.fanoutexchange;
import org.springframework.amqp.core.queue;
import org.springframework.context.annotation.bean;
import org.springframework.context.annotation.configuration;

@configuration
public class fanoutconfig {
    /**
     * 声明交换机
     * @return fanout类型交换机
     */
    @bean
    public fanoutexchange fanoutexchange(){
        return new fanoutexchange("demo.fanout");
    }

    /**
     * 第1个队列
     */
    @bean
    public queue fanoutqueue1(){
        return new queue("fanout.queue1");
    }

    /**
     * 绑定队列和交换机
     */
    @bean
    public binding bindingqueue1(queue fanoutqueue1, fanoutexchange fanoutexchange){
        return bindingbuilder.bind(fanoutqueue1).to(fanoutexchange);
    }

    /**
     * 第2个队列
     */
    @bean
    public queue fanoutqueue2(){
        return new queue("fanout.queue2");
    }

    /**
     * 绑定队列和交换机
     */
    @bean
    public binding bindingqueue2(queue fanoutqueue2, fanoutexchange fanoutexchange){
        return bindingbuilder.bind(fanoutqueue2).to(fanoutexchange);
    }
}
2. direct示例
import org.springframework.amqp.core.*;
import org.springframework.context.annotation.bean;
import org.springframework.context.annotation.configuration;

@configuration
public class directconfig {

    /**
     * 声明交换机
     * @return direct类型交换机
     */
    @bean
    public directexchange directexchange(){
        return exchangebuilder.directexchange("direct.exchange").build();
    }

    /**
     * 第1个队列
     */
    @bean
    public queue directqueue1(){
        return new queue("direct.queue1");
    }

    /**
     * 绑定队列和交换机
     */
    @bean
    public binding bindingqueue1withred(queue directqueue1, directexchange directexchange){
        return bindingbuilder.bind(directqueue1).to(directexchange).with("red");
    }
    /**
     * 绑定队列和交换机
     */
    @bean
    public binding bindingqueue1withblue(queue directqueue1, directexchange directexchange){
        return bindingbuilder.bind(directqueue1).to(directexchange).with("blue");
    }

    /**
     * 第2个队列
     */
    @bean
    public queue directqueue2(){
        return new queue("direct.queue2");
    }

    /**
     * 绑定队列和交换机
     */
    @bean
    public binding bindingqueue2withred(queue directqueue2, directexchange directexchange){
        return bindingbuilder.bind(directqueue2).to(directexchange).with("red");
    }
    /**
     * 绑定队列和交换机
     */
    @bean
    public binding bindingqueue2withyellow(queue directqueue2, directexchange directexchange){
        return bindingbuilder.bind(directqueue2).to(directexchange).with("yellow");
    }
}
3.基于注解的方式声明队列和交换机
修改springrabbitlistener类:
@component
public class springrabbitlistener {

    // .......

    @rabbitlistener(bindings = @queuebinding(
            value = @queue(name = "direct.queue1"),
            exchange = @exchange(name = "demo.direct", type = exchangetypes.direct),
            key = {"red", "blue"}
    ))
    public void listendirectqueue1(string msg){
        system.out.println("消费者1接收到direct.queue1的消息:【" + msg + "】");
    }

    @rabbitlistener(bindings = @queuebinding(
            value = @queue(name = "direct.queue2"),
            exchange = @exchange(name = "demo.direct", type = exchangetypes.direct),
            key = {"red", "yellow"}
    ))
    public void listendirectqueue2(string msg){
        system.out.println("消费者2接收到direct.queue2的消息:【" + msg + "】");
    }

    @rabbitlistener(bindings = @queuebinding(
            value = @queue(name = "topic.queue1"),
            exchange = @exchange(name = "demo.topic", type = exchangetypes.topic),
            key = "china.#"
    ))
    public void listentopicqueue1(string msg){
        system.out.println("消费者1接收到topic.queue1的消息:【" + msg + "】");
    }

    @rabbitlistener(bindings = @queuebinding(
            value = @queue(name = "topic.queue2"),
            exchange = @exchange(name = "demo.topic", type = exchangetypes.topic),
            key = "#.news"
    ))
    public void listentopicqueue2(string msg){
        system.out.println("消费者2接收到topic.queue2的消息:【" + msg + "】");
    }

    // .......

}
删除交换机和队列后再次运行会发现又重新出现:

消息转换器
- 引入jackson依赖:
        <dependency>
            <groupid>com.fasterxml.jackson.dataformat</groupid>
            <artifactid>jackson-dataformat-xml</artifactid>
        </dependency>
-
配置消息转换器
在
publisher和consumer两个服务的启动类中添加一个bean即可:
@bean
public messageconverter messageconverter(){
    // 1.定义消息转换器
    jackson2jsonmessageconverter jackson2jsonmessageconverter = new jackson2jsonmessageconverter();
    // 2.配置自动创建消息id,用于识别不同消息,也可以在业务中基于id判断是否是重复消息
    jackson2jsonmessageconverter.setcreatemessageids(true);
    return jackson2jsonmessageconverter;
}
测试:
在fanoutconfig类中声明队列:
    @bean
    public queue objectqueue() {
        return new queue("object.queue");
    }
在springamqptest类中添加:
@test
public void testsendmap() throws interruptedexception {
    // 准备消息
    map<string,object> msg = new hashmap<>();
    msg.put("name", "柳岩");
    msg.put("age", 21);
    // 发送消息
    rabbittemplate.convertandsend("object.queue", msg);
}
在springrabbitlistener类中添加:
@rabbitlistener(queues = "object.queue")
public void listensimplequeuemessage(map<string, object> msg) throws interruptedexception {
    system.out.println("消费者接收到object.queue消息:【" + msg + "】");
}
运行测试类查看结果:

总结
本文较为详细的记录了rabbitmq的安装配置以及交换机学习,希望本文对大家学习rabbitmq有所帮助。


发表评论