文章目录
技术要点:
- opencv:用于图像处理和计算机视觉任务。
- python:作为编程语言,具有简单易学、资源丰富等优点。
- 图像处理技术:如灰度化、噪声去除、边缘检测、形态学操作、透视变换等。
1 导入相关模块
import cv2
from matplotlib import pyplot as plt
import os
import numpy as np
from pil import imagefont, imagedraw, image
2 相关功能函数定义
2.1 彩色图片显示函数(plt_show0)
def plt_show0(img):
    b,g,r = cv2.split(img)
    img = cv2.merge([r, g, b])
    plt.imshow(img)
    plt.show()
2.2 灰度图片显示函数(plt_show)
def plt_show(img):
    plt.imshow(img,cmap='gray')
    plt.show()
2.3 图像去噪函数(gray_guss)
def gray_guss(image):
    image = cv2.gaussianblur(image, (3, 3), 0)
    gray_image = cv2.cvtcolor(image, cv2.color_rgb2gray)
    return gray_image
cv2.gaussianblur参数说明:
src:输入图像,可以是任意数量的通道,这些通道可以独立处理,但深度应为cv_8u、cv_16u、cv_16s、cv_32f或cv_64f。ksize:高斯核的大小,必须是正奇数,例如 (3, 3)、(5, 5) 等。如果ksize的值为零,那么它会根据sigmax和sigmay的值来计算。sigmax:x 方向上的高斯核标准偏差。dst:输出图像,大小和类型与src相同。sigmay:y 方向上的高斯核标准偏差,如果sigmay是零,那么它会与sigmax的值相同。如果sigmay是负数,那么它会从ksize.width和ksize.height计算得出。bordertype:像素外插法,有默认值。
2 图像预处理
2.1 图片读取
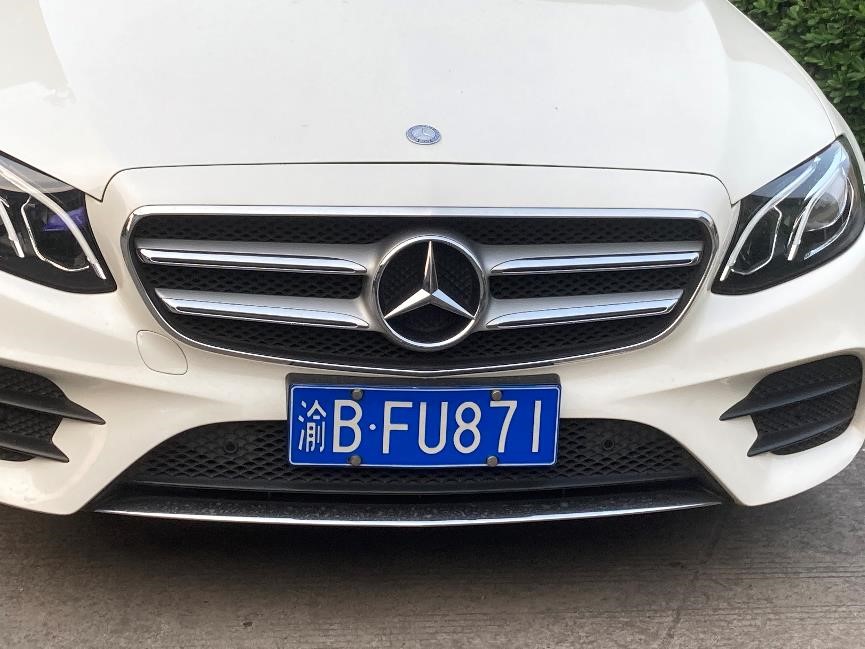
origin_image = cv2.imread('d:/image/car3.jpg')
此处演示识别车牌原图:
2.2 高斯去噪
origin_image = cv2.imread('d:/image/car3.jpg')
# 复制一张图片,在复制图上进行图像操作,保留原图
image = origin_image.copy()
gray_image = gray_guss(image)
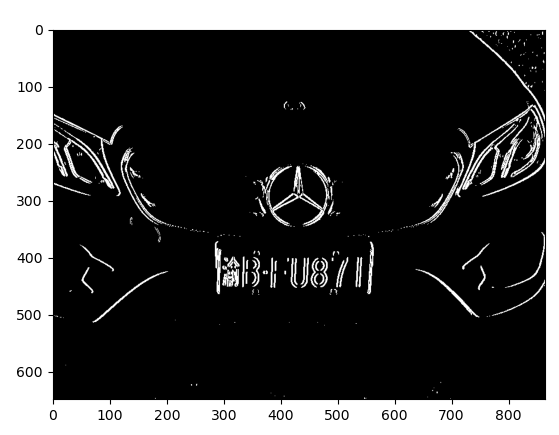
2.3 边缘检测
sobel_x = cv2.sobel(gray_image, cv2.cv_16s, 1, 0)
absx = cv2.convertscaleabs(sobel_x)
image = absx
2.4 阈值化
# 图像阈值化操作——获得二值化图
ret, image = cv2.threshold(image, 0, 255, cv2.thresh_otsu)
# 显示灰度图像
plt_show(image)
运行结果:
3 车牌定位
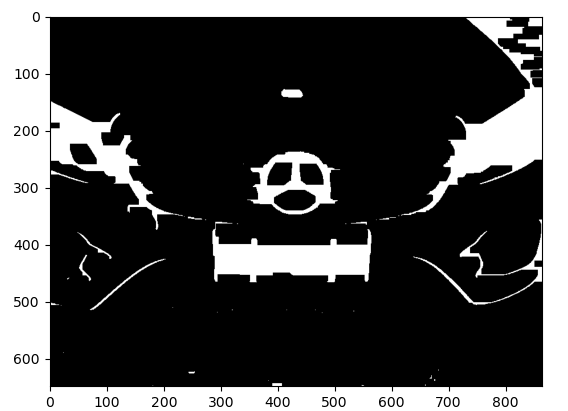
3.1 区域选择
kernelx = cv2.getstructuringelement(cv2.morph_rect, (30, 10))
image = cv2.morphologyex(image, cv2.morph_close, kernelx,iterations = 1)
# 显示灰度图像
plt_show(image)
运行结果:
3.2 形态学操作
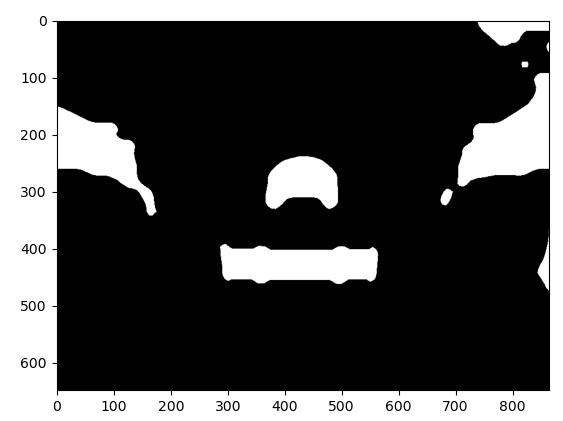
# 腐蚀(erode)和膨胀(dilate)
kernelx = cv2.getstructuringelement(cv2.morph_rect, (50, 1))
kernely = cv2.getstructuringelement(cv2.morph_rect, (1, 20))
#x方向进行闭操作(抑制暗细节)
image = cv2.dilate(image, kernelx)
image = cv2.erode(image, kernelx)
#y方向的开操作
image = cv2.erode(image, kernely)
image = cv2.dilate(image, kernely)
# 中值滤波(去噪)
image = cv2.medianblur(image, 21)
# 显示灰度图像
plt_show(image)
运行结果:
3.3 轮廓检测
contours, hierarchy = cv2.findcontours(image, cv2.retr_external, cv2.chain_approx_simple)
for item in contours:
rect = cv2.boundingrect(item)
x = rect[0]
y = rect[1]
weight = rect[2]
height = rect[3]
# 根据轮廓的形状特点,确定车牌的轮廓位置并截取图像
if (weight > (height * 3)) and (weight < (height * 4.5)):
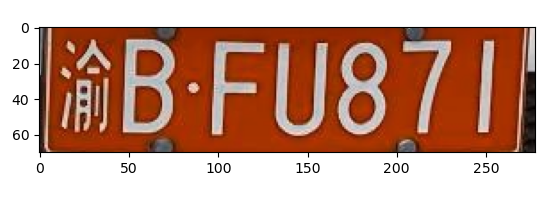
image = origin_image[y:y + height, x:x + weight]
plt_show(image)
4 车牌字符分割
4.1 高斯去噪
# 图像去噪灰度处理
gray_image = gray_guss(image)
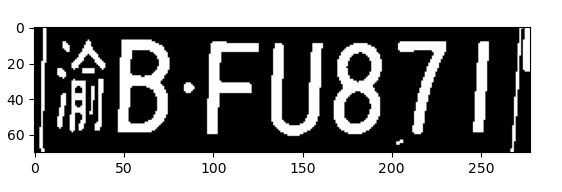
4.2 阈值化
ret, image = cv2.threshold(gray_image, 0, 255, cv2.thresh_otsu)
plt_show(image)
运行结果:
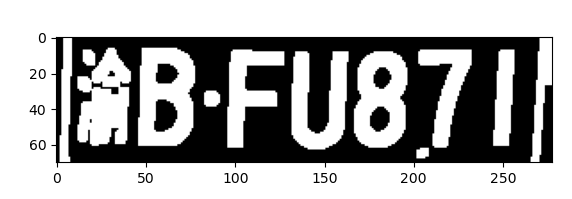
4.3 膨胀操作
#膨胀操作
kernel = cv2.getstructuringelement(cv2.morph_rect, (4, 4))
image = cv2.dilate(image, kernel)
plt_show(image)
运行结果:
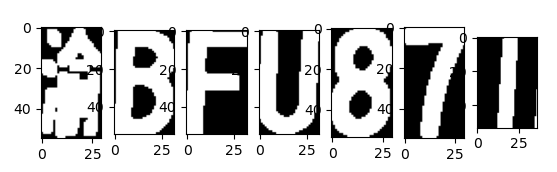
4.4 车牌号排序
words = sorted(words,key=lambda s:s[0],reverse=false)
i = 0
#word中存放轮廓的起始点和宽高
for word in words:
    # 筛选字符的轮廓
    if (word[3] > (word[2] * 1.5)) and (word[3] < (word[2] * 5.5)) and (word[2] > 10):
        i = i+1
        if word[2] < 15:
            splite_image = image[word[1]:word[1] + word[3], word[0]-word[2]:word[0] + word[2]*2]
        else:
            splite_image = image[word[1]:word[1] + word[3], word[0]:word[0] + word[2]]
        word_images.append(splite_image)
        print(i)
print(words)
运行结果:
1
2
3
4
5
6
7
[[2, 0, 7, 70], [12, 6, 30, 55], [15, 7, 7, 9], [46, 6, 32, 55], [83, 30, 9, 9], [96, 7, 32, 55], [132, 8, 32, 55], [167, 8, 30, 54], [202, 62, 7, 6], [203, 7, 30, 55], [245, 7, 12, 54], [266, 0, 12, 70]]
4.5 分割效果
for i,j in enumerate(word_images):
    plt.subplot(1,7,i+1)
    plt.imshow(word_images[i],cmap='gray')
plt.show()
运行结果:
5 模板匹配
5.1 准备模板
# 准备模板(template[0-9]为数字模板;)
template = ['0','1','2','3','4','5','6','7','8','9',
            'a','b','c','d','e','f','g','h','j','k','l','m','n','p','q','r','s','t','u','v','w','x','y','z',
            '藏','川','鄂','甘','赣','贵','桂','黑','沪','吉','冀','津','晋','京','辽','鲁','蒙','闽','宁',
            '青','琼','陕','苏','皖','湘','新','渝','豫','粤','云','浙']

# 读取一个文件夹下的所有图片,输入参数是文件名,返回模板文件地址列表
def read_directory(directory_name):
    referimg_list = []
    for filename in os.listdir(directory_name):
        referimg_list.append(directory_name + "/" + filename)
    return referimg_list

# 获得中文模板列表(只匹配车牌的第一个字符)
def get_chinese_words_list():
    chinese_words_list = []
    for i in range(34,64):
        #将模板存放在字典中
        c_word = read_directory('d:/refer1/'+ template[i])
        chinese_words_list.append(c_word)
    return chinese_words_list
chinese_words_list = get_chinese_words_list()


# 获得英文模板列表(只匹配车牌的第二个字符)
def get_eng_words_list():
    eng_words_list = []
    for i in range(10,34):
        e_word = read_directory('d:/refer1/'+ template[i])
        eng_words_list.append(e_word)
    return eng_words_list
eng_words_list = get_eng_words_list()


# 获得英文和数字模板列表(匹配车牌后面的字符)
def get_eng_num_words_list():
    eng_num_words_list = []
    for i in range(0,34):
        word = read_directory('d:/refer1/'+ template[i])
        eng_num_words_list.append(word)
    return eng_num_words_list
eng_num_words_list = get_eng_num_words_list()
5.2 匹配结果
# 获得英文和数字模板列表(匹配车牌后面的字符)
def get_eng_num_words_list():
    eng_num_words_list = []
    for i in range(0,34):
        word = read_directory('d:/refer1/'+ template[i])
        eng_num_words_list.append(word)
    return eng_num_words_list
eng_num_words_list = get_eng_num_words_list()


# 读取一个模板地址与图片进行匹配,返回得分
def template_score(template,image):
    #将模板进行格式转换
    template_img=cv2.imdecode(np.fromfile(template,dtype=np.uint8),1)
    template_img = cv2.cvtcolor(template_img, cv2.color_rgb2gray)
    #模板图像阈值化处理——获得黑白图
    ret, template_img = cv2.threshold(template_img, 0, 255, cv2.thresh_otsu)
#     height, width = template_img.shape
#     image_ = image.copy()
#     image_ = cv2.resize(image_, (width, height))
    image_ = image.copy()
    #获得待检测图片的尺寸
    height, width = image_.shape
    # 将模板resize至与图像一样大小
    template_img = cv2.resize(template_img, (width, height))
    # 模板匹配,返回匹配得分
    result = cv2.matchtemplate(image_, template_img, cv2.tm_ccoeff)
    return result[0][0]


# 对分割得到的字符逐一匹配
def template_matching(word_images):
    results = []
    for index,word_image in enumerate(word_images):
        if index==0:
            best_score = []
            for chinese_words in chinese_words_list:
                score = []
                for chinese_word in chinese_words:
                    result = template_score(chinese_word,word_image)
                    score.append(result)
                best_score.append(max(score))
            i = best_score.index(max(best_score))
            # print(template[34+i])
            r = template[34+i]
            results.append(r)
            continue
        if index==1:
            best_score = []
            for eng_word_list in eng_words_list:
                score = []
                for eng_word in eng_word_list:
                    result = template_score(eng_word,word_image)
                    score.append(result)
                best_score.append(max(score))
            i = best_score.index(max(best_score))
            # print(template[10+i])
            r = template[10+i]
            results.append(r)
            continue
        else:
            best_score = []
            for eng_num_word_list in eng_num_words_list:
                score = []
                for eng_num_word in eng_num_word_list:
                    result = template_score(eng_num_word,word_image)
                    score.append(result)
                best_score.append(max(score))
            i = best_score.index(max(best_score))
            # print(template[i])
            r = template[i]
            results.append(r)
            continue
    return results


word_images_ = word_images.copy()
# 调用函数获得结果
result = template_matching(word_images_)
print(result)
print( "".join(result))
运行结果:
['渝', 'b', 'f', 'u', '8', '7', '1']
渝bfu871
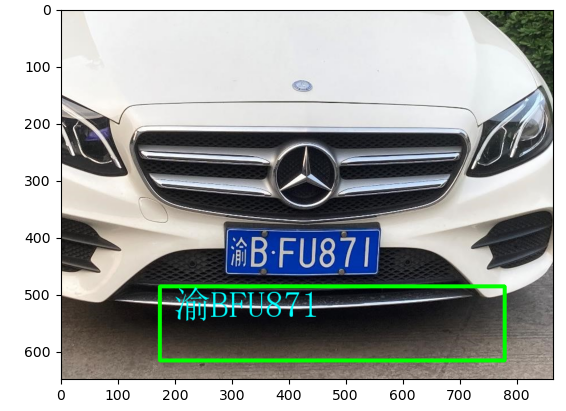
5.3 匹配效果展示
height,weight = origin_image.shape[0:2]
print(height)
print(weight)

image_1 = origin_image.copy()
cv2.rectangle(image_1, (int(0.2*weight), int(0.75*height)), (int(weight*0.9), int(height*0.95)), (0, 255, 0), 5)

#设置需要显示的字体
fontpath = "font/simsun.ttc"
font = imagefont.truetype(fontpath,64)
img_pil = image.fromarray(image_1)
draw = imagedraw.draw(img_pil)
#绘制文字信息
draw.text((int(0.2*weight)+25, int(0.75*height)),  "".join(result), font = font, fill = (255, 255, 0))
bk_img = np.array(img_pil)
print(result)
print( "".join(result))
plt_show0(bk_img)
运行结果:
6完整代码
# 导入所需模块
import cv2
from matplotlib import pyplot as plt
import os
import numpy as np
from pil import imagefont, imagedraw, image
# plt显示彩色图片
def plt_show0(img):
    b,g,r = cv2.split(img)
    img = cv2.merge([r, g, b])
    plt.imshow(img)
    plt.show()

# plt显示灰度图片
def plt_show(img):
    plt.imshow(img,cmap='gray')
    plt.show()

# 图像去噪灰度处理
def gray_guss(image):
    image = cv2.gaussianblur(image, (3, 3), 0)
    gray_image = cv2.cvtcolor(image, cv2.color_rgb2gray)
    return gray_image

# 读取待检测图片
origin_image = cv2.imread('d:/image/car3.jpg')
# 复制一张图片,在复制图上进行图像操作,保留原图
image = origin_image.copy()
# 图像去噪灰度处理
gray_image = gray_guss(image)
# x方向上的边缘检测(增强边缘信息)
sobel_x = cv2.sobel(gray_image, cv2.cv_16s, 1, 0)
absx = cv2.convertscaleabs(sobel_x)
image = absx

# 图像阈值化操作——获得二值化图
ret, image = cv2.threshold(image, 0, 255, cv2.thresh_otsu)
# 显示灰度图像
plt_show(image)
# 形态学(从图像中提取对表达和描绘区域形状有意义的图像分量)——闭操作
kernelx = cv2.getstructuringelement(cv2.morph_rect, (30, 10))
image = cv2.morphologyex(image, cv2.morph_close, kernelx,iterations = 1)
# 显示灰度图像
plt_show(image)


# 腐蚀(erode)和膨胀(dilate)
kernelx = cv2.getstructuringelement(cv2.morph_rect, (50, 1))
kernely = cv2.getstructuringelement(cv2.morph_rect, (1, 20))
#x方向进行闭操作(抑制暗细节)
image = cv2.dilate(image, kernelx)
image = cv2.erode(image, kernelx)
#y方向的开操作
image = cv2.erode(image, kernely)
image = cv2.dilate(image, kernely)
# 中值滤波(去噪)
image = cv2.medianblur(image, 21)
# 显示灰度图像
plt_show(image)

# 获得轮廓
contours, hierarchy = cv2.findcontours(image, cv2.retr_external, cv2.chain_approx_simple)

for item in contours:
    rect = cv2.boundingrect(item)
    x = rect[0]
    y = rect[1]
    weight = rect[2]
    height = rect[3]
    # 根据轮廓的形状特点,确定车牌的轮廓位置并截取图像
    if (weight > (height * 3)) and (weight < (height * 4.5)):
        image = origin_image[y:y + height, x:x + weight]
        plt_show(image)


#车牌字符分割
# 图像去噪灰度处理
gray_image = gray_guss(image)

# 图像阈值化操作——获得二值化图
ret, image = cv2.threshold(gray_image, 0, 255, cv2.thresh_otsu)
plt_show(image)

#膨胀操作
kernel = cv2.getstructuringelement(cv2.morph_rect, (4, 4))
image = cv2.dilate(image, kernel)
plt_show(image)


# 查找轮廓
contours, hierarchy = cv2.findcontours(image, cv2.retr_external, cv2.chain_approx_simple)
words = []
word_images = []
#对所有轮廓逐一操作
for item in contours:
    word = []
    rect = cv2.boundingrect(item)
    x = rect[0]
    y = rect[1]
    weight = rect[2]
    height = rect[3]
    word.append(x)
    word.append(y)
    word.append(weight)
    word.append(height)
    words.append(word)
# 排序,车牌号有顺序。words是一个嵌套列表
words = sorted(words,key=lambda s:s[0],reverse=false)
i = 0
#word中存放轮廓的起始点和宽高
for word in words:
    # 筛选字符的轮廓
    if (word[3] > (word[2] * 1.5)) and (word[3] < (word[2] * 5.5)) and (word[2] > 10):
        i = i+1
        if word[2] < 15:
            splite_image = image[word[1]:word[1] + word[3], word[0]-word[2]:word[0] + word[2]*2]
        else:
            splite_image = image[word[1]:word[1] + word[3], word[0]:word[0] + word[2]]
        word_images.append(splite_image)
        print(i)
print(words)

for i,j in enumerate(word_images):
    plt.subplot(1,7,i+1)
    plt.imshow(word_images[i],cmap='gray')
plt.show()

#模版匹配
# 准备模板(template[0-9]为数字模板;)
template = ['0','1','2','3','4','5','6','7','8','9',
            'a','b','c','d','e','f','g','h','j','k','l','m','n','p','q','r','s','t','u','v','w','x','y','z',
            '藏','川','鄂','甘','赣','贵','桂','黑','沪','吉','冀','津','晋','京','辽','鲁','蒙','闽','宁',
            '青','琼','陕','苏','皖','湘','新','渝','豫','粤','云','浙']

# 读取一个文件夹下的所有图片,输入参数是文件名,返回模板文件地址列表
def read_directory(directory_name):
    referimg_list = []
    for filename in os.listdir(directory_name):
        referimg_list.append(directory_name + "/" + filename)
    return referimg_list

# 获得中文模板列表(只匹配车牌的第一个字符)
def get_chinese_words_list():
    chinese_words_list = []
    for i in range(34,64):
        #将模板存放在字典中
        c_word = read_directory('d:/refer1/'+ template[i])
        chinese_words_list.append(c_word)
    return chinese_words_list
chinese_words_list = get_chinese_words_list()


# 获得英文模板列表(只匹配车牌的第二个字符)
def get_eng_words_list():
    eng_words_list = []
    for i in range(10,34):
        e_word = read_directory('d:/refer1/'+ template[i])
        eng_words_list.append(e_word)
    return eng_words_list
eng_words_list = get_eng_words_list()


# 获得英文和数字模板列表(匹配车牌后面的字符)
def get_eng_num_words_list():
    eng_num_words_list = []
    for i in range(0,34):
        word = read_directory('d:/refer1/'+ template[i])
        eng_num_words_list.append(word)
    return eng_num_words_list
eng_num_words_list = get_eng_num_words_list()


# 读取一个模板地址与图片进行匹配,返回得分
def template_score(template,image):
    #将模板进行格式转换
    template_img=cv2.imdecode(np.fromfile(template,dtype=np.uint8),1)
    template_img = cv2.cvtcolor(template_img, cv2.color_rgb2gray)
    #模板图像阈值化处理——获得黑白图
    ret, template_img = cv2.threshold(template_img, 0, 255, cv2.thresh_otsu)
#     height, width = template_img.shape
#     image_ = image.copy()
#     image_ = cv2.resize(image_, (width, height))
    image_ = image.copy()
    #获得待检测图片的尺寸
    height, width = image_.shape
    # 将模板resize至与图像一样大小
    template_img = cv2.resize(template_img, (width, height))
    # 模板匹配,返回匹配得分
    result = cv2.matchtemplate(image_, template_img, cv2.tm_ccoeff)
    return result[0][0]


# 对分割得到的字符逐一匹配
def template_matching(word_images):
    results = []
    for index,word_image in enumerate(word_images):
        if index==0:
            best_score = []
            for chinese_words in chinese_words_list:
                score = []
                for chinese_word in chinese_words:
                    result = template_score(chinese_word,word_image)
                    score.append(result)
                best_score.append(max(score))
            i = best_score.index(max(best_score))
            # print(template[34+i])
            r = template[34+i]
            results.append(r)
            continue
        if index==1:
            best_score = []
            for eng_word_list in eng_words_list:
                score = []
                for eng_word in eng_word_list:
                    result = template_score(eng_word,word_image)
                    score.append(result)
                best_score.append(max(score))
            i = best_score.index(max(best_score))
            # print(template[10+i])
            r = template[10+i]
            results.append(r)
            continue
        else:
            best_score = []
            for eng_num_word_list in eng_num_words_list:
                score = []
                for eng_num_word in eng_num_word_list:
                    result = template_score(eng_num_word,word_image)
                    score.append(result)
                best_score.append(max(score))
            i = best_score.index(max(best_score))
            # print(template[i])
            r = template[i]
            results.append(r)
            continue
    return results


word_images_ = word_images.copy()
# 调用函数获得结果
result = template_matching(word_images_)
print(result)
# "".join(result)函数将列表转换为拼接好的字符串,方便结果显示
print( "".join(result))


height,weight = origin_image.shape[0:2]
print(height)
print(weight)

image_1 = origin_image.copy()
cv2.rectangle(image_1, (int(0.2*weight), int(0.75*height)), (int(weight*0.9), int(height*0.95)), (0, 255, 0), 5)

#设置需要显示的字体
fontpath = "font/simsun.ttc"
font = imagefont.truetype(fontpath,64)
img_pil = image.fromarray(image_1)
draw = imagedraw.draw(img_pil)
#绘制文字信息
draw.text((int(0.2*weight)+25, int(0.75*height)),  "".join(result), font = font, fill = (255, 255, 0))
bk_img = np.array(img_pil)
print(result)
print( "".join(result))
plt_show0(bk_img)
发表评论