一、安装
1.安装electron
npm install electron --save-dev
npm install electron-builder --save-dev
2.在vue项目根目录新建文件index.js
// main.js

// modules to control application life and create native browser window
const { app, browserwindow,menu } = require('electron')

const createwindow = () => {
  // create the browser window.
  const mainwindow = new browserwindow({
    width: 800,
    height: 600,
    webpreferences: {
      nodeintegration: true, // 启用 node.js 集成
      contextisolation: false, // 禁用上下文隔离(node.js 集成的一个选项)
      websecurity: false, // 禁用同源策略
      contextisolation: false,
      session: {
        cookies: true // 这行确保启用了cookie
      }

    },
    icon: 'build/.icon-ico/icon.ico'//这里是自动生成的图标,默认情况下不需要改

  })

  // and load the index.html of the app.
  mainwindow.loadfile('./dist/index.html')//如果要本地化,这样写,如果写远程的,那这里就是请求的域名
  //隐藏顶部菜单
  // mainwindow.setmenu(null);
  // open the devtools.
  // open the devtools.
  //mainwindow.webcontents.opendevtools()
  mainwindow.maximize();//默认最大化
}
//设置中文菜单,默认是英文的
const createmenu = () => {
  const template = [
    {
      label: '文件',
      submenu: [
        {
          label: '退出',
          accelerator: 'cmdorctrl+q',
          click: () => {
            app.quit();
          }
        }
      ]
    },
    {
      label: '查看',
      submenu: [
        { label: '重新加载', accelerator: 'f5', role: 'reload' },
        { label: '全屏', accelerator: 'f11', role: 'togglefullscreen' },
        { label: '开发者工具', role: 'toggledevtools' }
      ]
    }
  ];

  const menu = menu.buildfromtemplate(template);
  menu.setapplicationmenu(menu);
}

// this method will be called when electron has finished
// initialization and is ready to create browser windows.
// some apis can only be used after this event occurs.
app.whenready().then(() => {
  createwindow()
  createmenu()//菜单设置
  app.on('activate', () => {
    // on macos it's common to re-create a window in the app when the
    // dock icon is clicked and there are no other windows open.
    if (browserwindow.getallwindows().length === 0) createwindow()
  })
})

// quit when all windows are closed, except on macos. there, it's common
// for applications and their menu bar to stay active until the user quits
// explicitly with cmd + q.
app.on('window-all-closed', () => {
  if (process.platform !== 'darwin') app.quit()
})

// in this file you can include the rest of your app's specific main process
// code. you can also put them in separate files and require them here.
3.package.json文件编辑
"scripts": {
    "serve": "vue-cli-service serve",
    "build": "vue-cli-service build",
    "lint": "vue-cli-service lint",
    "electron:build": "vue-cli-service build && electron-builder",
    "electron:serve": "electron ."
  },
  "build": {
    "productname": "这里是你的项目名",
    "appid": "com.example.这里是appid",
    "win": {
      "icon": "favicon.ico",
      "target": ["nsis", "appx"]
    },
    "directories": {
      "output": "build"
    },
    "files": [
      "dist/**/*",
      "index.js"//这里是刚才建的index.js
    ]
  },
4.测试
npm run electron:serve
5.打包
npm run electron:build
二、报错解决
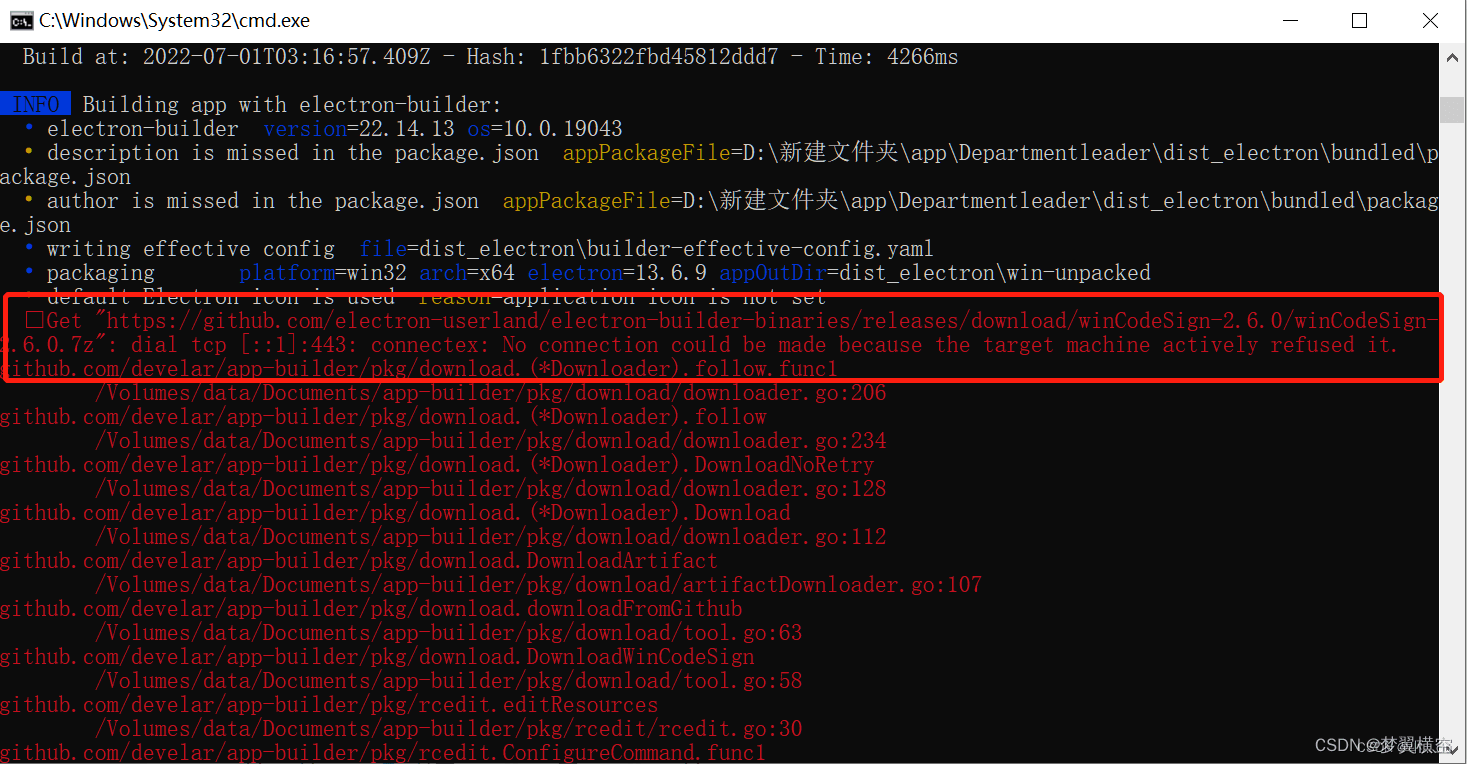
解决:打开cmd 执行 npm config edit
npm config edit
打开配置文件 粘贴以下内容
registry=https://registry.npm.taobao.org/
sass_binary_site=https://npm.taobao.org/mirrors/node-sass/
phantomjs_cdnurl=http://npm.taobao.org/mirrors/phantomjs
electron_mirror=https://npm.taobao.org/mirrors/electron/
electron_mirror=http://npm.taobao.org/mirrors/electron/
三、使用
真正用的时候会出现各种,比例启动exe的图标,cookie。
还有就是,平时我的打包项目不需要指定域名,如果这里用本地化就需要指定域名。
默认配置是不开启cookie的,还有就是用cookie不太好,每次启动exe都需要登录太麻烦了,推荐使用localstorage永久保存。
我的cookie示例,打包exe时使用localstorage,其他情况下使用cookie:
 setcookie(cname, cvalue)
 {
    if(process.env.node_env === "host"){
        localstorage.setitem(cname, cvalue);

    }else{
        document.cookie = cname + "=" + cvalue
    }
    //  var d = new date();
    //  d.settime(d.gettime() + (exdays * 24 * 60 * 60 * 1000));
    //  var expires = "expires=" + d.toutcstring();
     //document.cookie = cname + "=" + cvalue

 },
 getcookie(cname) {
    if(process.env.node_env === "host"){
        return localstorage.getitem(cname);
    }else{
        var name = cname + "=";
        var ca = document.cookie.split(';');
        for (var i = 0; i < ca.length; i++) {
            var c = ca[i];
            while (c.charat(0) == ' ') c = c.substring(1);
            if (c.indexof(name) != -1) {
                return c.substring(name.length, c.length);
            }
        }
        return "";

    }
 },
 clearcookie(cname) {
    if(process.env.node_env === "host"){
        localstorage.removeitem(cname);
    }else{
        var d = new date();
        d.settime(-1);
        var expires = "expires=" + d.toutcstring();
        document.cookie = cname + "=''; " + expires;
    }
},
其他代码一并粘出来分享一下。
main.js
const env = process.env.node_env || 'development';

if(env === "host"){//如果是打包exe需要指定接口域名
    axios.defaults.baseurl = process.env.vue_app_interface
    axios.defaults.withcredentials = true;//跨域请求的全局凭证

}
package.json
"scripts": {
    "serve": "vue-cli-service serve",
    "build": "vue-cli-service build",
    "lint": "vue-cli-service lint",
    "electron:build": "vue-cli-service build --mode host && electron-builder",//使用.env.host配置打包exe
    "electron:serve": "electron ."
  },
  "build": {
    "productname": "newsaas",
    "appid": "com.example.newsaas",
    "win": {
      "icon": "./icon256.png",//这里是启动图标必须是256*256的png图
      "target": [
        "nsis",
        "appx"
      ]
    },
    "mac": {
      "target": "dmg"
    },
    "nsis": {
      "oneclick": true,
      "allowtochangeinstallationdirectory": true,
      "permachine": true,
      "allowelevation": true,
      "createdesktopshortcut": true,
      "createstartmenushortcut": true,
      "shortcutname": "index"

    },
    "directories": {
      "output": "build"
    },
    "files": [
      "dist/**/*",
      "index.js",
      "public/favicon.ico"
    ]
  },
.dev
node_env=""
vue_app_interface="这里是我的接口域名,只能本地开发时,做代理用,打包不影响"
.dev.host
node_env="host"
vue_app_interface="http://这里是我的接口域名"
vue.config.js
const { defineconfig } = require('@vue/cli-service')

module.exports = defineconfig({
    devserver:{
      port:8080,
      allowedhosts: "all",
      websocketserver:false,
      proxy:{
        "/":{
          target: process.env.vue_app_interface,
          changeorigin:true,
          pathrewrite:{
            "^/":"/"
          }
        }
      }
    },

    transpiledependencies: true,
    publicpath: './',
    // 输出文件目录
    assetsdir: 'static',
    outputdir: process.env.outputdir,
    // eslint-loader 是否在保存的时候检查
    lintonsave: true,

    // 生产环境是否生成 sourcemap 文件
    productionsourcemap: false
})
以上就是全部代码,如果安装不了electron,或是安装后运行不起来,改一下npm镜像源试试,package-lock.json这个文件记得删除。
到此这篇关于vue3使用electron打包成exe的方法与打包报错解决的文章就介绍到这了,更多相关electron打包成exe与报错解决内容请搜索代码网以前的文章或继续浏览下面的相关文章希望大家以后多多支持代码网!


发表评论