mvvm模式的介绍
mvvm(model-view-viewmodel)是一种设计模式,特别适用于wpf(windows presentation foundation)等xaml-based的应用程序开发。mvvm模式主要包含三个部分:model(模型)、view(视图)和viewmodel(视图模型)。
- model(模型):模型代表的是业务逻辑和数据。它包含了应用程序中用于处理的核心数据对象。模型通常包含业务规则、数据访问和存储逻辑。
- view(视图):视图是用户看到和与之交互的界面。在wpf中,视图通常由xaml定义,并且包含各种用户界面元素,如按钮、文本框、列表等。
- viewmodel(视图模型):视图模型是视图的抽象,它包含视图所需的所有数据和命令。视图模型通过实现
inotifypropertychanged接口和使用icommand对象,将视图的状态和行为抽象化,从而实现了视图和模型的解耦。
mvvm模式的主要优点是分离了视图和模型,使得视图和业务逻辑之间的依赖性降低,提高了代码的可维护性和可测试性。此外,通过数据绑定和命令绑定,mvvm模式可以减少大量的样板代码,使得代码更加简洁和易于理解。
不使用mvvm模式的例子
要真正理解为什么要使用mvvm,使用mvvm有什么好处,肯定要与不使用mvvm的情况进行对比。在winform中我们使用了事件驱动编程,同样在wpf中我们也可以使用事件驱动编程。
windows forms(winforms)是一种基于事件驱动的图形用户界面(gui)框架。在winforms中,用户与应用程序的交互主要通过事件来驱动。
事件驱动编程是一种编程范式,其中程序的执行流程由外部事件(如用户操作或系统事件)决定。在winforms中,事件可以是用户的各种操作,如点击按钮、选择菜单项、输入文本等,也可以是系统的事件,如窗口加载、大小改变等。
当一个事件发生时,会触发与之关联的事件处理器(event handler)。事件处理器是一个函数或方法,用于响应特定的事件。例如,当用户点击一个按钮时,可以触发一个事件处理器,执行一些特定的操作。
在winforms中,你可以为各种控件添加事件处理器,以响应用户的操作。这种事件驱动的方式使得你可以很容易地创建交互式的gui应用程序,而无需关心程序的执行流程。
事件驱动的简图如下图所示:

- 事件源(event source):事件源是产生事件的对象。在winforms中,事件源通常是用户界面元素,如按钮、文本框、菜单项等。当用户与这些元素进行交互(如点击按钮、输入文本等)时,这些元素就会产生相应的事件。
- 事件(event):事件是由事件源产生的一个信号,表示某种特定的事情已经发生。例如,当用户点击一个按钮时,按钮就会产生一个click事件。事件通常包含一些关于该事件的信息,例如事件发生的时间、事件的源对象等。
- 事件处理器(event handler):事件处理器是一个函数或方法,用于响应特定的事件。当一个事件发生时,与该事件关联的事件处理器就会被调用。在事件处理器中,你可以编写代码来定义当事件发生时应该执行的操作。例如,你可以在按钮的click事件处理器中编写代码,定义当用户点击按钮时应该执行的操作。
现在我们通过一个例子在wpf中使用事件驱动编程。
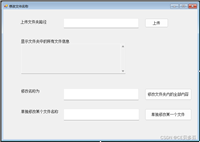
首先看一下我们的示例xaml页面:
 <window x:class="wpf_mvvm_pattern.mainwindow"
        xmlns="http://schemas.microsoft.com/winfx/2006/xaml/presentation"
        xmlns:x="http://schemas.microsoft.com/winfx/2006/xaml"
        xmlns:d="http://schemas.microsoft.com/expression/blend/2008"
        xmlns:mc="http://schemas.openxmlformats.org/markup-compatibility/2006"
        xmlns:local="clr-namespace:wpf_mvvm_pattern"
        mc:ignorable="d"
        title="mainwindow" height="450" width="800"
        loaded="window_loaded">
    <stackpanel>
        <toolbar>
            <label content="姓名:"></label>
            <textbox x:name="nametextbox" width="50"></textbox>
            <label content="邮箱:"></label>
            <textbox x:name="emailtextbox" width="100"></textbox>
            <button content="添加"
                    click="adduser"></button>
       </toolbar>
        <stackpanel>
            <datagrid x:name="datagrid1"></datagrid>

        </stackpanel>
    </stackpanel>
</window>

使用了两个事件,分别是窗体加载事件:
loaded="window_loaded"
与button点击事件:
<button content="添加"
        click="adduser"></button>
实现该操作与两个类有关:
 public class user
 {
     public string? name { get; set; }
     public string? email { get; set; }
 }
 public static class usermanager
 {
     public static observablecollection<user> databaseusers = new       observablecollection<user>()
     {
         new user() { name = "小王", email = "123@qq.com" },
         new user() { name = "小红", email = "456@qq.com" },
         new user() { name = "小五", email = "789@qq.com" }
     };

     public static observablecollection<user> getusers()
     {
         return databaseusers;
     }

     public static void adduser(user user)
     {
         databaseusers.add(user);
     }
 }
窗体加载事件处理程序:
 private void window_loaded(object sender, routedeventargs e)
 {
    datagrid1.itemssource =  usermanager.getusers();
 }
"添加"按钮点击事件处理程序:
 private void adduser(object sender, routedeventargs e)
 {
     user user = new user();
     user.name = nametextbox.text;
     user.email = emailtextbox.text;
     usermanager.adduser(user);
     messagebox.show("成功添加用户!");
 }
实现的效果如下所示:
使用mvvm的例子
刚刚我们使用的是事件驱动编程,我们在winform开发中经常这样干。对于一些小项目或者demo程序这样做很方便,但是如果业务逻辑很多,这样做就不好维护,因为ui与业务逻辑严重耦合了。
我们经常在cs文件中使用xaml中的元素,也就是经常在cs中引用xaml中的元素,如下所示:
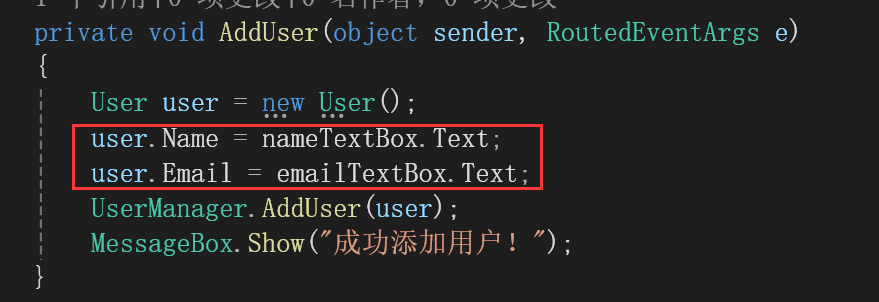
在c#代码文件中直接引用xaml元素,会导致代码与界面元素之间的耦合度增加,这是一种不良的编程实践。以下是这种做法的一些潜在问题:
- 耦合度高:代码与界面元素紧密耦合,这使得代码更难以维护和重用。如果你更改了界面元素(例如更改了元素的名称或类型),你可能需要修改引用这个元素的所有代码。
- 测试困难:由于代码直接依赖于界面元素,这使得单元测试变得困难。你可能需要创建一个界面元素的实例,或者使用复杂的模拟技术,才能测试这些代码。
- 违反mvvm模式:在wpf中,推荐使用mvvm(model-view-viewmodel)模式来组织代码。在mvvm模式中,视图(view)和模型(model)之间的交互是通过视图模型(viewmodel)来进行的,而不是直接在代码中引用界面元素。
开始使用mvvm模式
relaycommand
首先新建一个commands文件夹,新建一个relaycomand类:
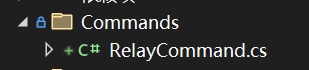
relaycommand如下:
public class relaycommand : icommand
{
public event eventhandler? canexecutechanged;
private action<object> _excute { get; set; }
private predicate<object> _canexcute { get;set; }
public relaycommand(action<object> excutemethod, predicate<object> canexcutemethod)
{
_excute = excutemethod;
_canexcute = canexcutemethod;
}
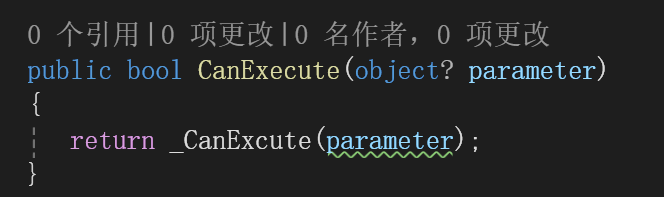
public bool canexecute(object? parameter)
{
return _canexcute(parameter);
}
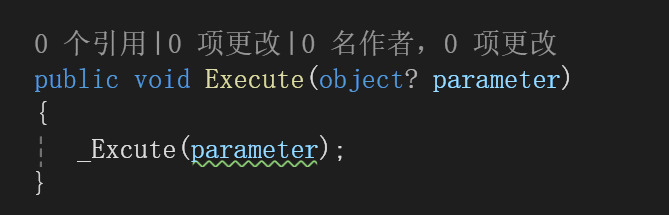
public void execute(object? parameter)
{
_excute(parameter);
}
}
relaycommand实现了icommand接口。
先来介绍一下icommand接口。
icommand
在wpf(windows presentation foundation)中,icommand是一个接口,它定义了一种机制,用于在用户界面(ui)中处理事件,这种机制与用户界面的具体行为进行了解耦。这是实现mvvm(model-view-viewmodel)设计模式的关键部分。
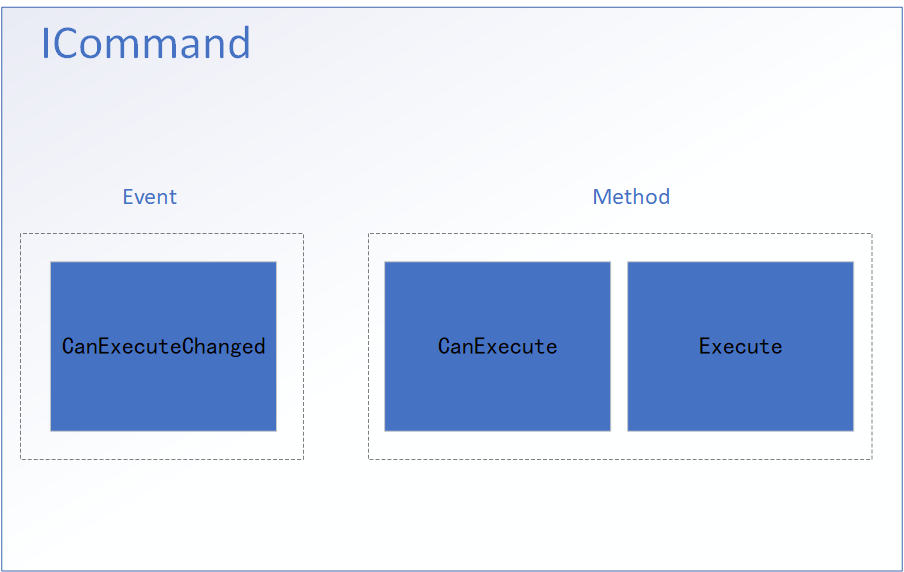
icommand接口包含两个方法和一个事件:
execute(object parameter):当调用此命令时,应执行的操作。canexecute(object parameter):如果可以执行execute方法,则返回true;否则返回false。这可以用于启用或禁用控件,例如按钮。canexecutechanged事件:当canexecute的返回值可能发生更改时,应引发此事件。
icommand的结构图如下所示:
代码如下所示:
public interface icommand
 {

     event eventhandler? canexecutechanged;

     bool canexecute(object? parameter);

     void execute(object? parameter);
 }
现在再来看看relaycommand。
relaycommand
relaycommand是一种常用于wpf和mvvm模式的设计模式,它是一种特殊的命令类型。在mvvm模式中,relaycommand允许将命令的处理逻辑从视图模型中分离出来,使得视图模型不需要知道命令的具体执行逻辑,从而实现了视图模型和命令处理逻辑的解耦。
relaycommand通常包含两个主要部分:canexecute和execute。canexecute是一个返回布尔值的函数,用于确定命令是否可以执行。execute是一个执行命令的函数,当canexecute返回true时,execute将被调用。
这种设计模式使得你可以在不改变视图模型的情况下,更改命令的处理逻辑,提高了代码的可维护性和可重用性。
简单理解就是relaycommand是icommand接口的一个常见实现,它允许你将execute和canexecute的逻辑定义为委托,从而实现对命令的灵活处理。
在relaycommand中我们定义了两个委托:
private action<object> _excute { get; set; }

private predicate<object> _canexcute { get;set; }
action<object>是一个委托,它封装了一个接受单个参数并且没有返回值的方法。这个参数的类型是object。
对应于这一部分:
predicate<object>是一个委托,它封装了一个接受单个参数并返回一个bool值的方法。这个参数的类型是object。
对应于这一部分:
relaycommand的构造函数为:
 public relaycommand(action<object> excutemethod, predicate<object> canexcutemethod)
 {
     _excute = excutemethod;
     _canexcute = canexcutemethod;
 }
现在去看看view—viewmodel。
view—viewmodel
viewmodel是一个抽象,它代表了view的状态和行为。viewmodel包含了view所需的数据,并提供了命令以响应view上的用户操作。viewmodel不知道view的具体实现,它只知道如何提供view所需的状态和行为。
viewmodel的主要职责包括:
- 数据绑定:viewmodel提供了view所需的数据。这些数据通常是以属性的形式提供的,当这些属性的值改变时,viewmodel会通过实现
inotifypropertychanged接口来通知view。 - 命令绑定:viewmodel提供了命令以响应view上的用户操作。这些命令通常是以
icommand接口的实现的形式提供的。 - 视图逻辑:viewmodel包含了view的逻辑,例如,决定何时显示或隐藏某个元素,何时启用或禁用某个按钮等。
新建一个viewmodel文件夹,在该文件夹中新建一个mainviewmodel类:
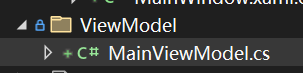
目前写的mainviewmodel如下:
public class mainviewmodel
{
    public observablecollection<user> users { get; set; }
    public icommand addusercommand { get; set; }
    public string? name { get; set; }
    public string? email { get; set; }

    public mainviewmodel()
    {
        users = usermanager.getusers();
        addusercommand = new relaycommand(adduser, canadduser);
    }

    private bool canadduser(object obj)
    {
        return true;
    }

    private void adduser(object obj)
    {
        user user = new user();
        user.name = name;
        user.email = email;
        usermanager.adduser(user);
    }
}
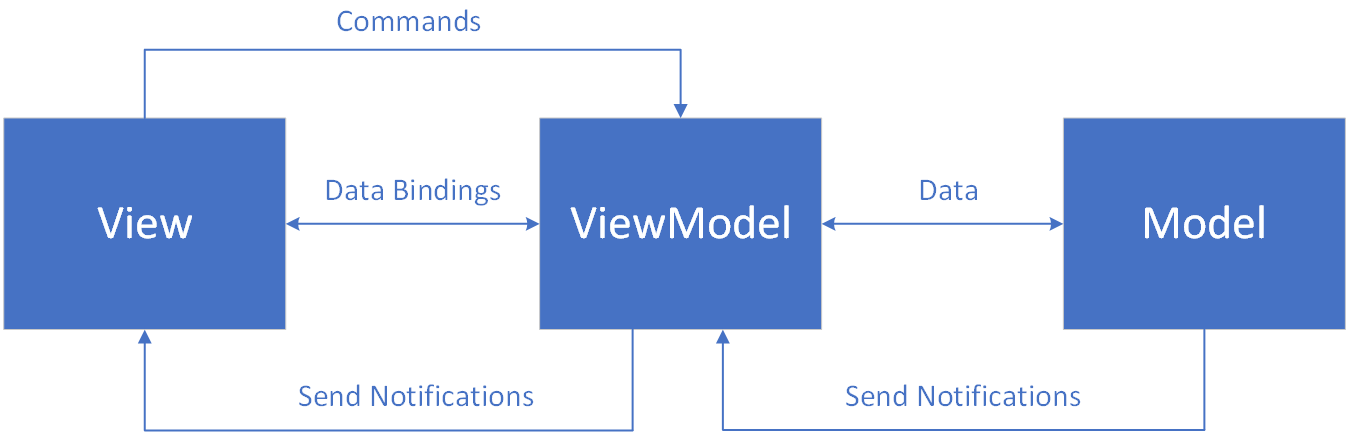
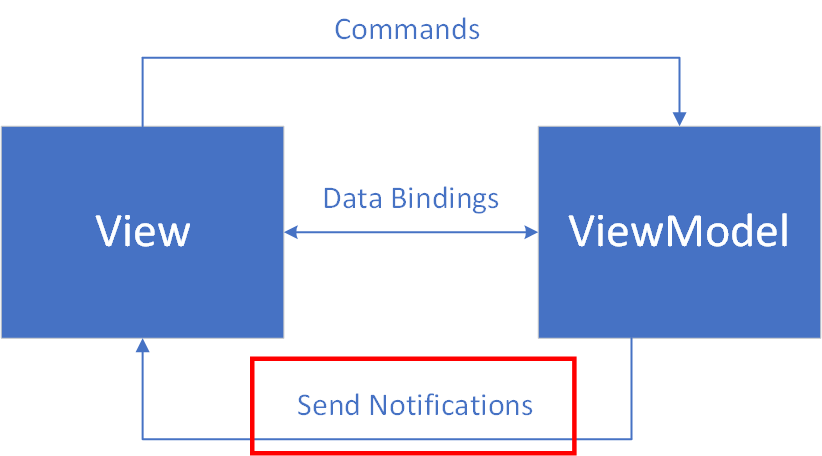
现在我们结合这张图,理解view与viewmodel之间的关系:
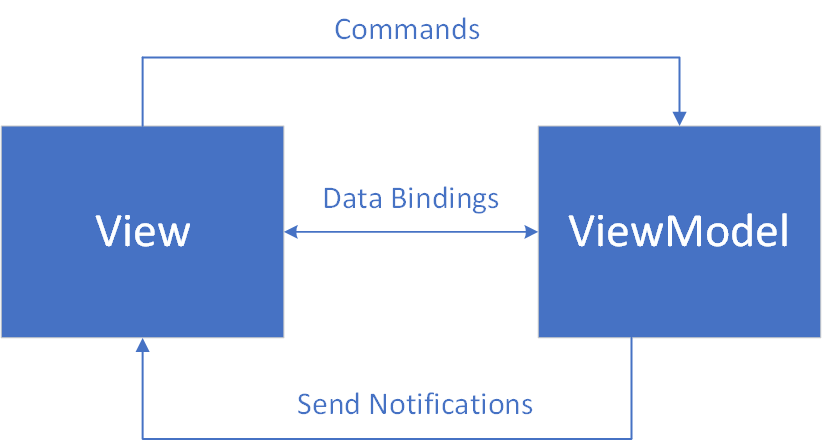
一个一个来理解,首先最重要的就是数据绑定。
现在view的xaml如下:
<window x:class="wpf_mvvm_pattern.mainwindow"
        xmlns="http://schemas.microsoft.com/winfx/2006/xaml/presentation"
        xmlns:x="http://schemas.microsoft.com/winfx/2006/xaml"
        xmlns:d="http://schemas.microsoft.com/expression/blend/2008"
        xmlns:mc="http://schemas.openxmlformats.org/markup-compatibility/2006"
        xmlns:local="clr-namespace:wpf_mvvm_pattern"
        mc:ignorable="d"
        title="mainwindow" height="450" width="800">
    <stackpanel>
        <toolbar>
            <label content="姓名:"></label>
            <textbox text="{binding name}"  width="50"></textbox>
            <label content="邮箱:"></label>
            <textbox text="{binding email}" width="100"></textbox>
            <button content="添加"
                    command="{binding addusercommand }"></button>
        </toolbar>
        <stackpanel>
            <datagrid itemssource="{binding users}"></datagrid>

        </stackpanel>
    </stackpanel>
</window>
cs如下:
public partial class mainwindow : window
{
    public mainwindow()
    {
        initializecomponent();
        mainviewmodel mainviewmodel = new mainviewmodel();
        this.datacontext = mainviewmodel;
    }

}
将mainwindow的datacontext赋值给了mainviewmodel。
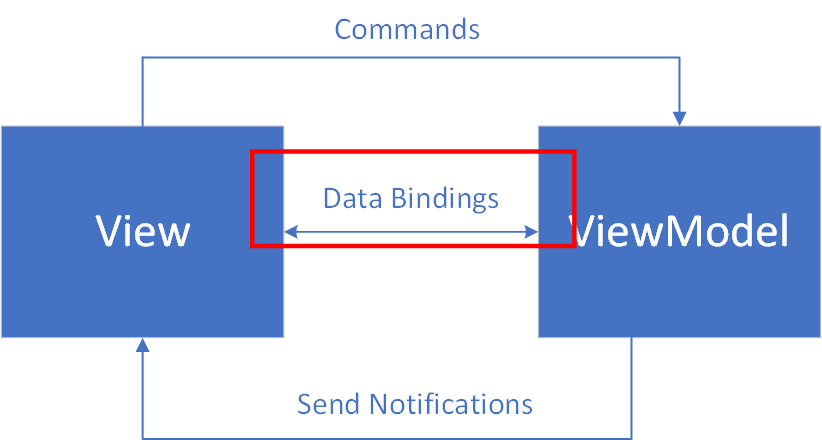
在
 <textbox text="{binding name}"  width="50"></textbox>
 <textbox text="{binding email}" width="100"></textbox>
 <datagrid itemssource="{binding users}"></datagrid>
中进行了数据绑定,对应于图中的这一部分:
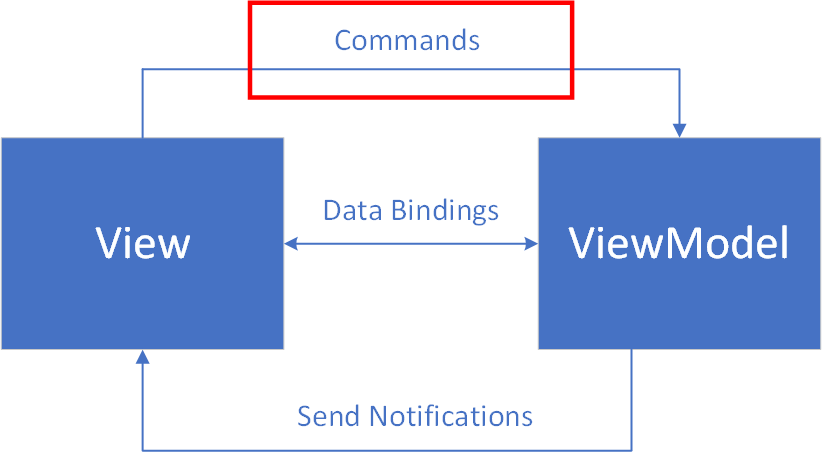
现在来看看命令绑定。
 <button content="添加"
         command="{binding addusercommand }"></button>
进行了命令绑定,对应于图中这一部分:
现在先来看看效果:

现在已经实现了与前面基于事件驱动同样的效果,但是上面那张图中的send notifications还没有体现。
send notifications表示viewmodel中的更改会通知view。
现在我们来以一个例子说明一下send notifications是如何实现的。
首先添加一个测试命令:
public icommand testcommand { get; set; }
在构造函数中添加:
testcommand = new relaycommand(test, cantest);
实现test与cantest方法:
private bool cantest(object obj)
{
    return true;
}

private void test(object obj)
{
    name = "小1";
    email = "111@qq.com";
}
view中修改如下:
 <button content="测试"
         command="{binding testcommand }"></button>
现在去尝试,我们会发现没有效果,原因是我们的viewmodel没有实现inotifypropertychanged接口。
inotifypropertychanged接口介绍
在wpf(windows presentation foundation)中,inotifypropertychanged接口用于实现数据绑定中的属性更改通知。当绑定到ui元素的数据源中的属性值发生更改时,inotifypropertychanged接口可以通知ui元素更新。
inotifypropertychanged接口只定义了一个事件:propertychanged。当属性值发生更改时,应触发此事件。事件参数propertychangedeventargs包含更改的属性的名称。
现在我们的mainviewmodel实现一下inotifypropertychanged接口,如下所示:
public class mainviewmodel : inotifypropertychanged
{
public observablecollection<user> users { get; set; }
public icommand addusercommand { get; set; }
public icommand testcommand { get; set; }
private string? _name;
public string? name
{
get { return _name; }
set
{
if (_name != value)
{
_name = value;
onpropertychanged(nameof(name));
}
}
}
private string? _email;
public string? email
{
get { return _email; }
set
{
if (_email != value)
{
_email = value;
onpropertychanged(nameof(email));
}
}
}
public mainviewmodel()
{
users = usermanager.getusers();
addusercommand = new relaycommand(adduser, canadduser);
testcommand = new relaycommand(test, cantest);
}
private bool cantest(object obj)
{
return true;
}
private void test(object obj)
{
name = "小1";
email = "111@qq.com";
}
private bool canadduser(object obj)
{
return true;
}
private void adduser(object obj)
{
user user = new user();
user.name = name;
user.email = email;
usermanager.adduser(user);
}
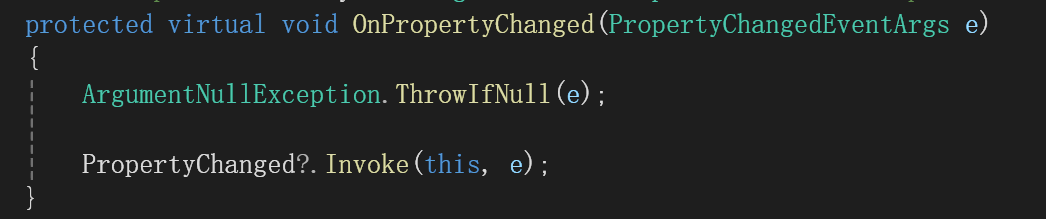
public event propertychangedeventhandler? propertychanged;
protected virtual void onpropertychanged(string propertyname)
{
propertychanged?.invoke(this, new propertychangedeventargs(propertyname));
}
}
现在再尝试一下,会发现viewmodel中的更改会成功通知view了,如下所示:
对应于图中的这一部分:
现在我们来看看viewmodel—model。
viewmodel—model
现在我们来看看viewmodel与model之间的关系,可以根据下面这张图进行理解:
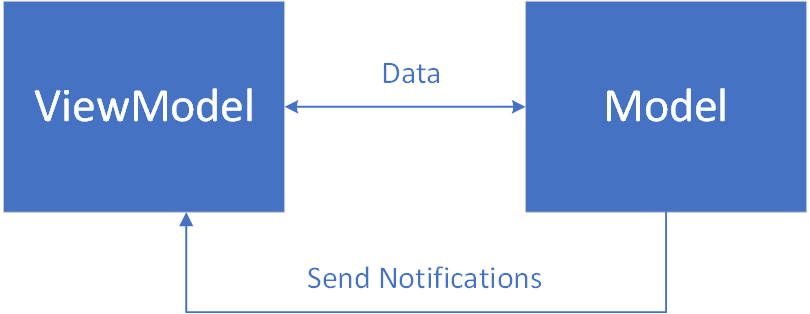
model(模型):model代表了业务逻辑和数据。它包含了应用程序中的数据和对数据的操作,例如,从数据库中获取数据,或者向数据库中添加数据。model是独立于ui的,它不知道ui的存在。
viewmodel(视图模型):viewmodel是model和view之间的桥梁。它包含了view所需的数据(这些数据来自于model),并提供了命令以响应view上的用户操作。viewmodel将model的数据转换为view可以显示的数据,同时,它也将view上的用户操作转换为对model的操作。
在我们这个例子中我们的数据来源于model文件夹下的user类与usermanager类:

这里的send notifications又该如何理解呢?
我们也是以一个小例子进行说明。
首先将viewmodel中的test方法修改为:
 private void test(object obj)
 {
     users[0].name = "小1";
     users[0].email = "111@qq.com";
 }
会发现现在并不会发送通知,实现view上的修改,这是因为user类并没有实现inotifypropertychanged接口,现在修改user类实现inotifypropertychanged接口:
public class user : inotifypropertychanged
{
    private string? _name;
    public string? name
    {
        get { return _name; }
        set
        {
            if (_name != value)
            {
                _name = value;
                onpropertychanged(nameof(name));
            }
        }
    }

    private string? _email;
    public string? email
    {
        get { return _email; }
        set
        {
            if (_email != value)
            {
                _email = value;
                onpropertychanged(nameof(email));
            }
        }
    }

    public event propertychangedeventhandler? propertychanged;

    protected virtual void onpropertychanged(string propertyname)
    {
        propertychanged?.invoke(this, new propertychangedeventargs(propertyname));
    }
}
现在可以实现通知了,效果如下所示:
使用mvvm库
我们会发现如果全部都手动实现mvvm模式的话,代码有点多,有点麻烦。这时候就可以使用一些mvvm库来简化我们的操作。
这里以communitytoolkit.mvvm为例,进行说明。
communitytoolkit.mvvm介绍
communitytoolkit.mvvm是microsoft community toolkit的一部分,它是一个轻量级但功能强大的mvvm(model-view-viewmodel)库,旨在帮助开发者更容易地实现mvvm设计模式。
该库提供了一些基础类,如observableobject和observablerecipient,这些类实现了inotifypropertychanged接口,并提供了setproperty方法,可以在属性值改变时触发propertychanged事件。这使得数据绑定变得更加简单和高效。
此外,该库还提供了icommand接口的实现,如relaycommand和asyncrelaycommand,这些类可以帮助你创建命令,命令是mvvm模式中的一个重要组成部分。
communitytoolkit.mvvm还提供了一些其他有用的特性,如消息传递、设计时数据支持等,这些特性可以帮助你更好地组织和管理你的代码。
communitytoolkit.mvvm是一个强大的工具,它可以帮助你更容易地实现mvvm模式,从而提高你的代码质量和开发效率。

修改之后的viewmodel如下所示:
 public partial class mainviewmodel : observableobject
 {
     public observablecollection<user> users { get; set; }

     [observableproperty]
     private string? name;

     [observableproperty]
     private string? email;


     public mainviewmodel()
     {
         users = usermanager.getusers();
     }

     [relaycommand]
     private void test(object obj)
     {
         users[0].name = "小1";
         users[0].email = "111@qq.com";
     }

     [relaycommand]
     private void adduser(object obj)
     {
         user user = new user();
         user.name = name;
         user.email = email;
         usermanager.adduser(user);
     }

 }
修改之后的user类如下所示:
 public partial class user : observableobject
 {
     [observableproperty]
     private string? _name;

     [observableproperty]
     private string? _email;
 }
用到了communitytoolkit.mvvm库中的三个东西,分别是observableobject、[observableproperty]与[relaycommand]。
先来看一下observableobject。
observableobject是communitytoolkit.mvvm库中的一个基础类,它实现了inotifypropertychanged接口。这个接口是.net数据绑定基础架构的一部分,当对象的一个属性改变时,它会通知绑定到该属性的任何元素。

具体见:observableobject - community toolkits for .net | microsoft learn
在这里我们使用
 [observableproperty]
 private string? name;
它将生成一个像这样的可观察属性:
public string? name
{
    get => name;
    set => setproperty(ref name, value);
}
具体见:observableproperty attribute - community toolkits for .net | microsoft learn
我们使用
[relaycommand]
private void adduser(object obj)
{
   user user = new user();
   user.name = name;
   user.email = email;
   usermanager.adduser(user);
}
代码生成器会生成一个命令如下所示:
private relaycommand? addusercommand;

public irelaycommand addusercommand => addusercommand ??= new relaycommand(adduser);
具体见:relaycommand attribute - community toolkits for .net | microsoft learn
现在我们的viewmodel与model就可以简化了,现在再来看看效果:
总结
本文先总体介绍了一下mvvm模式,关于mvvm模式可以根据这张图帮助理解:
由于很多同学可能与我一样,是从winform到wpf的,因此在wpf中使用winform中的事件驱动编程范式完成了一个小例子,关于事件驱动编程,可以根据这张图帮助理解:
由于这种模式耦合比较多,我们想要松耦合,因此开始学习mvvm模式。我们创建了实现icommand接口的relaycommand类,实现inotifypropertychanged接口的mainviewmodel类与user类。使用数据绑定与命令绑定改写xaml页面。
最后由于手动实现mvvm模式,需要写很多代码,看过去比较复杂与麻烦,我们可以使用mvvm库来简化mvvm模式的实现。
以上就是wpf中mvvm模式的理解与实现的详细内容,更多关于wpf mvvm模式的资料请关注代码网其它相关文章!


发表评论