1. 背景
在现代软件开发中,面向切面编程(aop)是一种强大的编程范式,允许开发者跨越应用程序的多个部分定义横切关注点(如日志记录、事务管理等)。本文将介绍如何在spring框架中通过aspectj注解以及对应的xml配置来实现aop,在不改变主业务逻辑的情况下增强应用程序的功能。
2. 基于aspectj注解来实现aop
对于一个使用maven的spring项目,需要在pom.xml中添加以下依赖:
<dependencies>
    <dependency>
        <groupid>org.springframework</groupid>
        <artifactid>spring-context</artifactid>
        <version>5.3.10</version>
    </dependency>
    <dependency>
        <groupid>org.aspectj</groupid>
        <artifactid>aspectjrt</artifactid>
        <version>1.9.6</version>
    </dependency>
    <dependency>
        <groupid>org.aspectj</groupid>
        <artifactid>aspectjweaver</artifactid>
        <version>1.9.6</version>
    </dependency>
</dependencies>
确保版本号与使用的spring版本相匹配,可以自行调整。
创建业务逻辑接口myservice:
package com.example.demo.aop;


public interface myservice {
    void performaction();
}
创建业务逻辑类myserviceimpl.java:
package com.example.demo.aop;

import org.springframework.stereotype.service;

@service
public class myserviceimpl implements myservice {
    @override
    public void performaction() {
        system.out.println("performing an action in myservice");
    }
}
定义切面
创建切面类myaspect.java,并使用注解定义切面和通知:
package com.example.demo.aop;

import org.aspectj.lang.annotation.aspect;
import org.aspectj.lang.annotation.before;
import org.springframework.stereotype.component;

@aspect
@component
public class myaspect {

    @before("execution(* com.example.demo.aop.myserviceimpl.performaction(..))")
    public void logbeforeaction() {
        system.out.println("before performing action");
    }
}
@aspect注解是用来标识一个类作为aspectj切面的一种方式,这在基于注解的aop配置中是必需的。它相当于xml配置中定义切面的方式,但使用注解可以更加直观和便捷地在类级别上声明切面,而无需繁琐的xml配置。
配置spring以启用注解和aop
创建一个java配置类来代替xml配置,使用@configuration注解标记为配置类,并通过@componentscan注解来启用组件扫描,通过@enableaspectjautoproxy启用aspectj自动代理:
package com.example.demo.config;

import org.springframework.context.annotation.componentscan;
import org.springframework.context.annotation.configuration;
import org.springframework.context.annotation.enableaspectjautoproxy;

@configuration
@componentscan("com.example")
@enableaspectjautoproxy
public class appconfig {
}
@enableaspectjautoproxy注解在spring中用于启用对aspectj风格的切面的支持。它告诉spring框架去寻找带有@aspect注解的类,并将它们注册为spring应用上下文中的切面,以便在运行时通过代理方式应用这些切面定义的通知(advice)和切点(pointcuts)。
如果不写@enableaspectjautoproxy,spring将不会自动处理@aspect注解定义的切面,则定义的那些前置通知(@before)、后置通知(@after、@afterreturning、@afterthrowing)和环绕通知(@around)将不会被自动应用到目标方法上。这意味着定义的aop逻辑不会被执行,失去了aop带来的功能增强。
@before 注解定义了一个前置通知(advice),它会在指定方法执行之前运行。切点表达式execution(* com.example.demo.aop.myserviceimpl.performaction(..))精确地定义了这些连接点的位置。在这个例子中,切点表达式指定了myserviceimpl类中的performaction方法作为连接点,而@before注解标识的方法(logbeforeaction)将在这个连接点之前执行,即logbeforeaction方法(前置通知)会在performaction执行之前被执行。
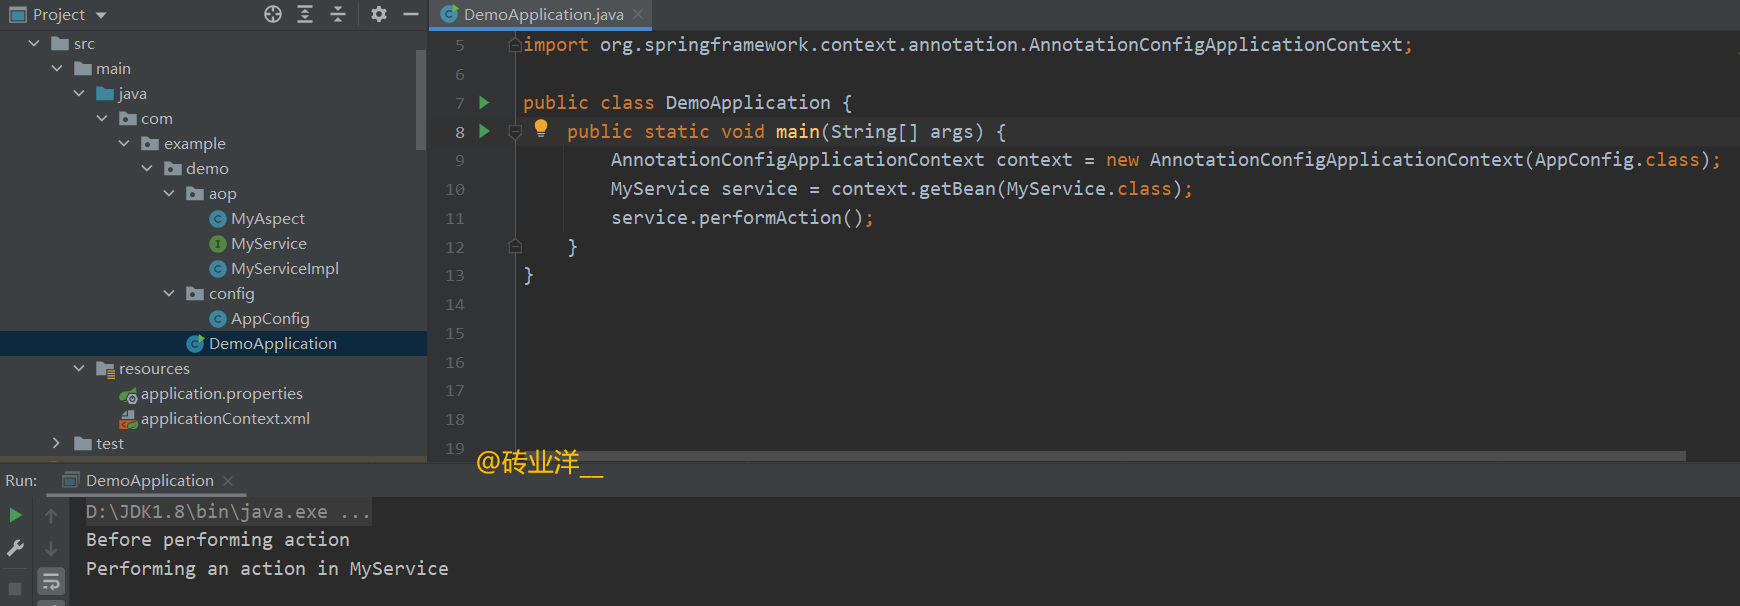
创建主类和测试aop功能
主程序如下:
package com.example.demo;

import com.example.demo.aop.myservice;
import com.example.demo.config.appconfig;
import org.springframework.context.annotation.annotationconfigapplicationcontext;

public class demoapplication {
    public static void main(string[] args) {
        annotationconfigapplicationcontext context = new annotationconfigapplicationcontext(appconfig.class);
        myservice service = context.getbean(myservice.class);
        service.performaction();
    }
}
运行结果如下:
3. xml实现和注解实现aop的代码对比
对于上面的代码,我们将原有基于注解的aop配置改写为完全基于xml的形式,方便大家对比。首先需要移除切面类和业务逻辑类上的所有spring相关注解,然后在xml文件中配置相应的bean和aop逻辑。
移除注解
首先,我们移除业务逻辑类和切面类上的所有注解。
myservice.java (无变化,接口保持原样):
package com.example.demo.aop;

public interface myservice {
    void performaction();
}
myserviceimpl.java (移除@service注解):
package com.example.demo.aop;

public class myserviceimpl implements myservice {
    @override
    public void performaction() {
        system.out.println("performing an action in myservice");
    }
}
myaspect.java (移除@aspect和@component注解,同时去掉方法上的@before注解):
package com.example.demo.aop;

public class myaspect {
    public void logbeforeaction() {
        system.out.println("before performing action");
    }
}
xml配置
接下来,删除appconfig配置类,在spring的xml配置文件中定义beans和aop配置。
applicationcontext.xml:
<?xml version="1.0" encoding="utf-8"?>
<beans xmlns="http://www.springframework.org/schema/beans"
       xmlns:xsi="http://www.w3.org/2001/xmlschema-instance"
       xmlns:aop="http://www.springframework.org/schema/aop"
       xsi:schemalocation="http://www.springframework.org/schema/beans
                           http://www.springframework.org/schema/beans/spring-beans.xsd
                           http://www.springframework.org/schema/aop
                           http://www.springframework.org/schema/aop/spring-aop.xsd">

    <!-- 定义业务逻辑bean -->
    <bean id="myservice" class="com.example.demo.aop.myserviceimpl"/>

    <!-- 定义切面 -->
    <bean id="myaspect" class="com.example.demo.aop.myaspect"/>

    <!-- aop配置 -->
    <aop:config>
        <aop:aspect id="aspect" ref="myaspect">
            <aop:pointcut id="serviceoperation" expression="execution(* com.example.demo.aop.myservice.performaction(..))"/>
            <aop:before pointcut-ref="serviceoperation" method="logbeforeaction"/>
        </aop:aspect>
    </aop:config>
</beans>
在这个xml配置中,我们手动注册了myserviceimpl和myaspect作为beans,并通过<aop:config>元素定义了aop逻辑。我们创建了一个切点serviceoperation,用于匹配myservice.performaction(..)方法的执行,并定义了一个前置通知,当匹配的方法被调用时,myaspect的logbeforeaction方法将被执行。
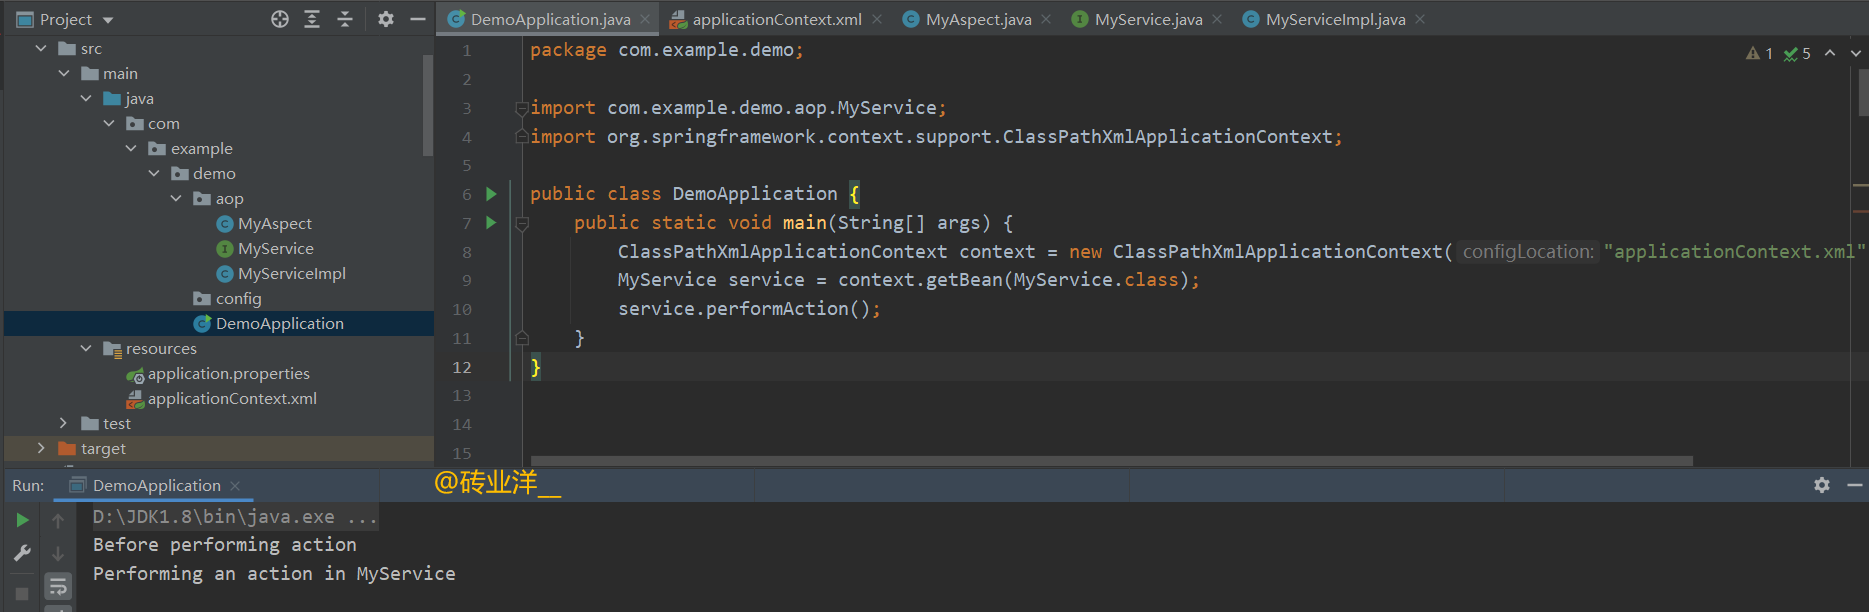
主类和测试aop功能
主类demoapplication的代码不需要改变,只是在创建applicationcontext时使用xml配置文件而不是java配置类:
package com.example.demo;

import com.example.demo.aop.myservice;
import org.springframework.context.support.classpathxmlapplicationcontext;

public class demoapplication {
    public static void main(string[] args) {
        classpathxmlapplicationcontext context = new classpathxmlapplicationcontext("applicationcontext.xml");
        myservice service = context.getbean(myservice.class);
        service.performaction();
    }
}
运行结果是一样的
4. aop通知讲解
在spring aop中,通知(advice)定义了切面(aspect)在目标方法调用过程中的具体行为。spring aop支持五种类型的通知,它们分别是:前置通知(before)、后置通知(after)、返回通知(after returning)、异常通知(after throwing)和环绕通知(around)。通过使用这些通知,开发者可以在目标方法的不同执行点插入自定义的逻辑。
@before(前置通知)
前置通知是在目标方法执行之前执行的通知,通常用于执行一些预处理任务,如日志记录、安全检查等。
@before("execution(* com.example.demo.aop.myserviceimpl.performaction(..))")
public void logbeforeaction() {
    system.out.println("before performing action");
}
@afterreturning(返回通知)
返回通知在目标方法成功执行之后执行,可以访问方法的返回值。
@afterreturning(pointcut = "execution(* com.example.demo.aop.myserviceimpl.performaction(..))", returning = "result")
public void logafterreturning(object result) {
    system.out.println("method returned value is : " + result);
}
这里在@afterreturning注解中指定returning = "result"时,spring aop框架将目标方法的返回值传递给切面方法的名为result的参数,因此,切面方法需要有一个与之匹配的参数,类型兼容目标方法的返回类型。如果两者不匹配,spring在启动时会抛出异常,因为它无法将返回值绑定到切面方法的参数。
@afterthrowing(异常通知)
异常通知在目标方法抛出异常时执行,允许访问抛出的异常。
@afterthrowing(pointcut = "execution(* com.example.demo.aop.myserviceimpl.performaction(..))", throwing = "ex")
public void logafterthrowing(joinpoint joinpoint, throwable ex) {
    string methodname = joinpoint.getsignature().getname();
    system.out.println("@afterthrowing: exception in method: " + methodname + "; exception: " + ex.tostring());
}
在@afterthrowing注解的方法中包含joinpoint参数是可选的,当想知道哪个连接点(即方法)引发了异常的详细信息时非常有用,假设有多个方法可能抛出相同类型的异常,而我们想在日志中明确指出是哪个方法引发了异常。通过访问joinpoint提供的信息,可以记录下引发异常的方法名称和其他上下文信息,从而使得日志更加清晰和有用。
@after(后置通知)
后置通知在目标方法执行之后执行,无论方法执行是否成功,即便发生异常,仍然会执行。它类似于finally块。
@after("execution(* com.example.demo.aop.myserviceimpl.performaction(..))")
public void logafter() {
    system.out.println("after performing action");
}
@around(环绕通知)
环绕通知围绕目标方法执行,可以在方法调用前后执行自定义逻辑,同时决定是否继续执行目标方法。环绕通知提供了最大的灵活性和控制力。
@around("execution(* com.example.demo.aop.myserviceimpl.performaction(..))")
public object logaround(proceedingjoinpoint joinpoint) throws throwable {
    system.out.println("before method execution");
    object result = joinpoint.proceed(); // 继续执行目标方法
    system.out.println("after method execution");
    return result;
}
接下来,我们来演示一下,全部代码如下:
服务接口(myservice.java):
package com.example.demo.aop;

public interface myservice {
    string performaction(string input);
}
服务实现(myserviceimpl.java):
修改performaction方法,使其在接收到特定输入时抛出异常
package com.example.demo.aop;

import org.springframework.stereotype.service;

@service
public class myserviceimpl implements myservice {
    @override
    public string performaction(string input) {
        system.out.println("performing action with: " + input);
        if ("error".equals(input)) {
            throw new runtimeexception("simulated error");
        }
        return "processed " + input;
    }
}
完整的切面类(包含所有通知类型)
切面类(myaspect.java) - 保持不变,确保包含所有类型的通知:
package com.example.demo.aop;

import org.aspectj.lang.joinpoint;
import org.aspectj.lang.proceedingjoinpoint;
import org.aspectj.lang.annotation.*;
import org.springframework.stereotype.component;

@aspect
@component
public class myaspect {

    @before("execution(* com.example.demo.aop.myservice.performaction(..))")
    public void beforeadvice(joinpoint joinpoint) {
        system.out.println("@before: before calling performaction");
    }

    @after("execution(* com.example.demo.aop.myservice.performaction(..))")
    public void afteradvice(joinpoint joinpoint) {
        system.out.println("@after: after calling performaction");
    }

    @afterreturning(pointcut = "execution(* com.example.demo.aop.myservice.performaction(..))", returning = "result")
    public void afterreturningadvice(joinpoint joinpoint, object result) {
        system.out.println("@afterreturning: method returned value is : " + result);
    }

    @afterthrowing(pointcut = "execution(* com.example.demo.aop.myservice.performaction(..))", throwing = "ex")
    public void afterthrowingadvice(joinpoint joinpoint, throwable ex) {
        string methodname = joinpoint.getsignature().getname();
        system.out.println("@afterthrowing: exception in method: " + methodname + "; exception: " + ex.tostring());
    }

    @around("execution(* com.example.demo.aop.myservice.performaction(..))")
    public object aroundadvice(proceedingjoinpoint proceedingjoinpoint) throws throwable {
        system.out.println("@around: before method execution");
        object result = null;
        try {
            result = proceedingjoinpoint.proceed();
        } catch (throwable throwable) {
        	// 如果执行方法出现异常,打印这里
            system.out.println("@around: exception in method execution");
            throw throwable;
        }
        // 如果执行方法正常,打印这里
        system.out.println("@around: after method execution");
        return result;
    }
}
这里要强调几点:
@around环绕通知常见用例是异常捕获和重新抛出。在这个例子中,我们通过proceedingjoinpoint的proceed()方法调用目标方法。如果目标方法执行成功,记录执行后的消息并返回结果。如果在执行过程中发生异常,在控制台上打印出异常信息,然后重新抛出这个异常。这样做可以确保异常不会被吞没,而是可以被上层调用者捕获或由其他异常通知处理。
@afterthrowing注解标明这个通知只有在目标方法因为异常而终止时才会执行。throwing属性指定了绑定到通知方法参数上的异常对象的名称。这样当异常发生时,异常对象会被传递到afterthrowingadvice方法中,方法中可以对异常进行记录或处理。
@afterthrowing和@afterreturning通知不会在同一个方法调用中同时执行。这两个通知的触发条件是互斥的。@afterreturning 通知只有在目标方法成功执行并正常返回后才会被触发,这个通知可以访问方法的返回值。@afterthrowing 通知只有在目标方法抛出异常时才会被触发,这个通知可以访问抛出的异常对象。
假设想要某个逻辑总是在方法返回时执行,不管是抛出异常还是正常返回,则考虑放在@after或者@around通知里执行。
配置类
package com.example.demo.config;

import org.springframework.context.annotation.componentscan;
import org.springframework.context.annotation.configuration;
import org.springframework.context.annotation.enableaspectjautoproxy;

@configuration
@componentscan("com.example")
@enableaspectjautoproxy
public class appconfig {
}
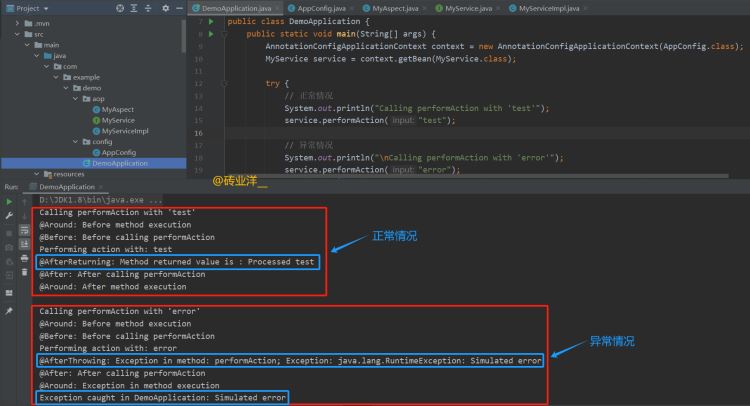
测试不同情况
为了测试所有通知类型的触发,在主类中执行performaction方法两次:一次传入正常参数,一次传入会导致异常的参数。
主程序如下:
package com.example.demo;

import com.example.demo.aop.myservice;
import org.springframework.context.annotation.annotationconfigapplicationcontext;

public class demoapplication {
    public static void main(string[] args) {
        annotationconfigapplicationcontext context = new annotationconfigapplicationcontext(appconfig.class);
        myservice service = context.getbean(myservice.class);

        try {
            // 正常情况
            system.out.println("calling performaction with 'test'");
            service.performaction("test");

            // 异常情况
            system.out.println("\ncalling performaction with 'error'");
            service.performaction("error");
        } catch (exception e) {
            system.out.println("exception caught in demoapplication: " + e.getmessage());
        }
    }
}
在这个例子中,当performaction方法被第二次调用并传入"error"作为参数时,将会抛出异常,从而触发@afterthrowing通知。
运行结果如下:
5. aop时序图
这里展示在spring aop框架中一个方法调用的典型处理流程,包括不同类型的通知(advice)的执行时机。
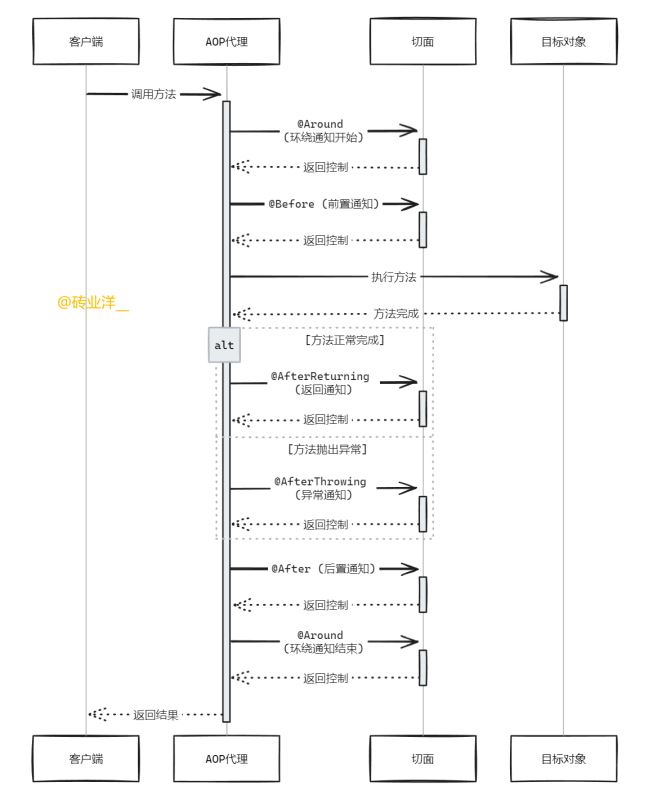
- 客户端调用方法:
- 客户端(
client)发起对某个方法的调用。这个调用首先被aop代理(aop proxy)接收,这是因为在spring aop中,代理负责在真实对象(target)和外界之间进行中介。
- 环绕通知开始 (
@around):
aop代理首先调用切面(aspect)中定义的环绕通知的开始部分。环绕通知可以在方法执行前后执行代码,并且能决定是否继续执行方法或直接返回自定义结果。这里的“开始部分”通常包括方法执行前的逻辑。
- 前置通知 (
@before):
- 在目标方法执行之前,执行前置通知。这用于在方法执行前执行如日志记录、安全检查等操作。
- 执行目标方法:
- 如果环绕通知和前置通知没有中断执行流程,代理会调用目标对象(
target)的实际方法。
- 方法完成:
- 方法执行完成后,控制权返回到
aop代理。这里的“完成”可以是成功结束,也可以是抛出异常。
- 返回通知或异常通知:
- 返回通知 (
@afterreturning):如果方法成功完成,即没有抛出异常,执行返回通知。这可以用来处理方法的返回值或进行某些后续操作。 - 异常通知 (
@afterthrowing):如果方法执行过程中抛出异常,执行异常通知。这通常用于异常记录或进行异常处理。
- 后置通知 (
@after):
- 独立于方法执行结果,后置通知总是会执行。这类似于在编程中的
finally块,常用于资源清理。
- 环绕通知结束 (
@around):
- 在所有其他通知执行完毕后,环绕通知的结束部分被执行。这可以用于执行清理工作,或者在方法执行后修改返回值。
- 返回结果:
- 最终,
aop代理将处理的结果返回给客户端。这个结果可能是方法的返回值,或者通过环绕通知修改后的值,或者是异常通知中处理的结果。
以上就是spring aop注解实战指南的详细内容,更多关于spring aop注解的资料请关注代码网其它相关文章!


发表评论