前言
在即将发布的 .net 6 runtime 中,默认的线程池实现从 c++ 代码改为了 c#,更方便我们学习线程池的设计了。
https://github.com/dotnet/runtime/tree/release/6.0/src/libraries/system.threading.threadpool
新的线程池实现位于 portablethreadpool 中,原 threadpool 中的对外公开的接口会直接调用 portablethreadpool 中的实现。
通过设置环境变量 threadpool_useportablethreadpool 为 0 可以设置成使用老的线程池实现。
https://github.com/dotnet/runtime/pull/43841/commits/b0d47b84a6845a70f011d1b0d3ce5adde9a4d7b7
本文以 .net 6 runtime 源码作为学习材料,对线程池的设计进行介绍。从目前的理解上来看,其整体的设计与原来 c++ 的实现并没有特别大的出入。
注意:
- 本文不涉及细节的代码实现,主要为大家介绍其整体设计。所展示的代码并非原封不动的源码,而是为了方便理解的简化版。
threadpool.setmaxthreads(int workerthreads, int completionportthreads)中的completionportthreads所相关的iocp线程池是 .net framework 时代的遗留产物,用于管理 windows 平台专有的 iocp 的回调线程池。目前没看到有什么地方在用它了,completionportthreads 这个参数也已经没有意义,底层io库是自己维护的io等待线程池。本文只涉及 worker thread 池的介绍。- 本文理解并不完整也不一定完全正确,有异议的地方欢迎留言讨论。
- 为了解释问题,一部分代码会运行在 .net 6 之前的环境中。
任务的调度
线程池的待执行任务被存放在一个队列系统中。这个系统包括一个 全局队列,以及绑定在每一个 worker thread 上 的 本地队列 。而线程池中的每一个线程都在执行 while(true) 的循环,从这个队列系统中领取并执行任务。


在 threadpool.queueuserworkitem 的重载方法 threadpool.queueuserworkitem<tstate>(action<tstate> callback, tstate state, bool preferlocal) 里有一个 preferlocal 参数。
调用不带 preferlocal 参数的 threadpool.queueuserworkitem 方法重载,任务会被放到全局队列。
当 preferlocal 为 true 的时候,如果调用 threadpool.queueuserworkitem 代码的线程正好是个线程池里的某个线程,则该任务就会进入该线程的本地队列中。除此之外的情况则会被放到全局队列中等待未来被某个 worker thread 捡走。
在线程池外的线程中调用,不管 preferlocal 传的是什么,任务都会被放到全局队列。

基本调度单元
本地队列和全局队列的元素类型被定义为 object,实际的任务类型分为两类,在从队列系统取到任务之后会判断类型并执行对应的方法。
ithreadpoolworkitem 实现类的实例。
/// <summary>represents a work item that can be executed by the threadpool.</summary>
public interface ithreadpoolworkitem
{
    void execute();
}
执行 execute 方法也就代表着任务的执行。
ithreadpoolworkitem 的具体实现有很多,例如通过 threadpool.queueuserworkitem(waitcallback callback) 传入的 callback 委托实例会被包装到一个 queueuserworkitemcallback 实例里。queueuserworkitemcallback 是 ithreadpoolworkitem 的实现类。
task
class task
{
    internal void innerinvoke();
}
执行 innerinvoke 会执行 task 所包含的委托。
全局队列
全局队列 是由 threadpoolworkqueue 维护的,同时它也是整个队列系统的入口,直接被 threadpool 所引用。
public static class threadpool
{
    internal static readonly threadpoolworkqueue s_workqueue = new threadpoolworkqueue();

    public static bool queueuserworkitem(waitcallback callback, object state)
    {
        object tpcallback = new queueuserworkitemcallback(callback!, state);

        s_workqueue.enqueue(tpcallback, forceglobal: true);

        return true;
    }
}

internal sealed class threadpoolworkqueue
{
    // 全局队列
    internal readonly concurrentqueue<object> workitems = new concurrentqueue<object>();

    // forceglobal 为 true 时,push 到全局队列,否则就放到本地队列
    public void enqueue(object callback, bool forceglobal);
}
本地队列
线程池中的每一个线程都会绑定一个 threadpoolworkqueuethreadlocals 实例,在 workstealingqueue 这个字段上保存着本地队列。
internal sealed class threadpoolworkqueuethreadlocals
{
    // 绑定在线程池线程上
    [threadstatic]
    public static threadpoolworkqueuethreadlocals threadlocals;

    // 持有全局队列的引用,以便能在需要的时候将任务转移到全局队列上
    public readonly threadpoolworkqueue workqueue;
    // 本地队列的直接维护者
    public readonly threadpoolworkqueue.workstealingqueue workstealingqueue;
    public readonly thread currentthread;

    public threadpoolworkqueuethreadlocals(threadpoolworkqueue tpq)
    {
        workqueue = tpq;
        workstealingqueue = new threadpoolworkqueue.workstealingqueue();
        // workstealingqueuelist 会集中管理 workstealingqueue
        threadpoolworkqueue.workstealingqueuelist.add(workstealingqueue);
        currentthread = thread.currentthread;
    }

    // 提供将本地队列中的任务转移到全局队列中去的功能,
    // 当 threadpool 通过后文将会介绍的 hillclimbing 算法判断得出当前线程是多余的线程后,
    // 会调用此方法对任务进行转移
    public void transferlocalwork()
    {
        while (workstealingqueue.localpop() is object cb)
        {
            workqueue.enqueue(cb, forceglobal: true);
        }
    }

    ~threadpoolworkqueuethreadlocals()
    {
        if (null != workstealingqueue)
        {
            // transferlocalwork 真正的目的并非是为了在这里被调用,这边只是确保任务不会丢的 fallback 逻辑
            transferlocalwork();
            threadpoolworkqueue.workstealingqueuelist.remove(workstealingqueue);
        }
    }
}
偷窃机制
这里思考一个问题,为什么本地队列的名字会被叫做 workstealingqueue 呢?
所有 worker thread 的 workstealingqueue 都被集中在 workstealingqueuelist 中。对线程池中其他所有线程可见。
worker thread 的 while(true) 中优先会从自身的 workstealingqueue 中取任务。如果本地队列已经被清空,就会从全局队列中取任务。例如下图的 thread1 取全局队列中领取了一个任务。
同时 thread3 也没活干了,但是全局队列中的任务被 thread1 抢走了。这时候就会去 从 thread2 的本地队列中抢 thread2 的活。

worker thread 的生命周期管理
接下来我们把格局放大,关注点从 worker thread 的打工日常转移到对它们的生命周期管理上来。
为了更方便的解释线程管理的机制,这边使用下面使用一些代码做演示。
代码参考自 https://devblogs.microsoft.com/dotnet/performance-improvements-in-net-6/。
线程注入实验
task.run 会将 task 调度到线程池中执行,下面的示例代码中等效于 threadpool.queueuserworkitem(waitcallback callback),会把 task 放到队列系统的全局队列中(顺便一提,如果在一个线程池线程中执行 task.run 会将 task 调度到此线程池线程的本地队列中)。
.net 5 实验一 默认线程池配置
static void main(string[] args)
{
    var sw = stopwatch.startnew();
    var tcs = new taskcompletionsource();
    var tasks = new list<task>();
    for (int i = 1; i <= environment.processorcount * 2; i++)
    {
        int id = i;
        console.writeline($"loop id: {id:00}    | {sw.elapsed.totalseconds:0.000} | busy threads: {getbusythreads()}");
        tasks.add(task.run(() =>
        {
            console.writeline($"task id: {id:00}    | {sw.elapsed.totalseconds:0.000} | busy threads: {getbusythreads()}");
            tcs.task.wait();
        }));
    }

    tasks.add(task.run(() =>
    {
        console.writeline($"task setresult | {sw.elapsed.totalseconds:0.000} | busy threads: {getbusythreads()}");
        tcs.setresult();
    }));
    task.waitall(tasks.toarray());
    console.writeline($"done:          | {sw.elapsed.totalseconds:0.000}");
}

static int getbusythreads()
{
    threadpool.getavailablethreads(out var available, out _);
    threadpool.getmaxthreads(out var max, out _);
    return max - available;
}
首先在代码在 .net 5 环境中运行以下代码,cpu 逻辑核心数 12。
loop id: 01    | 0.000 | busy threads: 0
loop id: 02    | 0.112 | busy threads: 1
loop id: 03    | 0.112 | busy threads: 2
loop id: 04    | 0.113 | busy threads: 4
loop id: 05    | 0.113 | busy threads: 7
loop id: 06    | 0.113 | busy threads: 10
loop id: 07    | 0.113 | busy threads: 10
task id: 01    | 0.113 | busy threads: 11
task id: 02    | 0.113 | busy threads: 12
task id: 03    | 0.113 | busy threads: 12
task id: 07    | 0.113 | busy threads: 12
task id: 04    | 0.113 | busy threads: 12
task id: 05    | 0.113 | busy threads: 12
loop id: 08    | 0.113 | busy threads: 10
task id: 08    | 0.113 | busy threads: 12
loop id: 09    | 0.113 | busy threads: 11
loop id: 10    | 0.113 | busy threads: 12
loop id: 11    | 0.114 | busy threads: 12
loop id: 12    | 0.114 | busy threads: 12
loop id: 13    | 0.114 | busy threads: 12
loop id: 14    | 0.114 | busy threads: 12
loop id: 15    | 0.114 | busy threads: 12
loop id: 16    | 0.114 | busy threads: 12
loop id: 17    | 0.114 | busy threads: 12
loop id: 18    | 0.114 | busy threads: 12
loop id: 19    | 0.114 | busy threads: 12
loop id: 20    | 0.114 | busy threads: 12
loop id: 21    | 0.114 | busy threads: 12
loop id: 22    | 0.114 | busy threads: 12
loop id: 23    | 0.114 | busy threads: 12
loop id: 24    | 0.114 | busy threads: 12
task id: 09    | 0.114 | busy threads: 12
task id: 06    | 0.114 | busy threads: 12
task id: 10    | 0.114 | busy threads: 12
task id: 11    | 0.114 | busy threads: 12
task id: 12    | 0.114 | busy threads: 12
task id: 13    | 1.091 | busy threads: 13
task id: 14    | 1.594 | busy threads: 14
task id: 15    | 2.099 | busy threads: 15
task id: 16    | 3.102 | busy threads: 16
task id: 17    | 3.603 | busy threads: 17
task id: 18    | 4.107 | busy threads: 18
task id: 19    | 4.611 | busy threads: 19
task id: 20    | 5.113 | busy threads: 20
task id: 21    | 5.617 | busy threads: 21
task id: 22    | 6.122 | busy threads: 22
task id: 23    | 7.128 | busy threads: 23
task id: 24    | 7.632 | busy threads: 24
task setresult | 8.135 | busy threads: 25
done:          | 8.136
task.run 会把 task 调度到线程池上执行,前 24 个 task 都会被阻塞住,直到第 25 个被执行。每次都会打印出当前线程池中正在执行任务的线程数(也就是创建完成的线程数)。
可以观察到以下结果:
- 前几次循环,线程随着 task 数量递增,后面几次循环直到循环结束为止,线程数一直维持在 12 没有发生变化。
- 线程数在达到 12 之前,零间隔时间增加。第 12 到 第 13 线程间隔 1s 不到,往后约 500ms 增加一个线程。
.net 5 实验二 调整 threadpool 设置
在上面的代码最前面加入以下两行代码,继续在 .net 5 环境运行一次。
threadpool.getminthreads(out int defaultminthreads, out int completionportthreads);
console.writeline($"defaultminthreads: {defaultminthreads}");
threadpool.setminthreads(14, completionportthreads);
运行结果如下
defaultminthreads: 12
loop id: 01    | 0.000 | busy threads: 0
loop id: 02    | 0.003 | busy threads: 1
loop id: 03    | 0.003 | busy threads: 2
loop id: 04    | 0.003 | busy threads: 5
loop id: 05    | 0.004 | busy threads: 8
task id: 01    | 0.004 | busy threads: 10
task id: 03    | 0.004 | busy threads: 10
loop id: 06    | 0.004 | busy threads: 10
task id: 02    | 0.004 | busy threads: 10
task id: 04    | 0.004 | busy threads: 10
task id: 05    | 0.004 | busy threads: 12
loop id: 07    | 0.004 | busy threads: 9
loop id: 08    | 0.004 | busy threads: 10
loop id: 09    | 0.004 | busy threads: 11
loop id: 10    | 0.004 | busy threads: 12
task id: 08    | 0.004 | busy threads: 14
task id: 06    | 0.004 | busy threads: 14
task id: 09    | 0.004 | busy threads: 14
task id: 10    | 0.004 | busy threads: 14
loop id: 11    | 0.004 | busy threads: 14
loop id: 12    | 0.004 | busy threads: 14
loop id: 13    | 0.004 | busy threads: 14
loop id: 14    | 0.004 | busy threads: 14
loop id: 15    | 0.004 | busy threads: 14
loop id: 16    | 0.004 | busy threads: 14
loop id: 17    | 0.004 | busy threads: 14
loop id: 18    | 0.004 | busy threads: 14
loop id: 19    | 0.004 | busy threads: 14
loop id: 20    | 0.004 | busy threads: 14
loop id: 21    | 0.004 | busy threads: 14
loop id: 22    | 0.004 | busy threads: 14
task id: 11    | 0.004 | busy threads: 14
loop id: 23    | 0.004 | busy threads: 14
loop id: 24    | 0.005 | busy threads: 14
task id: 07    | 0.005 | busy threads: 14
task id: 12    | 0.005 | busy threads: 14
task id: 13    | 0.005 | busy threads: 14
task id: 14    | 0.005 | busy threads: 14
task id: 15    | 0.982 | busy threads: 15
task id: 16    | 1.486 | busy threads: 16
task id: 17    | 1.991 | busy threads: 17
task id: 18    | 2.997 | busy threads: 18
task id: 19    | 3.501 | busy threads: 19
task id: 20    | 4.004 | busy threads: 20
task id: 21    | 4.509 | busy threads: 21
task id: 22    | 5.014 | busy threads: 22
task id: 23    | 5.517 | busy threads: 23
task id: 24    | 6.021 | busy threads: 24
task setresult | 6.522 | busy threads: 25
done:          | 6.523
在调整完线程池的最小线程数量之后,线程注入速度发生转折的时间点从第 12(默认min threads) 个线程换到了第 14(修改后的min threads)个线程。
整体时间也从 8s 缩到 6s。
.net 5 实验三 tcs.task.wait() 改为 thread.sleep
static void main(string[] args)
{
    var sw = stopwatch.startnew();
    var tasks = new list<task>();
    for (int i = 1; i <= environment.processorcount * 2; i++)
    {
        int id = i;
        console.writeline(
            $"loop id: {id:00}    | {sw.elapsed.totalseconds:0.000} | busy threads: {getbusythreads()}");
        tasks.add(task.run(() =>
        {
            console.writeline(
                $"task id: {id:00}    | {sw.elapsed.totalseconds:0.000} | busy threads: {getbusythreads()}");
            thread.sleep(environment.processorcount * 1000);
        }));
    }

    task.whenall(tasks.toarray()).continuewith(_ =>
    {
        console.writeline($"done:          | {sw.elapsed.totalseconds:0.000}");
    });
    console.readline();
}
loop id: 01    | 0.000 | busy threads: 0
loop id: 02    | 0.027 | busy threads: 1
loop id: 03    | 0.027 | busy threads: 2
loop id: 04    | 0.027 | busy threads: 3
loop id: 05    | 0.028 | busy threads: 4
loop id: 06    | 0.028 | busy threads: 10
loop id: 07    | 0.028 | busy threads: 9
loop id: 08    | 0.028 | busy threads: 9
loop id: 09    | 0.028 | busy threads: 10
loop id: 10    | 0.028 | busy threads: 12
loop id: 11    | 0.028 | busy threads: 12
loop id: 12    | 0.028 | busy threads: 12
loop id: 13    | 0.028 | busy threads: 12
loop id: 14    | 0.028 | busy threads: 12
loop id: 15    | 0.028 | busy threads: 12
loop id: 16    | 0.028 | busy threads: 12
loop id: 17    | 0.028 | busy threads: 12
loop id: 18    | 0.028 | busy threads: 12
loop id: 19    | 0.028 | busy threads: 12
loop id: 20    | 0.028 | busy threads: 12
loop id: 21    | 0.028 | busy threads: 12
loop id: 22    | 0.028 | busy threads: 12
loop id: 23    | 0.028 | busy threads: 12
loop id: 24    | 0.028 | busy threads: 12
task id: 01    | 0.029 | busy threads: 12
task id: 05    | 0.029 | busy threads: 12
task id: 03    | 0.029 | busy threads: 12
task id: 08    | 0.029 | busy threads: 12
task id: 09    | 0.029 | busy threads: 12
task id: 10    | 0.029 | busy threads: 12
task id: 06    | 0.029 | busy threads: 12
task id: 11    | 0.029 | busy threads: 12
task id: 12    | 0.029 | busy threads: 12
task id: 04    | 0.029 | busy threads: 12
task id: 02    | 0.029 | busy threads: 12
task id: 07    | 0.029 | busy threads: 12
task id: 13    | 1.018 | busy threads: 13
task id: 14    | 1.522 | busy threads: 14
task id: 15    | 2.025 | busy threads: 15
task id: 16    | 2.530 | busy threads: 16
task id: 17    | 3.530 | busy threads: 17
task id: 18    | 4.035 | busy threads: 18
task id: 19    | 4.537 | busy threads: 19
task id: 20    | 5.040 | busy threads: 20
task id: 21    | 5.545 | busy threads: 21
task id: 22    | 6.048 | busy threads: 22
task id: 23    | 7.049 | busy threads: 23
task id: 24    | 8.056 | busy threads: 24
done:          | 20.060
达到 min threads (默认12)之后,线程注入速度明显变慢,最快间隔 500ms。
.net 6 实验一 默认 threadpool 设置
将 .net 5 实验一的代码在 .net 6 执行一次
loop id: 01    | 0.001 | busy threads: 0
loop id: 02    | 0.018 | busy threads: 1
loop id: 03    | 0.018 | busy threads: 3
loop id: 04    | 0.018 | busy threads: 6
loop id: 05    | 0.018 | busy threads: 4
loop id: 06    | 0.018 | busy threads: 5
loop id: 07    | 0.018 | busy threads: 6
loop id: 08    | 0.018 | busy threads: 8
task id: 01    | 0.018 | busy threads: 11
task id: 04    | 0.018 | busy threads: 11
task id: 03    | 0.018 | busy threads: 11
task id: 02    | 0.018 | busy threads: 11
task id: 05    | 0.018 | busy threads: 11
loop id: 09    | 0.018 | busy threads: 12
loop id: 10    | 0.018 | busy threads: 12
loop id: 11    | 0.018 | busy threads: 12
loop id: 12    | 0.018 | busy threads: 12
loop id: 13    | 0.018 | busy threads: 12
task id: 09    | 0.018 | busy threads: 12
loop id: 14    | 0.018 | busy threads: 12
loop id: 15    | 0.018 | busy threads: 12
loop id: 16    | 0.018 | busy threads: 12
loop id: 17    | 0.018 | busy threads: 12
task id: 06    | 0.018 | busy threads: 12
loop id: 18    | 0.018 | busy threads: 12
loop id: 19    | 0.018 | busy threads: 12
loop id: 20    | 0.018 | busy threads: 12
loop id: 21    | 0.018 | busy threads: 12
loop id: 22    | 0.018 | busy threads: 12
loop id: 23    | 0.018 | busy threads: 12
loop id: 24    | 0.018 | busy threads: 12
task id: 10    | 0.018 | busy threads: 12
task id: 07    | 0.019 | busy threads: 12
task id: 11    | 0.019 | busy threads: 12
task id: 08    | 0.019 | busy threads: 12
task id: 12    | 0.019 | busy threads: 12
task id: 13    | 0.020 | busy threads: 16
task id: 14    | 0.020 | busy threads: 17
task id: 15    | 0.020 | busy threads: 18
task id: 16    | 0.020 | busy threads: 19
task id: 17    | 0.020 | busy threads: 20
task id: 18    | 0.020 | busy threads: 21
task id: 19    | 0.020 | busy threads: 22
task id: 20    | 0.020 | busy threads: 23
task id: 21    | 0.020 | busy threads: 24
task id: 23    | 0.020 | busy threads: 24
task id: 22    | 0.020 | busy threads: 24
task id: 24    | 0.020 | busy threads: 24
task setresult | 0.045 | busy threads: 25
done:          | 0.046
与实验一相比,虽然线程数仍然停留在 12 了一段时间,但随后线程就立即增长了,后文会介绍 .net 6 在这方面做出的改进。
.net 6 实验二 调整 threadpool 设置
将 .net 5 实验二的代码在 .net 6 中执行一次
defaultminthreads: 12
loop id: 01    | 0.001 | busy threads: 0
loop id: 02    | 0.014 | busy threads: 1
loop id: 03    | 0.014 | busy threads: 2
loop id: 04    | 0.015 | busy threads: 5
loop id: 05    | 0.015 | busy threads: 4
loop id: 06    | 0.015 | busy threads: 5
loop id: 07    | 0.015 | busy threads: 7
loop id: 08    | 0.015 | busy threads: 8
loop id: 09    | 0.015 | busy threads: 11
task id: 06    | 0.015 | busy threads: 9
task id: 01    | 0.015 | busy threads: 9
task id: 02    | 0.015 | busy threads: 9
task id: 05    | 0.015 | busy threads: 9
task id: 03    | 0.015 | busy threads: 9
task id: 04    | 0.015 | busy threads: 9
task id: 07    | 0.015 | busy threads: 9
task id: 08    | 0.016 | busy threads: 9
task id: 09    | 0.016 | busy threads: 9
loop id: 10    | 0.016 | busy threads: 9
loop id: 11    | 0.016 | busy threads: 10
loop id: 12    | 0.016 | busy threads: 11
loop id: 13    | 0.016 | busy threads: 13
task id: 10    | 0.016 | busy threads: 14
loop id: 14    | 0.016 | busy threads: 14
loop id: 15    | 0.016 | busy threads: 14
loop id: 16    | 0.016 | busy threads: 14
task id: 11    | 0.016 | busy threads: 14
loop id: 17    | 0.016 | busy threads: 14
loop id: 18    | 0.016 | busy threads: 14
loop id: 19    | 0.016 | busy threads: 14
loop id: 20    | 0.016 | busy threads: 14
loop id: 21    | 0.016 | busy threads: 14
loop id: 22    | 0.016 | busy threads: 14
loop id: 23    | 0.016 | busy threads: 14
loop id: 24    | 0.016 | busy threads: 14
task id: 12    | 0.016 | busy threads: 14
task id: 13    | 0.016 | busy threads: 14
task id: 14    | 0.016 | busy threads: 14
task id: 15    | 0.017 | busy threads: 18
task id: 16    | 0.017 | busy threads: 19
task id: 17    | 0.017 | busy threads: 20
task id: 18    | 0.017 | busy threads: 21
task id: 19    | 0.017 | busy threads: 22
task id: 20    | 0.018 | busy threads: 23
task id: 21    | 0.018 | busy threads: 24
task id: 22    | 0.018 | busy threads: 25
task id: 23    | 0.018 | busy threads: 26
task id: 24    | 0.018 | busy threads: 26
task setresult | 0.018 | busy threads: 25
done:          | 0.019
前半部分有部分日志乱序,可以看到,与实验三一样,维持在最大线程数一小段时间之后,立即就开始了线程增长。
.net 6 实验三 tcs.task.wait() 改为 thread.sleep
将 .net 5 实验三的代码在 .net 6 中执行一次
loop id: 01    | 0.003 | busy threads: 0
loop id: 02    | 0.024 | busy threads: 1
loop id: 03    | 0.025 | busy threads: 2
loop id: 04    | 0.025 | busy threads: 3
loop id: 05    | 0.025 | busy threads: 7
loop id: 06    | 0.025 | busy threads: 5
loop id: 07    | 0.025 | busy threads: 6
loop id: 08    | 0.025 | busy threads: 7
loop id: 09    | 0.025 | busy threads: 9
loop id: 10    | 0.025 | busy threads: 10
loop id: 11    | 0.026 | busy threads: 10
loop id: 12    | 0.026 | busy threads: 11
loop id: 13    | 0.026 | busy threads: 12
loop id: 14    | 0.026 | busy threads: 12
loop id: 15    | 0.026 | busy threads: 12
loop id: 16    | 0.026 | busy threads: 12
loop id: 17    | 0.026 | busy threads: 12
loop id: 18    | 0.026 | busy threads: 12
loop id: 19    | 0.026 | busy threads: 12
loop id: 20    | 0.026 | busy threads: 12
loop id: 21    | 0.026 | busy threads: 12
loop id: 22    | 0.026 | busy threads: 12
loop id: 23    | 0.026 | busy threads: 12
loop id: 24    | 0.026 | busy threads: 12
task id: 01    | 0.026 | busy threads: 12
task id: 02    | 0.026 | busy threads: 12
task id: 05    | 0.026 | busy threads: 12
task id: 04    | 0.026 | busy threads: 12
task id: 06    | 0.026 | busy threads: 12
task id: 08    | 0.026 | busy threads: 12
task id: 09    | 0.026 | busy threads: 12
task id: 03    | 0.026 | busy threads: 12
task id: 11    | 0.026 | busy threads: 12
task id: 10    | 0.026 | busy threads: 12
task id: 07    | 0.026 | busy threads: 12
task id: 12    | 0.026 | busy threads: 12
task id: 13    | 1.026 | busy threads: 13
task id: 14    | 2.027 | busy threads: 14
task id: 15    | 3.028 | busy threads: 15
task id: 16    | 4.030 | busy threads: 16
task id: 17    | 5.031 | busy threads: 17
task id: 18    | 6.032 | busy threads: 18
task id: 19    | 6.533 | busy threads: 19
task id: 20    | 7.035 | busy threads: 20
task id: 21    | 8.036 | busy threads: 21
task id: 22    | 8.537 | busy threads: 22
task id: 23    | 9.538 | busy threads: 23
task id: 24    | 10.039 | busy threads: 24
done:          | 22.041
结果与 .net 5 的实验三相差不大。
线程注入
对照上述的几组实验结果,接下来以 .net 6 中 c# 实现的 threadpool 作为资料来理解一下线程注入的几个阶段(按个人理解进行的划分,仅供参考)。
1. 第一个线程的出现
随着任务被调度到队列上,第一个线程被创建出来。
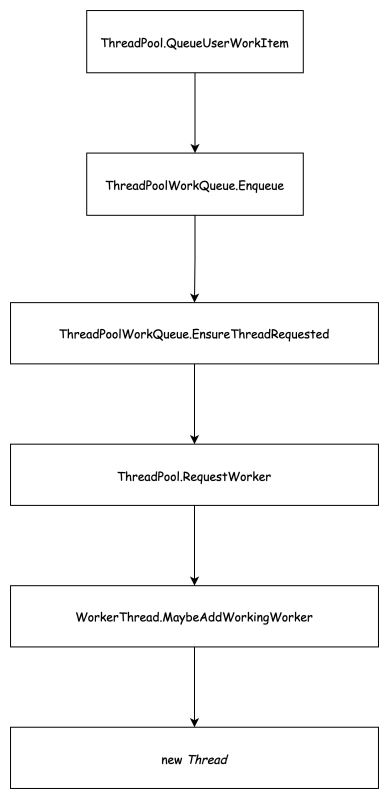
下面是线程池在执行第一个任务的时候的代码摘要,涉及到计数的并执行相关处理的地方,代码都使用了 while(xxx) + interlocked 的方式来进行并发控制,可以理解成乐观锁。这一阶段,实际上我们只需要关注到 threadpoolworkqueue.ensurethreadrequested 方法就行了。
可利用 rider 的反编译 debug 功能帮助我们学习。
下面是第一个 task.run 的代码执行路径

注意:执行环节是 main thread

public static class threadpool
{
    internal static readonly threadpoolworkqueue s_workqueue = new threadpoolworkqueue();

    public static bool queueuserworkitem(waitcallback callback, object state)
    {
        object tpcallback = new queueuserworkitemcallback(callback!, state);

        s_workqueue.enqueue(tpcallback, forceglobal: true);

        return true;
    }
}

internal sealed class threadpoolworkqueue
{
    [structlayout(layoutkind.sequential)]
    private struct cachelineseparated
    {
        private readonly internal.paddingfor32 pad1;

        public volatile int numoutstandingthreadrequests;

        private readonly internal.paddingfor32 pad2;
    }

    private cachelineseparated _separated;

    public void enqueue(object callback, bool forceglobal)
    {
        // 线程池中执行的任务有两种:ithreadpoolworkitem、task
        debug.assert((callback is ithreadpoolworkitem) ^ (callback is task));

        if (loggingenabled && frameworkeventsource.log.isenabled())
            frameworkeventsource.log.threadpoolenqueueworkobject(callback);

        threadpoolworkqueuethreadlocals? tl = null;
        if (!forceglobal)
            // 获取本地队列,如果执行改代码的线程不是线程池线程,
            // 那这边是获取不到的,就算 forceglobal 是 false,
            // 也会把任务放到全局队列
            tl = threadpoolworkqueuethreadlocals.threadlocals;

        if (null != tl)
        {
            // 放到本地队列
            tl.workstealingqueue.localpush(callback);
        }
        else
        {
            // 当道全局队列
            workitems.enqueue(callback);
        }

        ensurethreadrequested();
    }

    internal void ensurethreadrequested()
    {
        //
        // if we have not yet requested #procs threads, then request a new thread.
        //
        // coreclr: note that there is a separate count in the vm which has already been incremented
        // by the vm by the time we reach this point.
        //
        int count = _separated.numoutstandingthreadrequests;
        while (count < environment.processorcount)
        {
            int prev = interlocked.compareexchange(ref _separated.numoutstandingthreadrequests, count + 1, count);
            if (prev == count)
            {
                threadpool.requestworkerthread();
                break;
            }
            count = prev;
        }
    }

    public static class threadpool
    {

        /// <summary>
        /// this method is called to request a new thread pool worker to handle pending work.
        /// </summary>
        internal static void requestworkerthread() => portablethreadpool.threadpoolinstance.requestworker();
    }

    internal sealed class portablethreadpool
    {
        public static readonly portablethreadpool threadpoolinstance = new portablethreadpool();

        internal void requestworker()
        {
            // the order of operations here is important. maybeaddworkingworker() and ensurerunning() use speculative checks to
            // do their work and the memory barrier from the interlocked operation is necessary in this case for correctness.
            interlocked.increment(ref _separated.numrequestedworkers);
            workerthread.maybeaddworkingworker(this);
            // 初始化 gatethread
            gatethread.ensurerunning(this);
        }

        /// <summary>
        /// the worker thread infastructure for the clr thread pool.
        /// </summary>
        private static class workerthread
        {
            internal static void maybeaddworkingworker(portablethreadpool threadpoolinstance)
            {
                threadcounts counts = threadpoolinstance._separated.counts;
                short numexistingthreads, numprocessingwork, newnumexistingthreads, newnumprocessingwork;
                // 这个 while (true) 是确保计算出正确的待创建线程数
                while (true)
                {
                    numprocessingwork = counts.numprocessingwork;
                    if (numprocessingwork >= counts.numthreadsgoal)
                    {
                        return;
                    }

                    newnumprocessingwork = (short)(numprocessingwork + 1);
                    numexistingthreads = counts.numexistingthreads;
                    newnumexistingthreads = math.max(numexistingthreads, newnumprocessingwork);

                    threadcounts newcounts = counts;
                    newcounts.numprocessingwork = newnumprocessingwork;
                    newcounts.numexistingthreads = newnumexistingthreads;

                    threadcounts oldcounts = threadpoolinstance._separated.counts.interlockedcompareexchange(newcounts, counts);

                    if (oldcounts == counts)
                    {
                        break;
                    }

                    counts = oldcounts;
                }

                int tocreate = newnumexistingthreads - numexistingthreads;
                int torelease = newnumprocessingwork - numprocessingwork;

                if (torelease > 0)
                {
                    s_semaphore.release(torelease);
                }

                while (tocreate > 0)
                {
                    if (trycreateworkerthread())
                    {
                        tocreate--;
                        continue;
                    }

                    counts = threadpoolinstance._separated.counts;
                    while (true)
                    {
                        threadcounts newcounts = counts;
                        newcounts.subtractnumprocessingwork((short)tocreate);
                        newcounts.subtractnumexistingthreads((short)tocreate);

                        threadcounts oldcounts = threadpoolinstance._separated.counts.interlockedcompareexchange(newcounts, counts);
                        if (oldcounts == counts)
                        {
                            break;
                        }
                        counts = oldcounts;
                    }
                    break;
                }
            }

            private static bool trycreateworkerthread()
            {
                try
                {
                    // thread pool threads must start in the default execution context without transferring the context, so
                    // using unsafestart() instead of start()
                    thread workerthread = new thread(s_workerthreadstart);
                    workerthread.isthreadpoolthread = true;
                    workerthread.isbackground = true;
                    // thread name will be set in thread proc
                    workerthread.unsafestart();
                }
                catch (threadstartexception)
                {
                    return false;
                }
                catch (outofmemoryexception)
                {
                    return false;
                }

                return true;
            }
        }
    }
}
2. 达到 min threads 之前的线程数增长
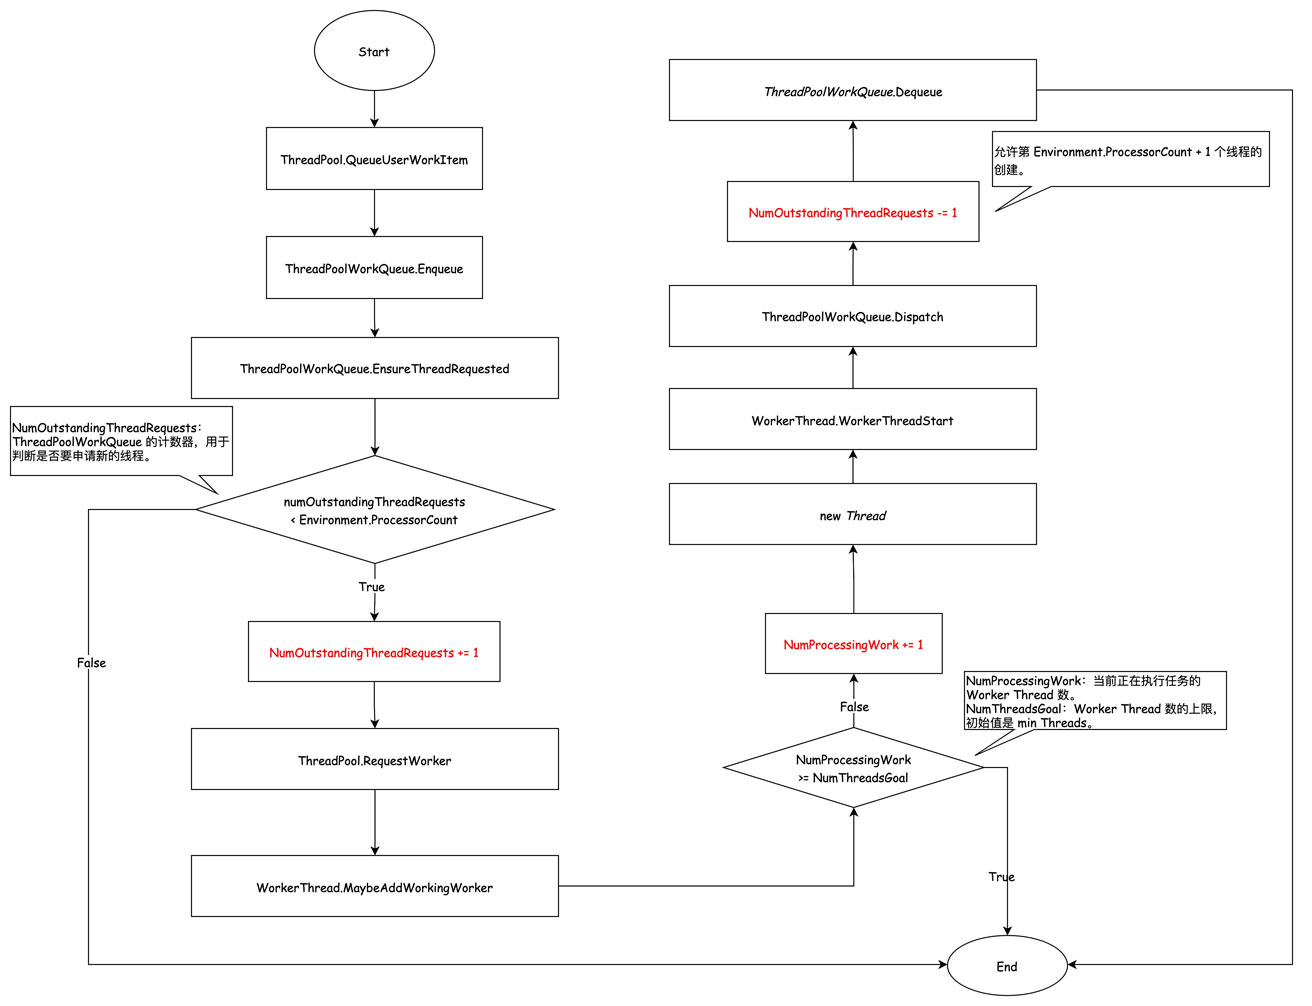
细心的朋友会发现上面代码里 ensurethreadrequested 方法有一个终止条件,_separated.numoutstandingthreadrequests == environment.processorcount,每次新增一个 threadrequested,这个数就会 +1,似乎允许创建的最大 worker thread 是 environment.processorcount?
其实 threadpoolworkqueue 维护的 numoutstandingthreadrequests 这个值会在线程池线程真正跑起来之后,会在 threadpoolworkqueue.dispatch方法中 -1。也就是说,只要有一个线程真正运行起来了,就能创建第 environment.processorcount + 1 个thread。当然,在向 threadpoolworkqueue 加入第13个任务的时候,第13个 worker thread 就算不允许创建也没关系,因为任务已经入队了,会被运行起来的 worker thread 取走。
min threads 初始值为 运行环境 cpu 核心数,可通过 threadpool.setminthreads 进行设置,参数有效范围是 [1, max threads]。
portablethreadpool里维护了一个计数器 portablethreadpool.threadpoolinstance._separated.counts,记录了 worker thread 相关的三个数值:
- numprocessingwork:当前正在执行任务的 worker thread。
- numexistingthreads:当前线程池中实际有的 worker thread。
- numthreadsgoal:当前允许创建的最大 worker thread,初始值为 min threads。
    internal class portablethreadpool
    {

        public static readonly portablethreadpool threadpoolinstance = new portablethreadpool();

        private cachelineseparated _separated;

        private struct cachelineseparated
        {
            public threadcounts counts;
        }

        /// <summary>
        /// tracks information on the number of threads we want/have in different states in our thread pool.
        /// </summary>
        private struct threadcounts
        {
            /// <summary>
            /// number of threads processing work items.
            /// </summary>
            public short numprocessingwork { get; set; }

            /// <summary>
            /// number of thread pool threads that currently exist.
            /// </summary>
            public short numexistingthreads { get; set; }

            // <summary>
            /// max possible thread pool threads we want to have.
            /// </summary>
            public short numthreadsgoal { get; set; }
        }
    }
3. 避免饥饿机制(starvation avoidance)
上面讲到,随着任务进入队列系统,worker thread 将随之增长,直到达到 numthreadsgoal。
numthreadsgoal 是12,前 12 个线程都被堵住了,加入到队列系统的第 13 个任务没办法被这前 12 个线程领走执行。
在这种情况下,线程池的 starvation avoidance 机制就起到作用了。
在上述所说的第一个阶段,除了线程池中的第一个线程会被创建之外,gatethread 也会随之被初始化。在第一阶段的代码摘录中,可以看到 gatethread 的初始化。
internal sealed class portablethreadpool
{
    public static readonly portablethreadpool threadpoolinstance = new portablethreadpool();

    internal void requestworker()
    {
        interlocked.increment(ref _separated.numrequestedworkers);
        workerthread.maybeaddworkingworker(this);
        // 初始化 gatethread
        gatethread.ensurerunning(this);
    }
}
在 gatethread 是一个独立的线程,每隔 500ms 进行检查一下,如果 numprocessingwork >= numthreadsgoal(workerthread.maybeaddworkingworker 不添加 worker thread 的判断条件),就设置新的 numthreadsgoal = numprocessingwork + 1,并调用 workerthread.maybeaddworkingworker,这样新的 worker thread 就可以被 workerthread.maybeaddworkingworker 创建。
这就解释了,为什么 .net 5 实验一、二在线程数达到min threads(numthreadsgoal 的默认值)之后,后面 worker thread 的增长是每 500ms 一个。

由于在第三阶段中,线程的增长会比较缓慢,有经验的开发会在应用启动的时候设置一个较大的 min threads,使其较晚或不进入第三阶段。
线程注入在 .net 6 中的改进
.net 6 与 .net 5 的实验二相比,达到 min threads 之后,线程的增长速度有明显的差异,而两者的实验三却相差不大。
.net 6 对于 task.wait 导致线程池线程阻塞的场景进行了优化,但如果并非此原因导致的线程数不够用,依旧是 starvation avoidance 的策略。
新的 threadpool 提供了一个 threadpool.notifythreadblocked 的内部接口,里面会调用 gatethread.wake 去唤醒 gatethread 本来 500ms 执行一次的逻辑,这 500ms 的间隔时间是通过 autoresetevent 实现的,所以 gatethread.wake 也很简单。
关键代码示意,非真实代码:
internal class portablethreadpool
{
    public bool notifythreadblocked()
    {
        // ...
        gatethread.wake(this);
        return true;
    }

    private static class gatethread
    {
        private static readonly autoresetevent delayevent = new autoresetevent(initialstate: false);

        // gatethread 入口方法
        private static void gatethreadstart()
        {
            while(true)
            {
                delayevent.waitone(500);
                // ...
            }
        }

        public static void wake(portablethreadpool threadpoolinstance)
        {
            delayevent.set();
            ensurerunning(threadpoolinstance);
        }
    }

爬山算法(hill climbing)
除了上述介绍的线程注入机制外,从clr 4.0开始,线程池内实现了一个根据采集到线程池吞吐率数据(每次任务完成时记录数据),推导出该算法认为最优的线程池线程数量。
算法实现位于 hillclimbing.threadpoolhillclimber.update,有兴趣的朋友可以去看一下。
public (int newthreadcount, int newsamplems) update(int currentthreadcount, double sampledurationseconds, int numcompletions)
- currentthreadcount:当前线程数
- sampledurationseconds:采样间隔
- numcompletions:这段采样时间间隔内完成的任务数
- newthreadcount:新的线程数
- newsample:新的采样间隔时间
不必要线程的销毁
如果线程需要被移除的时候,本地队列还存在待执行任务,则会将这些任务转移到全局队列中。
在以下几个场景中,线程池将会销毁掉不需要的线程,并不一定全面,只限于笔者当前认知。
- 在无法从队列系统领取到任务时。
- 通过爬山算法认定当前线程属于多余线程时。
参考资料
https://www.codeproject.com/articles/3813/net-s-threadpool-class-behind-the-scenes
https://devblogs.microsoft.com/dotnet/performance-improvements-in-net-6/
https://mattwarren.org/2017/04/13/the-clr-thread-pool-thread-injection-algorithm/
https://docs.microsoft.com/zh-cn/previous-versions/msp-n-p/ff963549(v=pandp.10)?redirectedfrom=msdn
到此这篇关于.net 6线程池threadpool实现方法的文章就介绍到这了。希望对大家的学习有所帮助,也希望大家多多支持代码网。


发表评论