wpf 实现折线图
框架支持.net4 至 .net8;
visual studio 2022;
实现代码
1)新增 chartbase 代码如下:
1.绘制x轴:根据控件的宽度和数据的数量计算出图表的宽度,并在底部绘制x轴。
2.绘制y轴虚线:绘制一系列垂直的短线来代表y轴的虚线。
3.绘制y轴数值文本:在y轴虚线的旁边绘制对应的数值文本。
4.计算刻度值:根据数据的最大值和设定的行数来计算y轴上每个刻度的值。
5.绘制y轴线:在每个刻度值的位置绘制一条线来代表y轴。
6.绘制y轴数值文本:在每个刻度的位置绘制对应的数值文本。
xaxiheight 设定 x 轴的高度
starty 设定 y 轴的起始位置
width 计算图表的宽度
intervaly y 轴的间隔初始化为0
x 当前 x 轴的位置
y 当前 y 轴的位置加上画笔高度
drawingcontext.drawsnappedlinesbetweenpoints(mypen, mypen.thickness, new point(startx, starty), new point(width, starty)); 绘制x轴
drawingcontext.drawsnappedlinesbetweenpoints(mypen, mypen.thickness, points.toarray()); 绘制底部 x 轴的齿距
drawingcontext.drawtext(formattedtext, new point(startx - formattedtext.width - 10, yaxis - formattedtext.height / 2));绘制 y 轴的数值
drawingcontext.drawsnappedlinesbetweenpoints(xaxispen, xaxispen.thickness, points.toarray()); 绘制 y 轴上的线
public class chartbase : control
{
    public static readonly dependencyproperty datasproperty =
        dependencyproperty.register("datas", typeof(ienumerable<keyvaluepair<string, double>>),
            typeof(chartbase), new uipropertymetadata(dataschanged));

    static chartbase()
    {
        defaultstylekeyproperty.overridemetadata(typeof(chartbase),
            new frameworkpropertymetadata(typeof(chartbase)));
    }

    protected double rows { get; } = 5;

    protected double interval { get; } = 120;

    protected short scalefactor { get; private set; } = 80;

    protected brush chartfill { get; private set; }

    protected double startx { get; private set; }

    protected double starty { get; private set; }

    protected double maxy { get; }

    protected double intervaly { get; private set; }

    protected brush normalbrush => controlshelper.primarynormalbrush;

    public ienumerable<keyvaluepair<string, double>> datas
    {
        get => (ienumerable<keyvaluepair<string, double>>) getvalue(datasproperty);
        set => setvalue(datasproperty, value);
    }

    private static void dataschanged(dependencyobject d, dependencypropertychangedeventargs e)
    {
        var ctrl = d as chartbase;
        if (e.newvalue != null)
            ctrl.invalidatevisual();
    }

    protected override void onrender(drawingcontext drawingcontext)
    {
        base.onrender(drawingcontext);
        if (datas == null || datas.count() == 0)
            return;
        snapstodevicepixels = true;
        uselayoutrounding = true;
        chartfill = application.current.tryfindresource("wd.chartfillsolidcolorbrush") as brush;
        var mypen = new pen
        {
            thickness = 1,
            brush = chartfill
        };
        mypen.freeze();

        var xaxiheight = 4;
        starty = actualheight - (xaxiheight + mypen.thickness) - 20;
        var w = actualwidth;
        startx = 40;
        var width = datas.count() * interval + startx;
        intervaly = 0;
        var x = startx;
        var y = starty + mypen.thickness;

        drawingcontext.drawsnappedlinesbetweenpoints(mypen, mypen.thickness, new point(startx, starty),
            new point(width, starty));

        var points = new list<point>();
        for (var i = 0; i < datas.count() + 1; i++)
        {
            points.add(new point(x, y));
            points.add(new point(x, y + xaxiheight));
            x += interval;
        }

        drawingcontext.drawsnappedlinesbetweenpoints(mypen, mypen.thickness, points.toarray());

        var formattedtext = drawingcontexthelper.getformattedtext(intervaly.tostring(),
            chartfill, flowdirection.lefttoright);
        drawingcontext.drawtext(formattedtext,
            new point(startx - formattedtext.width * 2, starty - formattedtext.height / 2));

        var xaxispen = new pen
        {
            thickness = 1,
            brush = application.current.tryfindresource("wd.chartxaxissolidcolorbrush") as brush
        };
        xaxispen.freeze();
        var max = convert.toint32(datas.max(kvp => kvp.value));
        var min = convert.toint32(datas.min(kvp => kvp.value));
        scalefactor = convert.toint16(starty / rows);
        var yaxis = starty - scalefactor;
        points.clear();
        var average = convert.toint32(max / rows);
        var result = enumerable.range(0, (convert.toint32(max) - average) / average + 1)
            .select(i => average + i * average);
        foreach (var item in result)
        {
            points.add(new point(startx, yaxis));
            points.add(new point(width, yaxis));
            intervaly = item;
            formattedtext = drawingcontexthelper.getformattedtext(intervaly.tostring(),
                chartfill, flowdirection.lefttoright);
            drawingcontext.drawtext(formattedtext,
                new point(startx - formattedtext.width - 10, yaxis - formattedtext.height / 2));
            yaxis -= scalefactor;
        }
        drawingcontext.drawsnappedlinesbetweenpoints(xaxispen, xaxispen.thickness, points.toarray());
    }
}
2)新增 chartline 代码如下:
- 1.计算比例和位置:根据第一个数据点的值计算其在
y轴上的比例和位置。 - 2.绘制数据点标签:遍历数据集中的每一个数据点,为每个数据点绘制其标签,并计算标签的绘制位置。
- 3.绘制线条和椭圆:对于每个数据点,计算其在
y轴上的位置,并绘制从上一个数据点到当前数据点的线。同时,绘制一个椭圆来表示当前的数据点。 - 4.更新位置和状态:更新起始点和
x轴位置,为绘制下一个数据点做准备。
using system;
using system.collections.generic;
using system.linq;
using system.windows;
using system.windows.media;

namespace wpfdevelopers.controls
{
    public class chartline : chartbase
    {
        private const double _size = 10;
        protected override void onrender(drawingcontext drawingcontext)
        {
            if (datas == null || datas.count() == 0)
                return;
            base.onrender(drawingcontext);
            var x = startx;
            var interval = interval;
            var drawingpen = new pen
            {
                thickness = 1,
                brush = normalbrush
            };
            drawingpen.freeze();
            var firstdatapoint = datas.firstordefault();
            if (firstdatapoint.equals(default(keyvaluepair<string, double>)))
                return;
            double proportion = firstdatapoint.value / intervaly;
            double ypositionfrombottom = starty - proportion * (scalefactor * rows);
            var startpoint = new point(x + interval / 2, ypositionfrombottom);
            foreach (var item in datas)
            {
                var formattedtext = drawingcontexthelper.getformattedtext(item.key,
                   chartfill, flowdirection.lefttoright);
                var point = new point(x + interval / 2 - formattedtext.width / 2, starty + 4);
                drawingcontext.drawtext(formattedtext, point);

                var y = starty - (item.value / intervaly) * (scalefactor * rows);
                var endpoint = new point(x + interval / 2, y);
                drawingcontext.drawline(drawingpen, startpoint, endpoint);
                var ellipsepoint = new point(endpoint.x - _size / 2, endpoint.y - _size / 2);
                var rect = new rect(ellipsepoint, new size(_size, _size));
                var ellipsegeom = new ellipsegeometry(rect);
                drawingcontext.drawgeometry(drawingpen.brush, drawingpen, ellipsegeom);
                startpoint = endpoint;
                x += interval;
            }
        }
    }
}
3)新增 chartlineexample.xaml 示例代码如下:
<grid background="{dynamicresource wd.backgroundsolidcolorbrush}">
            <grid.rowdefinitions>
                <rowdefinition />
                <rowdefinition height="auto" />
            </grid.rowdefinitions>
            <scrollviewer verticalscrollbarvisibility="auto" horizontalscrollbarvisibility="auto">
                <border
                height="500"
                margin="30,0"
                background="{dynamicresource wd.backgroundsolidcolorbrush}">
                    <wd:chartline datas="{binding datas, relativesource={relativesource ancestortype=local:chartlineexample}}" />
                </border>
            </scrollviewer>
            <button
                grid.row="1"
                width="200"
                verticalalignment="bottom"
                click="button_click"
                content="刷新"
                style="{staticresource wd.primarybutton}" />
        </grid>
3)新增 chartlineexample.xaml.cs 示例代码如下:
public partial class chartlineexample : usercontrol
{
public ienumerable<keyvaluepair<string, double>> datas
{
get { return (ienumerable<keyvaluepair<string, double>>)getvalue(datasproperty); }
set { setvalue(datasproperty, value); }
}
public static readonly dependencyproperty datasproperty =
dependencyproperty.register("datas", typeof(ienumerable<keyvaluepair<string, double>>), typeof(chartlineexample), new propertymetadata(null));
private dictionary<string, ienumerable<keyvaluepair<string, double>>> keyvalues = new dictionary<string, ienumerable<keyvaluepair<string, double>>>();
private int _index = 0;
public chartlineexample()
{
initializecomponent();
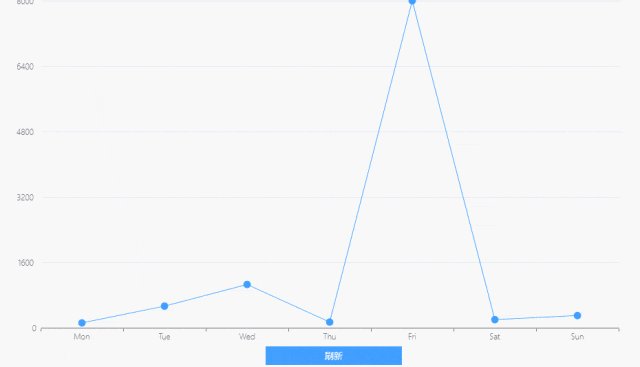
var models1 = new[]
{
new keyvaluepair<string, double>("mon", 120),
new keyvaluepair<string, double>("tue", 530),
new keyvaluepair<string, double>("wed", 1060),
new keyvaluepair<string, double>("thu", 140),
new keyvaluepair<string, double>("fri", 8000) ,
new keyvaluepair<string, double>("sat", 200) ,
new keyvaluepair<string, double>("sun", 300) ,
};
var models2 = new[]
{
new keyvaluepair<string, double>("(1)月", 120),
new keyvaluepair<string, double>("(2)月", 170),
new keyvaluepair<string, double>("(3)月", 30),
new keyvaluepair<string, double>("(4)月", 200),
new keyvaluepair<string, double>("(5)月", 100) ,
new keyvaluepair<string, double>("(6)月", 180) ,
new keyvaluepair<string, double>("(7)月", 90) ,
};
keyvalues.add("1", models1);
keyvalues.add("2", models2);
datas = models1;
}
private void button_click(object sender, routedeventargs e)
{
_index++;
if (_index >= keyvalues.count)
{
_index = 0;
}
datas = keyvalues.tolist()[_index].value;
}
}效果图
以上就是wpf实现绘制折线图的示例代码的详细内容,更多关于wpf折线图的资料请关注代码网其它相关文章!


发表评论