认识 ast
定义:在计算机科学中,抽象语法树是源代码语法结构的一种抽象表示。它以树状的形式表现编程语言的语法结构,树上的每个节点都表示源代码中的一种结构。之所以说语法是“抽象”的,是因为这里的语法并不会表示出真实语法中出现的每个细节。
从定义中我们只需要知道一件事就行,那就是 ast 是一种树形结构,并且是某种代码的一种抽象表示。
在线可视化网站:https://astexplorer.net/ ,利用这个网站我们可以很清晰的看到各种语言的 ast 结构。
estree[1]
estree 就是 es 语法对应的标准 ast,作为一个前端也比较方便理解。我们以官方文档为例
https://github.com/estree/estree/blob/master/es5.md
下面看一个代码
console.log('1')ast 为
{
  "type": "program",
  "start": 0, // 起始位置
  "end": 16, // 结束位置,字符长度
  "body": [
    {
      "type": "expressionstatement", // 表达式语句
      "start": 0,
      "end": 16,
      "expression": {
        "type": "callexpression", // 函数方法调用式
        "start": 0,
        "end": 16,
        "callee": {
          "type": "memberexpression", // 成员表达式 console.log
          "start": 0,
          "end": 11,
          "object": {
            "type": "identifier", // 标识符,可以是表达式或者结构模式
            "start": 0,
            "end": 7,
            "name": "console"
          },
          "property": {
            "type": "identifier",
            "start": 8,
            "end": 11,
            "name": "log"
          },
          "computed": false, // 成员表达式的计算结果,如果为 true 则是 console[log], false 则为 console.log
          "optional": false
        },
        "arguments": [ // 参数
          {
            "type": "literal", // 文字标记,可以是表达式
            "start": 12,
            "end": 15,
            "value": "1",
            "raw": "'1'"
          }
        ],
        "optional": false
      }
    }
  ],
  "sourcetype": "module"
}
看两个稍微复杂的代码
const b = { a: 1 };
const { a } = b;
function add(a, b) {
return a + b;
}这里建议读者自己将上述代码复制进上面提到的网站中,自行理解 estree 的各种节点类型。当然了,我们也不可能看一篇文章就记住那么多类型,只要心里有个大致的概念即可。
认识 acorn[2]
由 javascript 编写的 javascript 解析器,类似的解析器还有很多,比如 esprima[3] 和 shift[4] ,关于他们的性能,esprima 的官网给了个测试地址[5],但是由于 acron 代码比较精简,且 webpack 和 eslint 都依赖 acorn,因此我们这次从 acorn 下手,了解如何使用 ast。

基本操作
acorn 的操作很简单
import * as acorn from 'acorn'; const code = 'xxx'; const ast = acorn.parse(code, options)
这样我们就能拿到代码的 ast 了,options 的定义如下
interface options {
ecmaversion: 3 | 5 | 6 | 7 | 8 | 9 | 10 | 11 | 12 | 13 | 2015 | 2016 | 2017 | 2018 | 2019 | 2020 | 2021 | 2022 | 'latest'
sourcetype?: 'script' | 'module'
oninsertedsemicolon?: (lasttokend: number, lasttokendloc?: position) => void
ontrailingcomma?: (lasttokend: number, lasttokendloc?: position) => void
allowreserved?: boolean | 'never'
allowreturnoutsidefunction?: boolean
allowimportexporteverywhere?: boolean
allowawaitoutsidefunction?: boolean
allowsuperoutsidemethod?: boolean
allowhashbang?: boolean
locations?: boolean
ontoken?: ((token: token) => any) | token[]
oncomment?: ((
isblock: boolean, text: string, start: number, end: number, startloc?: position,
endloc?: position
) => void) | comment[]
ranges?: boolean
program?: node
sourcefile?: string
directsourcefile?: string
preserveparens?: boolean
}- ecmaversion ecma 版本,默认时 es7
- locations 默认为 false,设置为 true 时节点会携带一个 loc 对象来表示当前开始与结束的行数。
- oncomment 回调函数,每当代码执行到注释的时候都会触发,可以获取当前的注释内容
获得 ast 之后我们想还原之前的函数怎么办,这里可以使用 astring[6]
import * as astring from 'astring'; const code = astring.generate(ast);
实现普通函数转换为箭头函数
接下来我们就可以利用 ast 来实现一些字符串匹配不太容易实现的操作,比如将普通函数转化为箭头函数。
我们先来看两个函数的ast有什么区别
function add(a, b) {
    return a + b;
}const add = (a, b) => {
return a + b;
}{
"type": "program",
"start": 0,
"end": 41,
"body": [
{
"type": "functiondeclaration",
"start": 0,
"end": 40,
"id": {
"type": "identifier",
"start": 9,
"end": 12,
"name": "add"
},
"expression": false,
"generator": false,
"async": false,
"params": [
{
"type": "identifier",
"start": 13,
"end": 14,
"name": "a"
},
{
"type": "identifier",
"start": 16,
"end": 17,
"name": "b"
}
],
"body": {
"type": "blockstatement",
"start": 19,
"end": 40,
"body": [
{
"type": "returnstatement",
"start": 25,
"end": 38,
"argument": {
"type": "binaryexpression",
"start": 32,
"end": 37,
"left": {
"type": "identifier",
"start": 32,
"end": 33,
"name": "a"
},
"operator": "+",
"right": {
"type": "identifier",
"start": 36,
"end": 37,
"name": "b"
}
}
}
]
}
}
],
"sourcetype": "module"
}{
"type": "program",
"start": 0,
"end": 43,
"body": [
{
"type": "variabledeclaration",
"start": 0,
"end": 43,
"declarations": [
{
"type": "variabledeclarator",
"start": 6,
"end": 43,
"id": {
"type": "identifier",
"start": 6,
"end": 9,
"name": "add"
},
"init": {
"type": "arrowfunctionexpression",
"start": 12,
"end": 43,
"id": null,
"expression": false,
"generator": false,
"async": false,
"params": [
{
"type": "identifier",
"start": 13,
"end": 14,
"name": "a"
},
{
"type": "identifier",
"start": 16,
"end": 17,
"name": "b"
}
],
"body": {
"type": "blockstatement",
"start": 22,
"end": 43,
"body": [
{
"type": "returnstatement",
"start": 28,
"end": 41,
"argument": {
"type": "binaryexpression",
"start": 35,
"end": 40,
"left": {
"type": "identifier",
"start": 35,
"end": 36,
"name": "a"
},
"operator": "+",
"right": {
"type": "identifier",
"start": 39,
"end": 40,
"name": "b"
}
}
}
]
}
}
}
],
"kind": "const"
}
],
"sourcetype": "module"
}找到区别之后我们就可以有大致的思路
- 找到
functiondeclaration - 将其替换为
variabledeclarationvariabledeclarator节点 - 在
variabledeclarator节点的init属性下新建arrowfunctionexpression节点 - 并将
functiondeclaration节点的相关属性替换到arrowfunctionexpression上即可
但是由于 acorn 处理的 ast 只是单纯的对象,并不具备类似 dom 节点之类的对节点的操作能力,如果需要操作节点,需要写很多工具函数, 所以我这里就简单写一下。
import * as acorn from "acorn";
import * as astring from 'astring';
import { createnode, walknode } from "./utils.js";
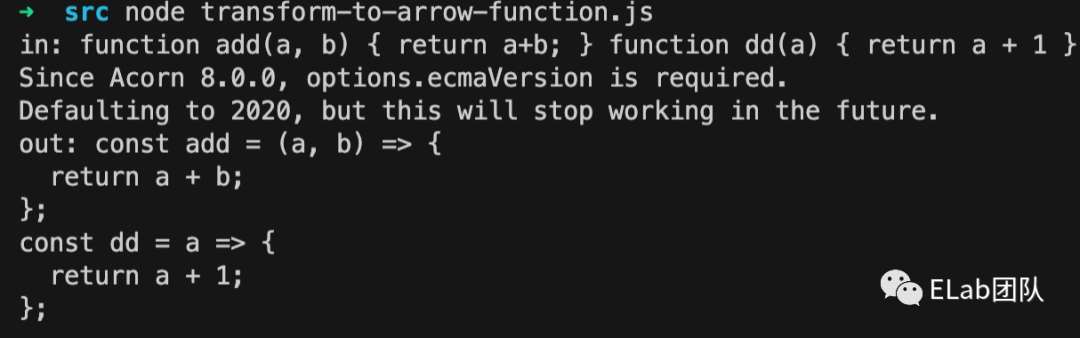
const code = 'function add(a, b) { return a+b; } function dd(a) { return a + 1 }';
console.log('in:', code);
const ast = acorn.parse(code);
walknode(ast, (node) => {
if(node.type === 'functiondeclaration') {
node.type = 'variabledeclaration';
const variabledeclaratornode = createnode('variabledeclarator');
variabledeclaratornode.id = node.id;
delete node.id;
const arrowfunctionexpressionnode = createnode('arrowfunctionexpression');
arrowfunctionexpressionnode.params = node.params;
delete node.params;
arrowfunctionexpressionnode.body = node.body;
delete node.body;
variabledeclaratornode.init = arrowfunctionexpressionnode;
node.declarations = [variabledeclaratornode];
node.kind = 'const';
}
})
console.log('out:', astring.generate(ast))结果如下
如果想要代码更加健壮,可以使用 recast[7],提供了对 ast 的各种操作
// 用螺丝刀解析机器
const ast = recast.parse(code);

// ast可以处理很巨大的代码文件
// 但我们现在只需要代码块的第一个body,即add函数
const add  = ast.program.body[0]

console.log(add)

// 引入变量声明,变量符号,函数声明三种“模具”
const {variabledeclaration, variabledeclarator, functionexpression} = recast.types.builders

// 将准备好的组件置入模具,并组装回原来的ast对象。
ast.program.body[0] = variabledeclaration("const", [
  variabledeclarator(add.id, functionexpression(
    null, // anonymize the function expression.
    add.params,
    add.body
  ))
]);

//将ast对象重新转回可以阅读的代码
const output = recast.print(ast).code;

console.log(output)
这里只是示例代码,展示 recast 的一些操作,最好的情况还是能遍历节点自动替换。
这样我们就完成了将普通函数转换成箭头函数的操作,但 ast 的作用不止于此,作为一个前端在工作中可能涉及 ast 的地方,就是自定义 eslint 、 stylelint 等插件。
到此这篇关于关于前端要知道的 ast知识的文章就介绍到这了,更多相关前端ast知识内容请搜索代码网以前的文章或继续浏览下面的相关文章希望大家以后多多支持代码网!


发表评论