机器 test3 192.168.23.103
1机器初始化配置
1.1关闭防火墙,清空防火墙规则
systemctl stop firewalld
iptables -f
setenforce 0
1.2部署时间同步
yum install ntp ntpdate -y
1.3安装基础软件包
yum install -y wget net-tools nfs-utils lrzsz gcc gcc-c++ make cmake libxml2-devel openssl-devel curl curl-devel unzip sudo ntp libaio-devel wget vim ncurses-devel autoconf automake zlib-devel python-devel epel-release openssh-server socat ipvsadm conntrack
1.4构建docker-ce源
https://developer.aliyun.com/mirror/
yum install -y yum-utils device-mapper-persistent-data lvm2
yum-config-manager --add-repo https://mirrors.aliyun.com/docker-ce/linux/centos/docker-ce.repo
sed -i 's+download.docker.com+mirrors.aliyun.com/docker-ce+' /etc/yum.repos.d/docker-ce.repo
yum makecache fast
yum -y install docker-ce
1.5启动docker
systemctl restart docker && systemctl enable docker
2.docker的配置
2.1要是想要docker能被其他服务器访问
要是想要docker相互之间通信没有问题,需要修改内核参数,开启包转发功能,内核参数修改,br_netfilter 模块用于将桥接流量转发至iptables链,
[root@test3 ~]# modprobe br_netfilter
模块可以通过这个命令看有没有开启
[root@test3 ~]# lsmod |grep br_netfilter
br_netfilter           22256  0
bridge                151336  1 br_netfilter
[root@test3 ~]# cat > /etc/sysctl.d/docker.conf << eof
> net.bridge.bridge-nf-call-ip6tables = 1
> net.bridge.bridge-nf-call-iptables = 1
> net.ipv4.ip_forward = 1
> eof
具体功能如下
docker 安装后出现:warning: bridge-nf-call-iptables is disabled 的解决办法:
net.bridge.bridge-nf-call-ip6tables = 1
net.bridge.bridge-nf-call-iptables = 1
net.ipv4.ip_forward = 1:
将 linux 系统作为路由或者 vpn 服务就必须要开启 ip 转发功能。当 linux 主机有多个网卡时一个网卡收
到的信息是否能够传递给其他的网卡 ,如果设置成 1 的话 可以进行数据包转发,可以实现 vxlan 等功
能。不开启会导致 docker 部署应用无法访问。
使模块生效
[root@test3 ~]#  sysctl -p /etc/sysctl.d/docker.conf
net.bridge.bridge-nf-call-ip6tables = 1
net.bridge.bridge-nf-call-iptables = 1
net.ipv4.ip_forward = 1
重启后模块失效,下面是开机自动加载模块的脚本
在/etc/新建 rc.sysinit 文件
cat /etc/rc.sysinit
#!/bin/bash
for file in /etc/sysconfig/modules/*.modules ; do
[ -x $file ] && $file
done
cat /etc/sysconfig/modules/br_netfilter.modules
modprobe br_netfilter
增加权限
chmod 755 /etc/sysconfig/modules/br_netfilter.modules
这样即使重启也会加载模块
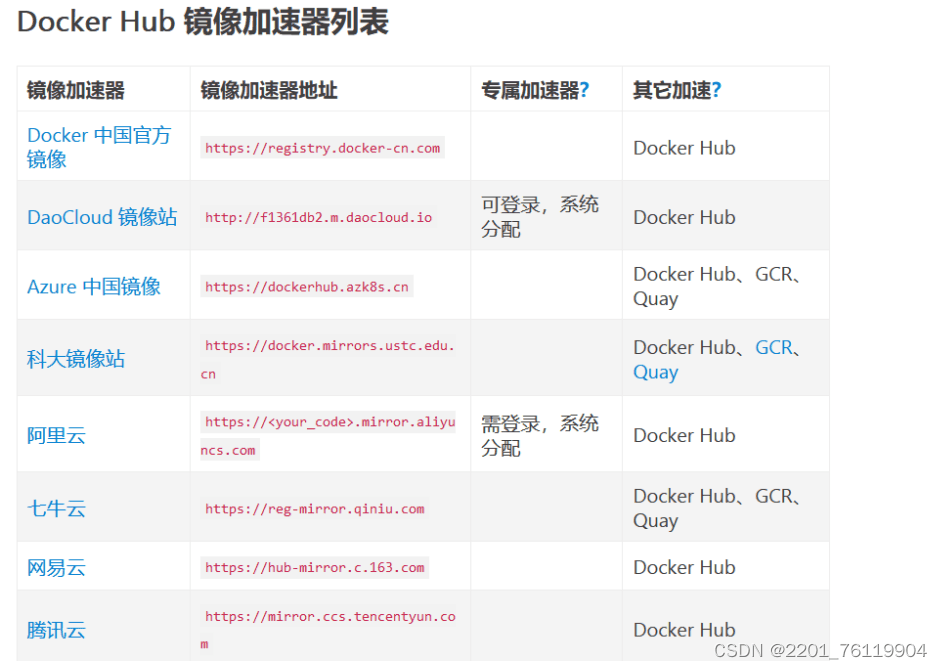
配置阿里云镜像加速器地址
https://cr.console.aliyun.com/cn-hangzhou/instances/mirrors
docker镜像相关的操作
从dockerhub上查找镜像
[root@test3 ~]# docker search centos
name                               description                                     stars     official
centos                             deprecated; the official build of centos.       7721      [ok]
kasmweb/centos-7-desktop           centos 7 desktop for kasm workspaces            43
bitnami/centos-base-buildpack      centos base compilation image                   0
dokken/centos-7                    centos 7 image for kitchen-dokken               10
dokken/centos-8                    centos 8 image for kitchen-dokken               6
spack/centos7                      centos 7 with spack preinstalled                2
dokken/centos-6                    eol: centos 6 image for kitchen-dokken          0
atlas/centos7-atlasos              atlas centos 7 software development os          3
ustclug/centos                     official centos image with ustc mirror          0
spack/centos6                      centos 6 with spack preinstalled                1
dokken/centos-stream-8                                                             5
eclipse/centos_jdk8                centos, jdk8, maven 3, git, curl, nmap, mc, …   5
dokken/centos-stream-9                                                             10
corpusops/centos-bare              https://github.com/corpusops/docker-images/     0
corpusops/centos                   centos corpusops baseimage                      0
eclipse/centos_go                  centos + go                                     0
spack/centos-stream                                                                2
fnndsc/centos-python3              source for a slim centos-based python3 image…   0
eclipse/centos_spring_boot         spring boot ready image based on centos         0
openmicroscopy/centos-systemd-ip   centos/systemd with iproute, for testing mul…   0
eclipse/centos                     centos based minimal stack with only git and…   1
eclipse/centos_nodejs              centos based nodejs4 stack                      0
eclipse/centos_vertx               centos + vertx                                  0
eclipse/centos_wildfly_swarm       centos, wildfly, swarm                          0
dockette/centos                    my custom centos dockerfiles                    1
解释说明
name: 镜像仓库的名称
description:镜像的描述
stars:类似 github 里面的star,表示点赞,喜欢的意思
official:是否 docker 官方发布
拉取镜像
[root@test3 ~]# docker pull centos
查看有哪些镜像
[root@test3 ~]# docker images
repository   tag       image id       created       size
centos       latest    5d0da3dc9764   2 years ago   231mb
把镜像做成离线压缩包
[root@test3 ~]# ls
anaconda-ks.cfg
[root@test3 ~]# docker save -o centos.tar.gz centos
[root@test3 ~]# ls
anaconda-ks.cfg  centos.tar.gz
解压
[root@test3 ~]# docker load -i centos.tar.gz
loaded image: centos:latest
删除镜像
docker rmi -f centos:latest
容器相关的操作 以交互式启动并运行容器
[root@test3 ~]# docker images
repository   tag       image id       created       size
centos       latest    5d0da3dc9764   2 years ago   231mb
[root@test3 ~]# docker run --name=hello -it centos /bin/bash
[root@573ed31d77d8 /]#
#docker run 运行并创建容器
--name 容器的名字
-i 交互式
-t 分配终端
centos:启动docker 需要的镜像
bin/bash 说明你的shell 类型为bash   bash是一种最常用的shell 是大多数 linux 发行版默认的shell 此外还有 c shell 等其他的shell
#在起一个终端看一下   docker ps 是查看正在运行的容器
[root@test3 ~]# docker ps
container id   image     command       created         status         ports     names
573ed31d77d8   centos    "/bin/bash"   6 seconds ago   up 5 seconds             hello
container id:容器的id
 image:容器使用的镜像
 command:容器运行的命令
 status:容器启动的时间
  ports : 容器的名字
#以守护式进程方式启动容器
[root@test3 ~]# docker run --name=hello1 -itd centos /bin/bash
ae2fe03e778aa2fbd0b9ba2ac412ff3b2f17eaf04772028e1ab4670fd9bdd7fe
d 表示后台运行
#进入hello1的容器
[root@test3 ~]# docker exec -it hello1 /bin/bash
[root@ae2fe03e778a /]#
#我们退出会发现 容器他依然运行
[root@test3 ~]# docker exec -it hello1 /bin/bash
[root@ae2fe03e778a /]# exit
exit
[root@test3 ~]# docker ps
container id   image     command       created         status         ports     names
ae2fe03e778a   centos    "/bin/bash"   3 minutes ago   up 3 minutes             hello1
[root@test3 ~]#
docker ps 会列出正在运行的容器
docker ps -a 会列出正在运行的和已经停止的容器全部都列出来
#查看容器日志
[root@test3 ~]# docker logs hello1
[root@test3 ~]#
运行和停止容器
[root@test3 ~]# docker stop hello1
hello1
[root@test3 ~]# docker ps
container id   image     command   created   status    ports     names
[root@test3 ~]# docker ps -a
container id   image     command       created          status                     ports     names
ae2fe03e778a   centos    "/bin/bash"   7 minutes ago    exited (0) 8 seconds ago             hello1
573ed31d77d8   centos    "/bin/bash"   26 minutes ago   exited (0) 8 minutes ago             hello
[root@test3 ~]# docker start hello1
hello1
[root@test3 ~]# docker ps
container id   image     command       created         status         ports     names
ae2fe03e778a   centos    "/bin/bash"   8 minutes ago   up 2 seconds             hello1
[root@test3 ~]# docker rm -f hello
hello
[root@test3 ~]# docker ps -a
container id   image     command       created         status          ports     names
ae2fe03e778a   centos    "/bin/bash"   8 minutes ago   up 48 seconds             hello1
docker部署nginx
[root@test3 ~]# docker run --name nginx -p 80 -itd centos
3bd4aa598dd007dc8aba6f43f67d9bd5610e885b724910679edb2694325c8a78
-p 把容器断端口 随机在物理机映射一个端口
#进入容器
[root@test3 ~]# docker exec -it nginx /bin/bash
[root@3bd4aa598dd0 /]#
#此时安装你会发现他会报错
[root@3bd4aa598dd0 /]# yum install wget
failed to set locale, defaulting to c.utf-8
centos linux 8 - appstream                                                                                                                                                         78  b/s |  38  b     00:00
error: failed to download metadata for repo 'appstream': cannot prepare internal mirrorlist: no urls in mirrorlist
[root@3bd4aa598dd0 /]#
#解决,删除/etc/yum.repos.d/所有文件,把阿里云的镜像重写进去
[root@3bd4aa598dd0 /]# rm -rf /etc/yum.repos.d/*
[root@3bd4aa598dd0 yum.repos.d]# curl -o /etc/yum.repos.d/centos-base.repo https://mirrors.aliyun.com/repo/centos-vault-8.5.2111.repo
  % total    % received % xferd  average speed   time    time     time  current
                                 dload  upload   total   spent    left  speed
100  2495  100  2495    0     0  25202      0 --:--:-- --:--:-- --:--:-- 25202
#此时下载就可以了
[root@3bd4aa598dd0 yum.repos.d]# yum install nginx vim -y
failed to set locale, defaulting to c.utf-8
centos-8.5.2111 - base - mirrors.aliyun.com                                                                                                                                       1.2 mb/s | 4.6 mb     00:03
centos-8.5.2111 - extras - mirrors.aliyun.com                                                                                                                                      64 kb/s |  10 kb     00:00
centos-8.5.2111 - appstream - mirrors.aliyun.com                                                                                                                                  2.1 mb/s | 8.4 mb     00:04
dependencies resolved.
==================================================================================================================================================================================================================
 package                                                  architecture                        version                                                                repository                              size
==================================================================================================================================================================================================================
installing:
 nginx                                                    x86_64                              1:1.14.1-9.module_el8.0.0+184+e34fea82                                 appstream                              570 k
upgrading:
#在容器里更改配置文件,重启nginx
[root@3bd4aa598dd0 yum.repos.d]# echo 'docker is nginx' > /usr/share/nginx/html/index.html
[root@3bd4aa598dd0 yum.repos.d]# /usr/sbin/nginx
#在宿主机上通过 docker ps 可以查看把容器的 80 端口映射到宿主机的那个端口上,可以看出映射到宿主机的32768端口
[root@test3 ~]# docker ps
container id   image     command       created        status        ports                                     names
3bd4aa598dd0   centos    "/bin/bash"   23 hours ago   up 23 hours   0.0.0.0:32768->80/tcp, :::32768->80/tcp   nginx
#访问测试,或者直接请求容器的ip也行
[root@test3 ~]# curl 127.0.0.1:32768
docker is nginx
[root@test3 ~]# curl 172.17.0.3
docker is nginx
#流量走向
访问物理节点ip:port(容器在物理节点映射的端口) ——>   容器 ip:port (容器里部署的服务器端口) ——> 就可以访问到容器里部署的应用了
直接运行nginx
[root@test3 ~]# docker pull nginx
using default tag: latest
latest: pulling from library/nginx
a2abf6c4d29d: pull complete
a9edb18cadd1: pull complete
589b7251471a: pull complete
186b1aaa4aa6: pull complete
b4df32aa5a72: pull complete
a0bcbecc962e: pull complete
digest: sha256:0d17b565c37bcbd895e9d92315a05c1c3c9a29f762b011a10c54a66cd53c9b31
status: downloaded newer image for nginx:latest
docker.io/library/nginx:latest
#运行nginx
[root@test3 ~]# docker run -d -p 28877:80 nginx
0c0313595bf4632610ae2692a7d8b1efd6321b996c61209d0e8e9f9493881a92
 -p 28877:80 将宿主机的 28877端口映射到容器的80端口上
指定版本
 # 查询centos镜像版本,也可以在浏览器上访问,看看有哪些版本
curl -s https://registry.hub.docker.com/v1/repositories/centos/tags  |   jq
# 领导让你 基于mysql5.7 部署个镜像
curl -s https://registry.hub.docker.com/v1/repositories/mysql/tags  |   jq
#查看容器ip
[root@test3 ~]# docker inspect nginx|grep ipaddress
            "secondaryipaddresses": null,
            "ipaddress": "172.17.0.3",
                    "ipaddress": "172.17.0.3",
对外访问nginx1.19.7,直接访问宿主机的80端口就能看到nginx
[root@test3 ~]# docker pull nginx:1.19.7
1.19.7: pulling from library/nginx
45b42c59be33: pull complete
8acc495f1d91: pull complete
ec3bd7de90d7: pull complete
19e2441aeeab: pull complete
f5a38c5f8d4e: pull complete
83500d851118: pull complete
digest: sha256:f3693fe50d5b1df1ecd315d54813a77afd56b0245a404055a946574deb6b34fc
status: downloaded newer image for nginx:1.19.7
docker.io/library/nginx:1.19.7
[root@test3 ~]# docker images
repository   tag       image id       created       size
nginx        latest    605c77e624dd   2 years ago   141mb
centos       latest    5d0da3dc9764   2 years ago   231mb
nginx        1.19.7    35c43ace9216   3 years ago   133mb
[root@test3 ~]# netstat -tunlp|grep 80
tcp        0      0 0.0.0.0:80              0.0.0.0:*               listen      6937/nginx: master
[root@test3 ~]# systemctl stop nginx
[root@test3 ~]# netstat -tunlp|grep 80
[root@test3 ~]# docker run -d -p 80:80 35c43ace9216
474c65449759c39c108f020bbe54c37f781620b9968f22f0896427dc597a3585
#批量停止正在运行中的容器
[root@test3 ~]# docker ps -q
474c65449759
0c0313595bf4
3bd4aa598dd0
[root@test3 ~]# docker stop $(docker ps -q)
474c65449759
0c0313595bf4
3bd4aa598dd0
docker创建镜像
[root@test3 ~]# docker ps -a
container id   image          command                  created      status                  ports     names
474c65449759   35c43ace9216   "/docker-entrypoint.…"   2 days ago   exited (0) 2 days ago             flamboyant_agnesi
0c0313595bf4   nginx          "/docker-entrypoint.…"   4 days ago   exited (0) 2 days ago             gifted_pasteur
3bd4aa598dd0   centos         "/bin/bash"              5 days ago   exited (0) 2 days ago             nginx
[root@test3 ~]# docker --help|grep comm
  exec        execute a command in a running container
  commit      create a new image from a container's changes
run 'docker command --help' for more information on a command.
[root@test3 ~]# docker commit 3bd linux0224.cc
sha256:b8dad6dbee789f541fb34736ee4f55708f9685a7dcec3c45ce7340f7d3d70bea
[root@test3 ~]# docker images
repository     tag       image id       created          size
linux0224.cc   latest    b8dad6dbee78   26 seconds ago   368mb
nginx          latest    605c77e624dd   2 years ago      141mb
centos         latest    5d0da3dc9764   2 years ago      231mb
nginx          1.19.7    35c43ace9216   3 years ago      133mb
[root@test3 ~]# docker image ls
repository     tag       image id       created          size
linux0224.cc   latest    b8dad6dbee78   42 seconds ago   368mb
nginx          latest    605c77e624dd   2 years ago      141mb
centos         latest    5d0da3dc9764   2 years ago      231mb
nginx          1.19.7    35c43ace9216   3 years ago      133mb
[root@test3 ~]# docker run -it linux0224.cc bash
[root@bc873f3b5d4f /]#
到此这篇关于docker的安装以及docker中nginx配置的文章就介绍到这了,更多相关docker nginx配置内容请搜索代码网以前的文章或继续浏览下面的相关文章希望大家以后多多支持代码网!


发表评论