项目环境:spring boot项目
pom.xml引入jwt和redis
        <!-- jwt -->
        <dependency>
            <groupid>com.auth0</groupid>
            <artifactid>java-jwt</artifactid>
            <version>4.3.0</version>
        </dependency>


        <!-- redis坐标-->
        <dependency>
            <groupid>org.springframework.boot</groupid>
            <artifactid>spring-boot-starter-data-redis</artifactid>
        </dependency>
application.yml配置文件中,对redis进行配置
  data:
    redis:
      port: 6379
      host: localhost
jwtutil工具类
package com.utils;

import com.auth0.jwt.jwt;
import com.auth0.jwt.algorithms.algorithm;

import java.util.date;
import java.util.map;

public class jwtutil {

    /*生成jwt字符串时用到的秘钥*/
    private static final string key = "itheima";

	//接收业务数据,生成token并返回
    public static string gentoken(map<string, object> claims) {
        return jwt.create()
                .withclaim("claims", claims)
                .withexpiresat(new date(system.currenttimemillis() + 1000 * 60 * 60 * 24 )) //失效时间 单位毫秒 当前值为1天
                .sign(algorithm.hmac256(key));
    }

	//接收token,验证token,并返回业务数据
    public static map<string, object> parsetoken(string token) {
        return jwt.require(algorithm.hmac256(key))
                .build()
                .verify(token)
                .getclaim("claims")
                .asmap();
    }

}
md5util工具类(因为登录时有对密码进行md5加密的逻辑)
package com.utils;

import java.security.messagedigest;
import java.security.nosuchalgorithmexception;

public class md5util {
    /**
     * 默认的密码字符串组合,用来将字节转换成 16 进制表示的字符,apache校验下载的文件的正确性用的就是默认的这个组合
     */
    protected static char hexdigits[] = {'0', '1', '2', '3', '4', '5', '6', '7', '8', '9', 'a', 'b', 'c', 'd', 'e', 'f'};

    protected static messagedigest messagedigest = null;

    static {
        try {
            messagedigest = messagedigest.getinstance("md5");
        } catch (nosuchalgorithmexception nsaex) {
            system.err.println(md5util.class.getname() + "初始化失败,messagedigest不支持md5util。");
            nsaex.printstacktrace();
        }
    }

    /**
     * 生成字符串的md5校验值
     *
     * @param s
     * @return
     */
    public static string getmd5string(string s) {
        return getmd5string(s.getbytes());
    }

    /**
     * 判断字符串的md5校验码是否与一个已知的md5码相匹配
     *
     * @param password  要校验的字符串
     * @param md5pwdstr 已知的md5校验码
     * @return
     */
    public static boolean checkpassword(string password, string md5pwdstr) {
        string s = getmd5string(password);
        return s.equals(md5pwdstr);
    }


    public static string getmd5string(byte[] bytes) {
        messagedigest.update(bytes);
        return buffertohex(messagedigest.digest());
    }

    private static string buffertohex(byte bytes[]) {
        return buffertohex(bytes, 0, bytes.length);
    }

    private static string buffertohex(byte bytes[], int m, int n) {
        stringbuffer stringbuffer = new stringbuffer(2 * n);
        int k = m + n;
        for (int l = m; l < k; l++) {
            appendhexpair(bytes[l], stringbuffer);
        }
        return stringbuffer.tostring();
    }

    private static void appendhexpair(byte bt, stringbuffer stringbuffer) {
        char c0 = hexdigits[(bt & 0xf0) >> 4];// 取字节中高 4 位的数字转换, >>>
        // 为逻辑右移,将符号位一起右移,此处未发现两种符号有何不同
        char c1 = hexdigits[bt & 0xf];// 取字节中低 4 位的数字转换
        stringbuffer.append(c0);
        stringbuffer.append(c1);
    }

}
登录的控制器
package com.controller;

import com.pojo.result;
import com.pojo.user;
import com.service.userservice;
import com.utils.jwtutil;
import com.utils.md5util;
import org.springframework.beans.factory.annotation.autowired;
import org.springframework.data.redis.core.stringredistemplate;
import org.springframework.data.redis.core.valueoperations;
import org.springframework.validation.annotation.validated;
import org.springframework.web.bind.annotation.*;

import java.util.hashmap;
import java.util.map;
import java.util.concurrent.timeunit;

@restcontroller
@requestmapping("/user")
@validated
@crossorigin
public class usercontroller1 {
    @autowired
    private userservice userservice;

    @autowired
    private stringredistemplate stringredistemplate;


    @postmapping("/login")
    public result login(string username, string password) {
        //查询用户
        string md5password = md5util.getmd5string(password);
        user user = userservice.login(username, md5password);
        if (user == null) {//用户名或密码错误
            return result.error("用户名或密码错误");
        } else {
            //登录成功
            map<string, object> claims = new hashmap<>();
            claims.put("id", user.getid());
            claims.put("username", user.getusername());
            string jwttoken = jwtutil.gentoken(claims);

            //往redis中存储一个键值对
            valueoperations<string, string> operations = stringredistemplate.opsforvalue();
            operations.set(jwttoken, jwttoken, 1, timeunit.days);

            return result.success(jwttoken);
        }
    }

}
在前端发起登录请求,用户名和密码验证通过后,生成jwt,把jwt字符长的值,存放在redis缓存中,然后把jwt字符串返回到前端。
前端拿到jwt字符串后存在一个变量中,在之后的每次请求中,都在请求头中携带上jwt,后端再根据jwt的内容进行验证,判断是否是已登录的正常请求,如果是已经登录后的请求,就放行,否则就返回401(未认证)。
后端是通过声明一个拦截器,对请求进行判断的,代码如下:
logininterceptor.java
package com.interceptor;
import com.utils.jwtutil;
import com.utils.threadlocalutil;
import jakarta.servlet.http.httpservletrequest;
import jakarta.servlet.http.httpservletresponse;
import org.springframework.beans.factory.annotation.autowired;
import org.springframework.data.redis.core.stringredistemplate;
import org.springframework.data.redis.core.valueoperations;
import org.springframework.stereotype.component;
import org.springframework.web.servlet.handlerinterceptor;

import java.util.list;
import java.util.map;

/**
 * @projectname: big-event
 * @package: com.interceptor
 * @classname: logininterceptor
 * @author: liangmeng
 * @description: 登录拦截器
 * @date: 2024/1/14 17:20
 * @version: 1.0
 */

@component
public class logininterceptor implements handlerinterceptor {

    @autowired
    private stringredistemplate stringredistemplate;

    //controller方法处理之前执行
    @override
    public boolean prehandle(httpservletrequest request, httpservletresponse response, object handler) throws exception {
        //获取到请求头的jwt字符串
        string token = request.getheader("authorization");
        //验证token
        try {
            //获取redis的值
            valueoperations<string, string> operations = stringredistemplate.opsforvalue();
            string redistoken = operations.get(token);
            if (redistoken == null) {
                //token失效 拦截请求
                throw new runtimeexception();
            } else {
                map<string, object> claims = jwtutil.parsetoken(token);

                //把业务数据存储到threadlocal中
                threadlocalutil.set(claims);

                //放行请求
                return true;
            }
        } catch (exception e) {
            //相应码401
            response.setstatus(401);
            //拦截请求
            return false;
        }
    }

    //该方法将在整个请求完成之后执行
    @override
    public void aftercompletion(httpservletrequest request, httpservletresponse response, object handler, exception ex) throws exception {
        //清空threadlocal中的信息 防止内存泄漏
        threadlocalutil.remove();
    }

}
上面代码是自定义的登录拦截器,在请求到来后,控制器方法执行前,会进入到拦截器的prehandle方法中,在这个方法里面,或获取到请求头中的authorization属性值,也就是jwt的值,然后再获取到redis中的值,redis中key和values是相同的,都是jwt字符串的内容,所以这里是用jwt的值作为key去获取value,如果value有值则说明该请求是可以放行的(已经登录过),否则拦截请求,返回响应码401。
aftercompletion方法是在整个请求完成之后执行,示例中是把threadlocal的值清空,这里根据需要,如果使用到了threadlocal,就把它清空,防止内存泄漏,如果没有使用到,则不需要处理。
拦截器定义好了之后,还需要把自定义的拦截器注册到全局拦截器中,使其生效。
webconfig.java
package com.config;

import com.interceptor.corsinterceptor;
import com.interceptor.logininterceptor;
import org.springframework.beans.factory.annotation.autowired;
import org.springframework.context.annotation.configuration;
import org.springframework.web.servlet.config.annotation.interceptorregistry;
import org.springframework.web.servlet.config.annotation.webmvcconfigurer;


@configuration
public class webconfig implements webmvcconfigurer {
    @autowired
    private logininterceptor logininterceptor;

    @autowired
    private corsinterceptor corsinterceptor;

    @override
    public void addinterceptors(interceptorregistry registry) {

        //把自定义的拦截器注册到全局拦截器中 排除登录和注册请求
        registry.addinterceptor(logininterceptor).excludepathpatterns("/user/login","/user/register");
    }
}
同步把登录和注册接口的请求放行,不需要拦截。
修改密码的接口处理逻辑,当用户修改密码后,需要主动将jwt做失效操作,下面是控制器的代码:
package com.controller;

import com.pojo.result;
import com.pojo.user;
import com.service.userservice;
import com.utils.md5util;
import com.utils.threadlocalutil;
import org.springframework.beans.factory.annotation.autowired;
import org.springframework.data.redis.core.stringredistemplate;
import org.springframework.data.redis.core.valueoperations;
import org.springframework.util.stringutils;
import org.springframework.validation.annotation.validated;
import org.springframework.web.bind.annotation.*;

import java.util.map;

@restcontroller
@requestmapping("/user")
@validated
@crossorigin
public class usercontroller {
    @autowired
    private userservice userservice;

    @autowired
    private stringredistemplate stringredistemplate;

    //更新用户密码
    @patchmapping("/updatepwd")
    public result updatepwd(@requestbody map<string, string> params, @requestheader("authorization") string jwttoken) {
        string oldpwd = params.get("oldpwd");
        string newpwd = params.get("newpwd");
        string renewpwd = params.get("renewpwd");
        if (!stringutils.haslength(oldpwd) || !stringutils.haslength(newpwd) || !stringutils.haslength(renewpwd)) {
            return result.error("缺少必要的参数");
        }

        //判断原始密码是否正确
        //获取用户名
        map<string, object> claims = threadlocalutil.get();
        string username = (string) claims.get("username");
        //根据用户名查询用户
        user user = userservice.findbyusername(username);
        string currpwd = user.getpassword();

        string oldpwdmd5 = md5util.getmd5string(oldpwd);
        if (!oldpwdmd5.equals(currpwd)) {
            return result.error("原始密码不正确");
        }

        //判断输入的两次密码是否一致
        if (!newpwd.equals(renewpwd)) {
            return result.error("两次密码不一致");
        }

        //更新密码
        //获取用户名
        string userid = (string) claims.get("id");
        string newpwdmd5 = md5util.getmd5string(newpwd);

        userservice.updatepwd(userid, newpwdmd5);

        //密码更新完毕,删除redis中的缓存jwttoken值,让用户重新登陆
        valueoperations<string, string> operations = stringredistemplate.opsforvalue();
        operations.getoperations().delete(jwttoken);

        return result.success();
    }


}
在密码修改完毕后,根据请求头中的authorization属性值来删除redis中存储的数据。这样原来的jwt就失效了,无法使用原来的jwt进行登录认证。
总结:因为http请求是无状态请求,使用jwt可以解决这一问题,登录成功后,在一段时间内就可以直接向后端发送请求,这样不需要重复进行登录操作。
因为jwt数据在后端没有进行存储,所以会出现一个问题,无法使其失效。这时候就引入了redis缓存,在redis缓存中将jwt的数据存下来,当用户修改密码、或退出登录后,将缓存的数据删除,然后在请求处理时(拦截器中)判断当前jwt是否有效,有效则正常处理请求,否则拦截请求,从而完成请求的权限控制。
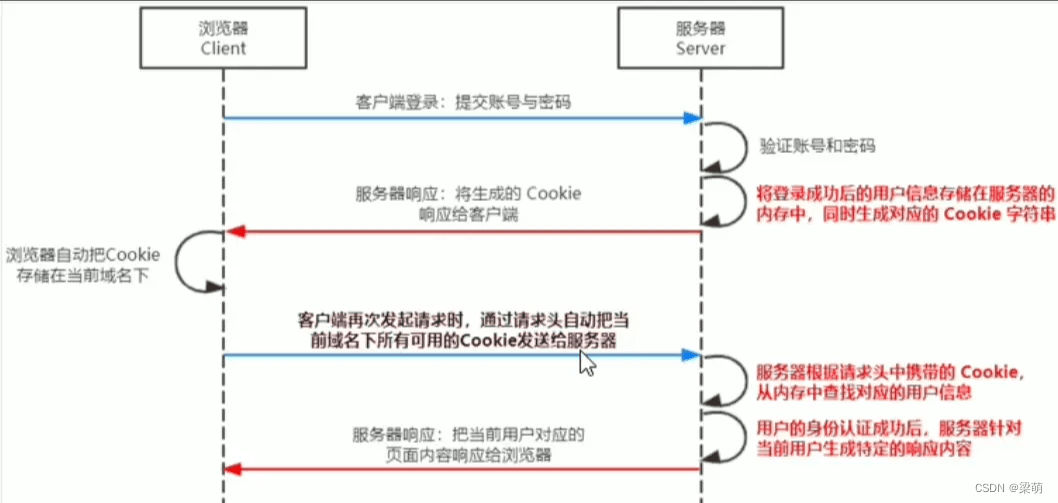
一般项目还会使用sessionid作为请求控制的方式,其逻辑如下图所示:
到此这篇关于jwt+redis实现登录认证的示例代码的文章就介绍到这了,更多相关jwt redis登录认证内容请搜索代码网以前的文章或继续浏览下面的相关文章希望大家以后多多支持代码网!


发表评论