需求背景:
限制某sql在30秒内最多只能执行3次
需求分析
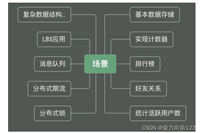
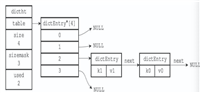
微服务分布式部署,既然是分布式限流,首先自然就想到了结合redis的zset数据结构来实现。
分析对zset的操作,有几个步骤,首先,判断zset中符合rangescore的元素个数是否已经达到阈值,如果未达到阈值,则add元素,并返回true。如果已达到阈值,则直接返回false。
代码实现
首先,我们需要根据需求编写一个lua脚本
redis.call('zremrangebyscore', keys[1], 0, tonumber(argv[3]))
local res = 0
if(redis.call('zcard', keys[1]) < tonumber(argv[5])) then
    redis.call('zadd', keys[1], tonumber(argv[2]), argv[1])
    res = 1
end
redis.call('expire', keys[1], tonumber(argv[4]))
return res
argv[1]: zset element
argv[2]: zset score(当前时间戳)
argv[3]: 30秒前的时间戳
argv[4]: zset key 过期时间30秒
argv[5]: 限流阈值
private final redistemplate<string, object> redistemplate;

public boolean execluascript(string luastr, list<string> keys, list<object> args){
	redisscript<boolean> redisscript = redisscript.of(luastr, boolean.class)
	return redistemplate.execute(redisscript, keys, args.toarray());
}
测试一下效果
@springboottest
public class apiapplicationtest {
    @test
    public void test2() throws interruptedexception{
        string luastr = "redis.call('zremrangebyscore', keys[1], 0, tonumber(argv[3]))\n" +
                "local res = 0\n" +
                "if(redis.call('zcard', keys[1]) < tonumber(argv[5])) then\n" +
                "    redis.call('zadd', keys[1], tonumber(argv[2]), argv[1])\n" +
                "    res = 1\n" +
                "end\n" +
                "redis.call('expire', keys[1], tonumber(argv[4]))\n" +
                "return res";
        for (int i = 0; i < 10; i++) {
            boolean res = execluascript(luastr, arrays.aslist("aaaa"), arrays.aslist("ele"+i, system.currenttimemillis(),system.currenttimemillis()-30*1000, 30, 3));
            system.out.println(res);
            thread.sleep(5000);
        }
    }
}
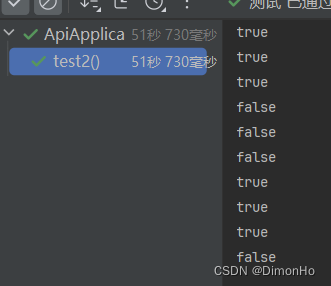
测试结果符合预期!
扩展阅读
lua脚本每次都需要传一长串脚本内容来回传输,会增加网络流量和延迟,而且每次都需要服务器重新解释和编译,效率较为低下。因此,不建议在实际生产环境中直接执行lua脚本,而应该使用lua脚本的hash值来进行传输。
为了方便使用,我们先把方法封装一下
import lombok.requiredargsconstructor;
import org.springframework.data.redis.connection.redisscriptingcommands;
import org.springframework.data.redis.connection.returntype;
import org.springframework.data.redis.core.redistemplate;
import org.springframework.data.redis.serializer.redisserializer;
import org.springframework.stereotype.component;

import java.util.list;

/**
 * @author 敖癸
 * @formatter:on
 * @since 2024/3/25
 */
@component
@requiredargsconstructor
public class redisservice {

    private final redistemplate<string, object> redistemplate;
    private static redisscriptingcommands commands;
    private static redisserializer keyserializer;
    private static redisserializer valserializer;

    public string loadscript(string luastr) {
        byte[] bytes = redisserializer.string().serialize(luastr);
        return this.getcommands().scriptload(bytes);
    }

    public <t> t execluahashscript(string hash, class<t> returntype, list<string> keys, object[] args) {
        byte[][] keysandargs = tobytearray(this.getkeyserializer(), this.getvalserializer(), keys, args);
        return this.getcommands().evalsha(hash, returntype.fromjavatype(returntype), keys.size(), keysandargs);
    }

    private static byte[][] tobytearray(redisserializer keyserializer, redisserializer argsserializer, list<string> keys, object[] args) {
        final int keysize = keys != null ? keys.size() : 0;
        byte[][] keysandargs = new byte[args.length + keysize][];
        int i = 0;
        if (keys != null) {
            for (string key : keys) {
                keysandargs[i++] = keyserializer.serialize(key);
            }
        }
        for (object arg : args) {
            if (arg instanceof byte[]) {
                keysandargs[i++] = (byte[]) arg;
            } else {
                keysandargs[i++] = argsserializer.serialize(arg);
            }
        }
        return keysandargs;
    }

    private redisscriptingcommands getcommands() {
        if (commands == null) {
            commands = redistemplate.getrequiredconnectionfactory().getconnection().scriptingcommands();
        }
        return commands;
    }

    private redisserializer getkeyserializer() {
        if (keyserializer == null) {
            keyserializer = redistemplate.getkeyserializer();
        }
        return keyserializer;
    }

    private redisserializer getvalserializer() {
        if (valserializer == null) {
            valserializer = redistemplate.getvalueserializer();
        }
        return valserializer;
    }
}
- 测试一下:
@springboottest
@testinstance(testinstance.lifecycle.per_class)
public class apiapplicationtest implements applicationcontextaware {
private static applicationcontext context;
private static redisservice redisservice;
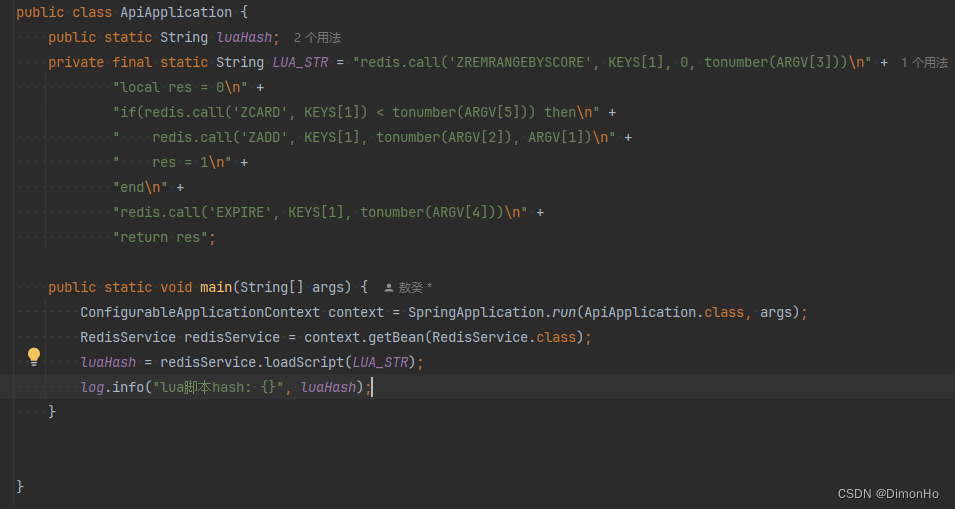
public static string luahash;
private final static string lua_str = "redis.call('zremrangebyscore', keys[1], 0, tonumber(argv[3]))\n" +
"local res = 0\n" +
"if(redis.call('zcard', keys[1]) < tonumber(argv[5])) then\n" +
" redis.call('zadd', keys[1], tonumber(argv[2]), argv[1])\n" +
" res = 1\n" +
"end\n" +
"redis.call('expire', keys[1], tonumber(argv[4]))\n" +
"return res";
@override
public void setapplicationcontext(applicationcontext applicationcontext) throws beansexception {
context = applicationcontext;
}
@beforeall
public static void before(){
redisservice = context.getbean(redisservice.class);
luahash = redisservice.loadscript(lua_str);
system.out.println("lua脚本hash: "+ luahash);
}
@test
public void testluahash() throws interruptedexception {
for (int i = 0; i < 50; i++) {
list<string> keys = collections.singletonlist("aaaa");
object[] args = new object[]{"ele" + i, system.currenttimemillis(), system.currenttimemillis() - 30 * 1000, 30, 3};
boolean b = redisservice.execluahashscript(luahash, boolean.class, keys, args);
system.out.println(b);
thread.sleep(3000);
}
}
}
使用的时候在项目启动时候,把脚本load一下,后续直接用hash值就行了
搞定收工!
以上就是利用redis lua脚本实现时间窗分布式限流的详细内容,更多关于redis lua时间窗分布式限流的资料请关注代码网其它相关文章!


发表评论